The Customers area is where you track everyone you sell to and the money they owe you. Each customer record links to a full history of invoices, credit memos, and payments, so you can always answer “what does this customer owe?” from one place. The examples below use our sample business, Demo Company Inc.
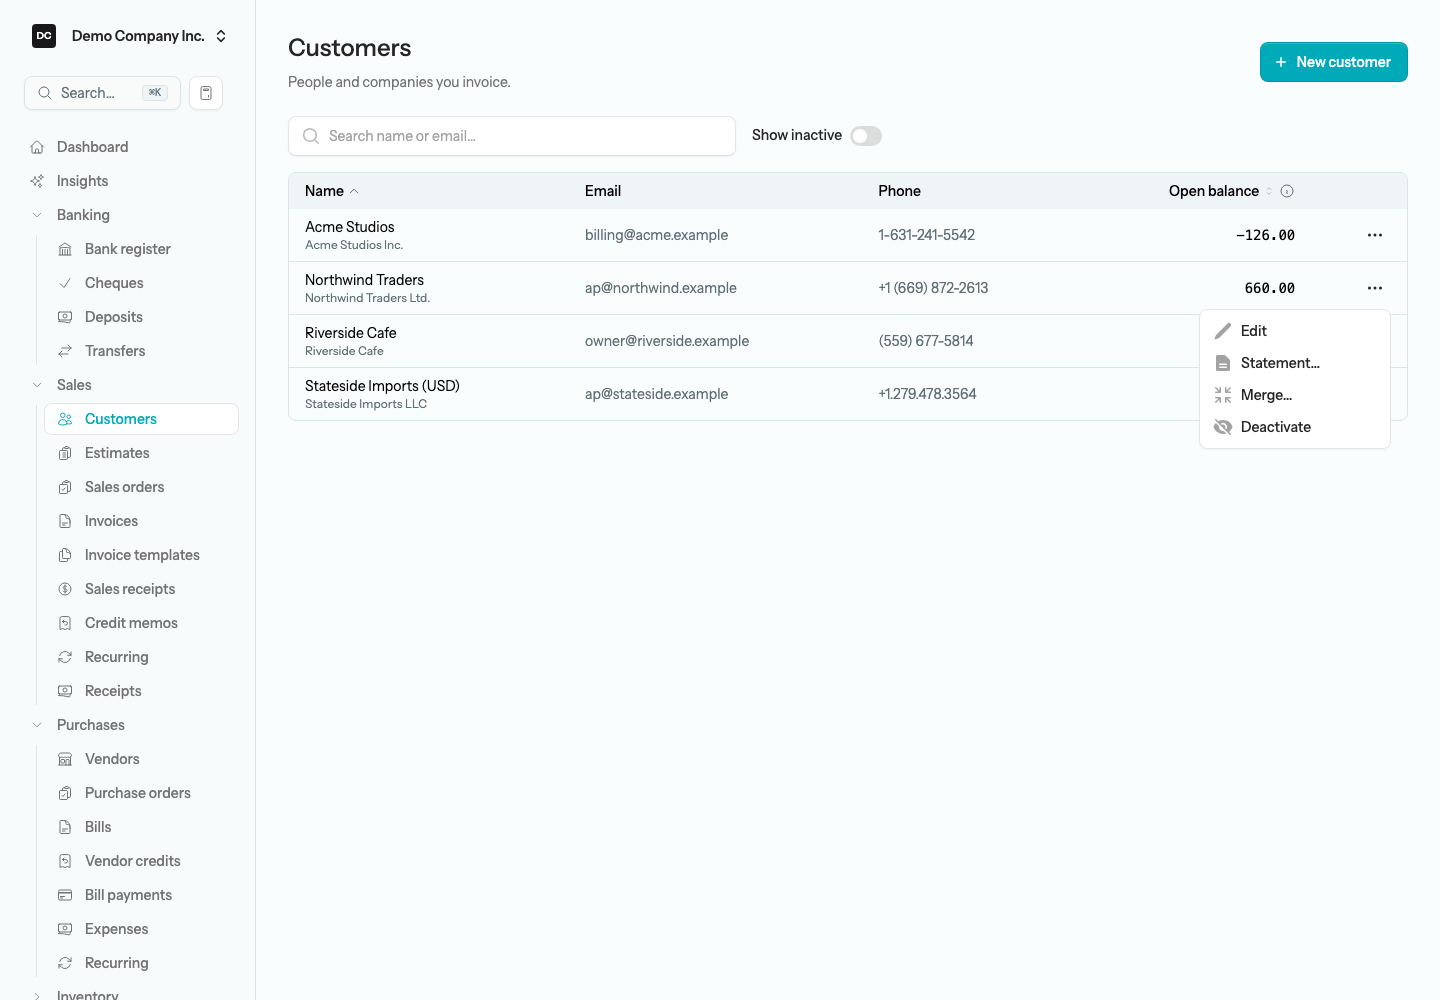
Open Customers from the sidebar — it sits in the Sales group (called Revenues for a non-profit organization). Each row shows the customer’s Open balance: their balance in Accounts Receivable, the same figure AR Aging and their statement show. It nets their invoices against payments, credit memos, and any journal entries posted to Accounts Receivable, so it can be negative when they have credit on account — in the demo data, Acme Studios shows -120.00 after a goodwill credit memo. The name opens their statement report, the balance figure opens their customer statement (see Send a customer a statement below), and the row’s menu offers Edit, Statement…, Merge…, and Deactivate. Search by name or email, and switch on Show inactive to include customers you no longer do business with.
Add a customer
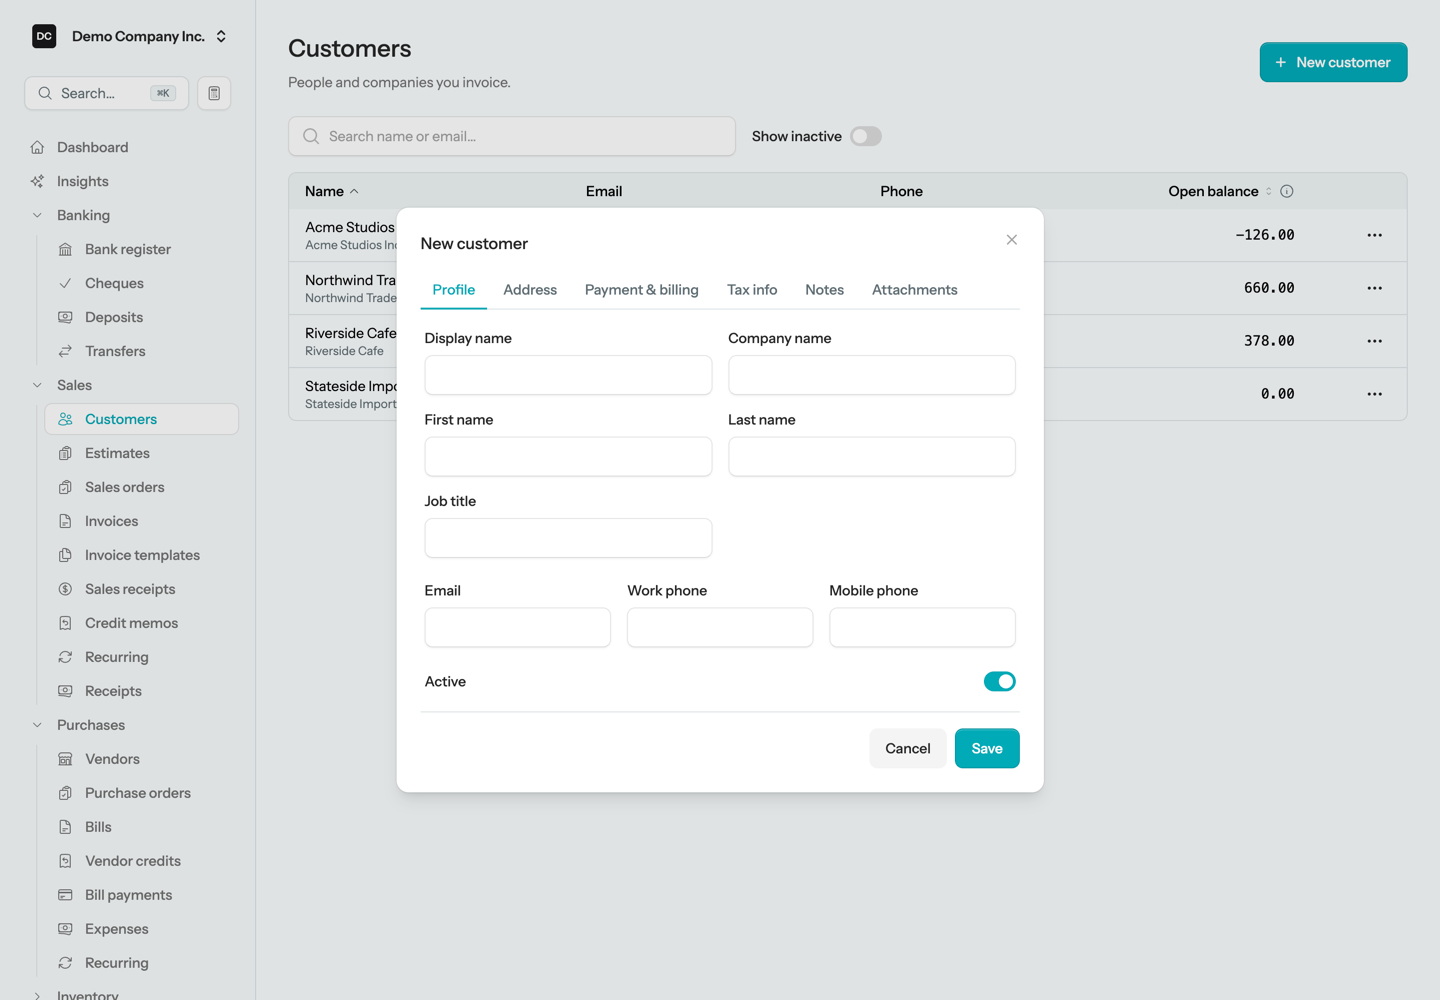
Before you can invoice someone, they need a customer record. You only have to set this up once — every future invoice, statement, and payment reuses it. The form is split into six tabs: Profile, Address, Payment & billing, Tax info, Notes, and Attachments. Only the display name is required, so fill in the rest as you go.
To add a customer:
- Open Customers from the sidebar.
- Select New customer in the top-right corner.
- On the Profile tab, enter a Display name — this is what you will pick from lists everywhere else in the app. Add the Company name, the contact person’s name and Job title, their Email, and a Work phone or Mobile phone if you have them. Email is what the app uses when you send an invoice or a statement. The form warns you if the name matches a customer you already have.
- On the Address tab, fill in the Bill to address and, if goods go somewhere else, the Ship to address. Same as billing copies one to the other.
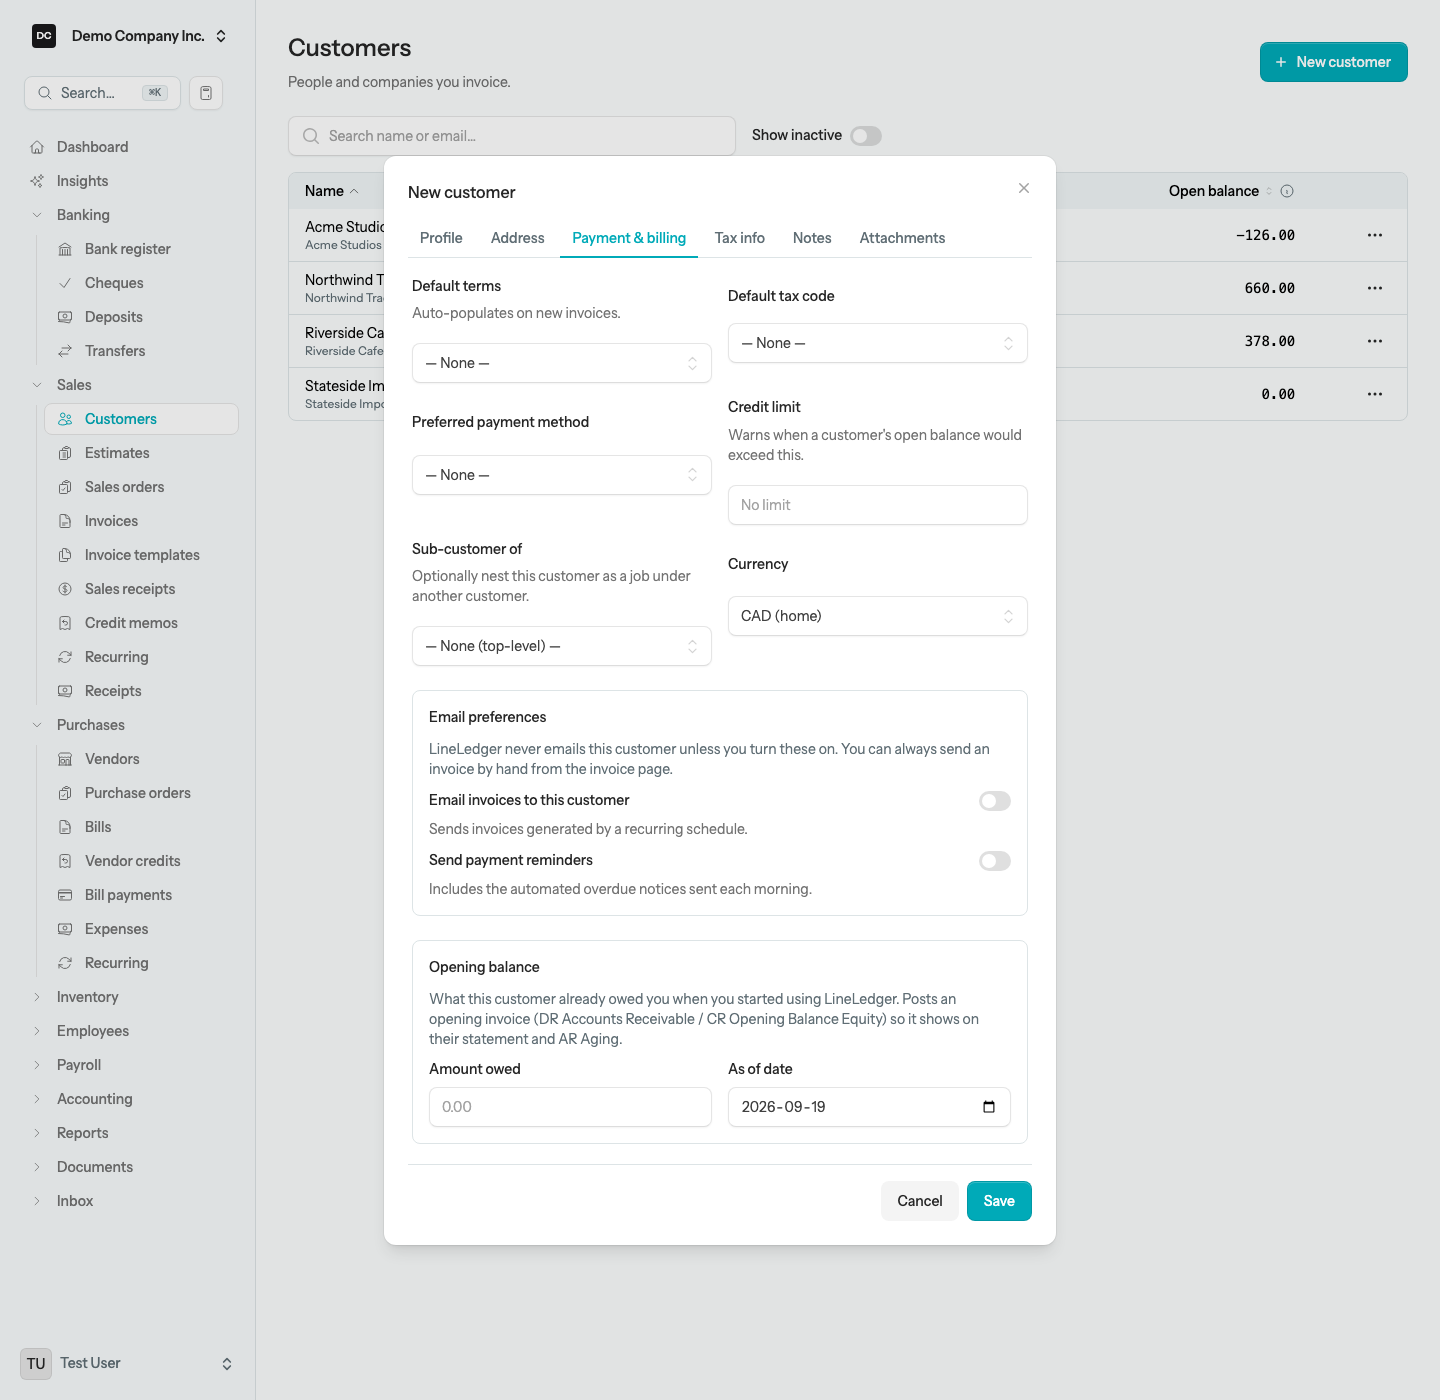
- On the Payment & billing tab, set Default terms (they auto-populate on new invoices), a Default tax code, a Preferred payment method, and a Credit limit. Sub-customer of nests this customer as a job under another one. The two Email preferences switches decide whether LineLedger may email this customer at all — see Payment reminders below.
- Use the Tax info tab for the customer’s Business / Tax number, Notes for internal notes the customer never sees, and Attachments for contracts or other files (PDF, images, or Office docs up to 10 MB each).
- Select Save.
The Payment & billing tab also has a Document language. Leave it on Organization default, or pick English or Français to send this customer invoices, statements, emails, and portal pages in that language — see Languages.
Tip. Set a credit limit and the invoice form will warn you when a new invoice would push the customer over it. It is only a heads-up — you can still bill past the limit. When you stop doing business with a customer, mark them inactive instead of deleting: they disappear from selectors but their history stays intact. In a hurry? The Customer box on a new invoice lets you type a name to add a customer on the spot, and the payee picker on a cheque or expense offers “Create … as a new customer”, which opens this form with the name already filled in.
Note — One person edits a record at a time. If a teammate already has a customer open for editing, you see who is editing instead of the form, and Owners and Admins can take over. The same applies to every invoice, credit memo, and receipt described on this page, and to actions such as voiding, merging, or deactivating while someone is editing. See Settings → Edit locks for how a lock is held and released.
What they already owed you
If a customer owed you money before you started using LineLedger, enter it in the Opening balance box on the Payment & billing tab while you create them: the Amount owed and the As of date. Saving posts an opening invoice — it debits Accounts Receivable and credits Opening Balance Equity — so the amount shows on their statement and on AR Aging from day one. The box is only offered on a new customer. Once the Opening Balances workspace has been opened at least once, owners also see a tip in the box that links to it — the workspace edits these per customer and keeps them tied to your draft trial balance. See Opening balances.
Merge duplicate customers
If the same customer was entered twice — say “Acme Studios” and “Acme Studios Inc.” — merge them rather than deleting one. All invoices, payments, and other history move to the customer you keep, and the duplicate is deactivated and removed from the list.
To merge two customers:
- On the Customers list, open the row menu of the duplicate you want to get rid of and choose Merge….
- In Merge into, pick the customer that should survive. The dialog summarizes what will move.
- Tick “I understand this cannot be undone.” and select Merge.
Heads up. Merging cannot be undone. Check the summary before you confirm, and note that a merge is refused while either customer is open for editing by someone else.
Note. Looking for Class or Location on an invoice line? Those columns are off by default. Turn Classes and Locations on under Settings → Organizations once, and a Class and Location selector appears on every transaction line you create afterward — invoices, credit memos, bills, journal entries — so you can slice your reports by department, project, or storefront. On the invoice form they also become toggles in the Fields menu described below.
Create and send an invoice
An invoice is a bill you send a customer for products or services. Creating one records the sale, adds the amount to what the customer owes you, and — once posted — flows straight into your financial reports.
To create an invoice:
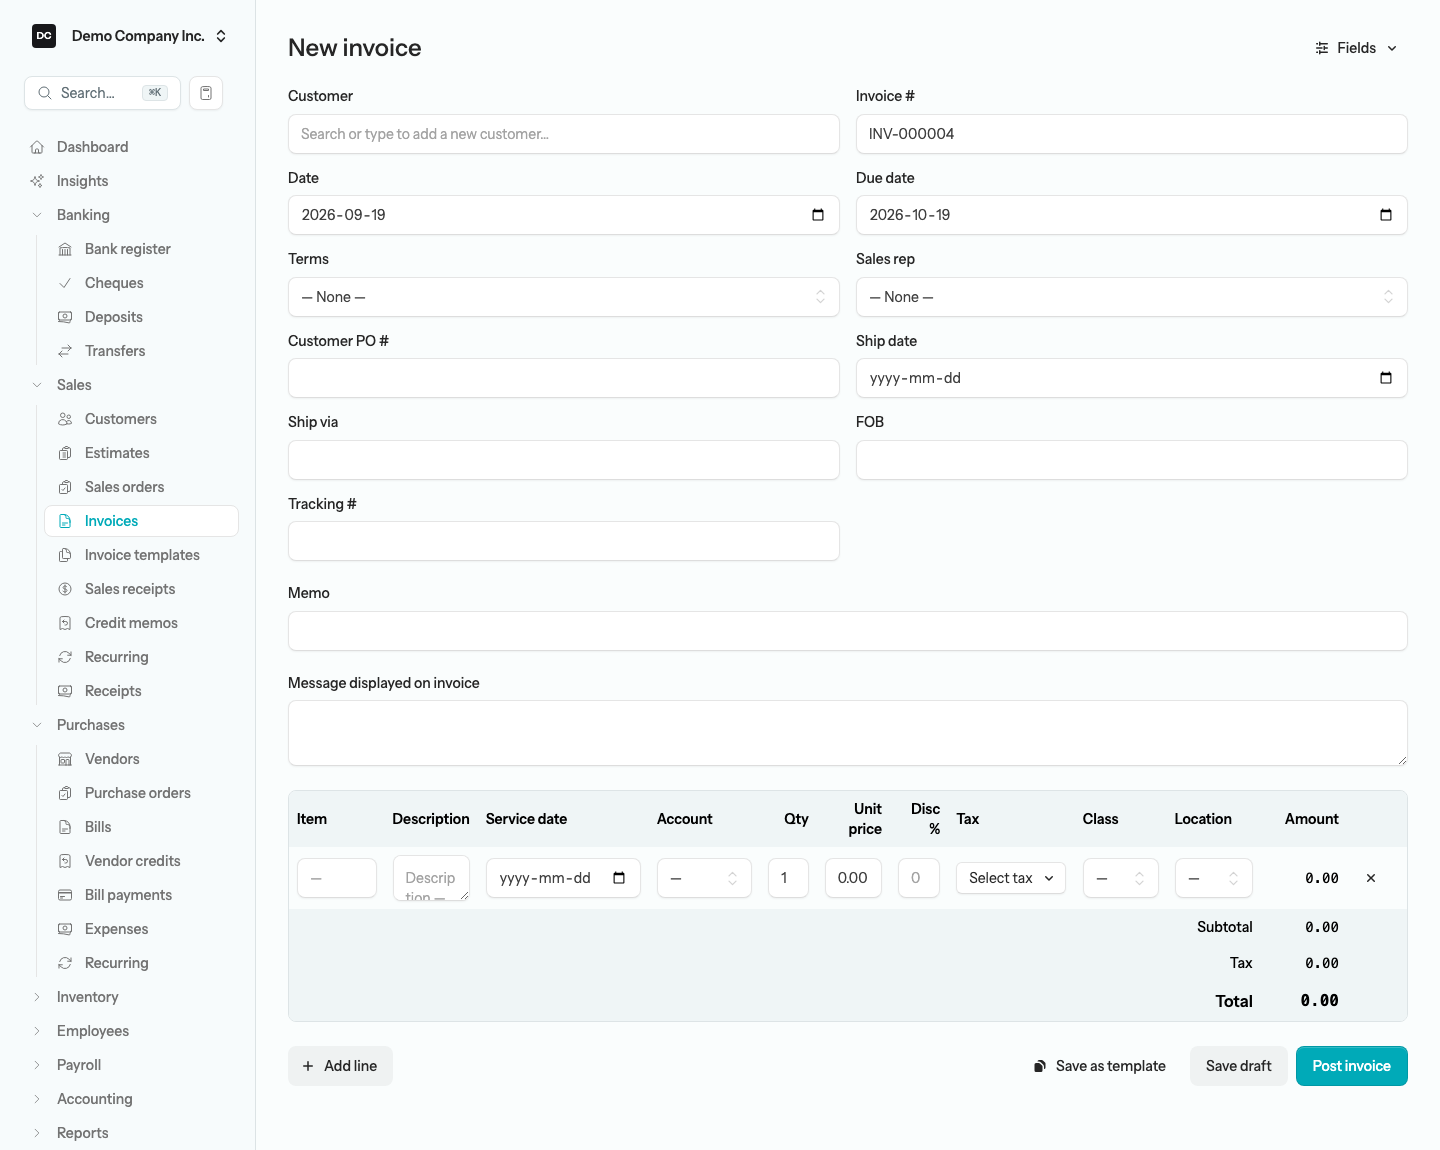
- Open Sales → Invoices from the sidebar, then select New invoice.
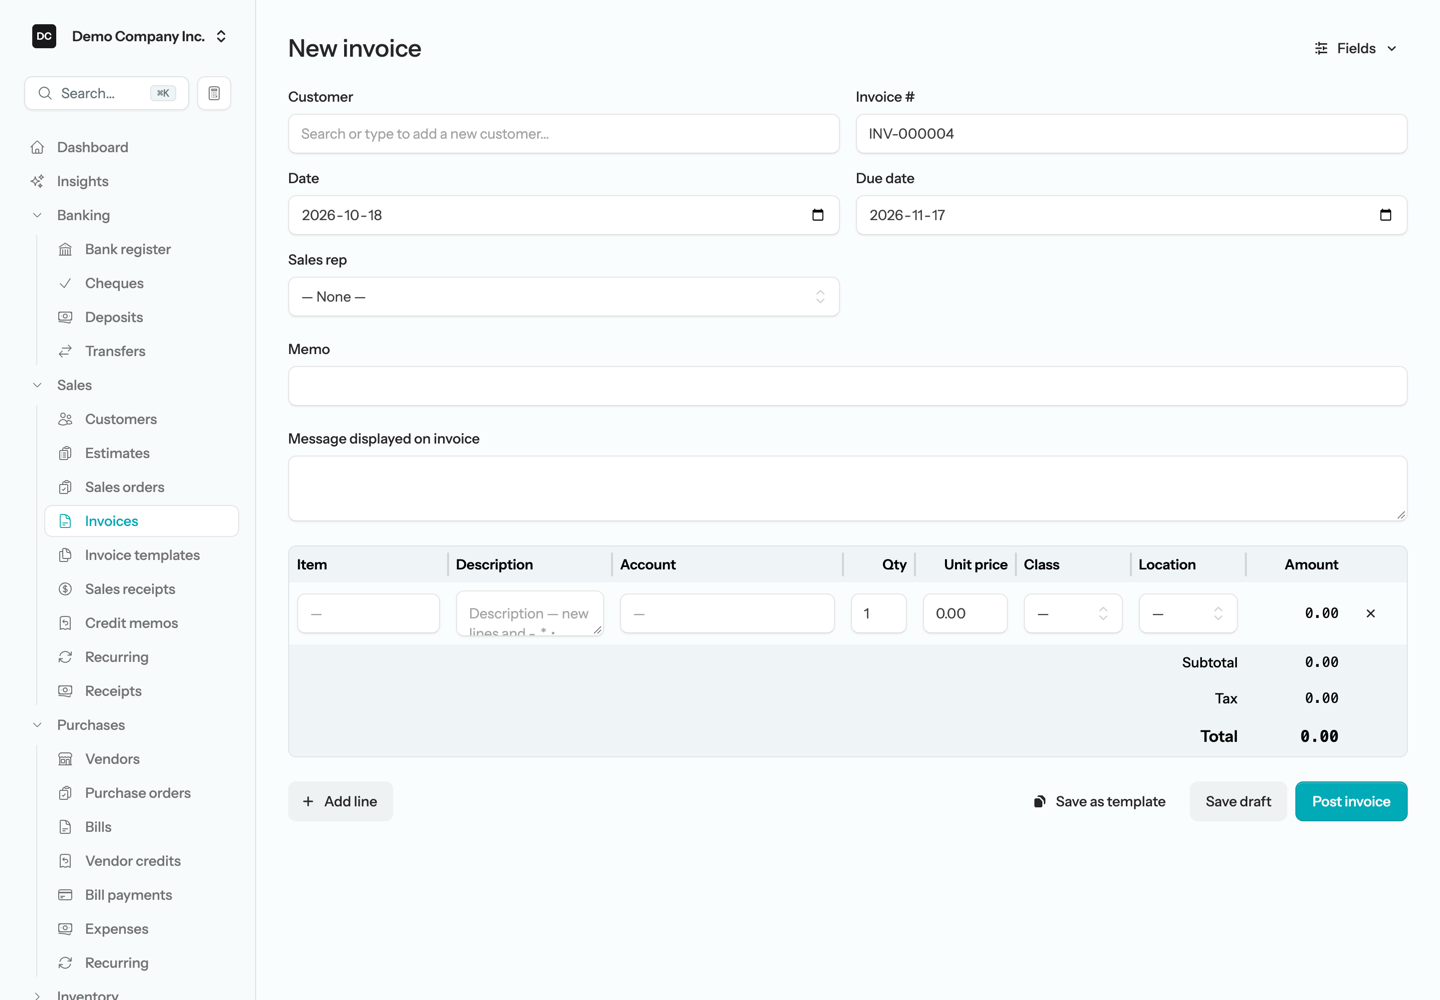
- Choose the Customer. The invoice number, date, and due date fill in automatically — adjust them if you need to. You can type your own number, but it must be unique within the organization, and the form tells you if it is already taken. A click anywhere in a date field opens the calendar.
- On the first line, pick an Item or an Account, type a Description, and enter the Quantity and Unit price. The line total calculates as you type. Picking an item fills the account, and fills the description from the item whenever the Description is still blank. On a line with no price yet it also fills the unit price and tax codes from the item; a line that already carries a price keeps its own price and tax when you tag it with an item.
- The line picks up a tax code from the item, the account, or the customer’s Default tax code. On a new organization the Tax, Service date, and Disc % columns are hidden: turn on Tax, Service date, or Discount in the Fields menu (see Optional invoice fields and columns below) to choose a tax code by hand, record a service date, or enter a per-line discount.
- Select Add line to bill for more than one thing on the same invoice.
- Select Post invoice to finalize it, or Save draft to keep working on it later.
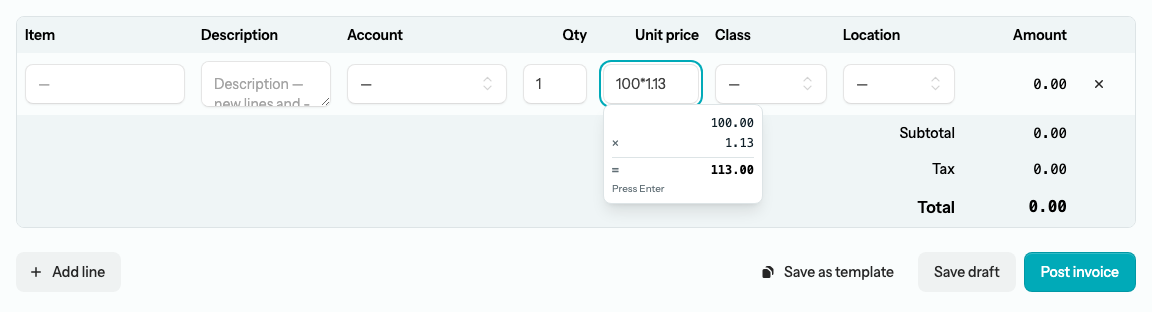
Tip. Every amount field on the invoice form doubles as a quick calculator with + − × ÷. Start typing math — for example 100*1.13 or 250/4 — and a tape pops up showing each operation. Press Enter (or click away) to commit the final value into the field. It works the same on credit memos, receipts, bills, cheques, and every other dollar cell in the app.
A draft stays out of your books, and you can open it and change it as often as you like. There is no Delete option for a draft invoice in the app, so a draft you no longer need stays on the Invoices list with its Draft badge. Posting locks the amounts into your books and assigns the invoice its place on your reports and the customer’s statement.
Note — What posting does to your books. Posting an invoice debits Accounts Receivable for the total and credits your revenue accounts, with any sales tax broken out to its own account. If a line uses an inventory-tracked item, posting also reduces that item’s quantity on hand and books its cost to cost-of-goods-sold — so your profit is recorded the moment you sell.
To send or print an invoice:
- Open the invoice you want to send.
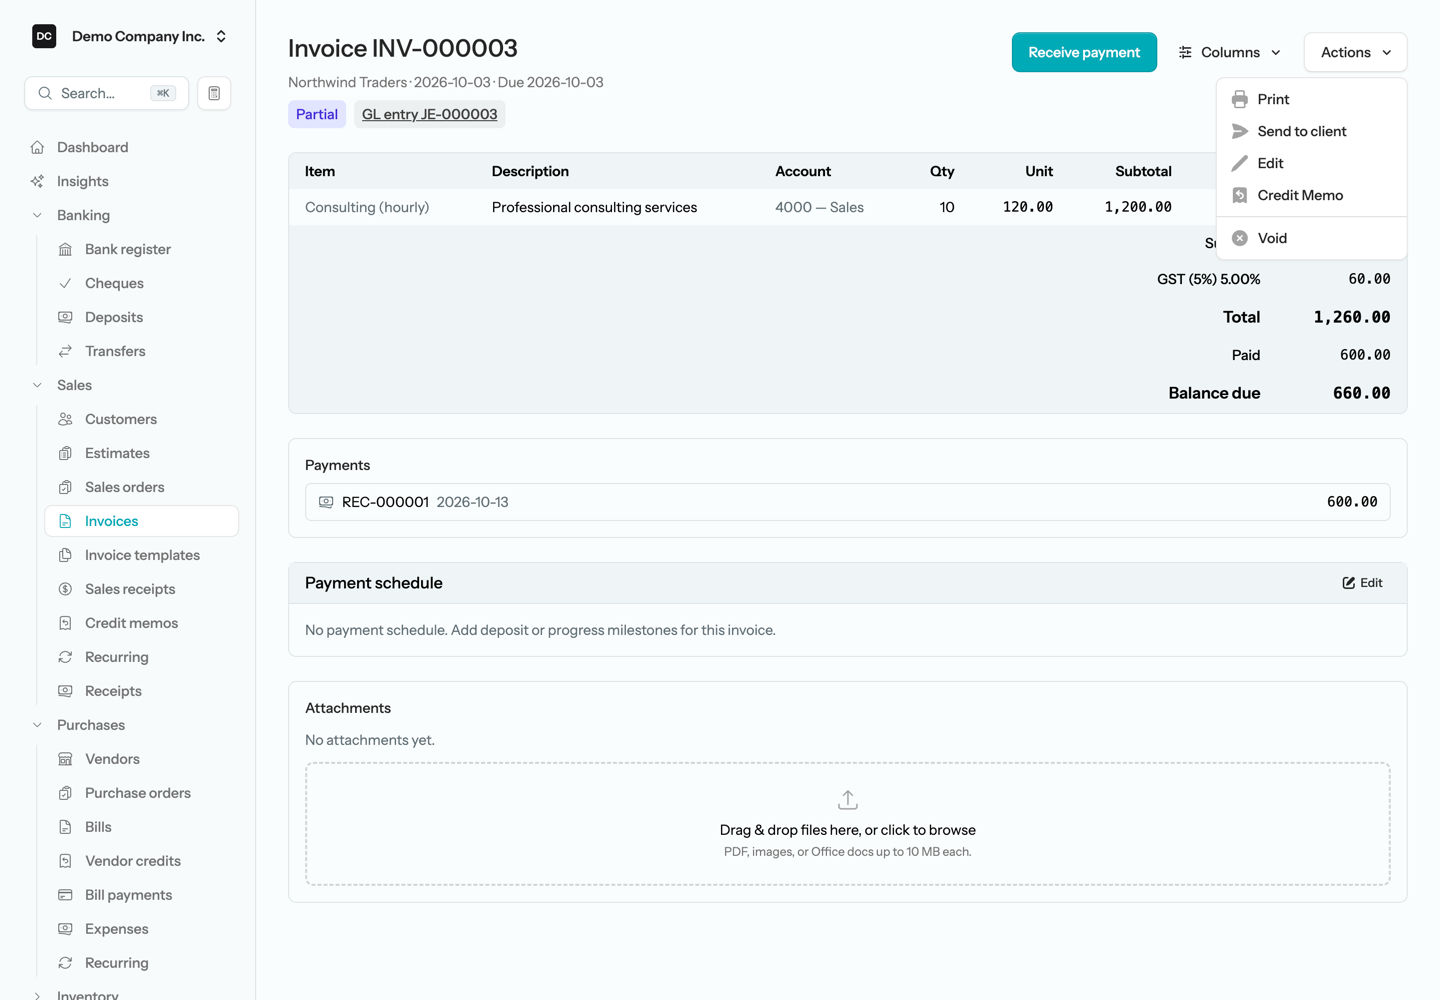
- Open the Actions menu in the top-right corner.
- Choose Send to client to email it — on an invoice raised for a membership member this reads Send to member — or choose Print to open a printable PDF copy in a new tab.
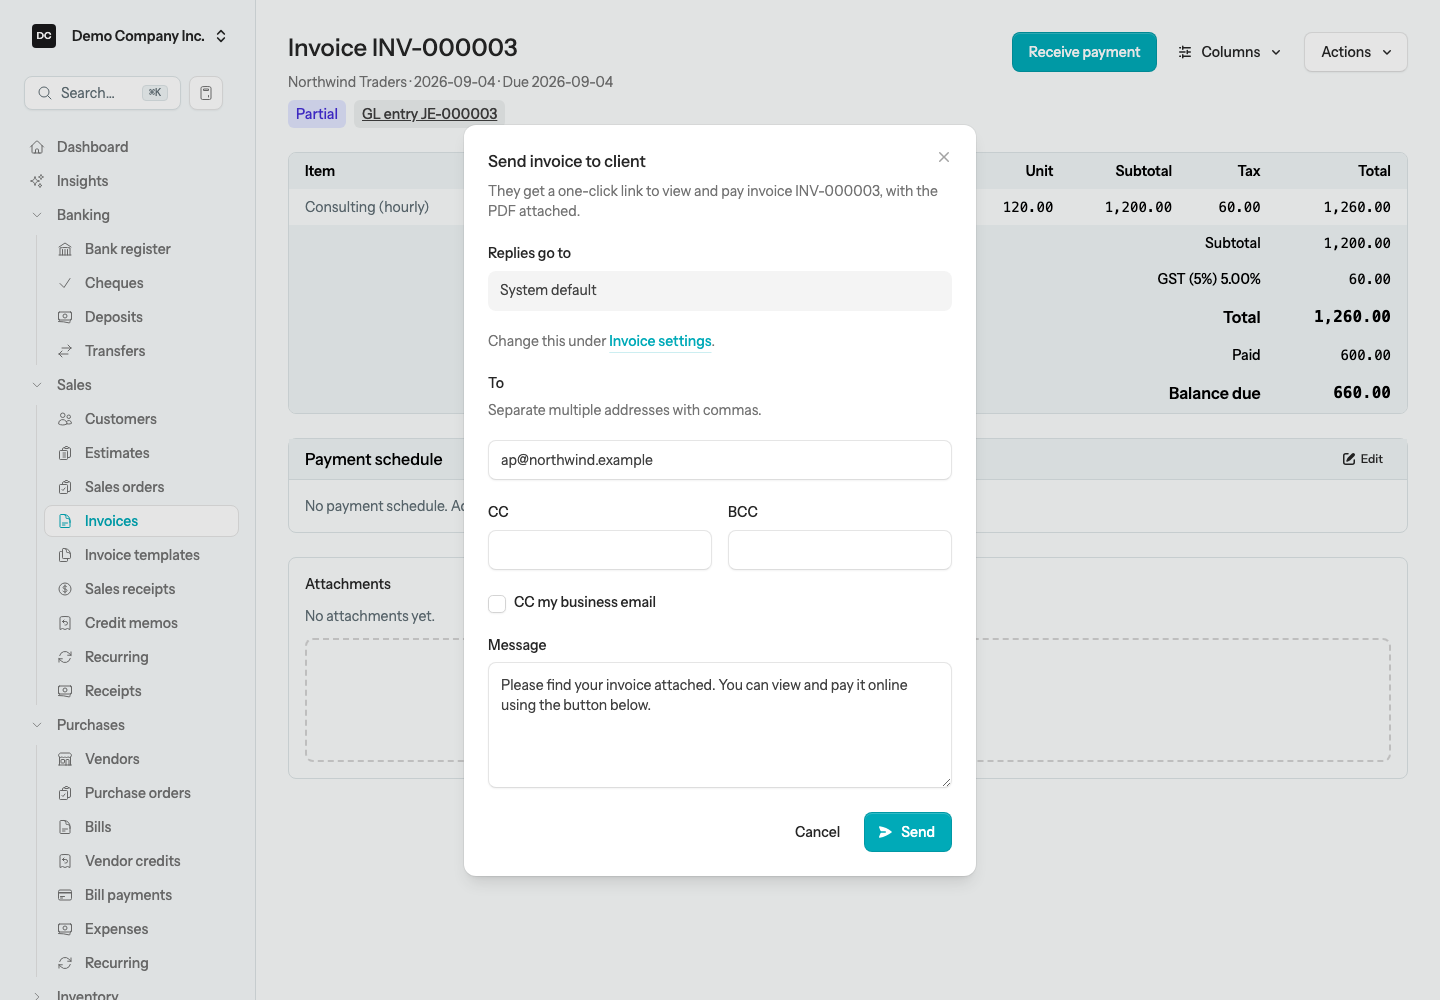
- In the send dialog, confirm the To address, add any CC or BCC recipients, edit the message, and select Send.
Everyone on the To, CC, and BCC lines receives the same email — your message, the PDF, and the View & pay invoice button — so copy only people who should be able to open the invoice online. Tick “CC my business email” to copy yourself. The Replies go to box shows where customer replies will land; it is read-only in the dialog and changes under Settings → Invoices. The Message starts from the default message set there too, and you can edit it for this send. A posted invoice shows its status, a link to the journal entry it created, and a running Balance due as payments come in.
Note. When an invoice mixes more than one tax code — say GST on some lines and a GST-plus-PST combination on others — the totals list each tax on its own line with its rate, instead of lumping everything into a single “Tax” amount. The posted invoice and its PDF then match exactly what each tax authority expects.
Heads up. A posted invoice is not edited the way a draft is. Choose Edit from the Actions menu, make your change, and select Save changes: the app re-posts the same journal entry in place, so your books and audit trail stay in step. It can no longer be saved back to a draft, and a change dated on or before your closing date is refused. Once receipts have been applied to an invoice, its total can’t go below what they applied: reduce the amount applied on the receipt first, or issue a credit memo for the difference. Never simply delete a posted invoice — that would leave a gap in your numbered records. To cancel one, choose Void: the app reverses the ledger entry (and any stock movement) and keeps the voided invoice on file for your audit trail.
Note — Imported books: a balance that was already settled. If you brought your books in from another system, an invoice can show a balance that a journal entry posted straight to Accounts Receivable already paid off. Choose Close settled balance from the invoice’s Actions menu to clear it without posting anything new. The Open Invoices report offers the same thing for many invoices at once as “Close ledger-settled”.
Optional invoice fields and columns
The invoice and credit memo forms ship with a lean default layout, but a long list of optional fields and line columns is one click away. Turn on only the ones Demo Company Inc. actually uses so the rest of the team is not staring at empty boxes.
To change which fields and columns appear:
- Open a new or existing invoice.
- Open the Fields menu in the top-right corner.
- Toggle the header fields and line columns you want. Each change saves as you make it and sticks for the whole organization, so the next invoice anyone opens uses the new layout.
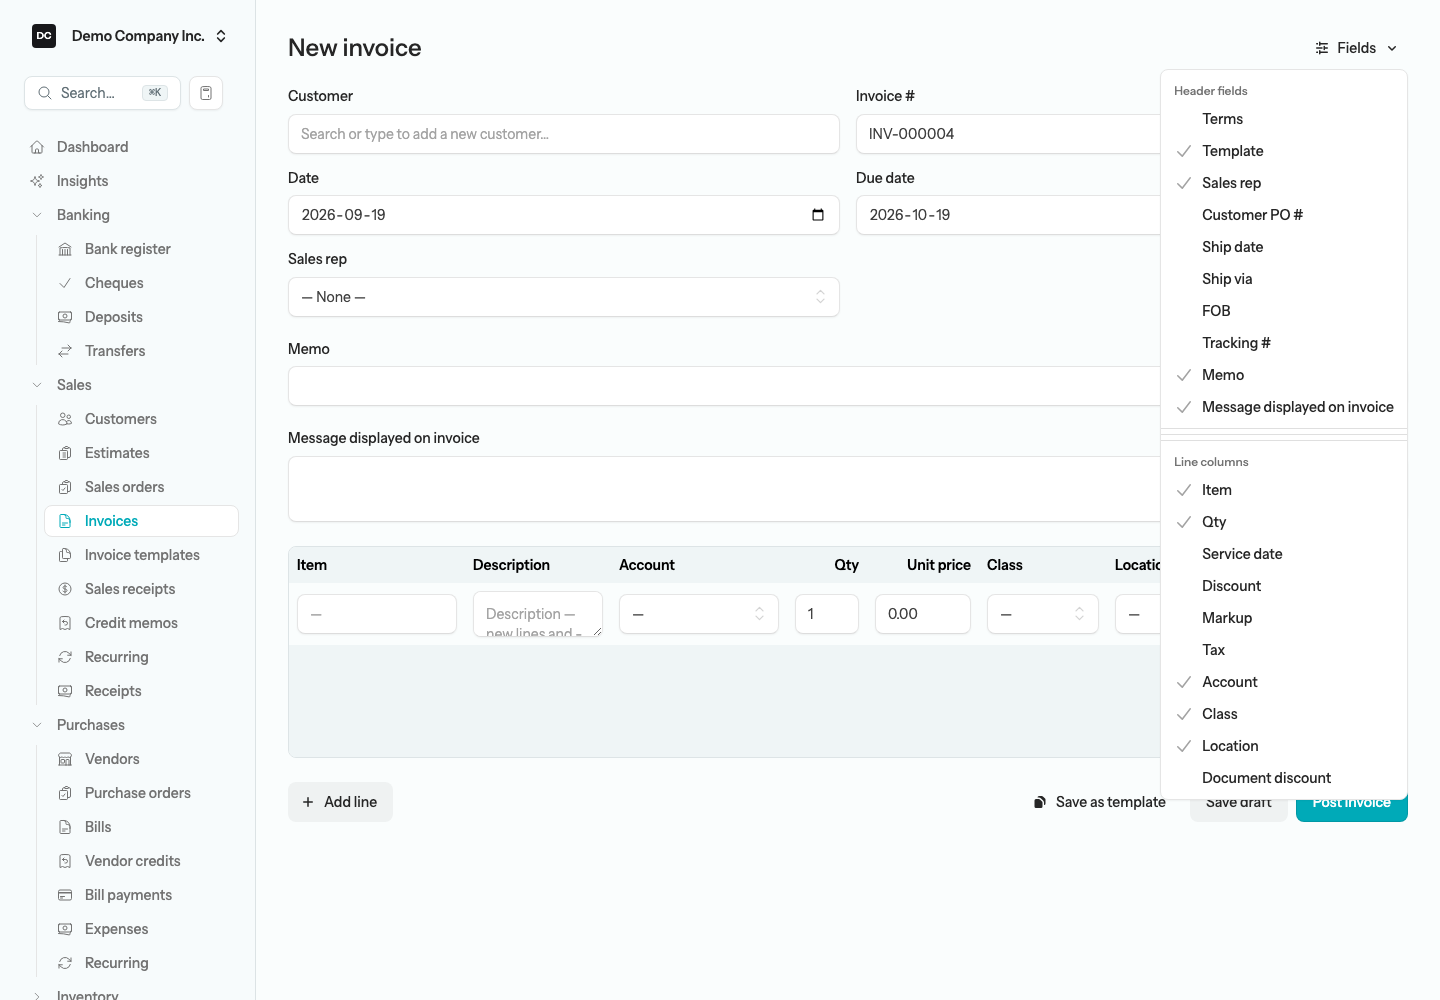
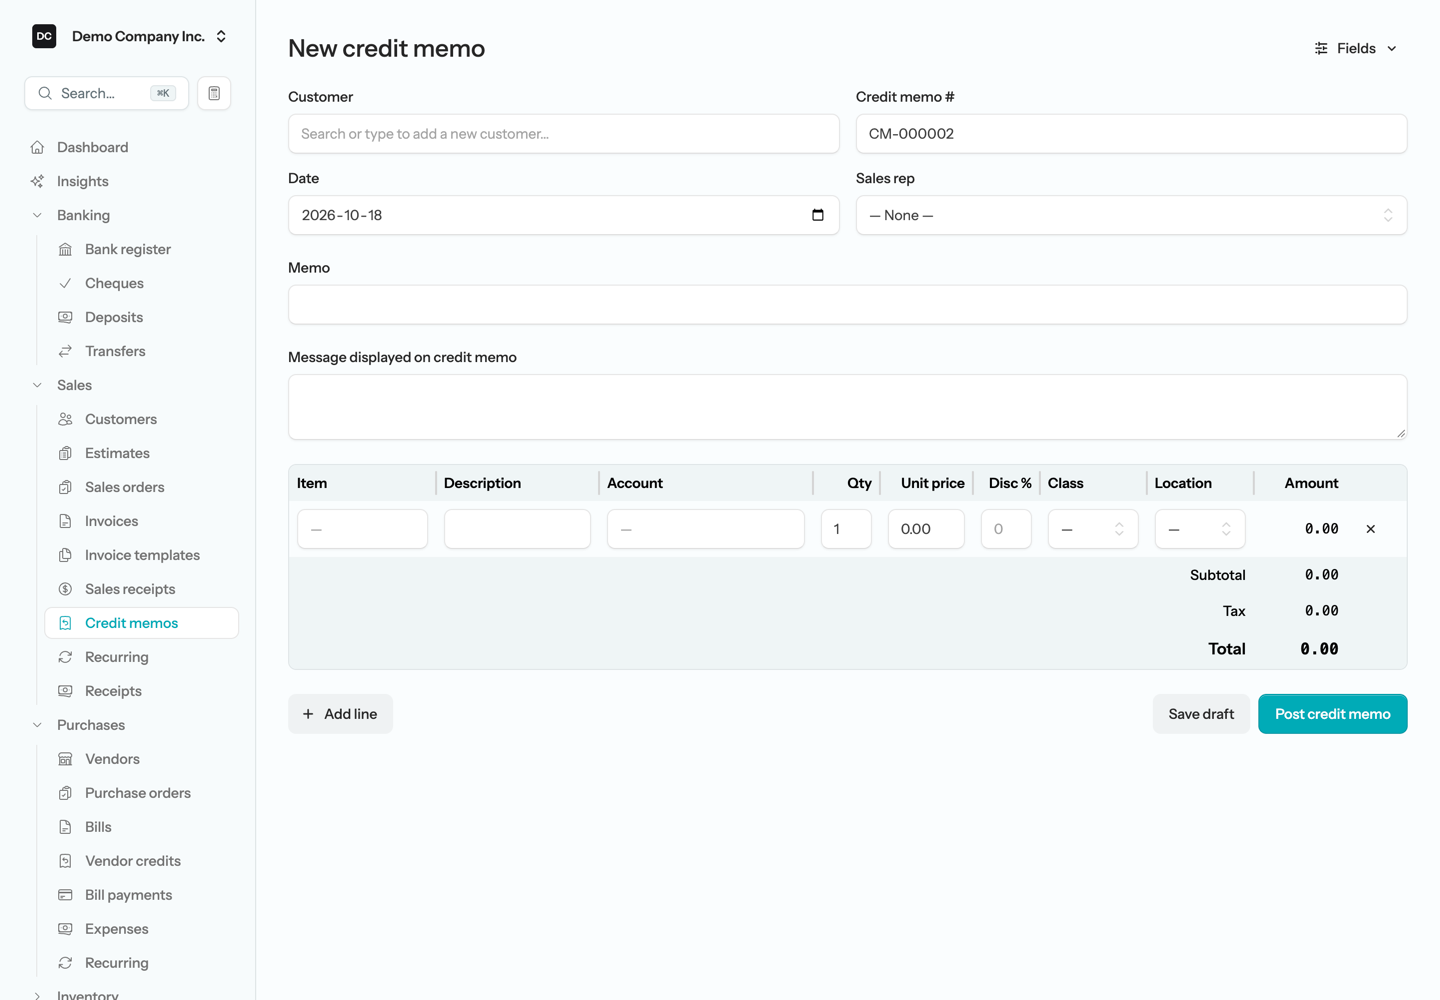
The Fields menu is split into two groups. Header fields cover Terms, Template (on a new invoice only), Sales rep (when the organization tracks employees), Customer PO #, Ship date, Ship via, FOB, Tracking #, Memo, and the message displayed on the invoice. Line columns cover Item, Qty, Service date, Discount, Markup, Tax, Account, Class and Location (when the organization tracks them), and a whole-document discount. A per-line discount is entered as a percentage in the Disc % column, so turn the Discount column on when you need it. The credit memo form’s Fields menu is slimmer — Sales rep, Memo, and the message in the header; Item, Qty, Tax, Service date, and Account for the lines — and its Disc % column is always shown, since a credit memo is neither shipped nor due.
Tip. The Fields menu is the right place to declutter: hide any column the business never fills in, and new invoices stop showing it for everyone on the team. You can turn a column back on later without losing the data on past invoices. Four of these switches are shared with Settings → Invoices: Item, Qty, Tax, and Service date are the same settings as its Line columns section (Show Item column, Show Quantity column, Show Tax column, Show Service date column), and they also decide which columns print on the PDF — so hiding one of them here leaves it off the printed and emailed invoice too. Most of the rest of Settings → Invoices shapes the printed document: your logo, which organization details appear, the tax registration line and footer message, and Hide zero-quantity lines in that same Line columns section, which leaves lines with a quantity of 0 and no amount off the PDF. Three sections reach beyond the PDF: Defaults sets the sales account a line is coded to when it has none (an item’s own income account still wins), Emailing invoices sets the sender name, reply-to address, and default message the send dialog uses, and Payment instructions shows under How to pay when a customer views or pays an invoice online. The registration number in the Tax & footer section reaches further still: it is saved as your organization’s own tax number, which the T4, T4A, RL-1, and ROE filings use as your business number, so change it there only when the number itself has changed.
Deposits and progress billing
A single invoice can be collected in stages — a deposit up front, progress payments through a project, or a balance on completion. The payment schedule on an invoice lets you spell out those milestones so you and the customer both know what is due and when. It is available on any invoice that has not been voided, drafts included.
To set up a payment schedule:
- Open the invoice and find the Payment schedule panel below the totals.
- Select Edit, then Add milestone for each stage you want to bill.
- Give each milestone a label such as “50% deposit”, choose Percentage or Fixed amount, enter the value, and set an optional due date.
- Select Save schedule. The milestones can add up to the full invoice but never more — an exact total folds any rounding into the last row.
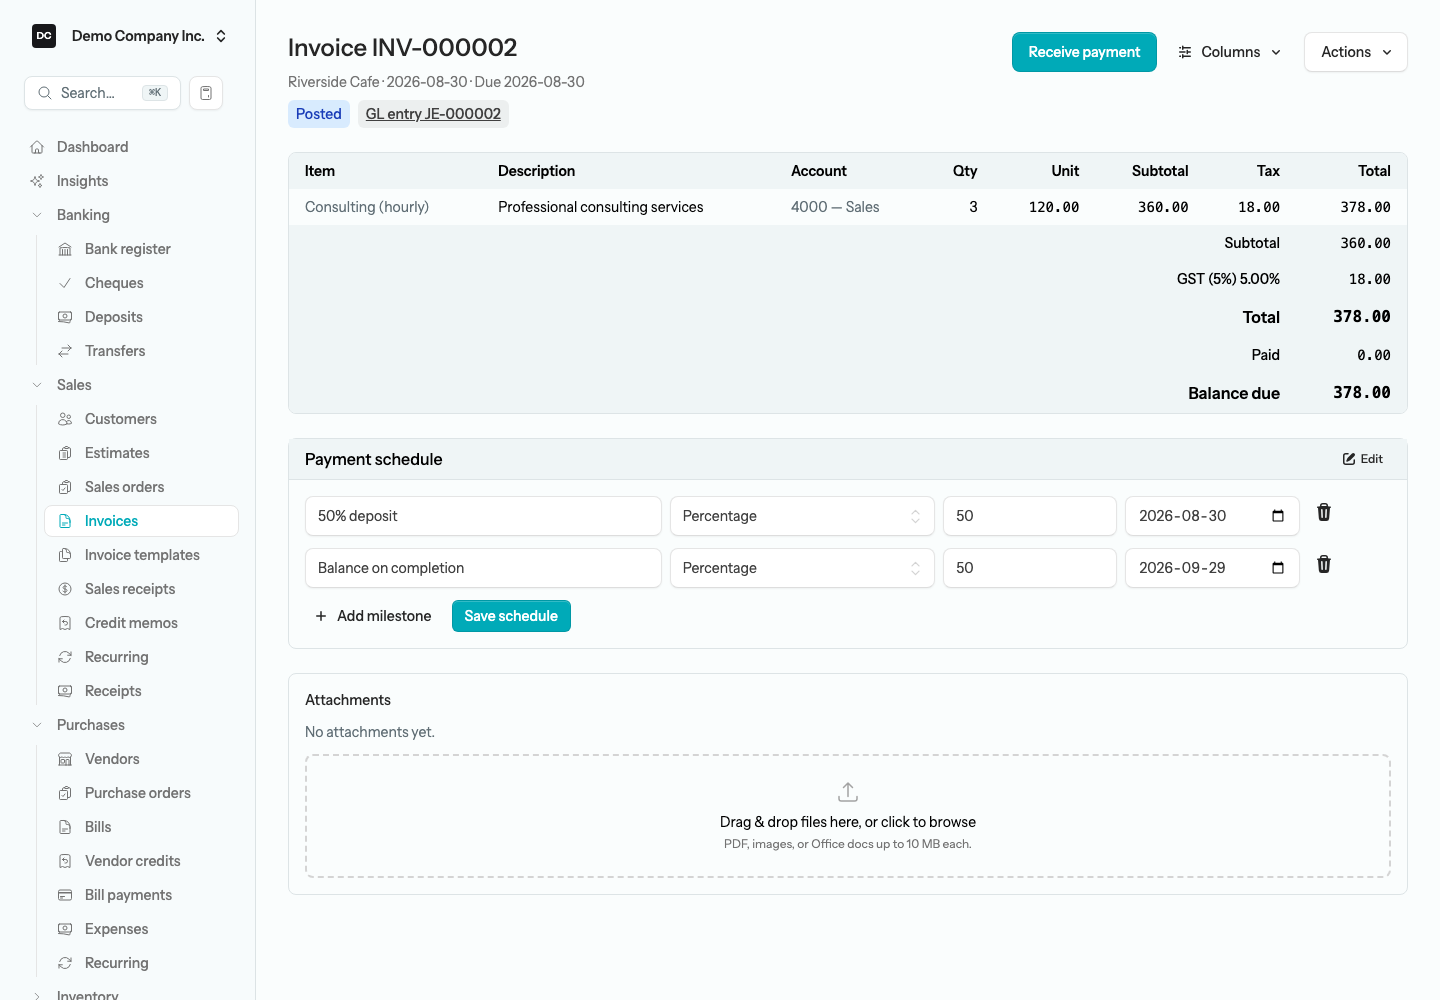
Each milestone shows a status: Requested until it is covered, or Paid once enough payments have landed against the invoice. Paid is worked out automatically from the payments applied to the invoice — you never mark a milestone paid by hand. To drop a milestone, select Edit, remove its row with the trash button, and select Save schedule: the milestone is deleted outright.
Note — Milestones do not change your books. A payment schedule is a billing plan, not a ledger entry. It creates no journal entries and never splits Accounts Receivable — the invoice keeps one single balance owing. Record customer payments the usual way under Receive a payment, and the milestones update their status to match.
Credit memos
A credit memo reduces what a customer owes you — use one for a return, a billing correction, or a goodwill adjustment. It is the mirror image of an invoice.
To create a credit memo:
- Open Sales → Credit memos, then select New credit memo — or open the posted invoice you are crediting and choose Credit Memo from its Actions menu to start with the customer already chosen.
- Choose the Customer and add lines exactly as you would on an invoice — item or account, quantity, price, and tax. The credit memo number is editable and, like an invoice number, must be unique.
- Select Post credit memo.
Note. A credit memo lowers the customer’s balance: it credits Accounts Receivable and debits the revenue (or other) account on each line. The credit then sits on the customer’s account as a whole: it lowers their Open balance and shows on their statement, but it is not applied to any one invoice, and nothing applies it to their next payment for you. When you record a payment from them while they have open invoices, the Receive payment form shows the available credit and their net balance, for reference only.
When the customer would rather have their money back than a credit on account, open the posted credit memo and select Refund to client. Choose By cheque to create a draft refund cheque you review and post — it debits Accounts Receivable and credits your bank — or By credit card to record the refund straight away. The card option books a negative customer receipt against Undeposited Funds, so you deposit it with your other card takings on a bank deposit. Either way the credit memo tracks how much has been refunded and shows a Partly refunded or Refunded badge, and you can drop a refund back off by voiding it. While a refund stands, the credit memo can’t be voided or edited below the amount refunded, so void the refund first.
Receive a payment
When a customer pays, record a receipt to clear the invoice from their balance and move the money into your bank.
To record a payment:
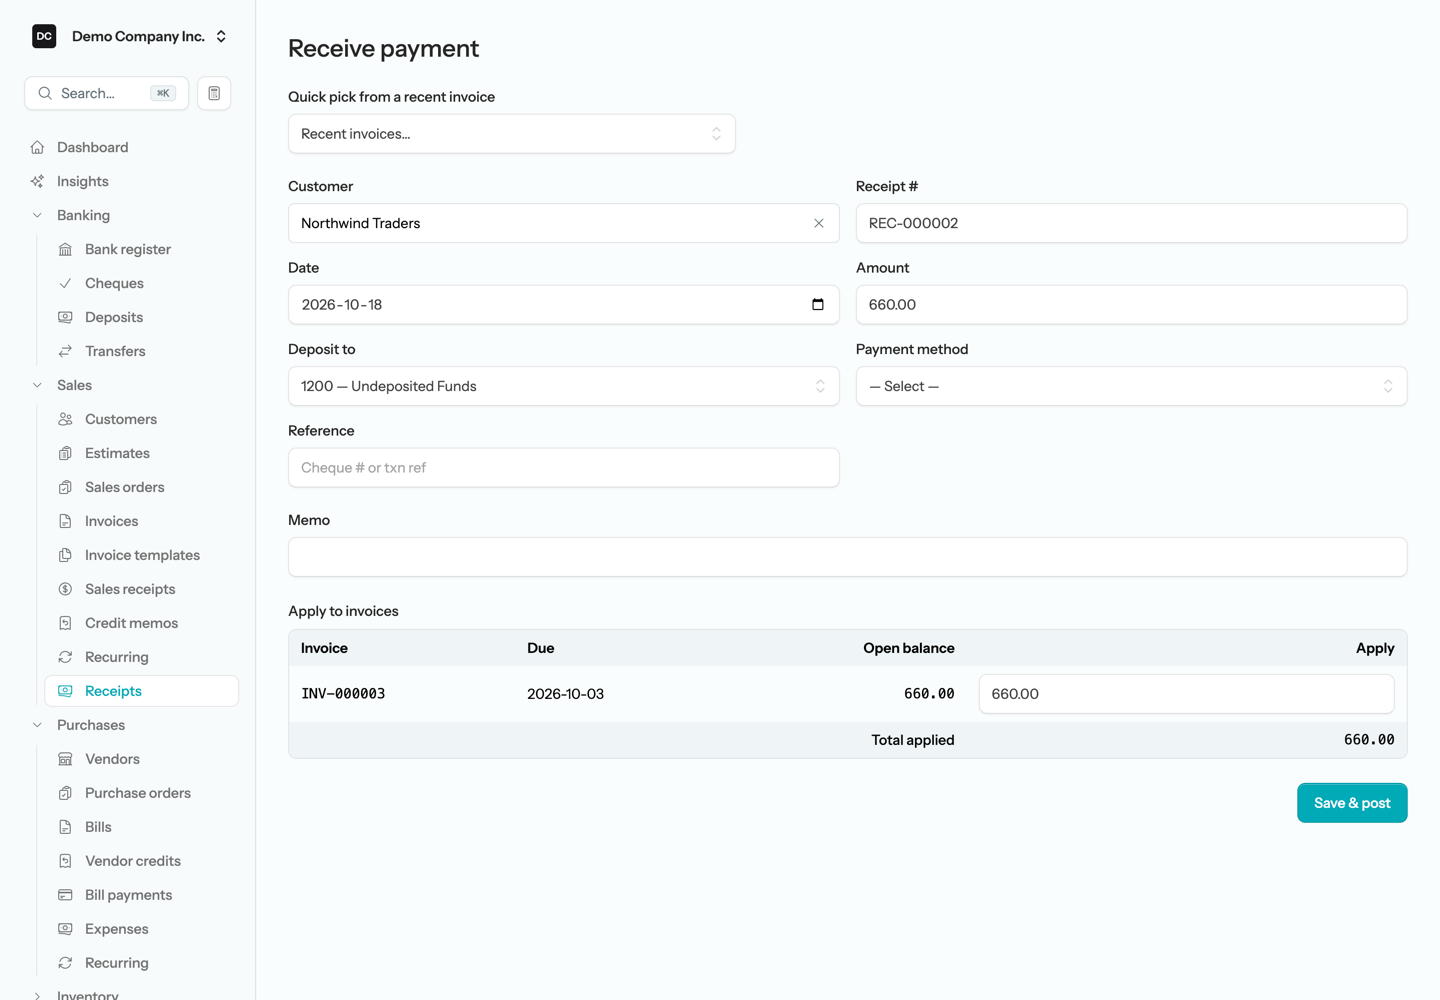
- Open Sales → Receipts and select Receive payment — or open a posted invoice and select Receive payment, which fills in the customer and sets the Amount to that invoice’s balance due.
- Choose the Customer. Their open invoices appear in the Apply to invoices table, each with an Apply amount.
- Enter the Amount and the Date. The amount is spread across the customer’s open invoices oldest due date first — even when you started from an invoice, an older open invoice is paid first — so check the Apply column and type into an Apply cell to decide the split yourself.
- In Deposit to, choose the bank account the money went into (or Undeposited Funds if you are grouping it for a later bank deposit).
- Select Save & post.
Note. Recording a receipt debits the bank or undeposited-funds account and credits Accounts Receivable, clearing the invoices it is applied to. Card payments your customers make through the Customer portal arrive here automatically.
Tip — Credits and partial payments. If the customer has credit on account — a credit memo or an earlier overpayment — a green panel on the form shows the available credit and what they actually owe once it is taken off. Any part of a receipt you do not apply to an invoice is kept as customer credit, and the form says so before you post. Once you have typed into an Apply cell, or when you reopen a saved receipt, changing the Amount no longer moves money between invoices, so a payment cannot be silently pulled off the invoice it was meant for.
Refund an overpayment
Sometimes a customer pays the same invoice twice — by card, then again by cheque — and you hand one payment back. No goods or services are being credited, so this needs no credit memo: the second payment is an overpayment, kept as credit on their account, and you refund that credit.
To refund an overpayment:
- Open the invoice. Under Payments it lists the payments applied to it; under Overpayment (customer credit) it lists the customer’s payments that no invoice took, and the credit remaining.
- Select Refund to client. When more than one payment holds credit, choose one under From payment — the newest is picked for you.
- Choose By credit card for a refund made through the card terminal, or By cheque to write one. Check the Amount and the Date, then select Record refund or Create draft cheque.
A card refund books a negative receipt to Undeposited Funds: it debits Accounts Receivable and credits Undeposited Funds. Put it on a bank deposit with your other card takings and it nets out of the batch; when refunds outweigh the receipts, the deposit total is negative and the deposit takes the money out of the bank, as the card processor does on your statement. A cheque refund is a draft cheque that debits Accounts Receivable and credits your bank — review, print and post it. The invoice itself doesn’t change: it stays paid by its original payment, and the refund is listed under the payment whose credit it used. You can also refund from the payment’s own page, which shows its unapplied credit.
Note. While a refund stands, its payment can’t be voided or moved to another customer, and the refunded credit can’t be applied to an invoice — remove the refund first. Remove a refund from the invoice or the payment: a card refund is voided, a draft refund cheque deleted. A card refund already on a deposit has to come off the deposit first. Refunds of foreign-currency payments aren’t supported yet, and a refund of a payment taken through Stripe is only recorded here — issue it in your Stripe dashboard too.
Send a customer a statement
A statement is the customer’s view of their account with Demo Company Inc. — the classic “here is what you owe” letter. LineLedger builds it straight from the ledger, so it always ties to AR Aging. The Customer statement page previews it on screen like any report; what you see there is exactly what the PDF and the email carry.
To preview, download, or email a statement:
- On the Customers list, select the customer’s Open balance, or choose Statement… from their row menu. (The Statement… button on the customer’s AR statement report opens the same page.)
- Pick the Statement type. Open invoices lists each unpaid invoice with its due date and balance, plus an aging summary. Account activity lists every charge and payment over the period, with a running balance.
- Choose the Period, or set Start and End. For Open invoices the period starts out as All — every invoice still open on the End date. Narrow it and the invoices dated inside the range are listed, with everything still open from before the Start date gathered into one Balance forward row. Account activity starts at the fiscal year to date.
- Use Columns to choose what the statement shows. Date, the invoice or document number, and the balance always print; Memo, Due Date, Original Amount, P.O. #, Terms, Amount Paid, and Days Past Due are yours to switch on or off for Open invoices, and Type, P.O. #, and Memo for Account activity. P.O. # is the customer’s purchase-order number from each invoice.
- Select View PDF to open it in a new tab, or Download to save it.
- To email it, select Email…, confirm the To address (separate several with commas), add a CC if you like, tick “CC my business email” to keep a copy, edit the Message, and select Send.
Tip — Make your columns the default. Column choices apply to the statement in front of you. When the selection differs from the company default, a Save as default columns button appears — select it and every statement of that type starts with those columns, including the PDF and the emailed copy. Saving the default takes the same access as Settings → Invoices. The sales rep is never offered: it is internal, and stays off everything the customer receives.
The emailed statement carries the PDF and a one-click link to the live statement in the Customer portal. Replies go to the address set under Settings → Invoices — the email form shows it. Sending a statement by hand works even for a customer whose automated invoice emails are turned off, and does not change that setting.
Note — Why the statement always matches the aging report. An Open invoices statement’s rows always add up to the customer’s balance in Accounts Receivable. Invoices from before the Start date are carried in the Balance forward row, and if the ledger balance differs from the open invoices — because of a credit memo, an unapplied payment, or a journal entry posted to Accounts Receivable — one extra row, Credits on account or Other balance, absorbs the difference, so the total due equals the aging total.
Payment reminders
LineLedger can chase overdue invoices for you. A built-in four-step ladder emails the customer a friendly nudge three days before the due date, then follow-ups one, seven, and fourteen days after it — each one a little firmer. Once a customer is opted in, reminders run on their own every morning, so collections keep moving without anyone remembering to send them.
Automated reminders are off for every customer until you turn them on. Open the customer, go to the Payment & billing tab, and switch on Send payment reminders under Email preferences. The neighbouring switch, Email invoices to this customer, is separate — it covers invoices generated by a recurring schedule. LineLedger never emails a customer unless one of these is on; sending an invoice or a statement by hand always works regardless.
After that, a reminder only goes out when it makes sense: the invoice is still open with a balance owing, reminders are switched on for that invoice, and the customer has an email address on file. Every reminder quotes the live balance owing, so a partial payment is always reflected.
To work today’s reminders by hand:
- Open Sales → Invoices and select Reminders — the bell button at the top of the list.
- Review the invoices that are due for a reminder today. Switch on Show reminders-off customers to also see the ones the morning run will skip.
- Select Send now to email a reminder immediately, Skip to stop reminders for that one invoice, or Turn off reminders to stop the automated ones for everything that customer owes.
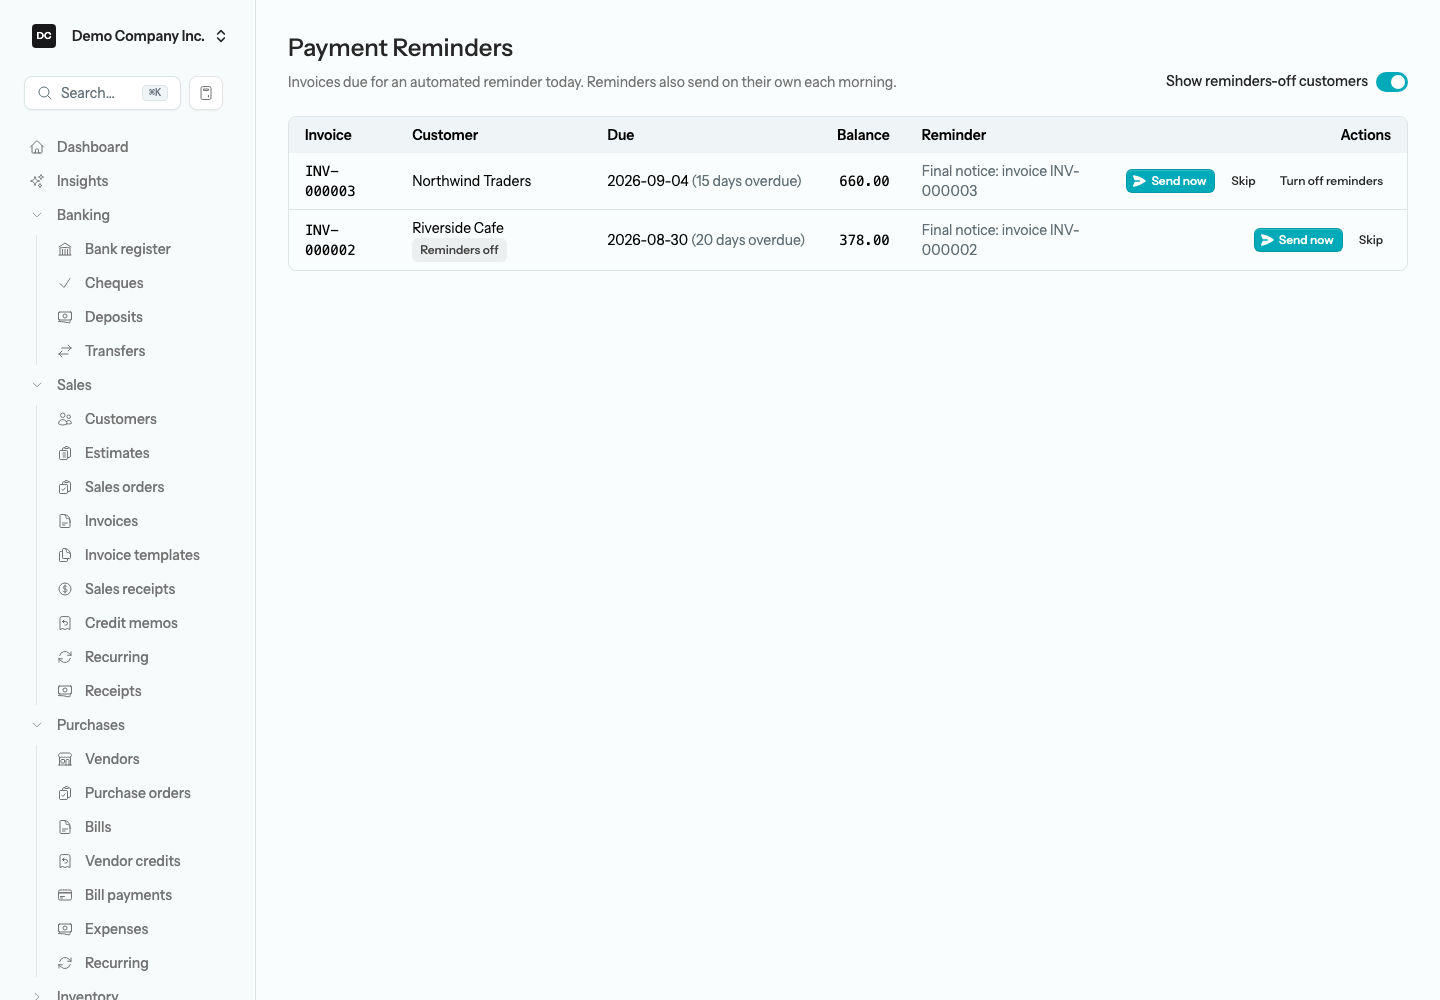
Tip. Skip turns reminders off for that one invoice for good: it gets no more reminders and drops off this worklist, even with Show reminders-off customers on, so Send now is no longer available for it — and there is no switch to turn them back on. Turn off reminders turns the automated ones off for that customer across every invoice. It writes the same switch as the customer form, so while someone else has that customer open for editing it is refused with an error message. After Turn off reminders, the customer’s invoices still appear when you switch on Show reminders-off customers, and Send now still works for them — it is an explicit, one-off send that leaves the customer’s preference untouched.
Reports tied to this area
- AR Aging — open balances bucketed by how overdue they are.
- Open Invoices — every unpaid invoice and its balance, with “Close ledger-settled” for imported books.
- Contact statement — every transaction with a single customer over a date range, with Statement… and Edit customer buttons at the top.
- Sales by Customer and Sales by Rep — revenue per customer or per sales rep over a period, net of credit memos; select a rep to drill down to the invoices behind the total.
- Sales Tax — tax collected on customer invoices, ready for filing.
All of these are described under Reports.