The Documents area is a central place for files that belong to the whole organization — incorporation paperwork, lease agreements, insurance certificates, anything you want kept together rather than pinned to one transaction. It complements the per-record attachments you drop onto invoices, bills, cheques, and expenses, and the Attachment index lets you search those from here too. The examples below use our sample business, Demo Company Inc.
Note — Documents vs. Inbox. Documents is for storing files. If you want to email or drop a receipt and have the app read it and prepare an entry for you, use the Inbox instead — it stages incoming receipts, reads them, and promotes each one to a draft bill or expense you review and post. See Inbox for that workflow.
Open Documents → Repository from the sidebar to see your folders. Each card shows how many subfolders and files it holds, plus a Shared badge when the folder has a share list. Two buttons sit in the top-right corner: Attachment index, which also has its own entry in the sidebar, and New folder.
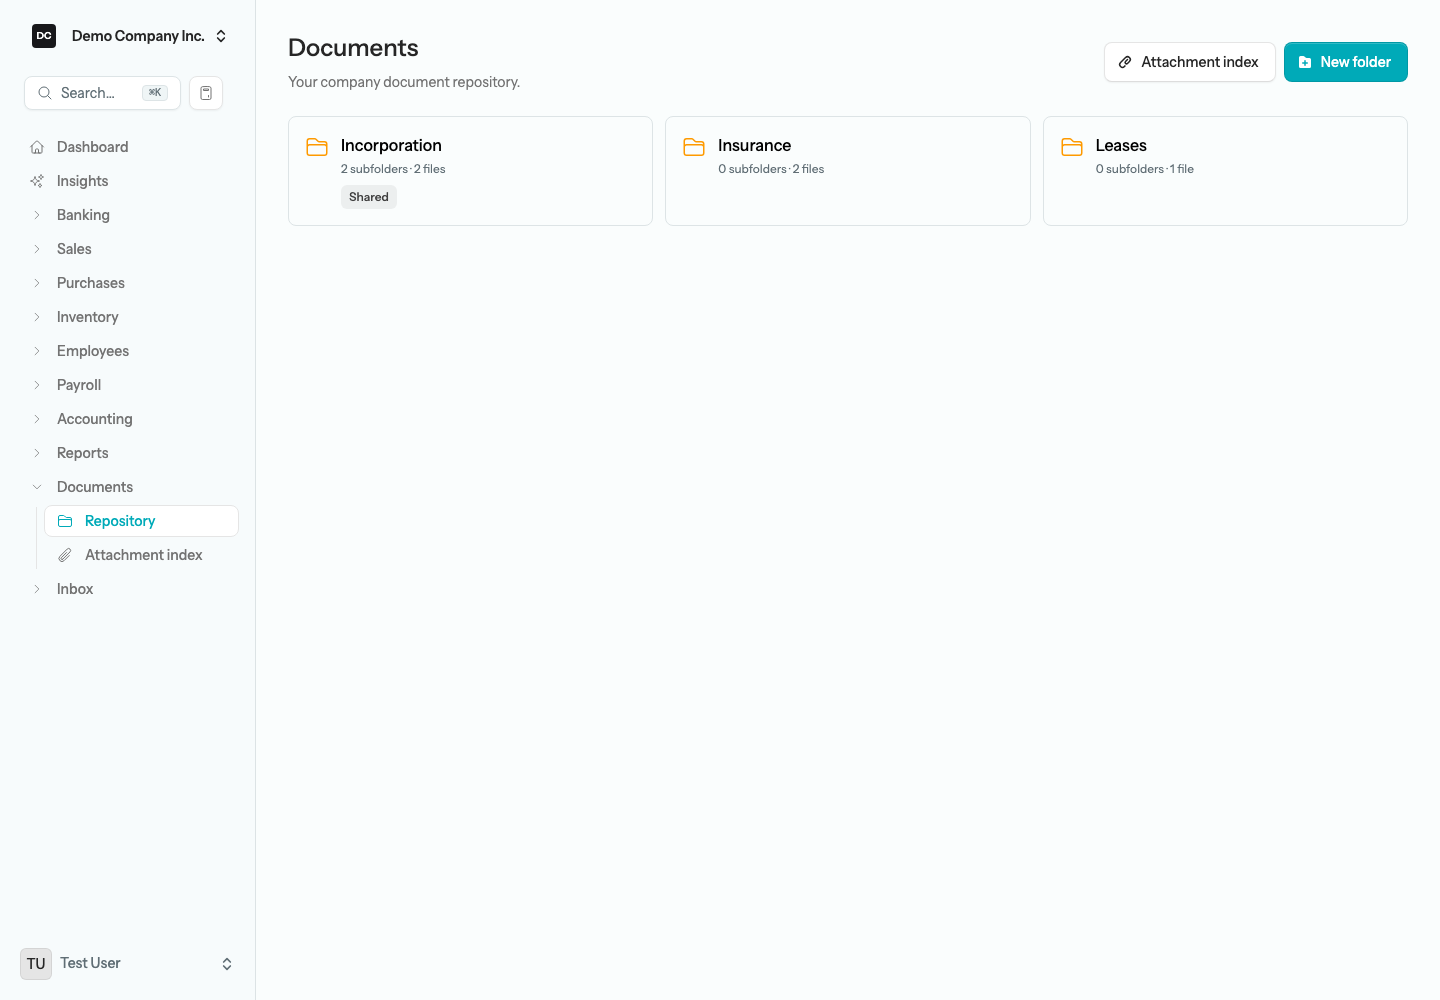
Note — Who sees the Documents group. Owners, Admins, and Accountants get the Documents section automatically. A Custom member only sees the Documents group in the sidebar — and can only open a folder you share with them — when the Documents section is part of their access. Section access is set per member under Settings → Organizations; see Settings.
Create a folder
Folders organize what you upload. They are private to you by default — only you, plus Owners and Admins, can see a folder until you explicitly share it with other team members.
To create a folder:
- Open Documents → Repository from the sidebar.
- Select New folder in the top-right corner.
- Enter a Folder name (for example, “Incorporation”).
- Select Create.
Tip. Inside a folder, select New subfolder to nest folders as deep as you need — Demo Company Inc. might keep an “Incorporation” folder with subfolders for “Articles” and “Bylaws”. A breadcrumb trail at the top of every folder takes you back up the tree; an ancestor you have not been given access to shows as Restricted in the trail rather than revealing its name.
Upload files into a folder
Open a folder to see its contents: subfolders first, then the Documents list of files in this folder, and — if you can manage the folder — an Add documents dropzone at the bottom. You can drag files straight onto the dropzone or click it to pick them from your computer.
To upload files:
- Open the folder you want to upload to.
- Drag one or more files onto the “Drag & drop files here, or click to browse” dropzone under Add documents, or click it to choose files from your computer.
- Select the Upload button — it reads “Upload 1 file(s)”, “Upload 2 file(s)” and so on, and appears as soon as at least one file is staged — to commit them to the folder.
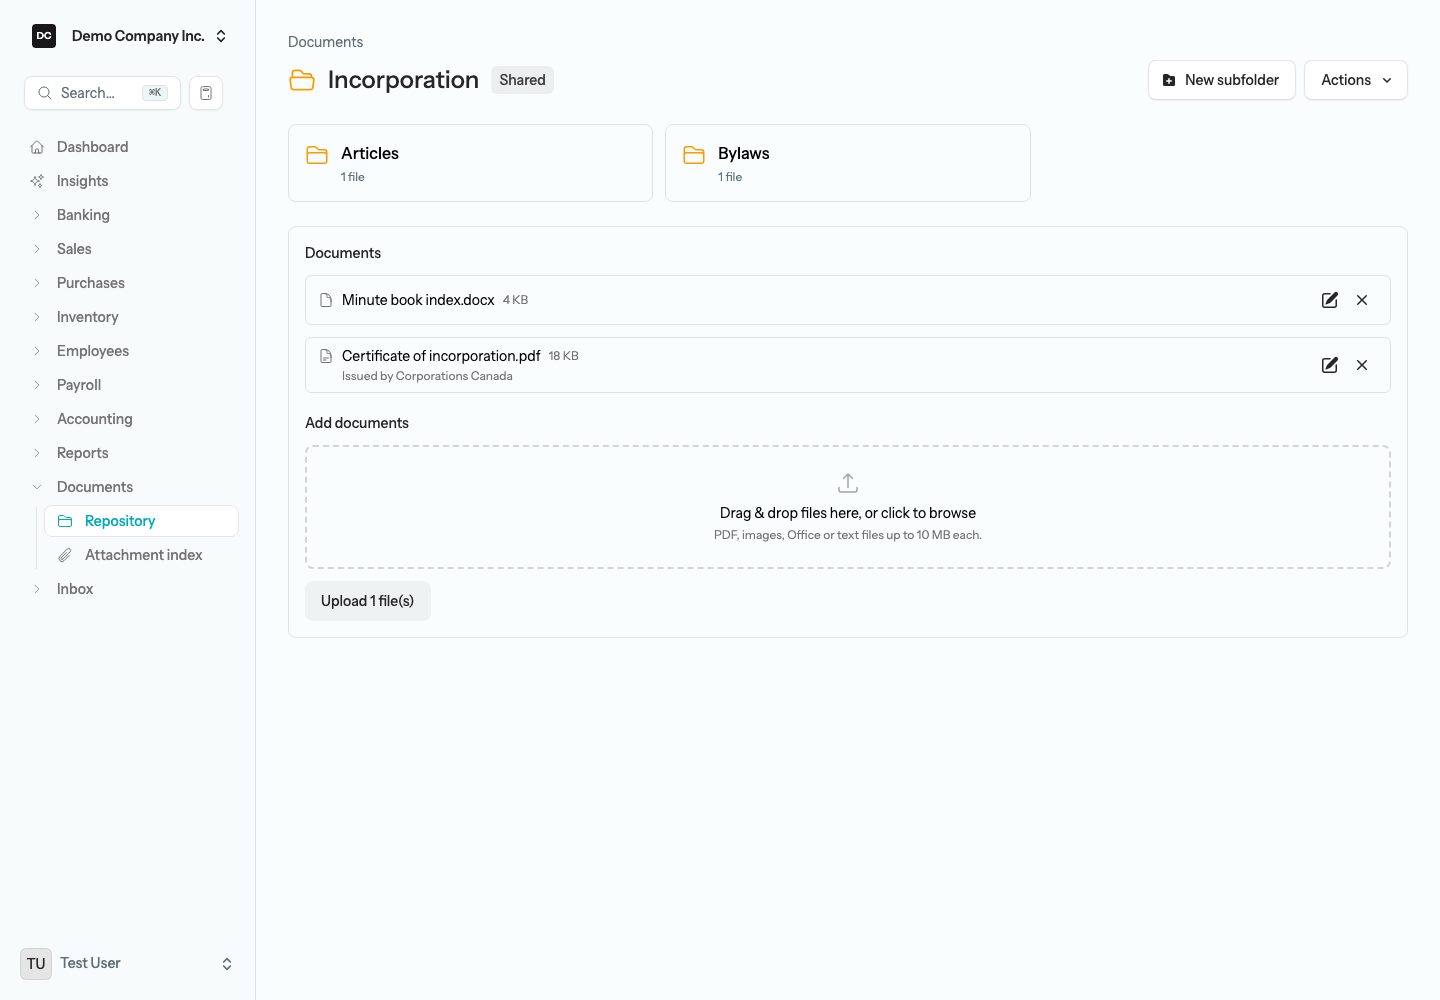
Note — What you can upload. Each file can be up to 10 MB. Allowed formats: PDF, images (PNG, JPG, JPEG, WEBP, GIF), Word (DOC, DOCX), Excel (XLS, XLSX), PowerPoint (PPT, PPTX), OpenDocument (ODT, ODS), CSV, and plain text — a wider set than transaction attachments elsewhere in the app, which share the same 10 MB limit but accept only PDF, images, Word, and Excel.
Open a file
Select a file name to open it. PDFs and images (PNG, JPG, GIF, WEBP) open in a new browser tab so you can read them without downloading — the small arrow that appears when you hover over the name tells you a file will open this way. Every other type, such as Word, Excel, CSV, or text, downloads to your computer. Attachments on invoices, bills, and every other record open and download the same way. A file in a folder is only served to members who can see that folder, so a link copied out of the page never bypasses sharing.
Share a folder with teammates
New folders are visible only to their creator plus Owners and Admins. Share a folder when you want a specific bookkeeper or accountant to be able to open it. Sharing is read-only: the people you share with can open the folder and read or download its files, but they see no New subfolder button, no Actions menu, no dropzone, and no pencil or X next to a file.
To share a folder:
- Open the folder.
- Open the Actions menu in the top-right corner and choose Share.
- Tick the members who should be able to view this folder and its files. The dialog lists every other member and reminds you that Owners and admins always have access, so ticking them gives them no extra access.
- Select Save. The folder card now carries a Shared badge.
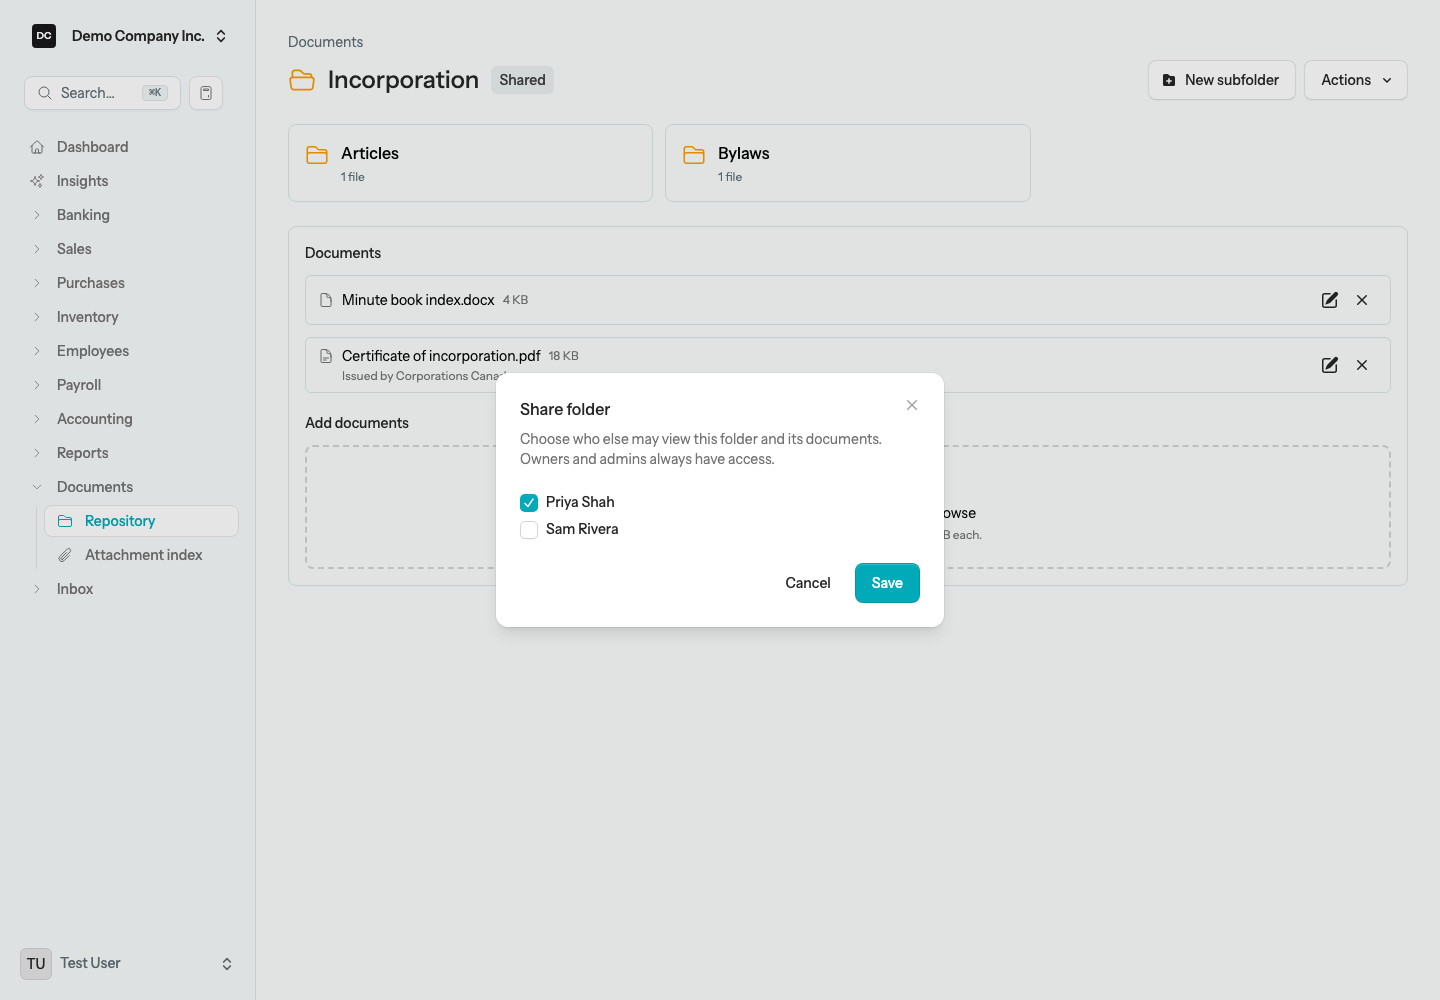
Heads up — Sharing needs the Documents section too. Ticking a member is not enough on its own. A Custom member whose access does not include the Documents section cannot open a folder you share with them — the Documents group does not appear in their sidebar and the folder link is refused. Grant the section under Settings → Organizations first, then share the folder. Sharing also does not cascade: each subfolder has its own list, so a member shared on “Incorporation” only sees “Articles” inside it if you share that subfolder as well.
Who can do what:
- Owners and Admins — open, upload to, rename, share, and delete every folder in the organization.
- The folder’s creator — the same, for the folders they created.
- A member the folder is shared with — open the folder and read or download its files, nothing more.
- Everyone else — cannot see the folder at all.
Tip. The Actions menu — shown only to Owners, Admins, and the folder’s creator — is also where you Rename a folder or choose Delete folder. Deleting a folder removes everything inside it, including subfolders and files, and the files are purged from storage, not just hidden — there is no undo, so use Share rather than Delete folder if you only want to limit access.
Find any attachment with the Attachment index
The Attachment index is a single table of every file attached to a record across the organization — invoices, bills, credit memos, vendor credits, cheques, expenses, fixed assets, bank reconciliations, customer and vendor records, and receipts captured by the Inbox. Use it when you remember a file existed but cannot remember exactly where you put it. Files stored in Documents folders are intentionally left out — this is the cross-transaction view.
To open the Attachment index:
- Open Documents → Attachment index from the sidebar, or select Attachment index in the top-right corner of the repository.
- Type into “Search file name…” to filter by file name. The search matches the file name only, not the description.
- Read the Attached to column to see which record holds the file. An invoice, bill, credit memo, or vendor credit shows its document number as a link that opens the record, and a fixed asset shows its name as a link. A customer or vendor row reads Contact followed by the contact’s name, with no link. A cheque, expense, bank reconciliation, or Inbox receipt row shows only the record type and its internal ID — “Cheque #12”, “Expense #5”, “BankReconciliation #3”, “InboxItem #8” — not the cheque number, the reference, or the statement date, and has no link either; use the file name, uploader, and date to place it, then open the record from its own area.
- Select Repository in the top-right corner to return to the folder grid.
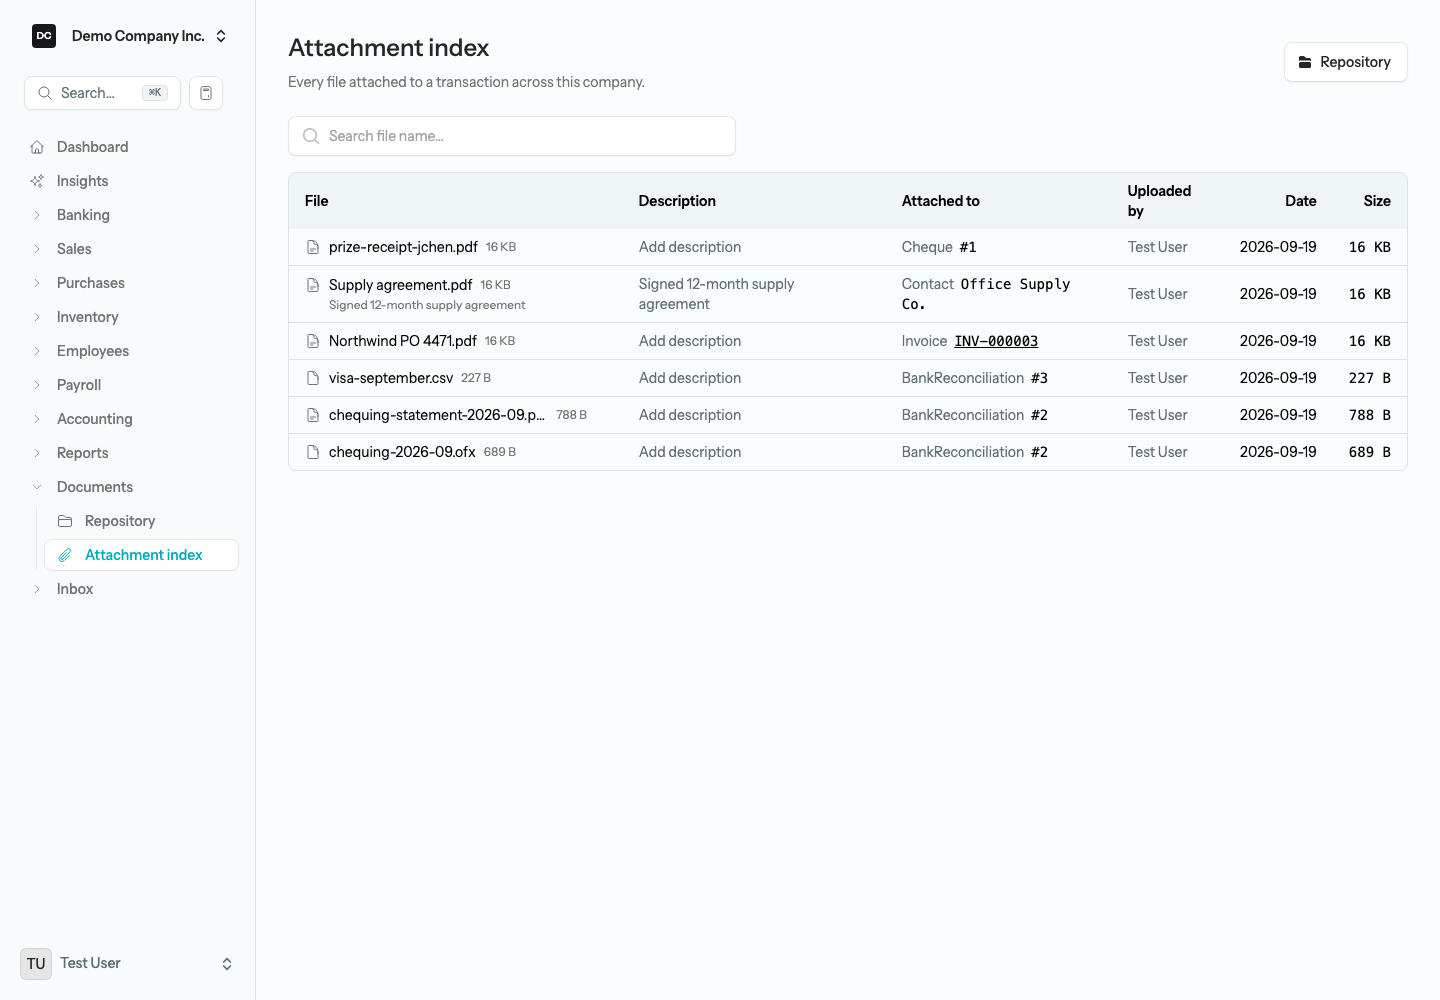
Note. The table shows the newest uploads first and 25 rows per page, with page links underneath. Each row also shows who uploaded the file, the date, and its size, and the file name opens or downloads the file exactly as it would from the record itself.
Rename a file or add a description
A short description makes a file easier to recognize later — useful when the original filename is something like “scan_2026-05-12_001.pdf”. It shows under the file name wherever the file is listed.
To edit a file’s name or description:
- From a folder, select the pencil icon next to the file. In the Edit document dialog, change the File name or add a Description (up to 500 characters), then select Save.
- From the Attachment index, select Add description (or the existing description text) in the Description column, type your note in the Edit description dialog, and select Save. Only the description can be changed here — the file keeps its name.
Attach files to transactions and records
Most records that back a number in your books carry an Attachments panel with the same dropzone you use in a folder. You will find it on the page of an invoice, credit memo, vendor credit, and fixed asset; on both the form and the page of a bill, a cheque, and an expense; on a bank reconciliation while you work it and on a completed one; and on customer and vendor records — the Attachments tab of the customer form, and the Attachments panel at the foot of a saved vendor’s form — for contracts, a void cheque, or a tax form that belongs to the contact rather than to one transaction.
To attach a file to a record:
- Open the record and find the Attachments panel — it is below the totals on a bill, cheque, or expense form, and at the bottom of an invoice or bill page.
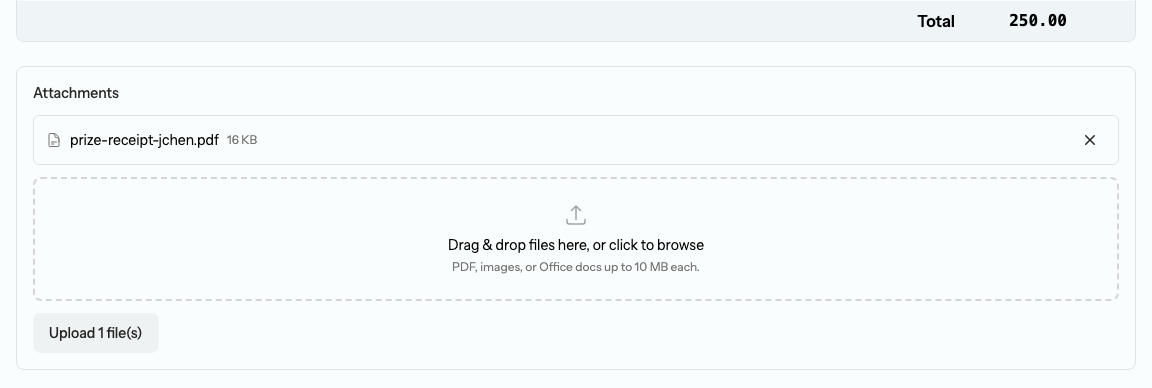
- Drag files onto the dropzone or click it to pick them. The panel notes the limit: PDF, images, or Office docs up to 10 MB each.
- On a saved record, select Upload 1 file(s) (the count follows what you staged). On a bill, cheque, expense, or customer you are still creating, the panel says “1 file(s) will be attached when you save” and the files go up with the record when you save or post it.
- Select the X next to a file to remove it; the app asks you to confirm.
Note — Attaching is not editing. One person edits a record at a time. If a teammate has a cheque, expense, or bill open for editing, its edit form shows you who is editing instead, and Owners and Admins can take over — but attaching or removing a file from the record’s own page still works, so you can file the receipt while they finish. See Settings → Edit locks for how a lock is held and released.
Attach the bank statement to a reconciliation
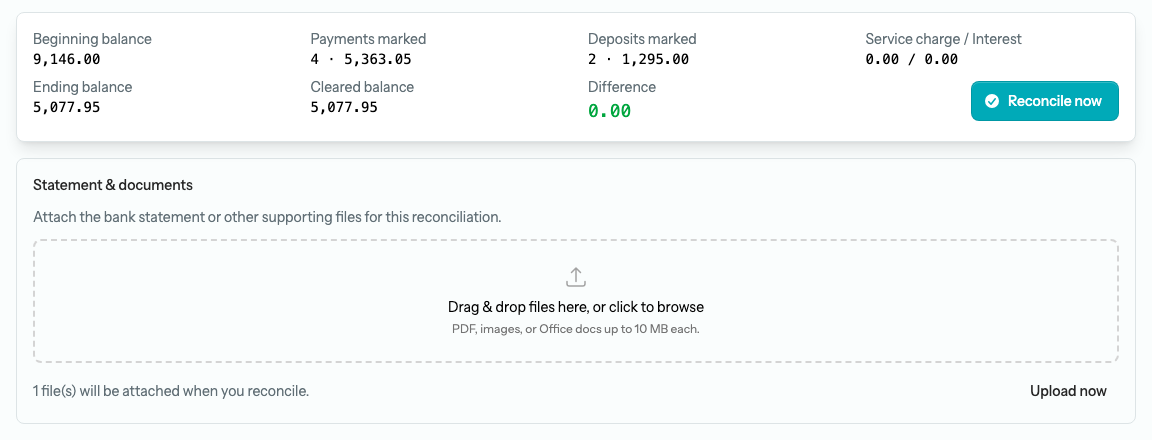
A reconciliation in progress has a Statement & documents panel under the Reconcile now button. Drop the monthly statement PDF there while you work. Files you stage are held until you finish: the panel says “1 file(s) will be attached when you reconcile”, and selecting Reconcile now uploads them the moment the reconciliation completes, so the statement and the closed period stay together in your audit trail. If you would rather not wait, select Upload now beside that message. A completed reconciliation keeps the same panel, so you can add a statement later, and a statement you drop onto the Begin reconciliation panel to auto-fill the ending balance is carried into the attachments too.
Related
- Inbox — email or drop a receipt to have it read and turned into a draft bill or expense, instead of just filing the raw image here.
- Banking — reconciling an account, including dropping a statement onto the Begin reconciliation panel to auto-fill the ending balance.
- Settings — the Company members section under Settings → Organizations is where you see who is an Owner or Admin (they can see every folder) and give a Custom member the Documents section before you share with them.
- Settings → Backup & export — folder contents and per-record attachments are included in your backup ZIP.