Settings cover two kinds of configuration. Personal settings change things only for you — your profile, security, appearance, sidebar, and legal agreements. Most of them follow you into every organization you belong to; the exceptions are your sidebar layout, which is kept separately for each organization, and the theme, which each browser remembers on its own. Per-organization settings — branding, features, invoice customization, backups, and so on — apply to everyone who works in that organization. Open Settings from the account menu at the bottom of the sidebar. The examples below use our sample business, Demo Company Inc.
The menu on the left of every Settings page lists your personal pages first — Profile, Security, Organizations, Combined reports, Appearance, Sidebar, and Legal — then a Company group for the organization you are working in (Invoices, Tax & filing, Payroll, Currencies, Inventory, and, for Owners, Backup & Export) and a Lists group. Combined reports, Tax & filing, Payroll, and the lists have their own pages: Reports, Tax returns, Payroll, and Lists.
Profile
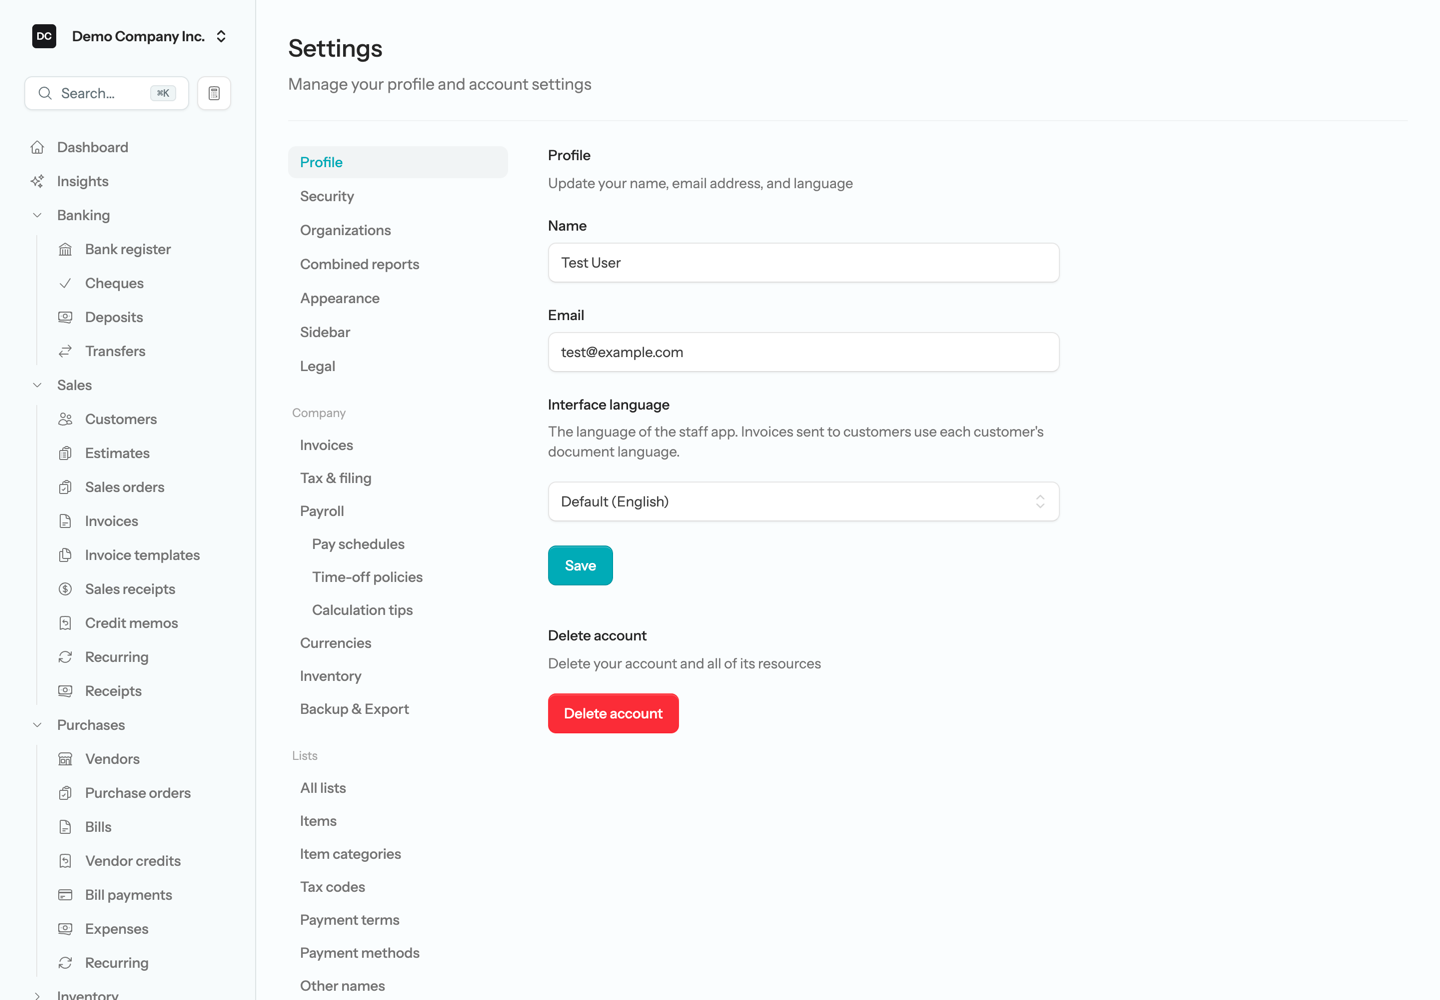
Your profile holds the Name and Email used to sign in and to deliver account notifications. It is account-level — the same no matter which organization you are working in. If you change your email, the page shows “Your email address is unverified” with a link to re-send the verification email until you confirm the new address.
To update your profile:
- Open Settings → Profile.
- Edit your Name or Email.
- Select Save.
Profile also holds your Interface language — English, Français, or Default, the server’s default language. It changes the app for you alone; what your customers receive follows the organization’s and each customer’s document language. See Languages.
Security
Settings → Security gathers everything about how you sign in: Update password, Two-factor authentication, Passkeys, and Browser sessions, followed by the API keys panel for the organization you are working in and the Authorized applications panel for your whole account (see API keys below). Two-factor authentication is TOTP-based — you pair an authenticator app and enter a rotating code at sign-in. Passkeys let you sign in without a password using your device’s fingerprint, face, or PIN.
Confirming it is you
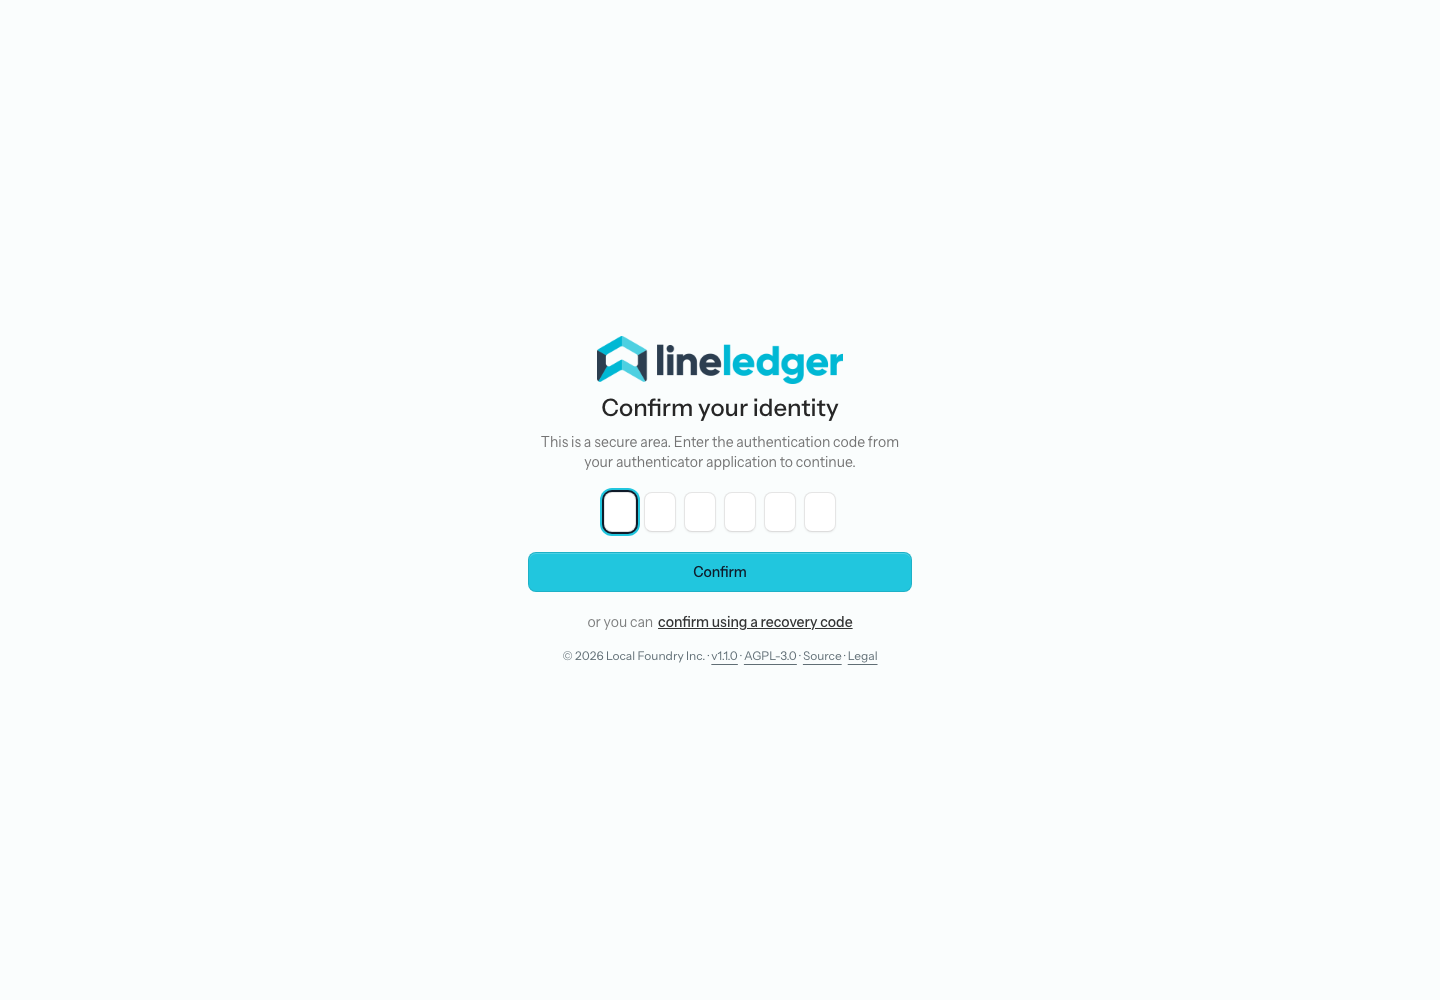
Opening Settings → Security or an organization’s edit page is a sensitive step, so the app first checks it is really you. If two-factor authentication is on, you land on a Confirm your identity screen and enter a fresh code from your authenticator app — or select “confirm using a recovery code” — and the confirmation lasts 15 minutes. A passkey does not satisfy this check, and neither does a device you asked the app to remember at sign-in. If you do not use two-factor, the app asks for your password instead.
Two-factor authentication
To turn on two-factor authentication:
- Open Settings → Security.
- Select Enable 2FA.
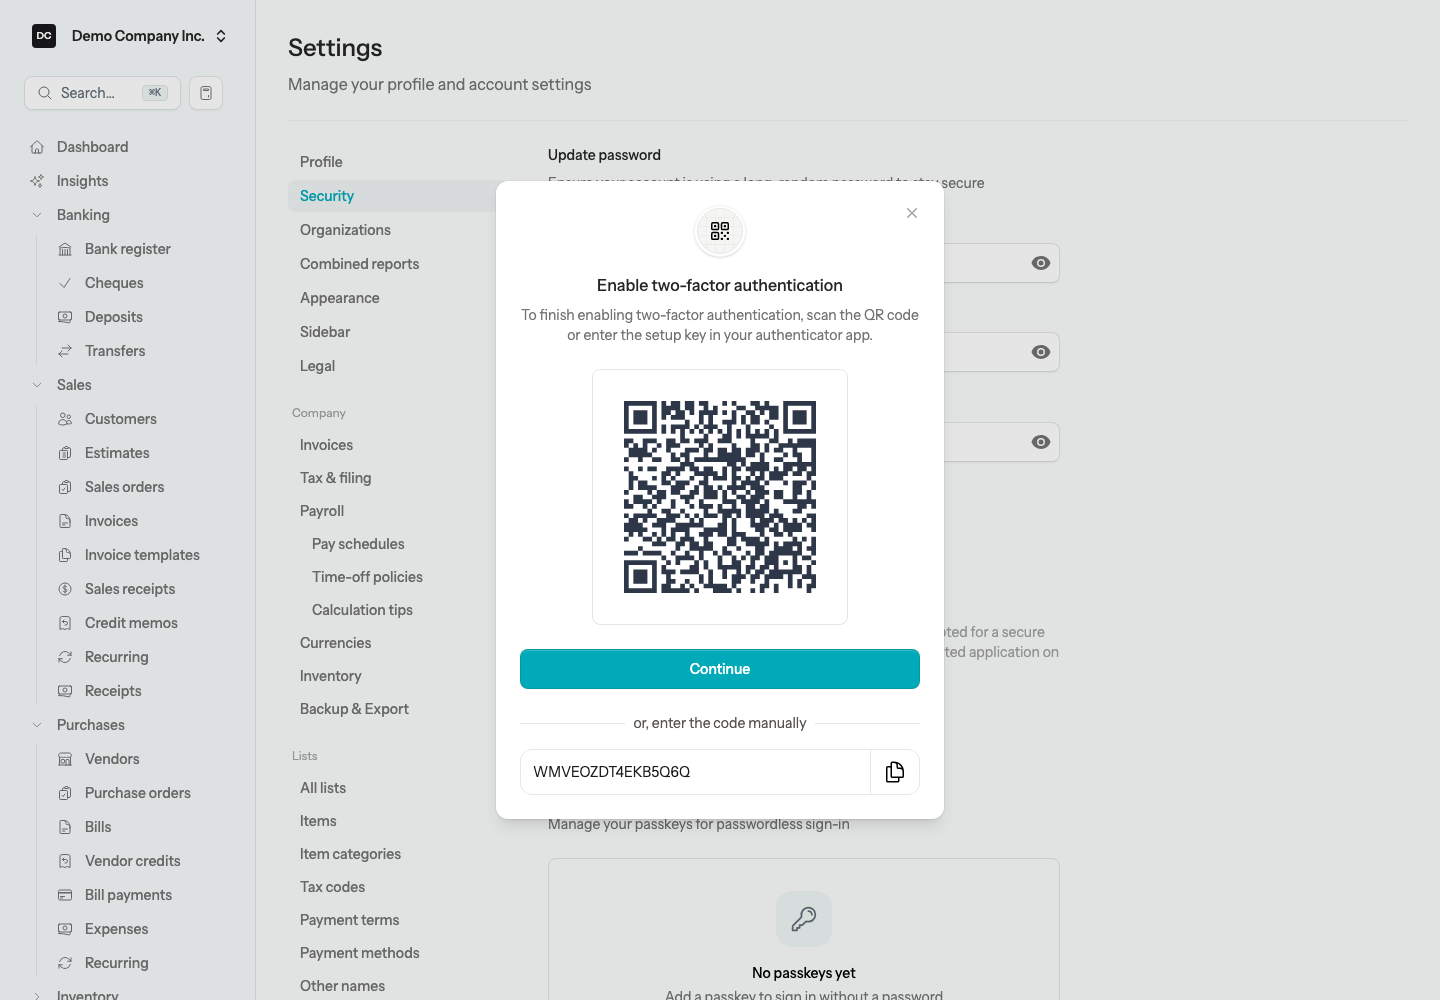
- Scan the QR code with your authenticator app — or, if you cannot scan, enter the setup key shown below the code manually.
- Enter the 6-digit confirmation code from the app to verify the pairing.
- Save the recovery codes somewhere safe — they are your only way back in if you lose your authenticator.
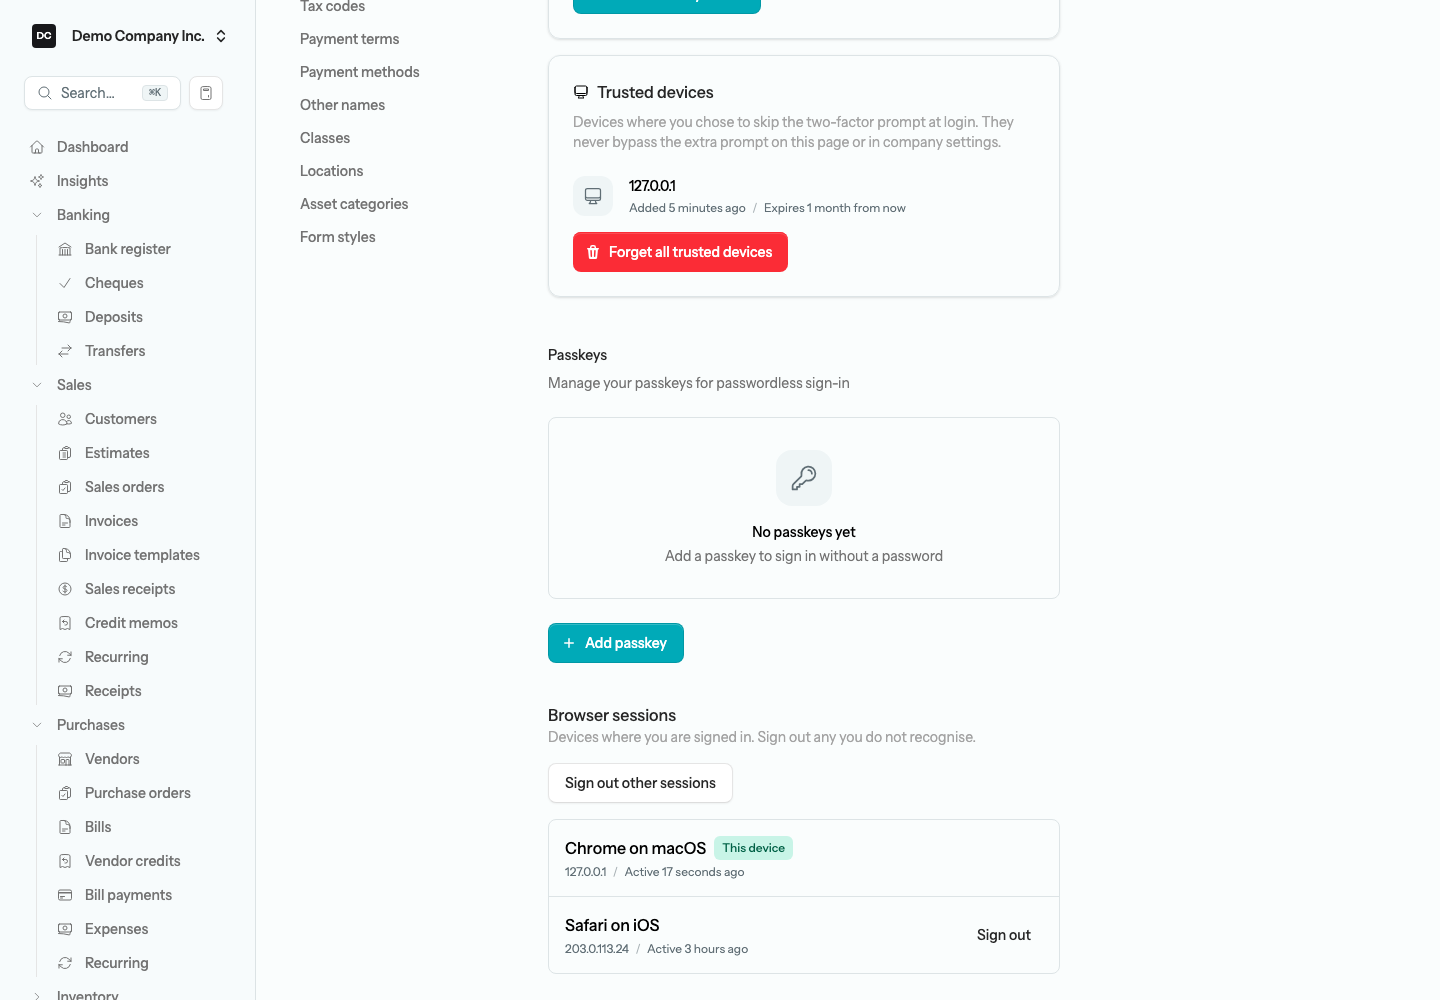
Once 2FA is on, the Security page lets you view, hide, or regenerate your recovery codes at any time, and Disable 2FA if you no longer want it. At sign-in, the two-factor step offers “Remember this device for 60 days”; devices you remember appear under Trusted devices with their IP address, when they were added or last used, and when the trust expires. They skip the two-factor prompt at login only — they never bypass the identity check above. Select Forget all trusted devices to make every device ask for a code at its next sign-in.
Heads up. Keep your recovery codes somewhere outside the app; without them and without your authenticator you can be locked out. Never remember a shared or public computer.
Passkeys, password, and browser sessions
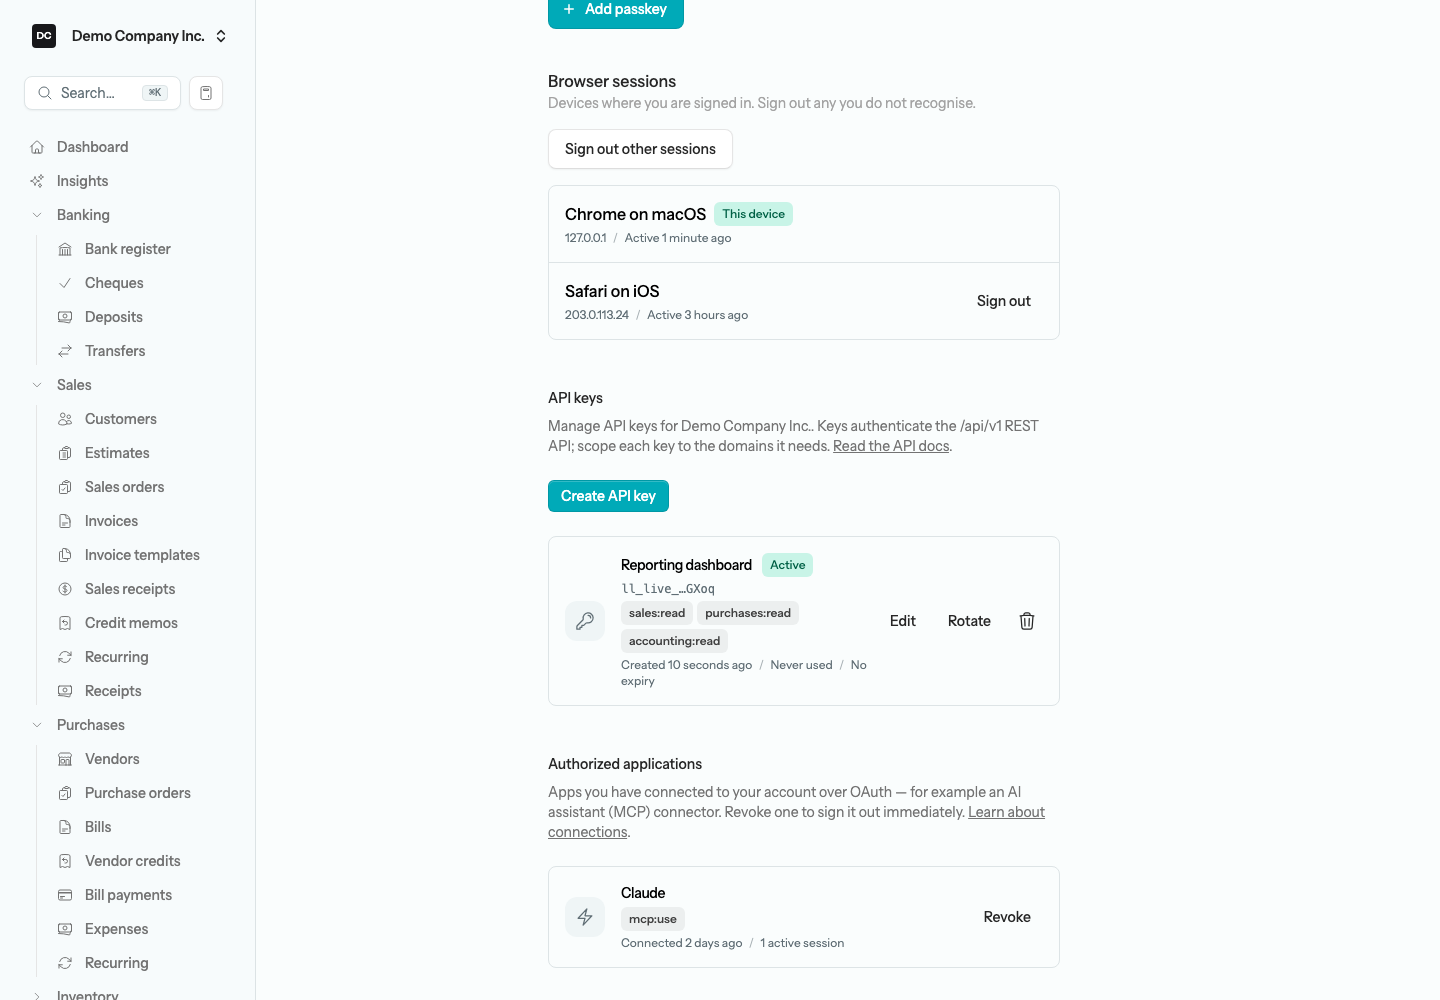
Under Passkeys, add a passkey to sign in with your device’s fingerprint, face, or PIN; each one lists its authenticator and when it was added and last used, and can be removed. Under Update password, enter your Current password, a New password, and Confirm password, then select Save. Browser sessions lists every device where you are signed in, with its IP address and when it was last active; the one you are using is badged This device. Select Sign out next to any session you do not recognise, or Sign out other sessions to end all of them at once — that one asks for your password.
Require two-factor for an organization
Owners and Admins can make two-factor authentication mandatory for an organization. On its edit page, turn on “Require two-factor authentication for owners & admins” and save. Every Owner and Admin is then prompted to set up 2FA before they can use that organization; lower-privilege roles such as Accountant and Custom members are unaffected.
Organizations
Settings → Organizations lists every organization you belong to, and a New organization button that asks for an Organization name, Country, province or state, Base currency, and Timezone. Each organization keeps its own books, contacts, and reports; organizations never share data. The button at the end of each row opens the edit page: Edit organization for Owners and Admins, View organization (read-only) for everyone else. See Creating a company for the full setup wizard and for restoring an organization from a backup.
The top of the edit page holds the details that print on documents and drive the books: Company name, Legal name (printed when “Show legal name” is on in invoice settings, and used on donation tax receipts), Address, City, province or state, Country (set at creation and cannot be changed), Telephone number, Website, Email address, Currency (your home currency — leave it as it was set when the organization was created; see Currencies below), Fiscal year start month, and Timezone — transaction dates default to today in this timezone, so a late-evening entry posts on the correct local day. The Save button at the bottom of the form saves this block along with the preferences, features, and branding described below.
The same block holds the Document language: the language of the organization’s invoices, invoice emails, and customer payment portal for every customer who has no language of their own (see Languages). A UK organization also has a Company number field for its Companies House number, which prints on invoices and other forms beneath the VAT number (see United Kingdom & VAT).
Switching organizations
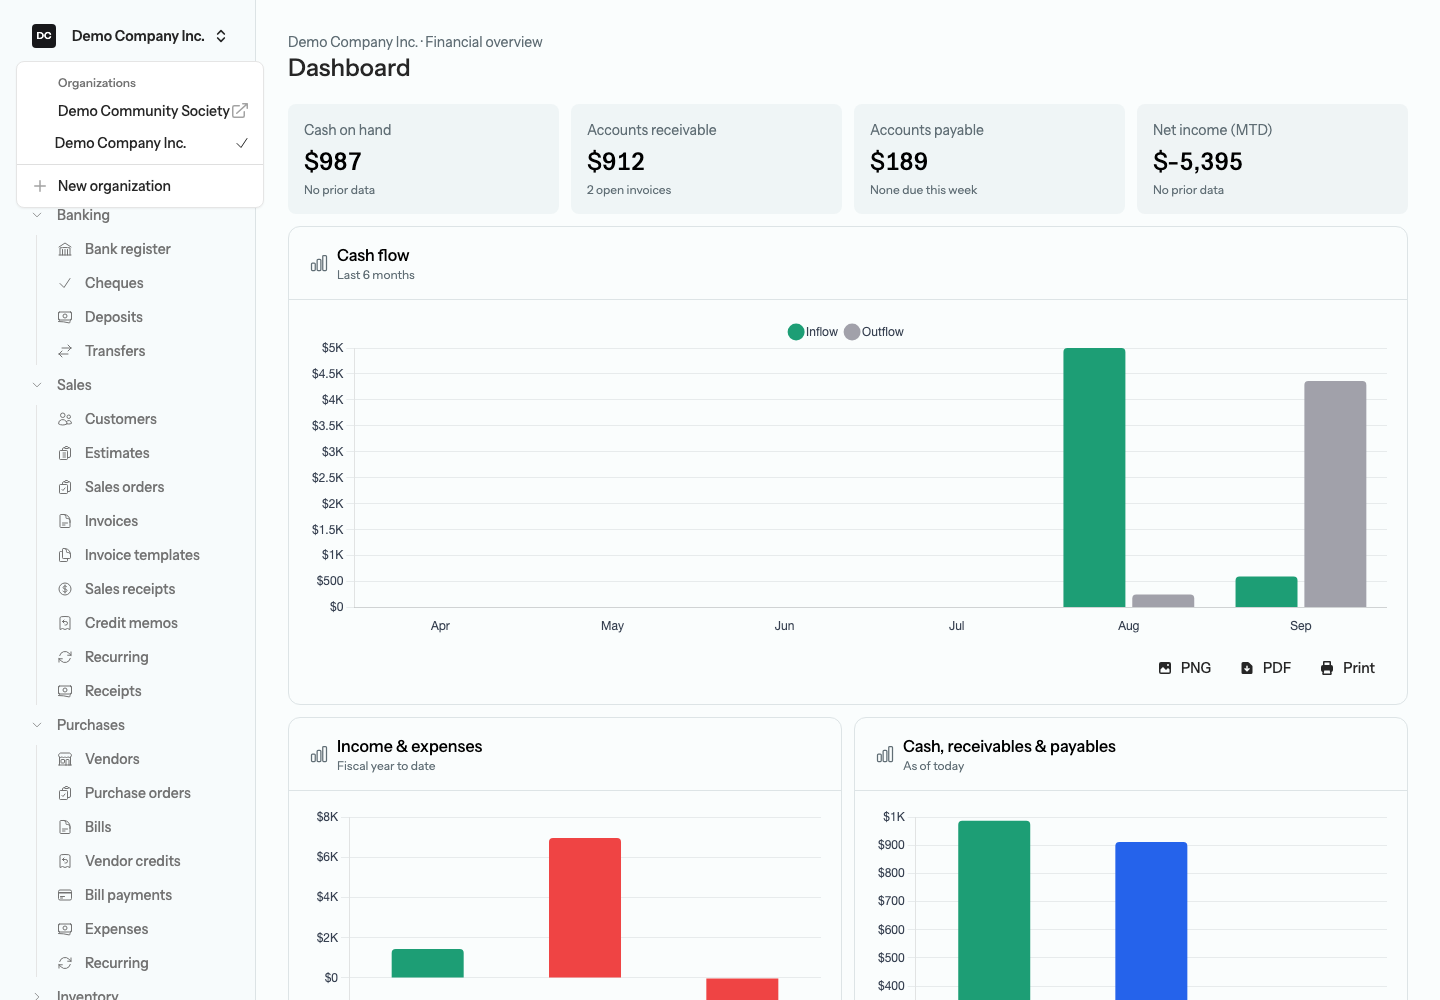
The organization switcher at the top of the sidebar lists your organizations under an Organizations heading, with a check mark on the current one. Choosing another opens it in a new browser tab — the tab you were in stays on the organization you were in — so you can keep two sets of books open side by side. The same menu ends with New organization.
Delete company
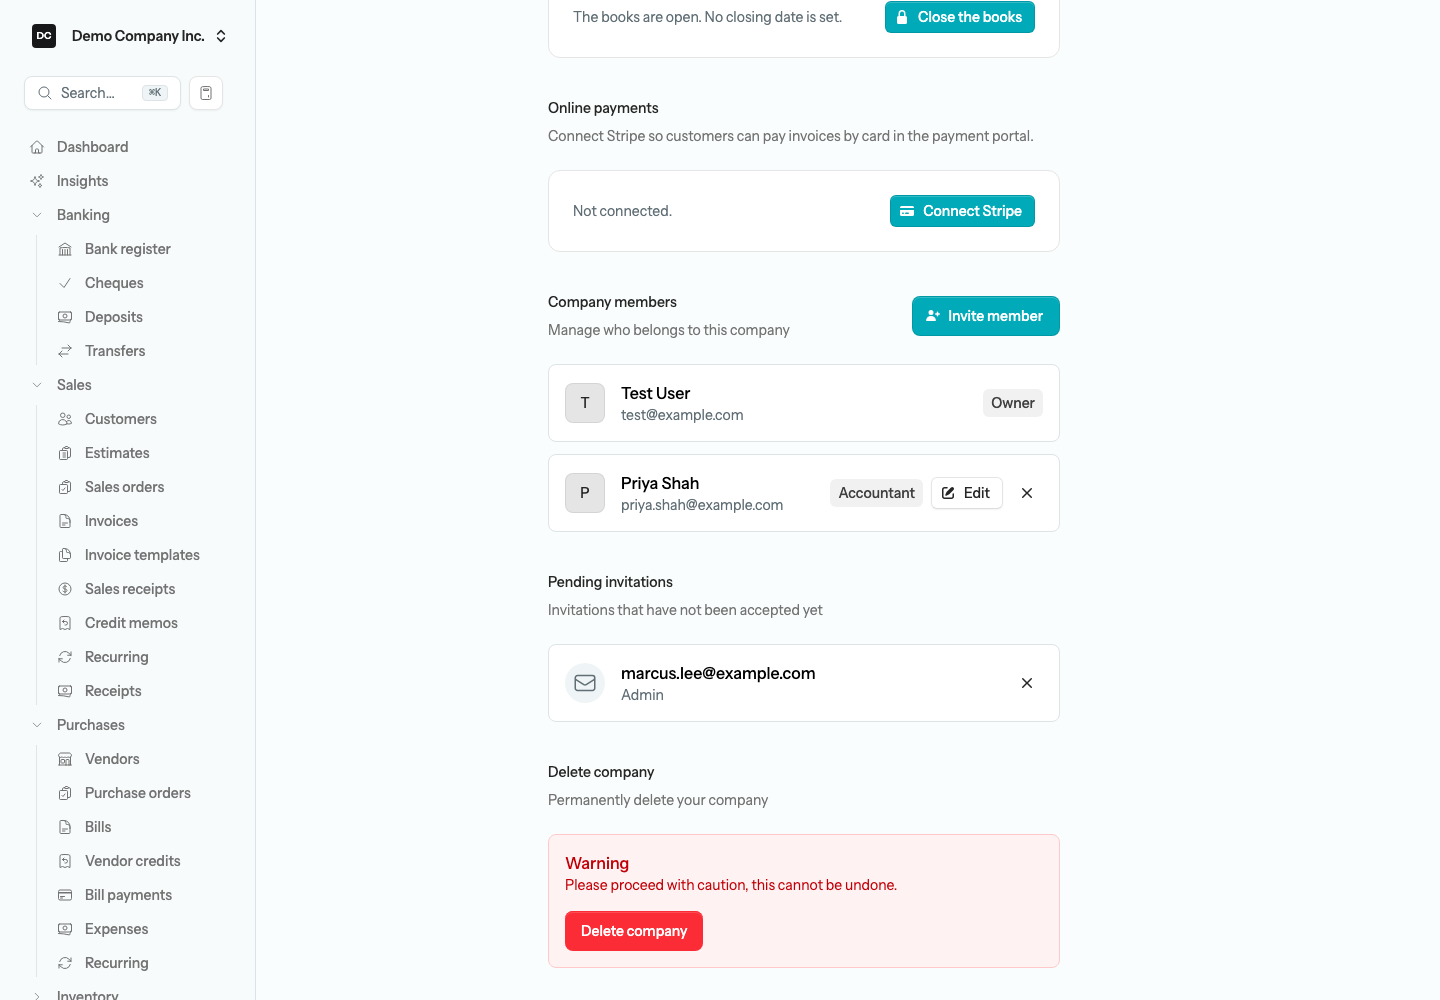
At the bottom of the edit page, Owners see a Delete company section. Select Delete company and type the organization’s name to confirm. It disappears for every member at once, but it is not erased on the spot — a site administrator can still restore it or purge it permanently (see Site administration). An organization badged Personal on the Organizations list cannot be deleted.
Team and permissions
Invite teammates to an organization and control what each can reach. Beyond the role, every member has section access: an Owner or Admin sees everything, an Accountant sees the books, and a Custom member is granted only the specific areas you choose — Customers, Vendors, Banking, Reports, and so on. People only see the sidebar sections they have access to, and the app blocks the rest even by direct link.
The roles:
- Owner — full access, including company settings and ownership.
- Admin — full access to every section, including settings.
- Accountant — access to every section except settings.
- Custom — access only to the sections you select.
The sections you can grant a Custom member are: Customers, Vendors, Employees, Payroll, Inventory, Accounting, Banking, Inbox, Fundraising, Reports, Lists, Documents, and Settings. Owners and Admins can invite people and cancel invitations; only the Owner can change a member’s role or remove a member, and the Owner’s own row has no Edit or remove control.
To invite a teammate:
- Open the organization’s edit page (Settings → Organizations → Edit organization).
- In the Company members section, select Invite member.
- Enter their Email address and choose a Role — Admin, Accountant, or Custom.
- For Custom, tick the Sections they should be able to reach.
- Select Send invitation.
To change a member’s role or remove them (Owner only):
- In the Company members section, select Edit next to the member, pick a new Role — and, for Custom, adjust the Sections they can reach — then select Save.
- To remove someone instead, select the remove (×) button next to the member and confirm.
Note. Lowering someone’s role or removing them takes effect immediately — their active sessions and API keys for the organization are revoked on the spot, so access never outlives the change. Pending invitations expire after 3 days; you can cancel one any time before it is accepted.
Edit locks (one editor at a time)
When several teammates work in the same organization, only one person can edit a record at a time — an invoice, bill, cheque, journal entry, customer, account, item, and so on. Whoever opens the record for editing first holds it until they save and leave, so nobody’s changes quietly overwrite someone else’s. There is nothing to switch on; it works for every member.
What your teammates see while you are editing:
- Anyone who opens the same edit page sees who is editing and when they were last active, instead of the form. They can view the record or try again, and the page offers Start editing as soon as you are done — it never takes the record on its own.
- On the record’s own page, a notice says who is editing, and actions that change the record — voiding, posting, deleting and the like — are refused until you are done.
- Edit dialogs on list pages — accounts, customers, vendors, employees, items, tax codes, bank rules and the other lists — behave the same way: opening a record someone else has open shows who is editing instead of the dialog, and making it inactive, merging or deleting it is refused.
- If a record changes after you opened it — a teammate took it over, or it was updated from somewhere else — your page says so and asks you to reload rather than saving over the newer version.
To take over a record someone else is editing (Owners and Admins only):
- Open the record, or its edit page or dialog.
- Select Take over editing and confirm.
- The editor opens for you. The other person’s page tells them you took over, and anything they had not saved can no longer be saved.
Note — When a lock is released. Saving and leaving the page releases the record straight away — pressing Escape to go back counts as leaving, too. If someone closes the tab, loses their connection or their computer goes to sleep, the lock expires on its own about 2 minutes after the page was closed. A page left open without any typing or clicking pauses editing after 15 minutes, so the record is free for others; select Continue editing to pick up where you left off, as long as nobody else opened or changed the record in the meantime.
The same rule applies outside the web app. Integrations using the API get a 423 response while a record is being edited and should retry a little later, and never see who is editing — see the API documentation. Employees updating their address or TD1 amounts in the employee portal are asked to try again in a few minutes while someone is editing their employee record, or to reload if it was opened or changed by someone else while their page was open.
Bookkeeping and dashboard preferences
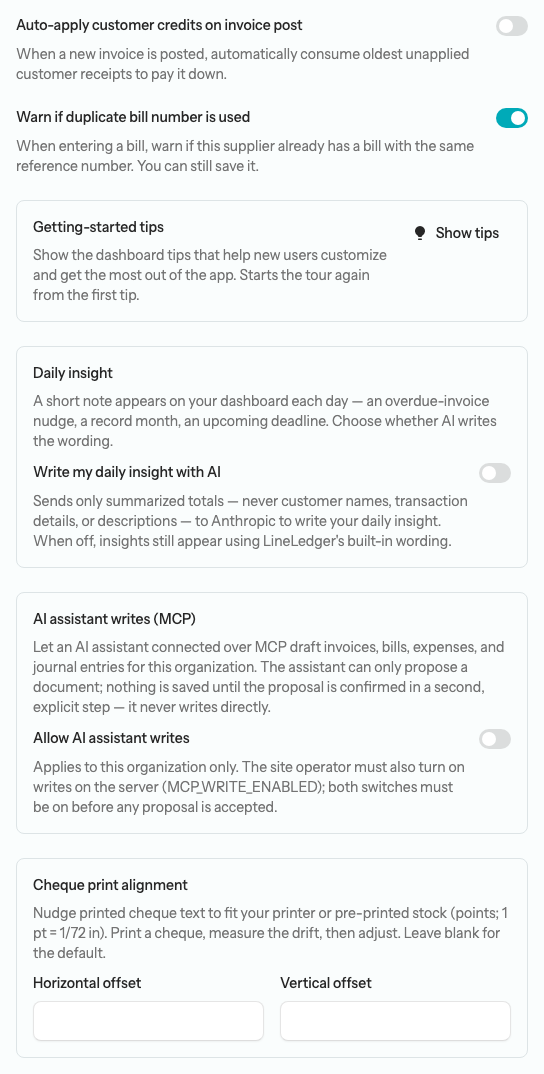
Between the address block and the Features list, the organization edit page carries a handful of preferences that shape day-to-day bookkeeping. Most save with the form’s Save button; Show tips and the two AI switches apply the moment you use them.
- Auto-apply customer credits on invoice post — when a new invoice is posted, the oldest unapplied customer receipts are used to pay it down automatically.
- Warn if duplicate bill number is used — when entering a bill, warns if this supplier already has a bill with the same reference number. You can still save it.
- Getting-started tips — Show tips restarts the dashboard tour from the first tip, for new users who dismissed it too soon.
- Daily insight — “Write my daily insight with AI” sends only summarized totals — never customer names, transaction details, or descriptions — to Anthropic to word the note on your dashboard. When off, insights still appear using LineLedger’s built-in wording. The block appears only when your operator has enabled the AI layer.
- Cheque print alignment — Horizontal offset and Vertical offset, in points (1 pt = 1/72 in), nudge printed cheque text onto your pre-printed stock. Print a cheque, measure the drift, then adjust; leave both blank for the default.
The AI assistant writes (MCP) block sits alongside these and is covered under AI assistant below. For what the daily insight shows and the per-person switch that hides it, see Insights; for printing cheques, see Banking.
Feature toggles
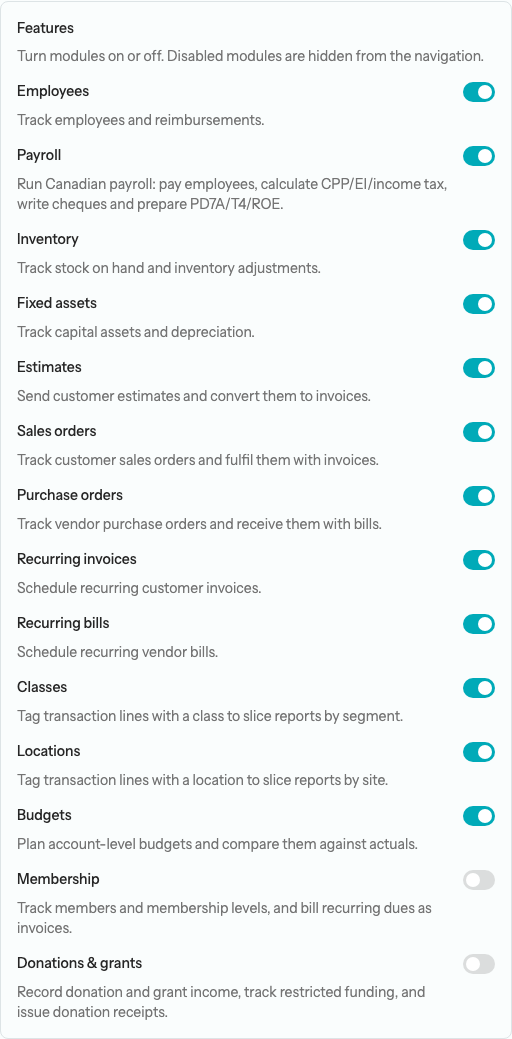
Not every organization needs every module. The Features section of the edit page switches modules on or off: Employees, Payroll, Inventory, Fixed assets, Estimates, Sales orders, Purchase orders, Recurring invoices, Recurring bills, Classes and Locations (the two reporting dimensions), Budgets, Membership, and — when the Fundraising section is available to your organization — Donations & grants. Turning a feature off simply hides its sidebar entries and forms; it never deletes data, so you can turn it back on later and find everything intact. Fund accounting is not here: it lives in the Non-profit & charity block described below.
To turn a feature on or off:
- Open Settings → Organizations and select Edit organization to open the edit page.
- Scroll to the Features section.
- Flip the switch for the module you want to show or hide.
- Select Save.
Period lock (closing the books)
Owners and Admins can set a closing date that freezes every transaction on or before it, so a finished period cannot be changed by accident. The control lives in the Close the books section of the edit page: select Close the books (or Change lock date once one is set), pick a Lock date — a click anywhere in the field opens the calendar, and leaving it blank removes the lock — enter Your account password, and select Confirm. Every change is recorded in the audit log. See Accounting → Period locking for exactly what it protects.
A period lock is not the same as an edit lock: the period lock freezes every transaction dated on or before the closing date for everyone until an Owner or Admin moves the date, while an edit lock only stops two people changing the same record at the same moment and clears itself when the editor is done.
Country, organization type and jurisdiction
You choose a Country — Canada, the United States, or the United Kingdom — when you create an organization. The choice shapes a lot: the starting chart of accounts, the seeded tax codes and tax agency, the default payment methods, the currency, and even the wording the app uses (Cheque vs. Check, GST/HST vs. Sales Tax vs. VAT, Province vs. State vs. Nation, Postal Code vs. ZIP Code vs. Postcode). Because changing it would invalidate posted history, the country is permanent once the organization is created.
Organization type — how your organization is legally structured — is set on the edit page and determines which CRA returns apply and how equity is presented. It too can be set only once: pick it from the Organization type list and save, and from then on the block shows the type with a note that it cannot be changed. Choosing a non-profit type reveals a Non-profit & charity block with a Legal structure (Unincorporated association, Non-profit corporation, or Registered charity), a CRA charity registration number when the structure requires one — your Business Number with RR program account, needed to issue official donation receipts and file the T3010 — and a Contribution accounting method. The Restricted fund method adds a Fund accounting switch, which tags transaction lines with a fund and seeds a default General Fund when turned on. Changing the contribution method only affects how new restricted contributions are recorded and how statements present — it never reclassifies existing entries. Demo Community Society is set up this way; see Fundraising.
Canadian organizations with Payroll turned on also see a Quebec payroll block — QHSF rate (%), CNESST rate (%), and the WSDRF levy switch — for employer levies remitted to Revenu Québec; leave the rates at 0 if you have no Quebec employees.
Branding
The edit page carries two branding controls. The Sidebar branding section sets the badge shown above the organization switcher: a Display name (leave it blank to use the Company name), Initials with your own Text color and Background color, or a Logo (PNG, JPG, or SVG up to 2 MB) that replaces the initials.
The Document logo section is a separate Logo image for your printed and PDF documents — invoices, estimates, and the rest — where it prints in place of the organization name. Logo height on documents (px) controls how large it appears (48–80 px is recommended), and if you leave the image blank the sidebar logo is used instead.
Inventory defaults
Settings → Inventory holds the organization-wide inventory defaults: the costing method (weighted average or FIFO) and the default inventory-asset and cost-of-goods-sold accounts that new tracked items inherit. The costing method locks as soon as any item records its first stock movement, so set it before you begin trading. See Inventory for per-item tracking.
Invoice customization
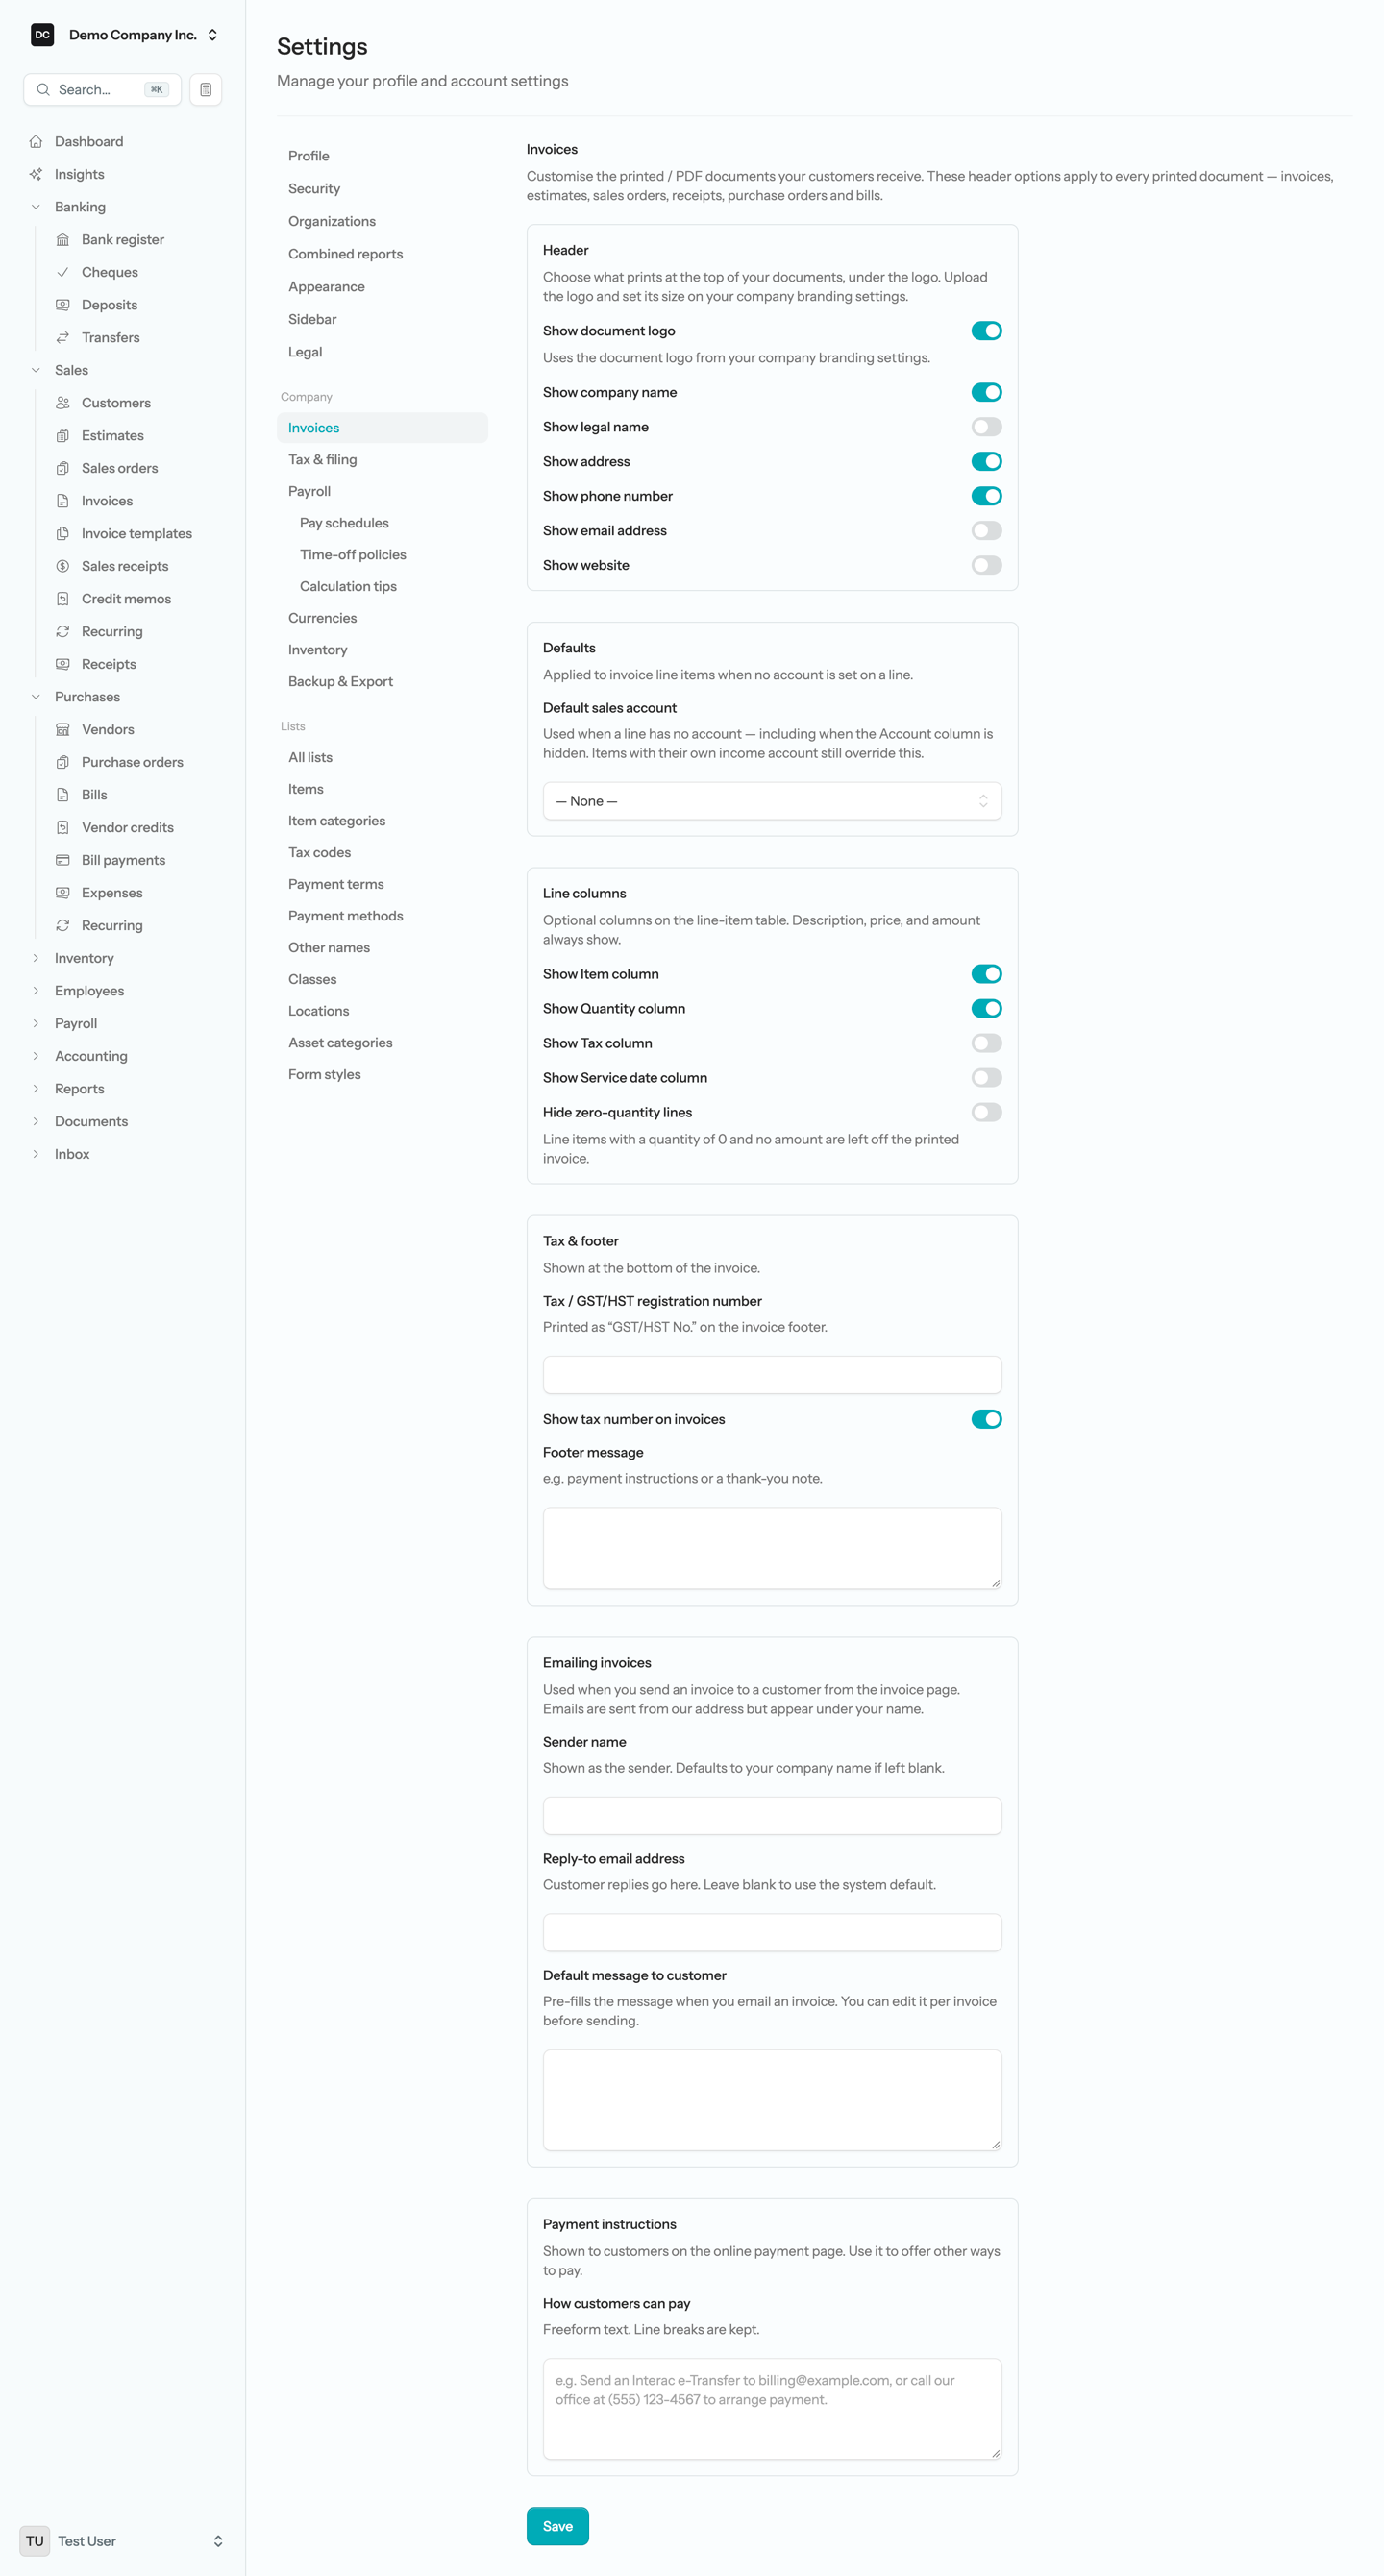
Settings → Invoices controls how your printed and PDF documents look and how invoices are emailed. The Header options here apply to every printed document Demo Company Inc. sends — invoices, estimates, sales orders, receipts, purchase orders, and bills — while the rest of the page is invoice-specific: a default sales account, which optional line columns appear, a tax registration number and footer message, the email sender and message, and the payment instructions shown on the online payment page.
To customize your invoices:
- Open Settings → Invoices.
- Under Header, choose whether to show your logo, company name, legal name, address, phone, email, and website.
- Under Defaults, set a default sales account — lines with no account (including when the Account column is hidden) fall back to it automatically.
- Under Line columns, toggle the optional columns (Item, Quantity, Tax, Service date). Description, price, and amount always show. Turn on “Hide zero-quantity lines” to leave line items with a quantity of 0 and no amount off the printed invoice.
- Under Tax & footer, enter your tax registration number and a footer message if you want them on the PDF.
- Under Emailing invoices, set the sender name, reply-to address, and default message.
- Under Payment instructions, add other ways customers can pay — for example an Interac e-Transfer address — to show on the online payment page.
- Select Save.
Optional invoice fields and columns
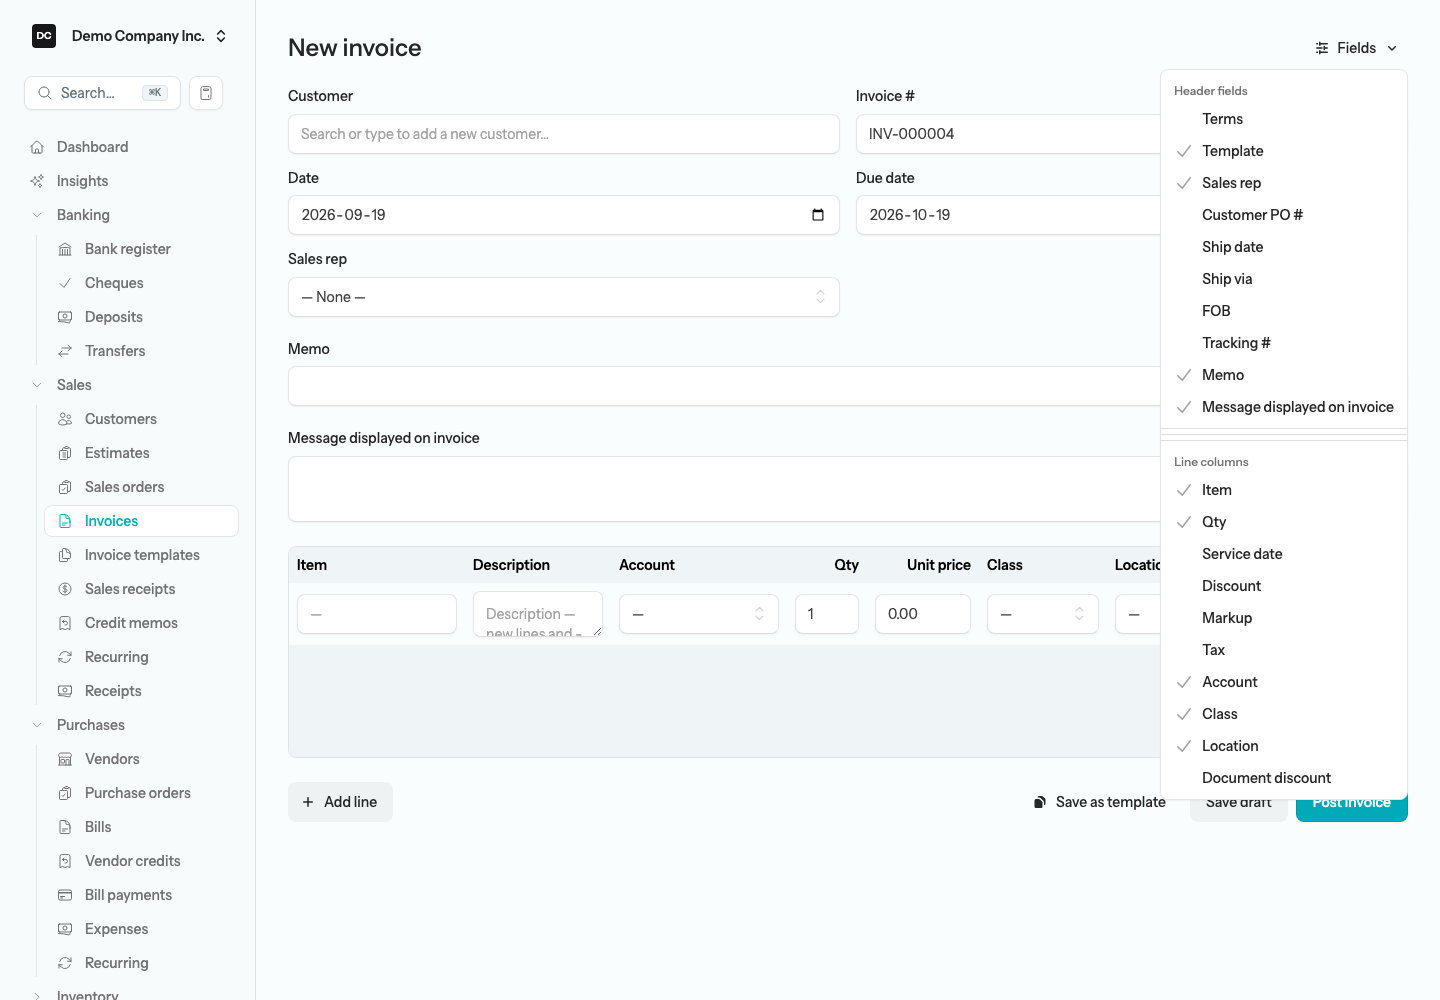
Beyond the few line columns on Settings → Invoices, the invoice and credit-memo forms carry a longer list of optional header fields and line columns — Terms, Sales rep, Customer PO #, Ship date, Ship via, FOB, Tracking #, Memo, the customer message, plus line columns like Discount, Markup, Tax, and Account. You turn these on or off from the Fields menu at the top-right of the invoice or credit-memo form, not from Settings. Your choice is saved for the whole organization, so the next form anyone opens uses the same layout. See Customers for what each field does on the invoice itself.
To change which fields and columns appear on invoices and credit memos:
- Open a new or existing invoice (Sales → Invoices → New invoice).
- Select the Fields menu in the top-right of the form.
- Tick or untick the header fields and line columns you want — for example Customer PO #, Ship date, or the Discount column.
- The form updates immediately, and the layout is saved for every invoice and credit memo Demo Company Inc. creates afterward.
Tip. Hiding a column never deletes existing data. If a past invoice used Customer PO and you later switch the field off, the value stays on that invoice and reappears the moment you turn the field back on.
Inbox email (forward receipts and bills)
The Inbox email settings page lets your team forward receipts and bills straight into LineLedger by email. Anything sent to the organization’s forwarding address is staged as a document in the Inbox review queue, where you turn it into a draft bill or expense. It is a quick way to capture a supplier invoice the moment it lands in someone’s mailbox, without logging in to upload it. See Inbox for the review queue itself.
The page is not listed in the Settings menu. Go to /settings/inbox-email directly, or select Open inbox settings in the Auto-fill is off notice on an Inbox review screen — that link appears only while Read receipts automatically is off for your organization. Only Owners and Admins can open the page, and it applies to the organization you are working in.
To turn on inbound email:
- Go to /settings/inbox-email while you are working in the organization.
- Switch on “Accept documents by email.”
- Select Save. Saving creates the organization’s forwarding address, in the form inbox+yourtoken@your-inbound-domain, and the Forwarding address field appears.
- Copy the Forwarding address and share it with your team — or add it as a contact so a supplier invoice can be forwarded in one tap.
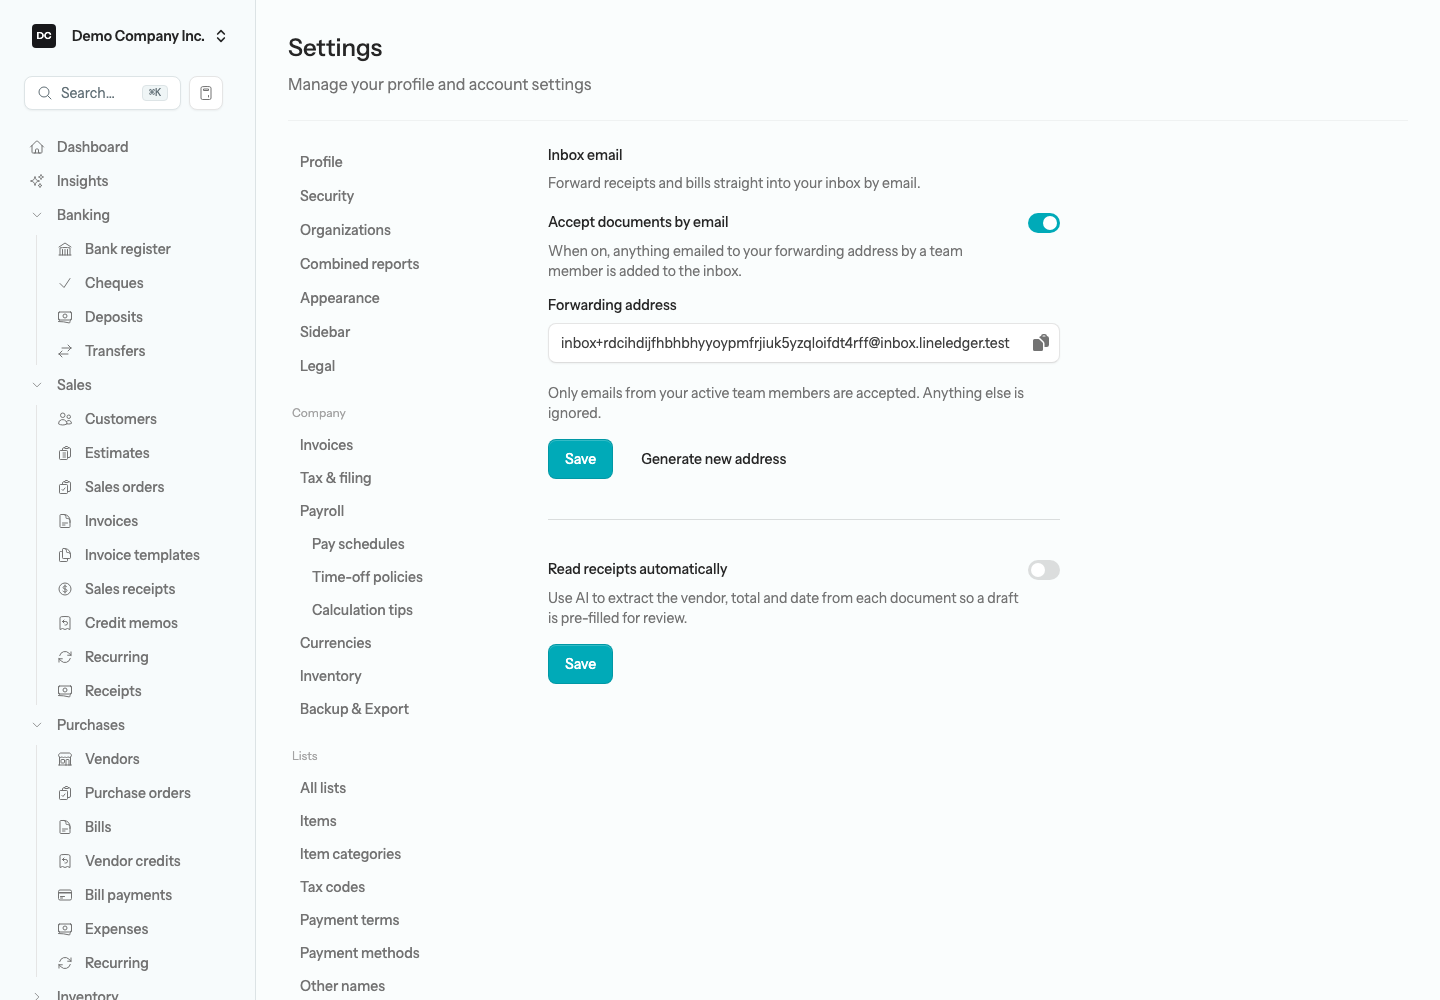
Note — Who can send in. Only emails from your organization’s active team members are accepted at the forwarding address — anything from an unknown sender is ignored, so the address is safe to share inside the team. If it is ever exposed, select “Generate new address” to rotate the token: the old address stops working immediately and a fresh one takes its place.
Just below, “Read receipts automatically” turns on optional AI reading of each forwarded or uploaded document: LineLedger extracts the vendor, total, and date so the draft bill is pre-filled and you only have to review it. This is off by default and opt-in — until you switch it on, documents go straight to manual review and nothing is ever sent to an AI service. Switch it on and select Save to enable it.
Heads up. The forwarding address only appears once your operator has configured an inbound mail domain on the server. Until then, switching on Accept documents by email shows a “not configured” notice instead of an address. Automatic reading also depends on the operator enabling the AI layer, so both you and the operator must opt in before any document is read. See Self-hosting.
Currencies
Settings → Currencies is where you enable the foreign currencies you trade in, manage exchange rates, and run period-end revaluations. The Home currency block at the top shows the currency your books are kept in — the Base currency chosen when the organization was created — with the note that it is fixed and cannot be changed. Every amount already in your ledger is recorded in that currency. The organization edit page still shows it in an editable Currency field, but editing it there converts nothing: your posted amounts would simply carry the wrong currency label, so leave it as it is. See Multi-currency for how foreign transactions are recorded.
Backup & export
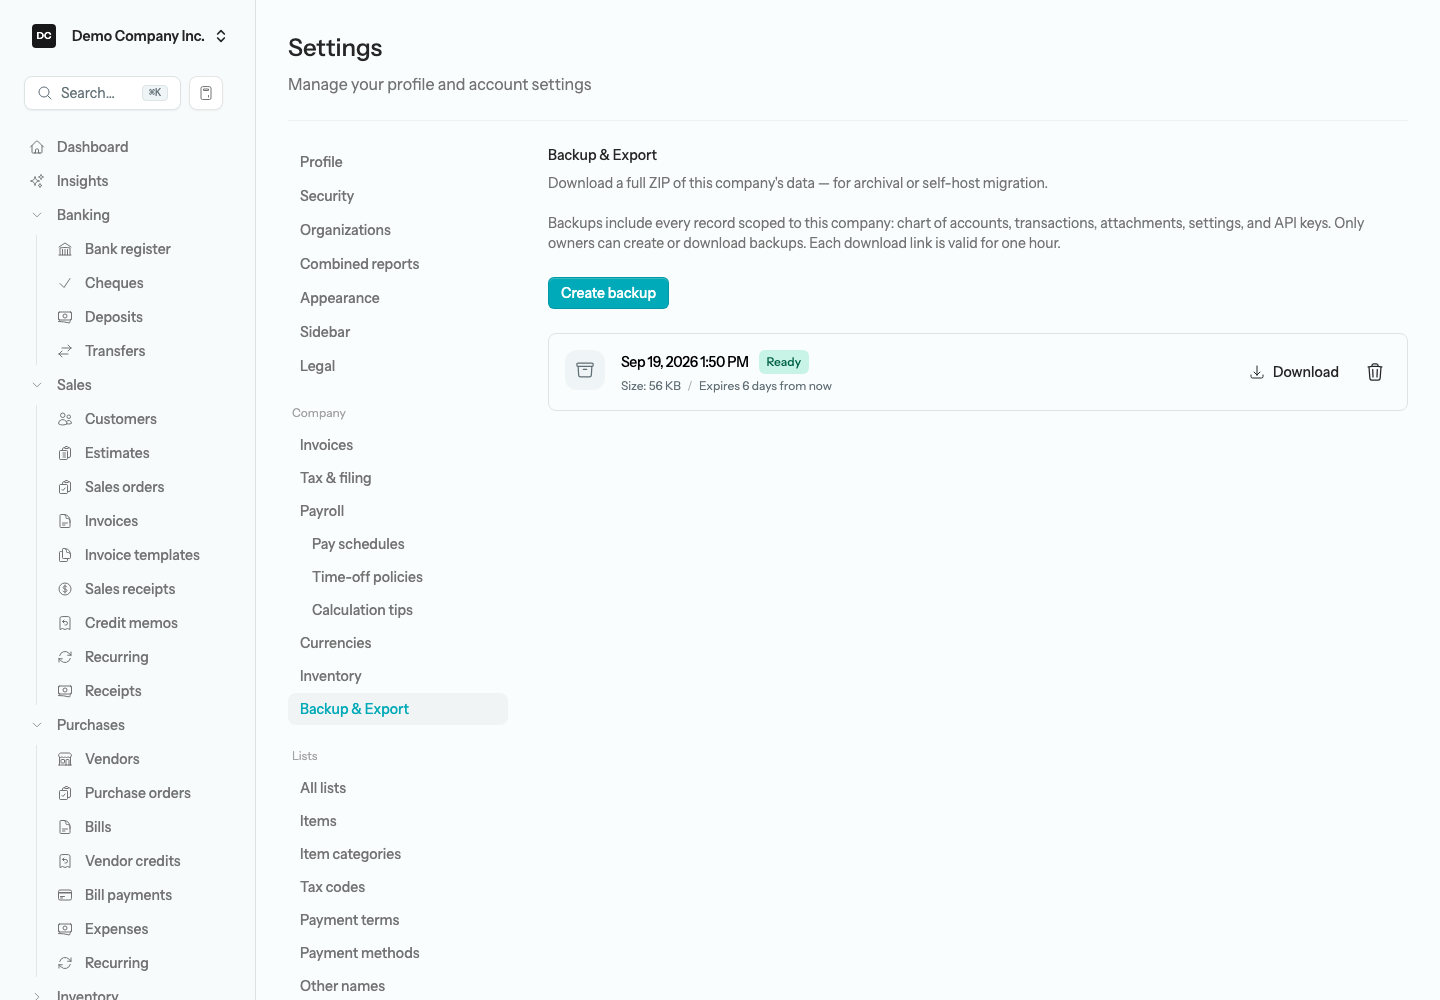
Owners can create a full backup of an organization from Settings → Backup & Export. The backup is built as a queued job, so it is not instant — the page refreshes itself every few seconds while one is in progress. Each backup holds every record scoped to the organization: chart of accounts, transactions, attachments, settings, and API keys — so treat the ZIP as sensitive. The page lists the organization’s 10 most recent backups.
A backup is kept for 7 days after it is built; the row shows when it expires. After that the Download button disappears, and a daily clean-up deletes the ZIP and marks the backup Expired — the row stays as a record that the backup was made. Download it well before then if you want to keep it. The Download link itself is created fresh each time the page loads and works for one hour; if you left the page open longer, reload it to get a new link.
To create a backup:
- Open Settings → Backup & Export.
- Select Create backup. The job is queued and the backup shows as Pending, then Running.
- Wait a moment — the status changes to Ready when the ZIP is built. A backup that could not be built shows Failed with the reason.
- Select Download to save the ZIP to your computer. Use the trash icon to delete a backup you no longer need; the ZIP is removed and its link stops working at once.
Restoring a backup
A restore never overwrites an existing organization. It always creates a brand-new organization from the ZIP, and whoever uploads it becomes that organization’s Owner; the organization the backup came from is left exactly as it is. Team members are matched by email address where they already have an account on the server, and anything recorded by someone who is not matched is attributed to you.
To restore a backup into a new organization:
- Select Restore from backup on the organization picker, or choose Restore from a backup in the new-organization wizard.
- Drop the backup ZIP onto the upload area, or click to choose it (up to 100 MB), then select Inspect bundle.
- Under Bundle ready to restore, check the Source company, the Records to restore, and the User attribution summary.
- Select Confirm and restore. The page updates as it works and takes you to the new organization’s dashboard when it is done.
See Creating a company for the new-organization wizard.
Note — Organization backups are not server backups. A backup from this page covers one organization and can only be restored as a new organization. It does not protect the server itself — the database with every organization and user, the storage volume, and the .env configuration. If you run your own LineLedger server, set up instance backups as well; see Self-hosting → Organization backups versus instance backups.
Online payments (Stripe)
Owners can connect a Stripe account so customers pay invoices by card through the customer portal. The Online payments section of the edit page shows Not connected with a Connect Stripe button, or Stripe connected with the account id and a Disconnect button; once connected, the accounts and payment method Stripe needs are created for you. If Stripe reports a problem, the section says the connection needs attention, card payments pause, and a Reconnect Stripe button appears. See Customer portal for how payments flow into your books.
Customizing your sidebar
Under Settings → Sidebar you can tailor the sidebar to the work you actually do. Each group — Sales (called Revenues for a non-profit organization), Purchases, Banking, Accounting, Reports, and so on — and every individual link inside it has its own switch. Turning off a whole section hides it and all its links, even if individual links are still on. A Reset to defaults button brings everything back. Links that only some members can reach, such as the Owner-only Opening balances entry under Accounting, are listed only for those members.
Your choices are saved per person and per organization: they only change what you see, never what your teammates see, and you can keep different layouts in different organizations. In the sidebar itself you can collapse or expand each group as you work, and the Reports group keeps a Favorites quick-list of the reports you star.
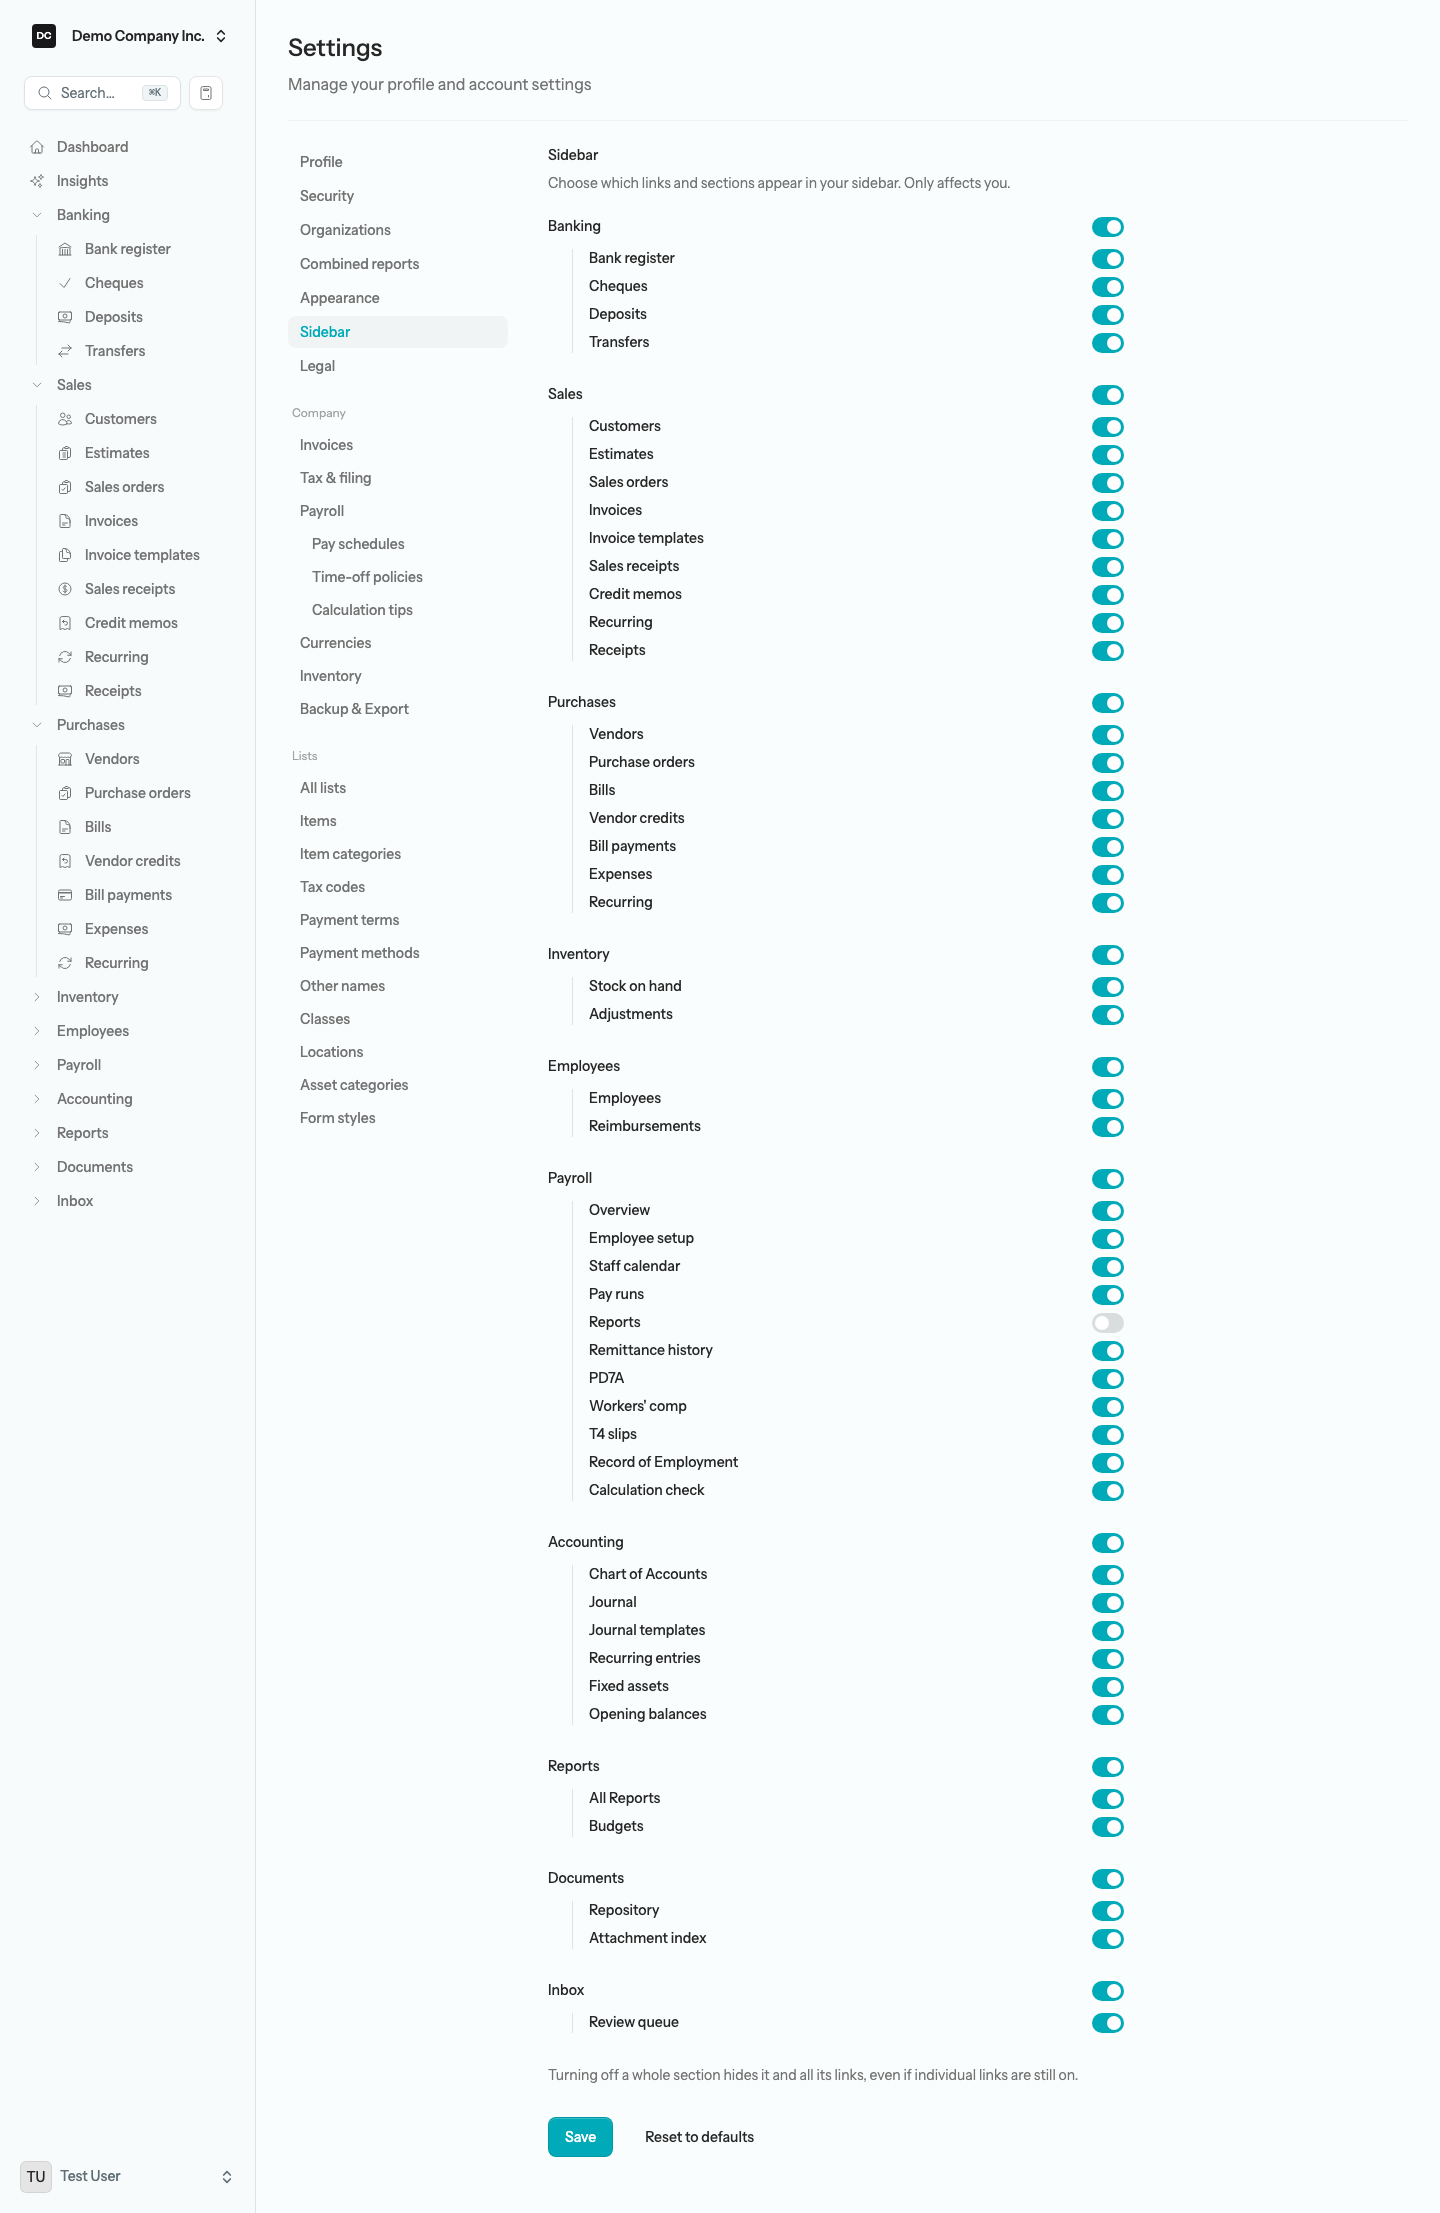
To customize your sidebar:
- Open Settings → Sidebar.
- Switch off any groups or links you do not want to see; switch on anything you want back.
- Select Save. To start over, select Reset to defaults.
Appearance
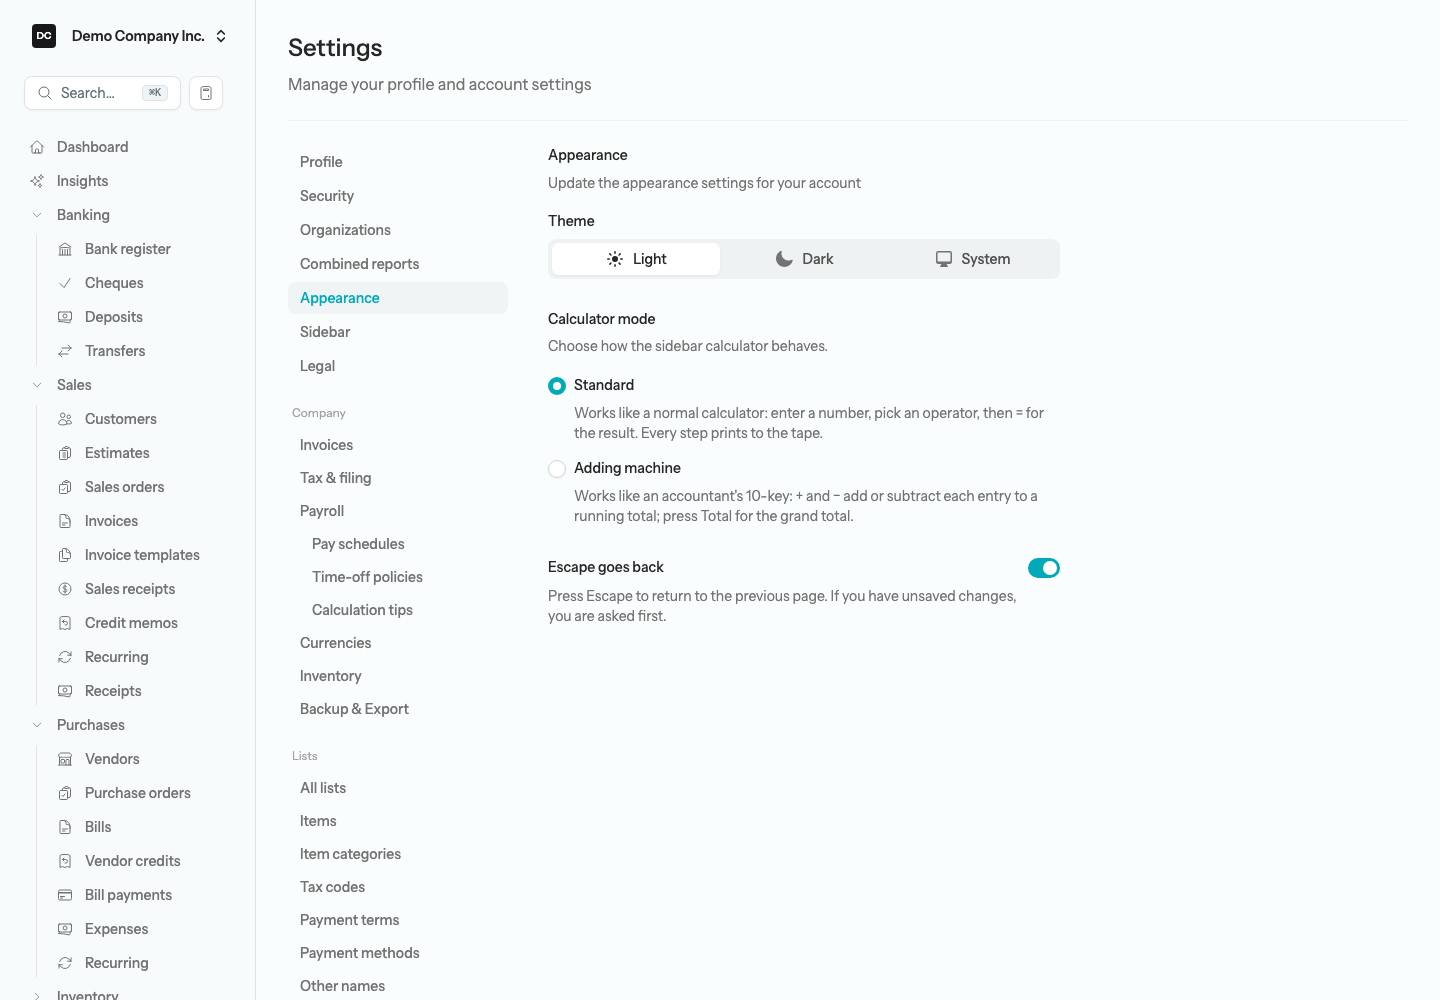
Settings → Appearance holds three personal preferences. Calculator mode and Escape goes back are saved on your account, so they follow you into every organization and onto every device you sign in from. The theme is different: it is remembered by the browser you pick it in, so a new browser or another computer starts on Light until you choose again there.
- Theme — Light, Dark, or System (System follows your device’s light or dark setting). The app uses the Tidewater design system, a teal-accented palette tuned for both modes so amounts, totals, and warnings stay readable in either.
- Calculator mode — how the sidebar calculator behaves. Standard works like a normal calculator: enter a number, pick an operator, then = for the result, with every step printed to the tape. Adding machine works like an accountant’s 10-key: + and − add or subtract each entry to a running total, and Total gives the grand total. This setting is separate from the calculator built into every dollar cell, where you can type an expression such as 100*1.13 with + − × ÷ and the cell commits the result.
- Escape goes back — on by default. Pressing Escape on any page does what the browser’s Back button does. If something is open — a dialog, a dropdown, a date picker, a search box with text in it — Escape closes that first and the page stays put. If you have unsaved changes in a form, you are asked “Leave this page?” before it goes anywhere, and with no page behind the current one Escape does nothing. Switch it off if you prefer Escape to leave the page alone.
Legal
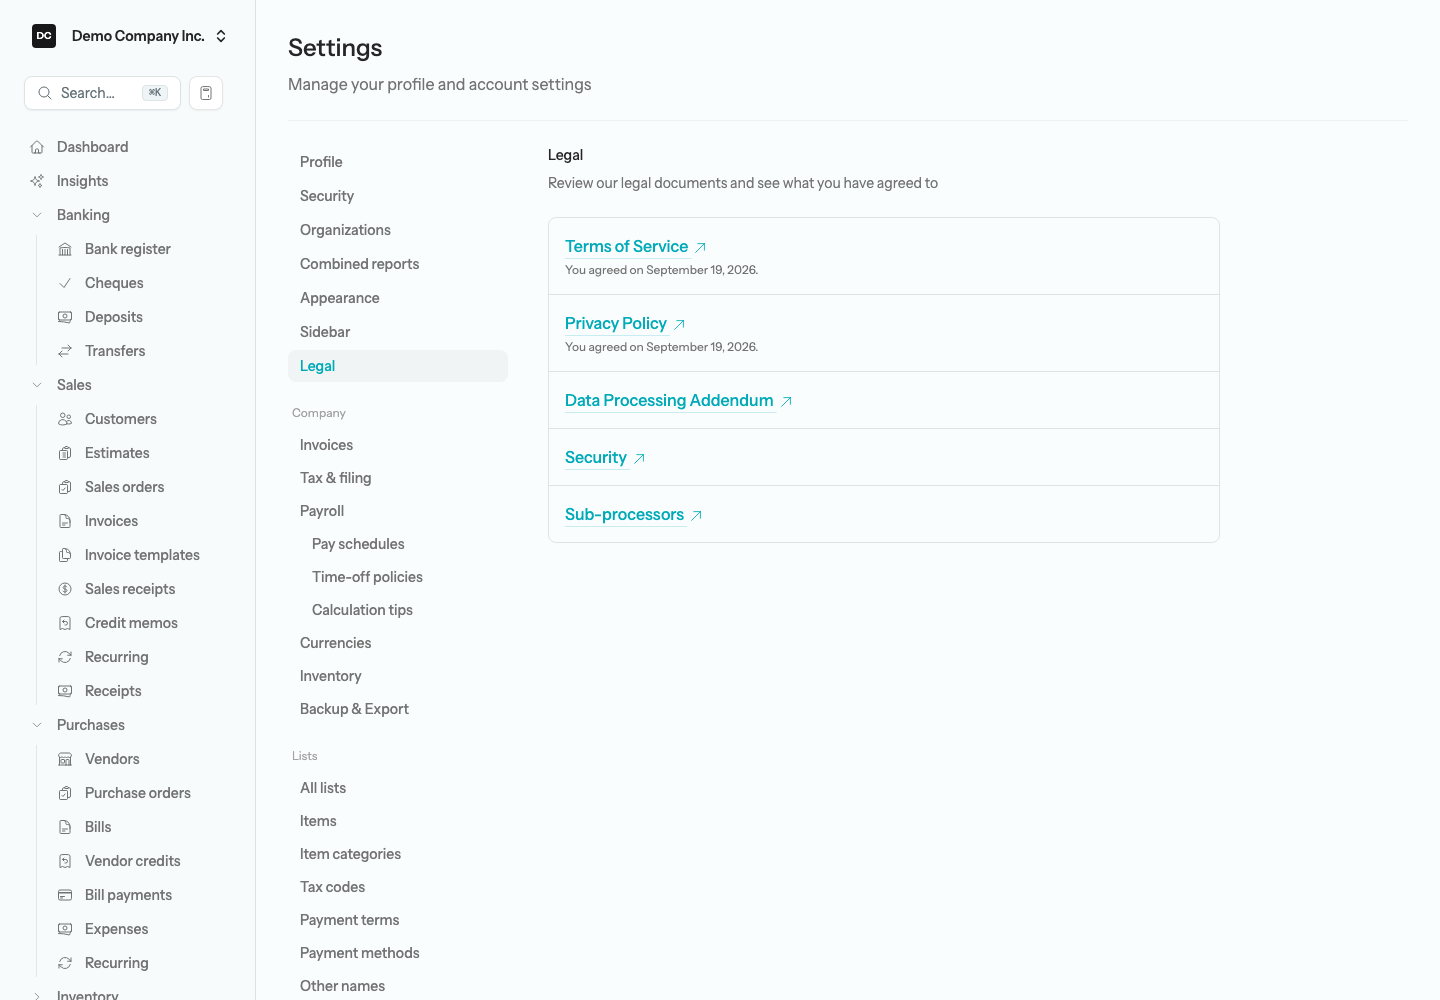
Settings → Legal lists the legal documents your operator has published — typically the Terms of Service, Privacy Policy, Data Processing Addendum, Security, and Sub-processors pages — each opening in a new tab. The ones you must agree to, such as the Terms of Service and Privacy Policy, show “You agreed on” with the date; the others are there for reference only.
You never have to come here to accept anything. Whenever a document that needs your agreement is new to you, or has been updated since you agreed, the next page you open is replaced by a Review our terms screen — Our terms have been updated if you had agreed to an earlier version — listing each document with a Read link. Tick “I have read and agree to the documents above.” and select Accept and continue to go on into the app, or select Log out. Until you accept, no other page opens, including this one; afterwards, Settings → Legal shows the new date.
API keys
API keys grant programs and integrations access to your organization’s data through the /api/v1 REST API. Owners and Admins manage them in the API keys panel near the bottom of Settings → Security, for the organization you are working in. Select Create API key, give it a Label, choose when it Expires (Never, In 30 days, In 90 days, or In 1 year), and tick Scopes — leave all unchecked for full access, or grant read or write per domain and refine by resource for a narrower key. The key is shown once, at creation; copy it then, because you cannot retrieve it later. Each row shows whether the key is Active, Expires soon, Expired, or Revoked, plus when it was last used, with Edit (label and scopes only), Rotate (a new value, the old one stops at once), and Revoke.
See the API documentation for the full step-by-step on creating a key and which endpoints accept it.
Authorized applications
Right below API keys, the Authorized applications panel lists every app you have connected to your account over OAuth — for example an AI assistant (MCP) connector. Each shows the scopes it holds (or a Full access badge), when it connected, and how many active sessions it has. Select Revoke to cut it off: its tokens stop working immediately and it must be reconnected to use again.
AI assistant (Business Q&A)
LineLedger ships a read-only Model Context Protocol (MCP) connector that lets an AI assistant answer plain-language questions about Demo Company Inc.’s books — “who owes me money?”, “how did last quarter look?”, “am I low on any stock?” It reads only from your posted general ledger and can never create, edit, or delete anything. Connect it with an API key or by signing in over OAuth; the API documentation covers the setup.
AI assistant writes (MCP)
A separate, write-enabled mode lets a connected assistant draft invoices, bills, expenses, and journal entries for an organization. It is deliberately gated twice. The site operator must first turn on writes on the server (MCP_WRITE_ENABLED); then an Owner or Admin opens the organization’s edit page (Settings → Organizations → Edit organization), finds the AI assistant writes (MCP) block, and turns on Allow AI assistant writes — it applies to this organization only and saves immediately. Until the operator has enabled writes, the switch is greyed out with a note that it cannot be turned on yet.
Note — Nothing is saved until you confirm. Even with both switches on, the assistant can only propose a document. Nothing is saved until the proposal is confirmed in a second, explicit step — it never writes directly to your ledger. With either switch off, which is the default, the assistant stays strictly read-only. See API documentation → MCP for the propose-and-confirm flow, and Self-hosting for the operator switch.