Inventory tracking turns an item into something the app counts and values for you. A tracked item carries a quantity on hand and a running value, and every time you buy or sell it the numbers move on their own — buying on a bill adds stock at the cost you paid, selling on an invoice or a sales receipt removes stock and records its cost. The examples below use our sample business, Demo Company Inc., and its tracked item, the Branded Mug.
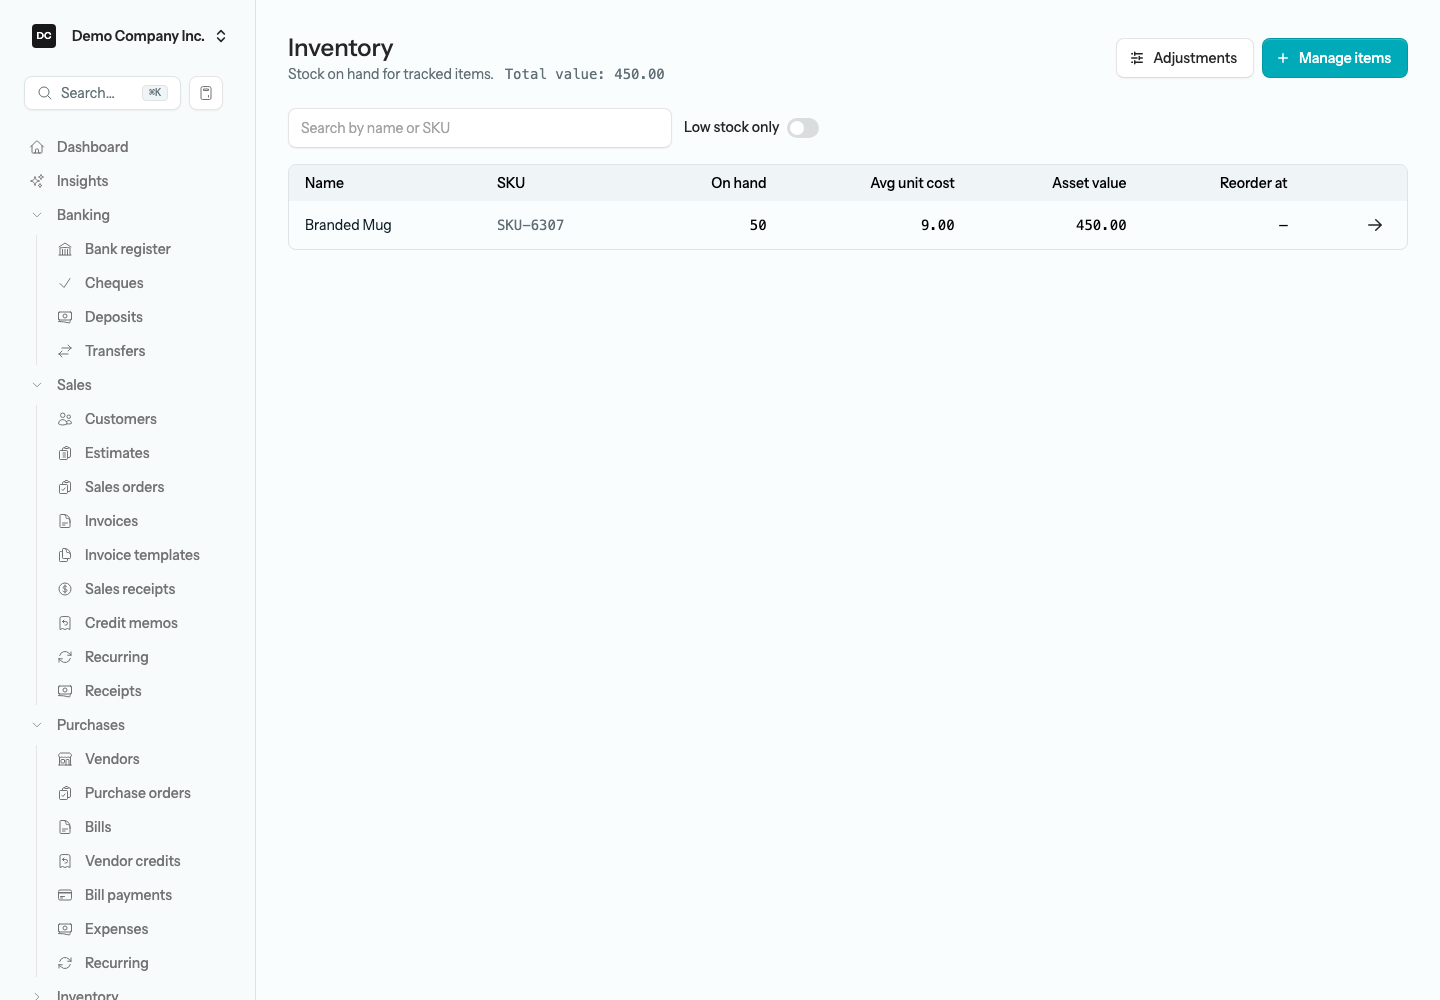
Open Inventory → Stock on hand from the sidebar to see the list. Each row shows an item’s Name, SKU, quantity On hand, Avg unit cost, the Asset value of that stock, and the Reorder at point (a dash when none is set). The Total value in the heading adds up every tracked item and should agree with the inventory asset account on your Balance Sheet. Adjustments (top-right) opens the stock-adjustment log and Manage items jumps to the Items list where you turn tracking on. Search by name or SKU, or switch on Low stock only to see just the items whose quantity has dropped below their reorder point — the same ones that carry the amber Low badge. The Inventory group is only in the sidebar while the Inventory feature is on and your role includes the Inventory section. A new organization does not always start with it on: the setup wizard’s Features step suggests switches from the industry you picked, and Inventory starts on only for Contractor / Construction, Manufacturing, Retail, and Restaurant / Food & Beverage — for General business, the default, and every other industry it starts off. Switch it on there, or later under Features on your organization’s page in Settings → Organizations.
Note — Before you start. A tracked item holds its value in an inventory asset account and books its cost to a cost-of-goods-sold (COGS) account when you sell. On the item form both accounts are pre-filled from the organization defaults under Settings → Inventory — a new organization gets defaults from its chart of accounts — so check those defaults, and choose your costing method, before you start trading. You can still override either account on an individual item.
Note. The Inventory asset selector — under Settings → Inventory and on the item form — offers active accounts whose subtype is Inventory; the COGS selector offers active accounts whose subtype is Cost of Goods Sold or Expense. An account that is already chosen stays in its list even after it is deactivated. If the account you want is missing, open Accounting → Chart of Accounts and check that it is active and carries the right subtype.
Turn on tracking and set an opening balance
You make an item track stock by setting its Type to Inventory under Settings → Lists → Items. Inventory is the only item type that counts quantity on hand and books cost-of-goods-sold — Service, Non-inventory, Other charge, and Bundle items just sell through. Choosing Inventory reveals an inventory section on the item form, and that is also where you record an opening balance — the stock you already hold the day you start using the app — so you do not need a historical bill to seed it.
To turn on tracking and record an opening balance:
- Open Settings → Lists → Items and open the item, or select New item.
- Set the item’s Type to Inventory. The form reveals the inventory section.
- Pick the Inventory asset account and the COGS account. Both are pre-filled from the organization defaults under Settings → Inventory — change them only if this item should use different accounts.
- Set a Reorder point if you want a Low flag on the Stock on hand list once the quantity drops below it.
- To seed stock you already hold, enter an Opening quantity and an Opening unit cost. For the Branded Mug, that is 50 at 9.00. These two fields are offered only on a new item, or on an existing item the first time you switch it to Inventory — after that, use a stock adjustment.
- Select Save.
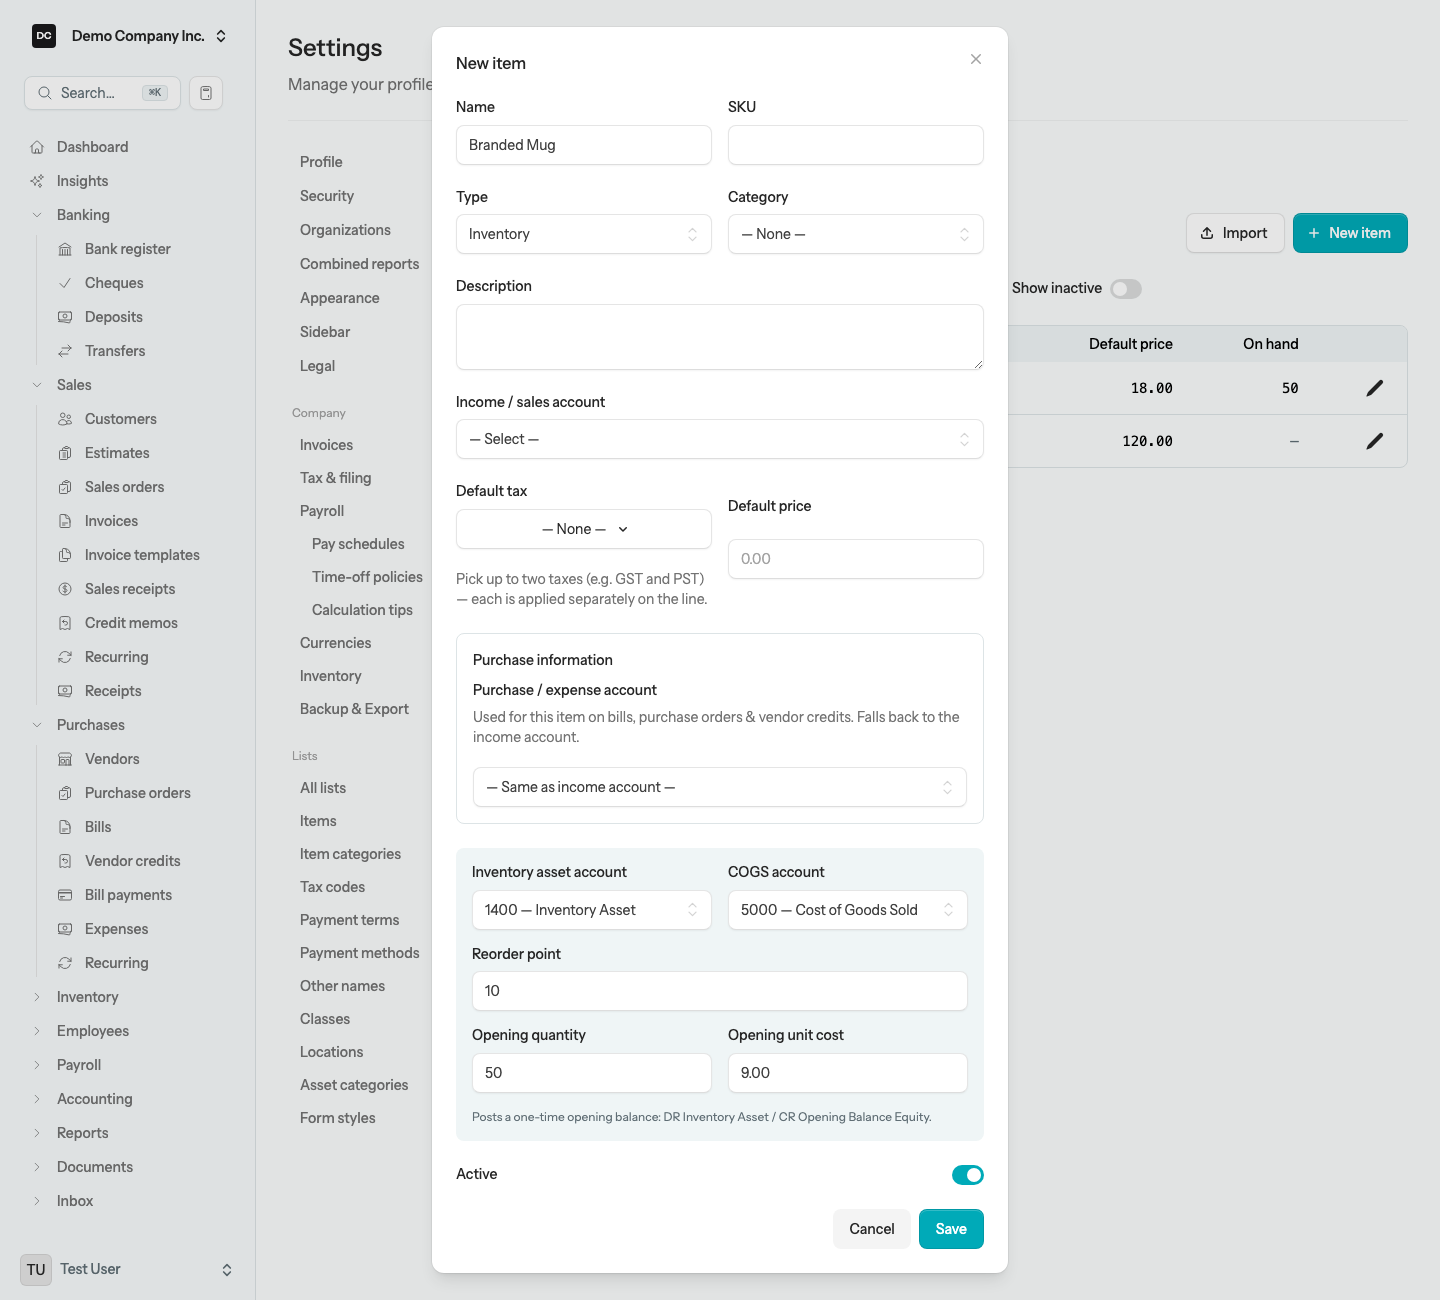
Note — What an opening balance does to your books. Entering an opening quantity posts a one-time opening-balance stock adjustment: it debits the inventory asset account for the stock’s value and credits Opening Balance Equity — setting up your starting position without touching revenue or expense. (Receiving the same item later on a vendor bill credits accounts payable instead, because you actually owe the supplier.)
Note — One person edits an item at a time. If a teammate already has the item open for editing, you see who is editing instead of the form, and Owners and Admins can take over. See Settings → Edit locks for how a lock is held and released.
Heads up. The organization’s costing method — Weighted Average or FIFO — locks the moment any item records its first movement. Pick the method you want under Settings → Inventory before you set any opening balances, because it cannot be switched once stock starts moving.
Seed many items at once
If you are carrying a whole stock list over from another system, you do not have to open every item. A single stock adjustment with the reason Opening balance can hold a line for every item, and it books exactly what the item form does: DR Inventory asset / CR Opening Balance Equity for each line’s quantity and cost.
To record opening stock for many items in one adjustment:
- Create the items first, each with Type set to Inventory — one at a time as above, leaving Opening quantity blank, or in bulk with Import on the Items list. (The items template’s is_inventory, inventory_asset_account_code, cogs_account_code, and reorder_point columns set up tracking but load no stock.)
- Open Inventory → Adjustments and select New adjustment.
- Set the Reason to Opening balance and the Date to the day your stock was counted — if you use the Opening balances workspace, its As of date. Add Notes such as “Opening stock count” if you like.
- On each line, pick an item, enter the counted quantity in Qty (±) as a positive number, and enter its Unit cost. Select Add line for the next item.
- Select Post adjustment.
Heads up — Import CSV on the Opening balances workspace. The Opening balances workspace (Accounting → Opening balances, available to the organization’s owner) has an Inventory on hand card under Other opening data, with an Import CSV button and a three-column template — sku, qty_on_hand, and unit_cost. In this version that import cannot be completed: selecting Preview on a file with valid rows stops with an error instead of listing them, so the Import button never becomes available. Record opening stock with a stock adjustment as above instead.
Post your opening stock before you finalize opening balances: finalizing locks the books through the As of date, and an adjustment dated on or before a locked date is refused. The rest of the workspace is described under Opening balances.
How buying and selling move stock
Once an item is tracked, most movement happens without any extra steps. Receiving the item on a vendor bill adds quantity at the cost you paid and raises the inventory asset account. Selling it on a customer invoice or a sales receipt removes quantity and books its cost to cost-of-goods-sold, using the organization’s costing method to decide which cost flows out. Weighted Average keeps a single running unit cost; FIFO tracks discrete cost layers and releases the oldest first. Voiding the bill, invoice, or receipt reverses the movement.
Note. Posting a bill line for a tracked item debits inventory and credits accounts payable. Posting an invoice or sales receipt line for a tracked item credits inventory and debits cost-of-goods-sold for the cost of the units sold — so your profit on the sale is recorded the moment you sell.
Heads up — You cannot sell what you do not have. Posting an invoice or a sales receipt checks every tracked line against the quantity on hand — lines for the same item are added together — and refuses the whole document if any item would go below zero. The form shows the error against its lines and nothing is posted, so receive the stock on a bill or a stock adjustment first, then post the sale. A stock adjustment that removes more than you hold is refused too.
Note — Returns and credits do not move stock. A credit memo or a vendor credit changes what is owed, not what is on the shelf. If a customer actually sends goods back, or you return goods to a supplier, record a stock adjustment for the quantity as well so the count stays right.
Tracking by class and location
Turn on Classes, Locations, or both, and transaction lines gain a selector for each feature you switch on — a Class selector for Classes, a Location selector for Locations. Bills, invoices, credit memos, journal entries, and stock adjustment lines all carry them; sales receipt lines do not, so a sale recorded on a sales receipt posts without a class or location. The tags travel with the journal entry each document posts, so the inventory and cost-of-goods-sold postings show up in the by-class and by-location versions of your ledger reports. For Demo Company Inc., that might mean tagging Branded Mug purchases with the Merchandise class and each invoiced sale with the Main Chapel or North Branch location. Note the limit: quantity on hand is one number per item. Stock movements carry no class or location, so the Stock on hand list and the inventory reports cannot tell you how many mugs sit at each location.
To enable class and location tracking:
- Open Settings → Organizations and open your organization with the pencil button.
- Under Features, switch on Classes, Locations, or both, then select Save. Transaction lines now show a selector for each one you turned on — Class for Classes, Location for Locations.
- Open Settings → Lists → Classes and Settings → Lists → Locations to create the values you want to choose from.
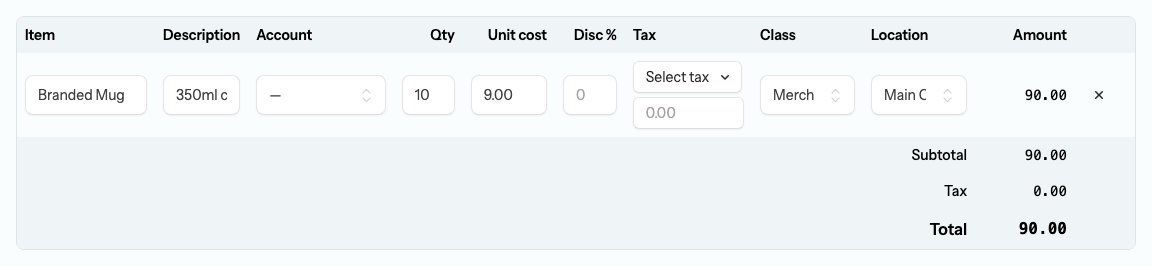
Tip. Tag stock adjustments too — a write-off tagged North Branch stays separate from one tagged Main Chapel on the ledger reports you slice by location, so those reports keep telling the truth. One gap for non-profits: a stock adjustment line has Class and Location selectors but no Fund selector, so an adjustment always posts without a fund even when Funds are on.
Record a stock adjustment
Use a stock adjustment when quantity changes for a reason that is not a sale or a purchase — an opening balance, shrinkage, damage, a recount, or a write-off. Each adjustment is dated, has one reason, and lists one or more items with a signed quantity change. Adjustments are numbered ADJ-000001 onward for you.
To record a stock adjustment:
- Open Inventory → Adjustments — or select Adjustments at the top of the Stock on hand list — then New adjustment.
- Choose a Reason: Opening balance, Shrinkage, Damage, Recount (the default), Write-off, or Other. Set the Date — a click anywhere in the field opens the calendar — and add Notes to explain the change if you like.
- Add a line for each item: pick the item (only active tracked items are offered) and type the change in Qty (±). A positive number adds stock; a negative number removes it.
- When you are adding stock, enter the Unit cost you are bringing it in at. For removals leave it blank — the cost is taken from your costing method automatically.
- If Classes or Locations are on, each line also shows a selector for each one you switched on — Class for Classes, Location for Locations — so you can tag the line with a Class, a Location, or both. Select Add line for more items.
- Select Post adjustment. The adjustment is saved and posted in one step.
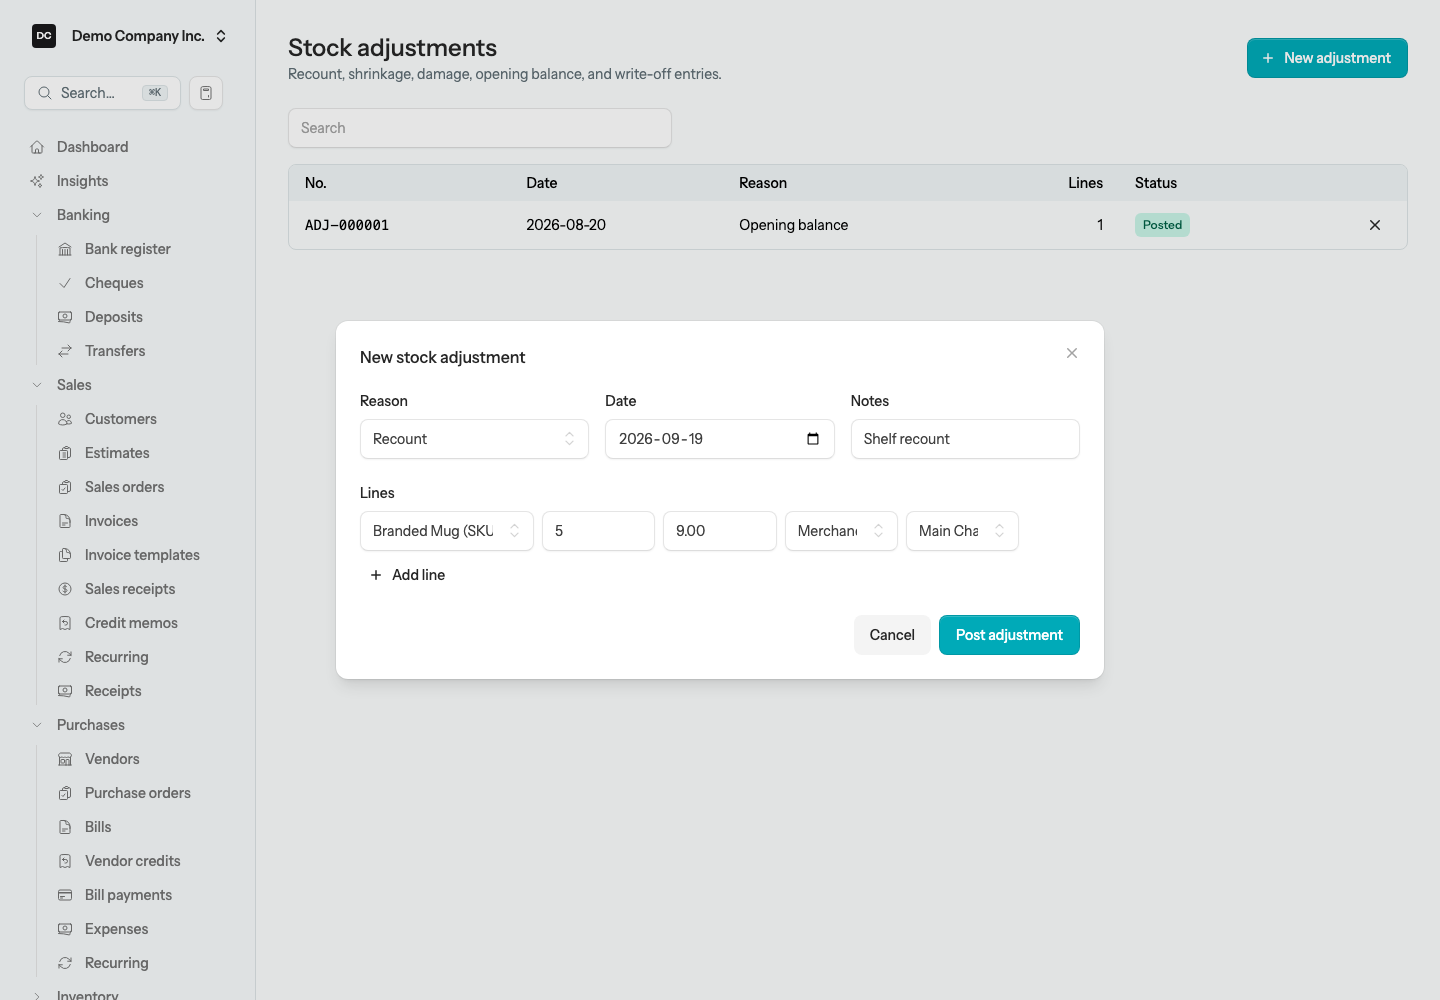
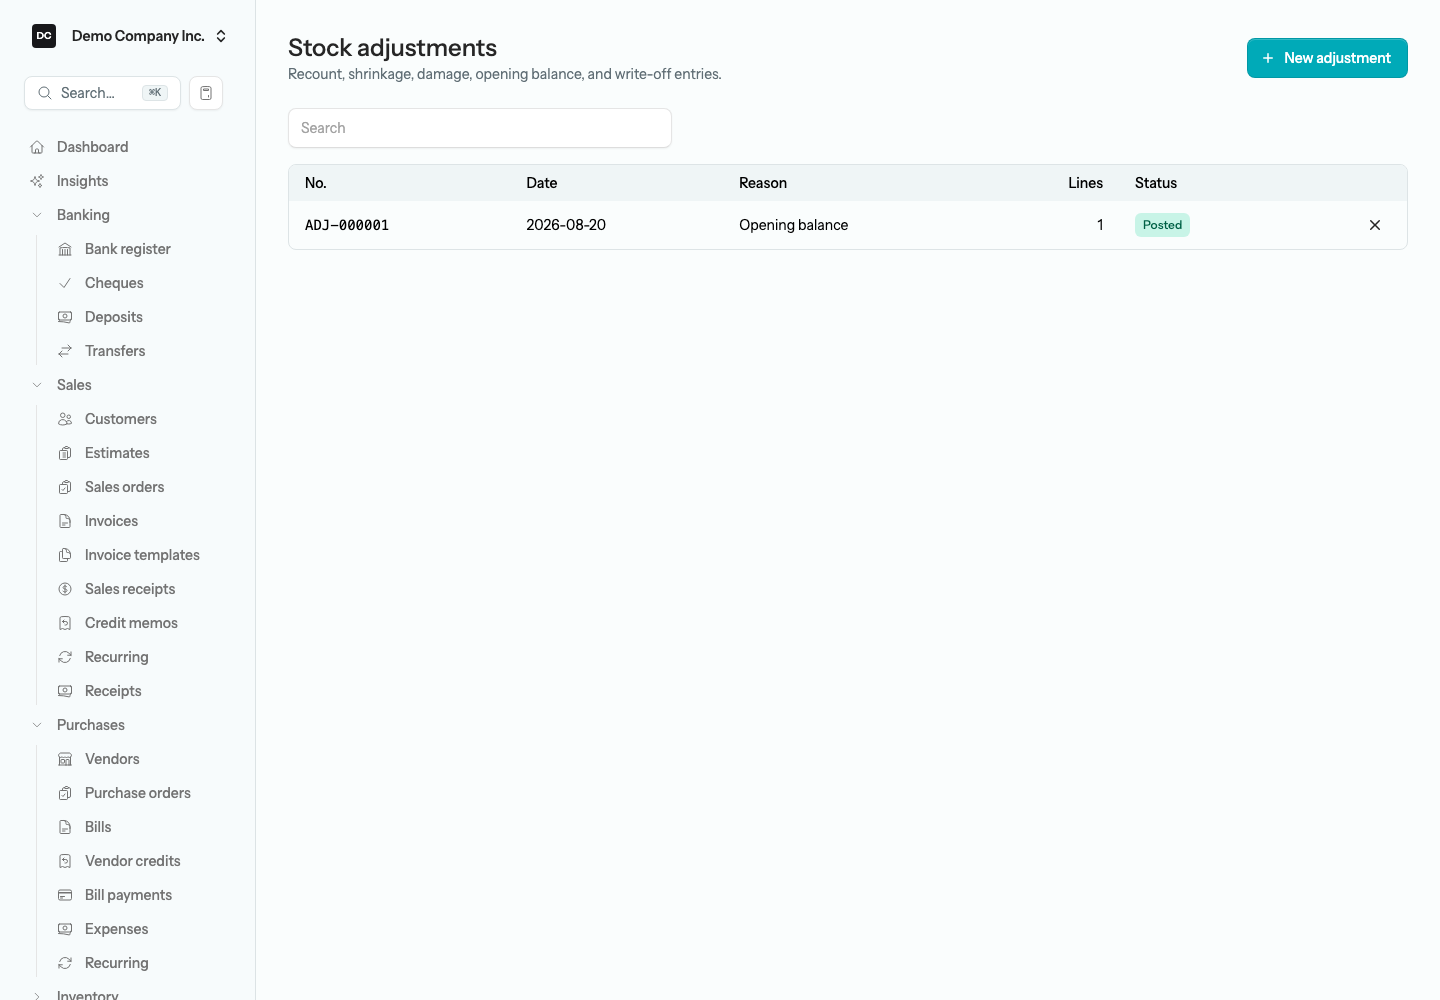
Note — What an adjustment does to your books. Posting an adjustment writes one balanced journal entry. Adding stock debits the inventory asset account; removing stock credits it. The offsetting side depends on the reason: an opening balance posts to Opening Balance Equity, while every other reason — recount, shrinkage, damage, write-off, or other — posts to the item’s cost-of-goods-sold (or adjustment) account. A posted adjustment cannot be edited: to correct one, void it and record a replacement. Voiding reverses both the journal entry and the stock it moved. An adjustment dated on or before your closing date is refused.
Review an item’s stock history
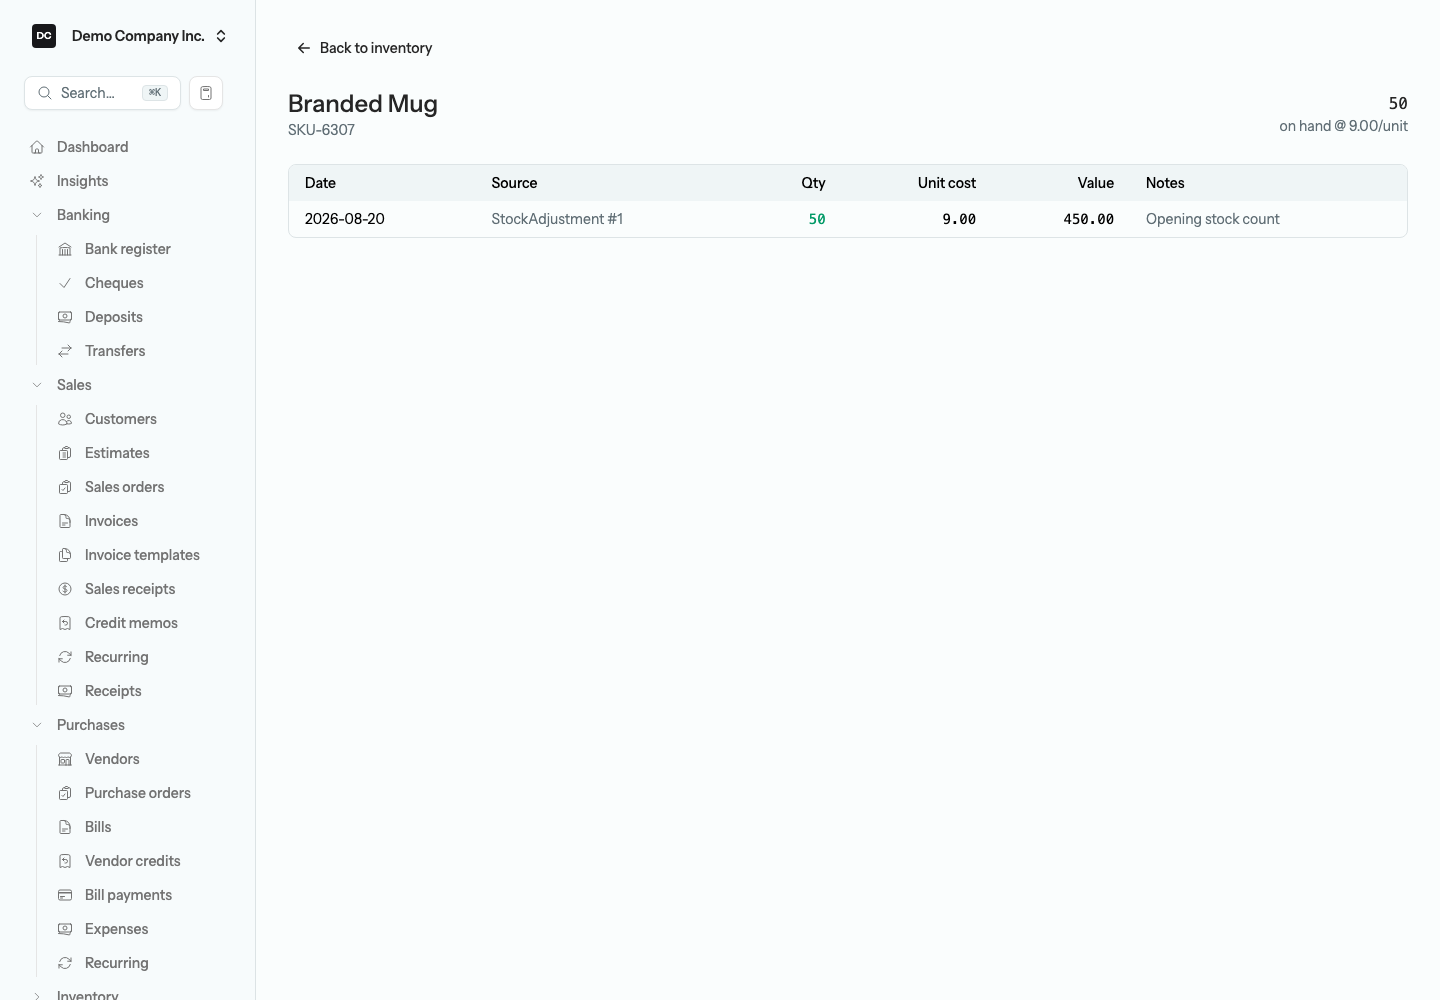
Open any item from the Stock on hand list to see its full movement history, newest first, under a heading that shows the quantity on hand and the unit cost it is carried at. Each row has six columns: the Date; the Source of the movement — the document type and its record number, such as Invoice #12, Bill #4, SalesReceipt #2, or StockAdjustment #1; the signed Qty, green for stock coming in and red for stock going out; the Unit cost; the resulting Value; and Notes, which carries the document’s own number (for example “Invoice INV-0001”) or the notes typed on an adjustment. When a document is voided, its original row stays as it was and a new reversing row appears, shown dimmed and tagged Reversal. This is the audit trail behind the item’s current quantity and average cost.
Reports tied to this area
- Stock Status (in the Inventory group of the Reports hub) — on-hand quantity, reorder point, and unit cost for every tracked item, with a Reorder badge on any item at or below its reorder point. (The Stock on hand list’s Low badge flags only items strictly below it.)
- Inventory Valuation — quantity, average cost, and value per item from the remaining FIFO cost layers. Only a FIFO organization has cost layers, so under Weighted Average every row reads zero; use the Total value on the Stock on hand list instead.
- Balance Sheet — the inventory asset account carries the value of your unsold stock; the Profit & Loss shows cost-of-goods-sold as you sell it.
All of these are described under Reports.
Related areas
- Settings → Inventory — the organization’s costing method and the default inventory-asset and COGS accounts.
- Settings → Lists → Items — set an item’s Type to Inventory, record its opening balance, or import items in bulk. See Lists.
- Accounting → Opening balances — the owner-only workspace for the rest of your opening figures; post opening stock before you finalize it. See Opening balances.
- API and AI assistants — another system can create and post stock adjustments through the API, and the MCP Inventory status tool answers “what is running low?” for an assistant. See API.