“Opening balance” means three different things in LineLedger, and it pays to land on the right one. The first is the Opening balance (optional) field on the New account dialog — a one-off starting figure for a single bank, loan, or equipment account, described under Accounting. The second is the QuickBooks migration wizard’s Opening balances mode, which loads your old trial balance for you as part of a guided import — see Migrating from QuickBooks. The third is this page: the Opening balances workspace, for an organization that was created without an import and now needs to bring its history in after setup. It holds your old system’s closing figures as targets, lets you fill in the customer, vendor, and bank detail behind them, and keeps one opening journal entry in step with every save. The examples below use our sample business, Demo Company Inc.
Who can open it, and where
Open Accounting → Opening balances from the sidebar. The entry appears only for the organization’s Owner — the workspace posts directly to the ledger and sets the lock date, so it is deliberately not offered to Admins, Accountants, or anyone on a custom role, and the pages refuse anyone else who types the address. Inside, a row of tabs runs across the top: Overview, Trial balance, Customers (AR), Vendors (AP), Outstanding cheques, and Deposits in transit. The heading reminds you of the as-of date and that “Everything here stays editable — the ledger follows every save.”
Note — When to use the workspace. Use it when you are switching to LineLedger part-way through your history and want the books to open exactly where the old ones closed: an existing business moving from another program, a spreadsheet, or an accountant’s year-end package. If you are starting a brand-new business with nothing to carry over, you do not need it. If your old system is QuickBooks, the migration wizard’s Opening balances mode is the other route, and it does not feed this workspace: it posts its own opening journal entry on the conversion date, so the Trial balance tab here starts empty. Finishing that migration also locks the books through the conversion date, and until the lock is lifted the workspace cannot post anything dated on or before it — not the opening entry, and not an outstanding cheque written before that date. See Accounting → Period locking for how to lift a lock.
Set the as-of date
Everything in the workspace is carried over as of one date — the Conversion date card on the Overview tab calls it “the date your balances are carried over as of — usually your last fiscal year-end in the old system.” The app suggests the end of your previous fiscal year; for Demo Company Inc., whose fiscal year follows the calendar, that is December 31 of last year. The opening journal entry is dated this day, and so is every opening invoice, bill, and credit you enter on the AR and AP tabs.
To set or change the as-of date:
- Open Accounting → Opening balances. You land on the Overview tab.
- In the Conversion date card, pick the As of date — a click anywhere in the field opens the calendar.
- Select Save. The opening entry is re-dated on the spot, and a message confirms that existing detail documents keep their own dates.
Heads up. Pick the date before you enter detail. Moving it later re-dates the opening journal entry, but the opening invoices, bills, cheques, and deposits you have already saved stay on the dates they were given — so an opening invoice dated the old as-of date would then sit inside your new opening period. The date field is locked once you Finalize & lock.
Read the Overview tab
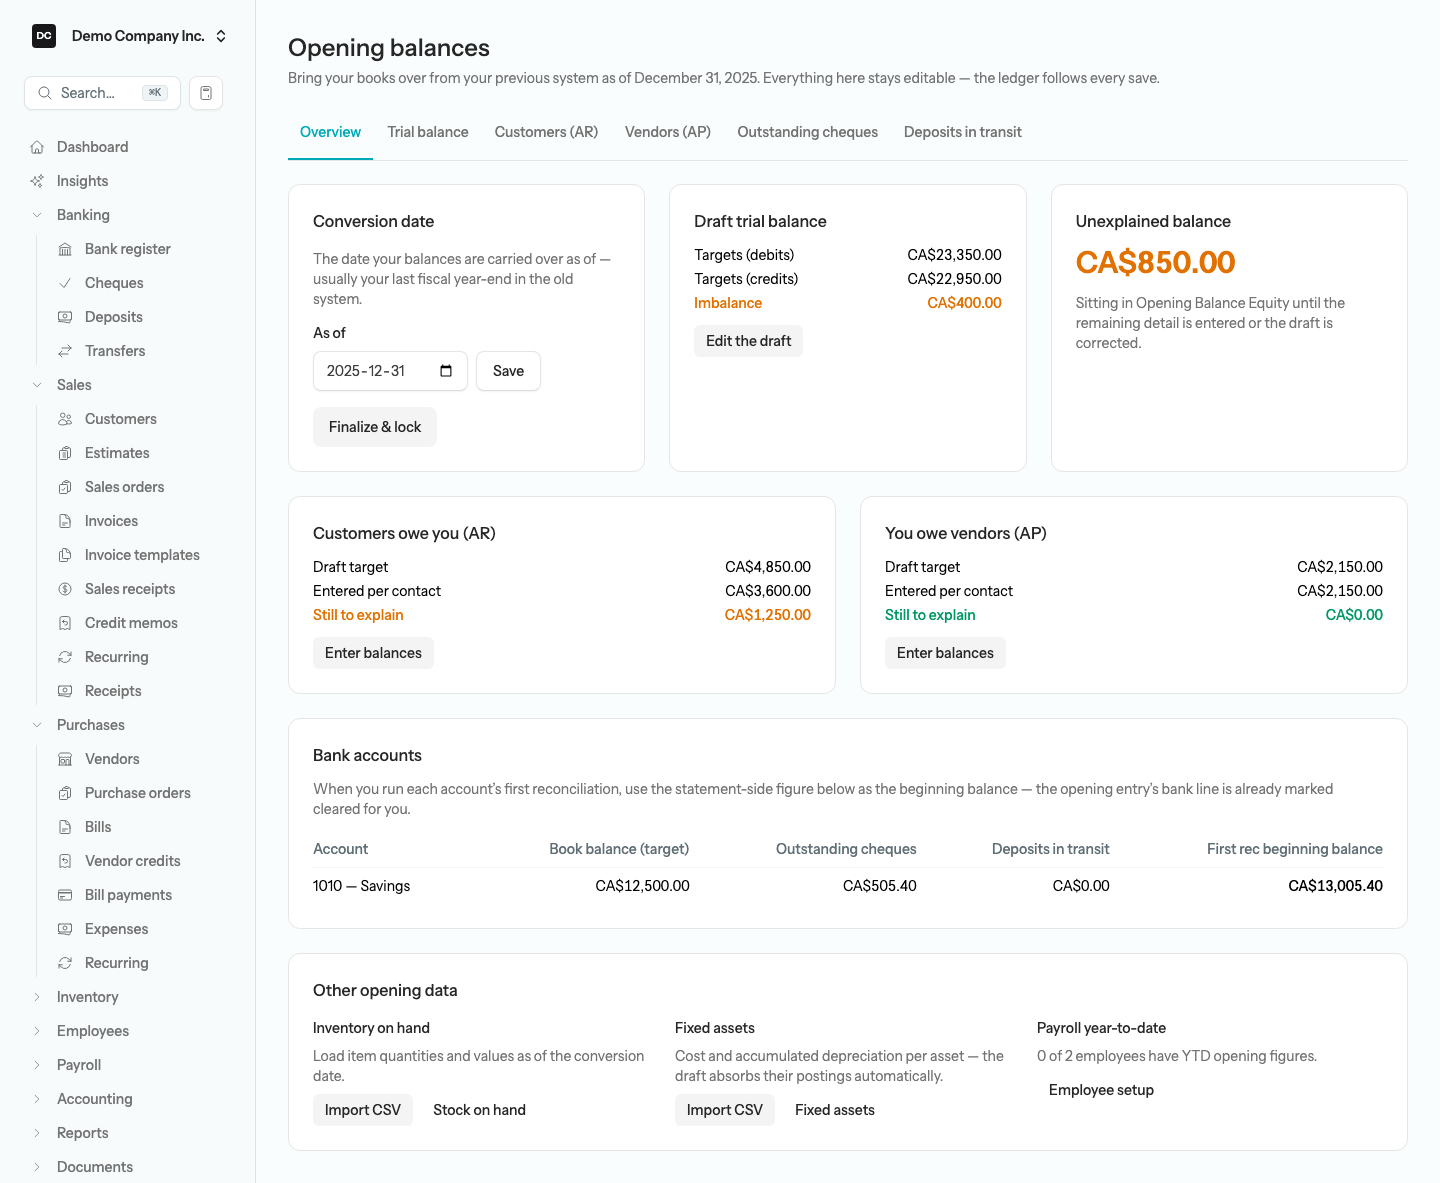
The Overview is a live reconciliation between what you said the balances should be (the draft) and what the ledger actually holds. Each card answers one question:
- Draft trial balance — Targets (debits), Targets (credits), and the Imbalance between them. Edit the draft opens the Trial balance tab.
- Unexplained balance — the amount sitting in Opening Balance Equity that nothing explains yet. It reads “Everything ties: the books fully explain the draft trial balance.” at zero, and otherwise “Sitting in Opening Balance Equity until the remaining detail is entered or the draft is corrected.”
- Customers owe you (AR) and You owe vendors (AP) — the Draft target for the control account, the total Entered per contact, and what is Still to explain. Enter balances opens the matching tab.
- Bank accounts — one row per bank or credit-card account with a target or outstanding items: Book balance (target), Outstanding cheques, Deposits in transit, and First rec beginning balance. That last column is the figure to type into the account’s first reconciliation.
- Other opening data — Inventory on hand, Fixed assets, and Payroll year-to-date, each with a way to load or check that data.
Figures turn green when they tie and amber while a difference remains. Work the tabs until Unexplained balance and both Still to explain lines read zero — that is the whole job.
Enter the draft trial balance
The Trial balance tab holds your targets: one row per account, with the closing Debit or Credit balance from your old system. The tab says it plainly — “Every save updates the books; AR, AP and Inventory rows are targets for their own tabs and are never posted from here.” Accounts Receivable, Accounts Payable, and Inventory rows carry a “sub-ledger target” badge because their balances are satisfied by customer, vendor, and stock detail rather than by this grid. You can load the grid from a CSV file or type it in, and the two mix freely.
To import a trial balance from a CSV file:
- On the Trial balance tab, select Import in the top-right corner.
- Select Download template to get a file with three columns — account_code, debit, credit — and fill in one row per account using your own account codes. Put each balance on one side only; leave the other column blank. A QuickBooks trial balance export lists every account, and rows with nothing in either column are simply skipped.
- Choose the file under CSV file and select Preview. The preview marks each row create, update, unchanged, or remove and stops on problems — an unknown account code, a code listed twice, a row with both a debit and a credit, or a negative amount (put the value in the other column instead).
- Select Import. Re-importing replaces the whole draft: rows missing from the file are removed, so always upload the complete trial balance.
To add or change a target by hand:
- Below the grid, choose an account under Add account, type the amount in Debit or Credit, and select Add. Only active accounts that are not yet on the grid are offered.
- To change a figure, type in its Debit or Credit cell and move to the next cell; the row saves as soon as you leave it, and the books update in the same breath. A row carries one side only, so filling one column clears the other.
- To drop a target, select the trash icon on its row and confirm “Remove this target? The books will be re-netted without it.”
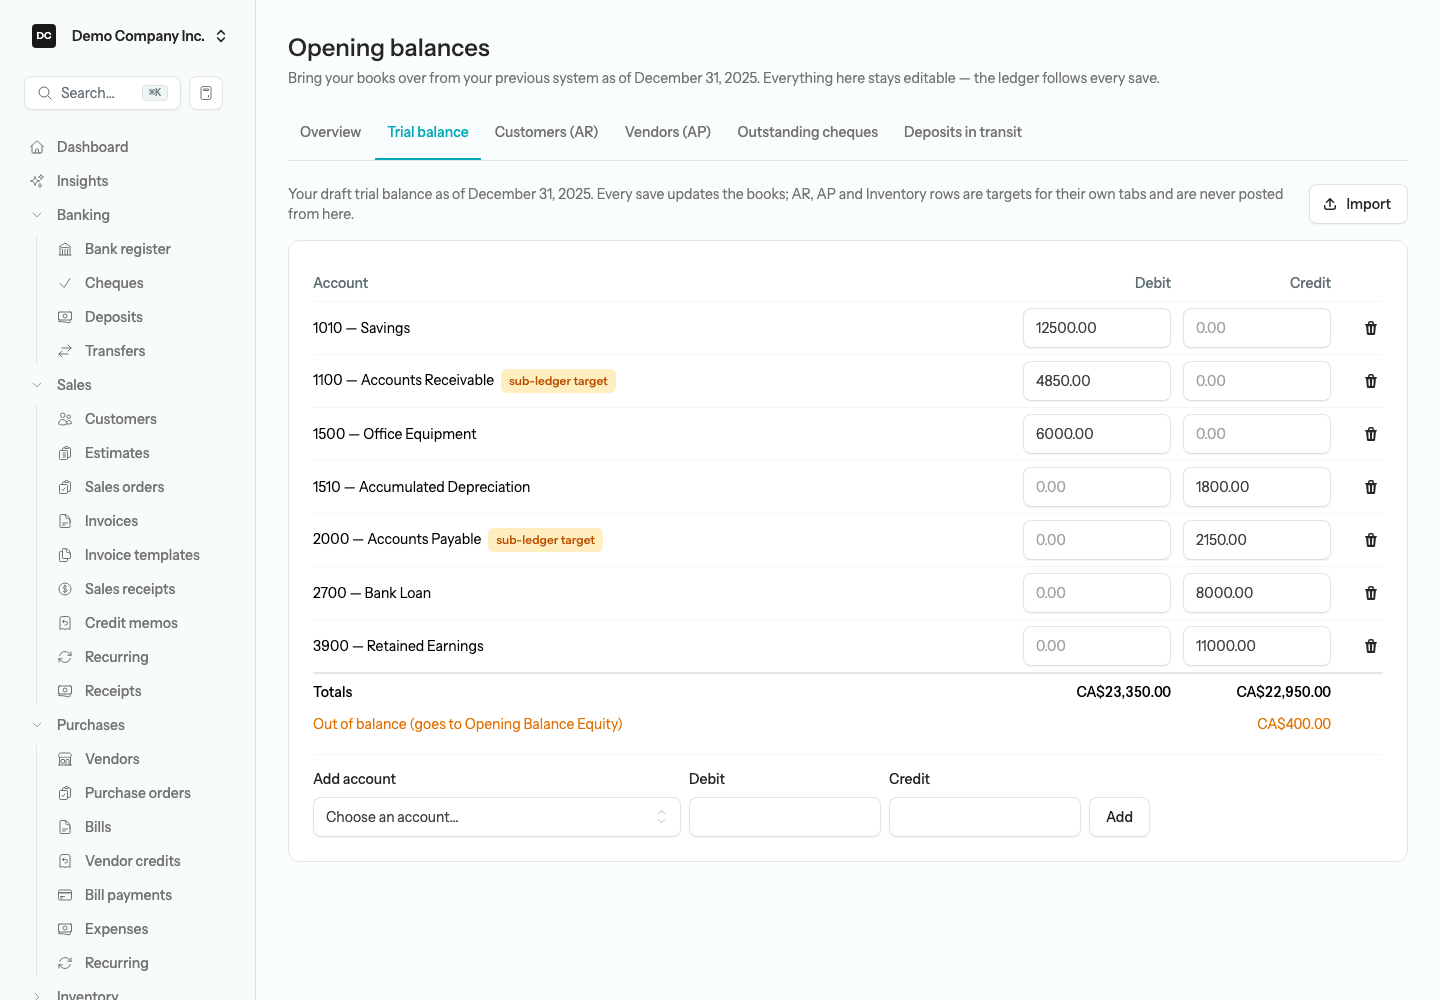
The Totals footer adds up both columns. If they differ, an extra line — Out of balance (goes to Opening Balance Equity) — shows the gap, and the Overview’s Imbalance turns amber. Every Debit and Credit cell doubles as a calculator: type 1250+300 or 4800/12 and press Enter to commit the result.
Note — What the draft does to your books. The workspace keeps exactly one journal entry, dated the as-of date, with the memo “Opening balances — draft trial balance”. For each target account other than AR, AP, and Inventory, it works out what is already posted to that account on or before the as-of date — a per-account opening balance you entered when creating the account, an outstanding cheque, a fixed-asset import — and posts only the difference, so the account lands exactly on its target. Debits and credits that do not offset each other are plugged to Opening Balance Equity (called Opening Balance Net Assets in a non-profit chart). The entry is re-posted in place every time a target changes, and voided if you clear every target; each re-post is recorded in the audit log. AR, AP, and Inventory are never plugged: a lump-sum line on a control account has no customer or vendor behind it and would show up as “Unattributed” on your aging reports.
Enter what customers owed you and what you owed vendors
The Customers (AR) and Vendors (AP) tabs are mirror images. Each lists every customer or vendor with three columns — Customer (or Vendor), Opening document no., and Opening balance — and a search box at the top. What you type in Opening balance becomes a real opening document dated the as-of date: a positive customer balance is an opening invoice, a negative one (type a minus sign) an opening credit memo; a positive vendor balance is an opening bill, a negative one an opening vendor credit. Because they are real documents, the customer’s statement, AR Aging, AP Aging, and Open Invoices all show them from day one, and a payment received later is applied to them like any other invoice or bill.
To enter opening balances per customer or vendor:
- Add your customers and vendors first — the grid lists contacts that already exist and tells you so if there are none. See Customers and Vendors.
- Open the Customers (AR) or Vendors (AP) tab. Use Search customers… or Search vendors… to find a row on a long list.
- Optionally type the number the document had in your old system in Opening document no. — for example INV-10020 or BILL-88213 — so the reference on the customer’s statement matches their records. Leave it on Auto and LineLedger generates one with an OB prefix. The number must be unique within the organization and at most 40 characters; the app tells you if it is already taken.
- Type the Opening balance in the contact’s currency (a badge marks a foreign-currency contact) and move to the next cell. The document posts as soon as you leave the cell.
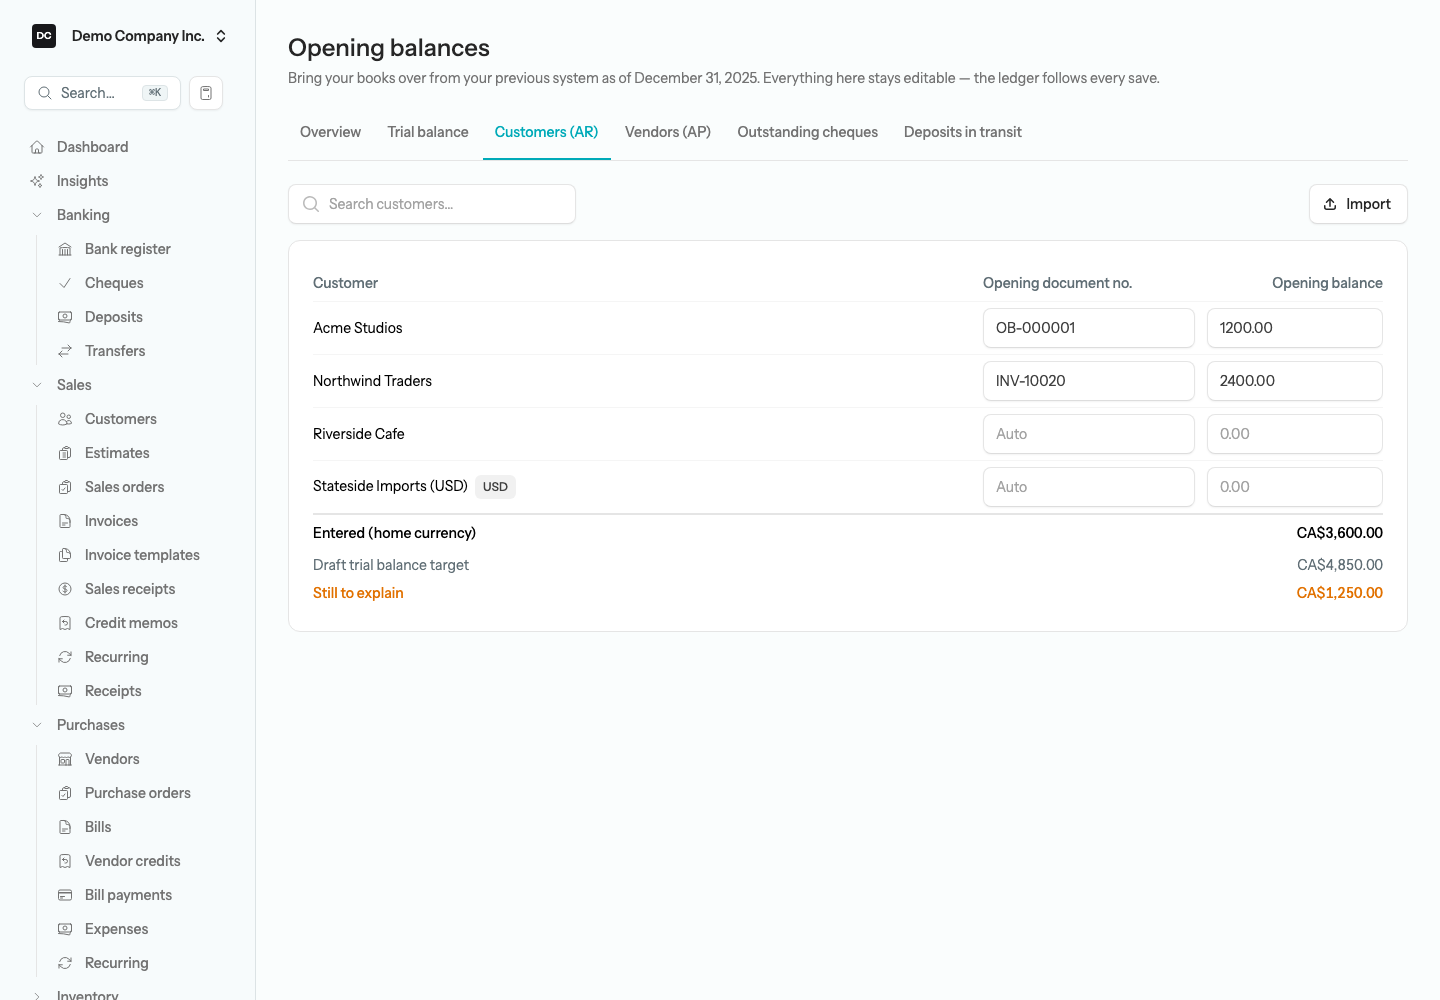
The footer under the grid shows Entered (home currency), the Draft trial balance target for the control account, and Still to explain — the same three figures as the Overview card. Changing an amount later re-posts the same document in place. Switching sign voids it and posts a fresh one of the other kind — an invoice becomes a credit memo, a bill a vendor credit — and clearing the cell (or typing zero) voids it and posts nothing in its place. A contact who has more than one opening document — typically from a QuickBooks migration, which brings each open invoice or bill across as its own opening document — shows every number under the cell with a “saving consolidates” badge, and the document number cell is locked. Saving a different balance for that contact voids them all and posts a single document in their place. A typed number can be edited afterwards too; the live document is renumbered and its journal entry re-posted so the memo follows.
To import balances from a CSV file:
- Select Import on the tab, then Download template. The columns are customer_display_name (or vendor_display_name) and balance, plus an optional document_no; the display name must match a contact exactly.
- Enter one row per contact, using a minus sign for a credit, choose the file, and select Preview. Rows are marked create, update, or unchanged.
- Select Import. Re-importing corrected figures updates the same opening documents rather than adding new ones.
Note — What an opening receivable or payable does to your books. An opening invoice debits Accounts Receivable and credits Opening Balance Equity; an opening credit memo does the reverse. An opening bill debits Opening Balance Equity and credits Accounts Payable; an opening vendor credit does the reverse. No revenue, expense, or sales tax is touched — the sale or purchase was already reported in your old system. For a foreign-currency contact the posting goes to that currency’s AR or AP account at the rate on the as-of date; see Multi-currency.
Heads up. An opening invoice that already has a payment applied cannot be rewritten from the grid — the save is refused and tells you to adjust it from the invoice screen instead. The New customer form has a one-at-a-time version of the same thing: an Opening balance box with Amount owed and As of date, offered only while you are creating the customer. It posts an opening invoice dated the As of date on that form, which defaults to today — set it to the workspace’s as-of date so the invoice lands in the opening period — and the Customers (AR) tab then lists it like any other. Once the workspace has been opened, an Owner also sees a tip in that box linking to the Customers (AR) tab. The New vendor form has no opening balance field; enter what you owed each vendor on the Vendors (AP) tab.
Record outstanding cheques and deposits in transit
Your old system’s bank balance is a book balance: it already deducts cheques you wrote that had not cleared, and already includes deposits the bank had not yet shown. The Outstanding cheques and Deposits in transit tabs carry those items across as real, posted cheques and deposits at their original dates — “so a future reconciliation can tick it when it cashes,” as the cheques tab puts it. Without them, your first reconciliation could never balance.
To add an outstanding cheque:
- On the Outstanding cheques tab, select Add cheque.
- In the Add outstanding cheque dialog, choose the Bank account, enter the Cheque #, its Original date (the day it was written, not the as-of date), the Payee, and the Amount, plus a Memo (optional).
- Select Save. The cheque appears in the list with its Cheque #, Date, Payee, Bank, and Amount, and the Bank math card underneath updates.
To add a deposit in transit:
- On the Deposits in transit tab, select Add deposit.
- In the Add deposit in transit dialog, choose the Bank account, enter the Original date and Amount, and add a Description (optional) and Memo (optional).
- Select Save. Deposits are numbered automatically with an OBD prefix.
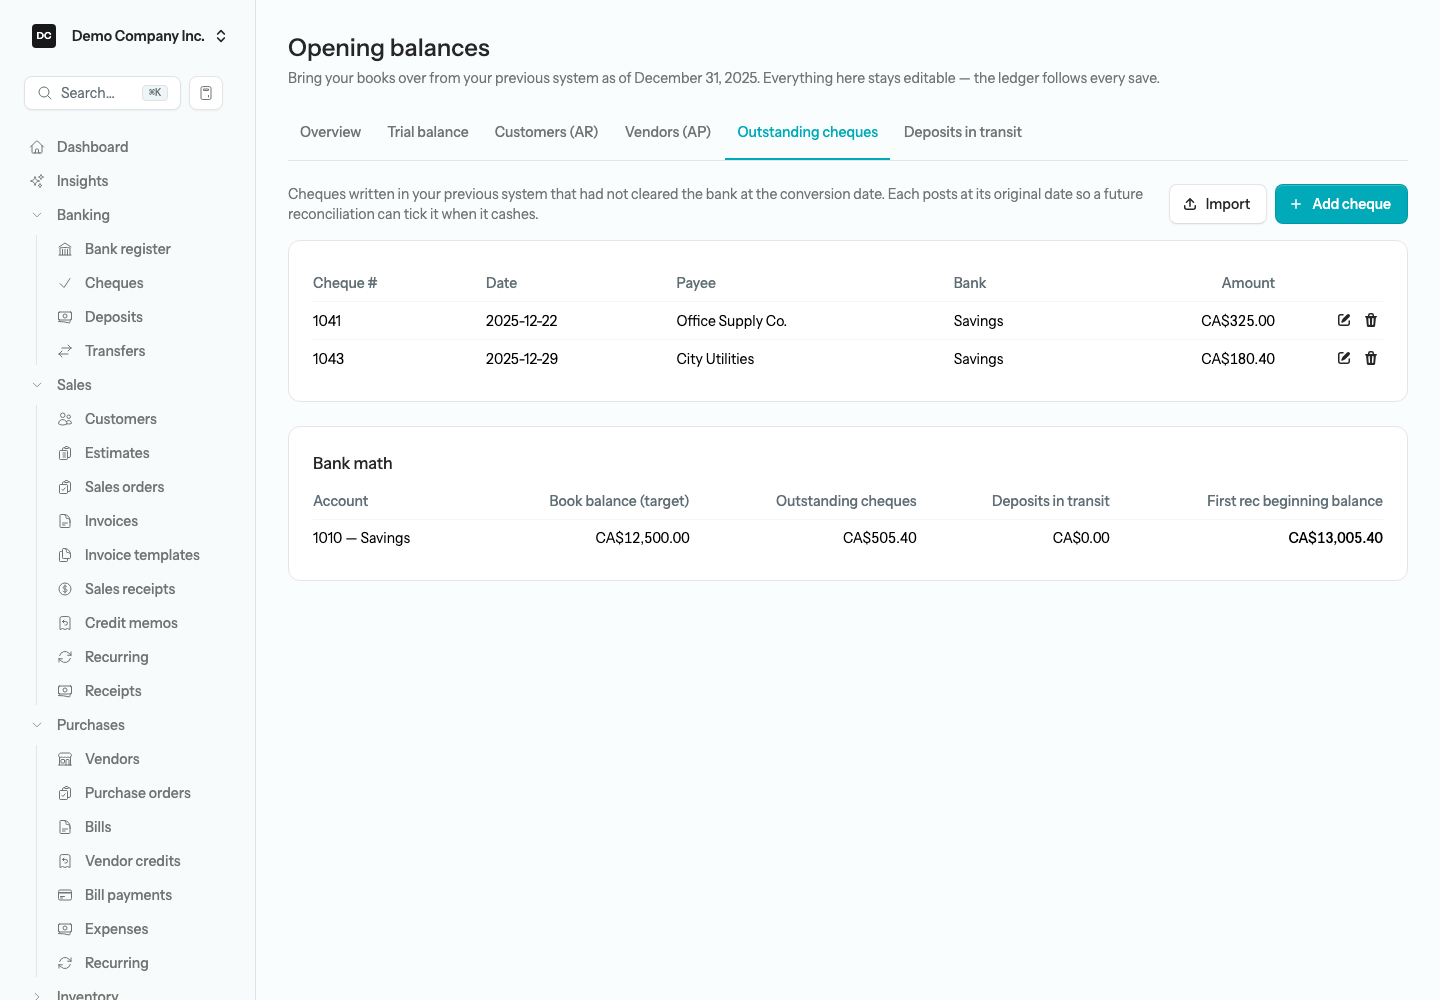
Both tabs also take a CSV: select Import, then Download template. The cheques file has bank_account_code, cheque_no, cheque_date, payee_name, amount, and memo, and rows whose cheque number already exists on that bank are skipped, so it is safe to re-run. The deposits file has bank_account_code, deposit_date, description, amount, and memo — deposits get generated numbers, so import that file once. Use the pencil icon on a row to edit an item and the trash icon to remove it; removing voids its posting and re-nets the bank. Only home-currency bank accounts are offered; record a foreign bank’s opening items with a journal entry at the correct exchange rate.
Note — What a carried-over cheque or deposit does to your books. An outstanding cheque debits Opening Balance Equity and credits the bank, dated the day the cheque was written; a deposit in transit debits the bank and credits Opening Balance Equity, dated the day it was deposited. The opening journal entry then nets the bank to your book balance target, which means its own bank line equals the statement-side balance — book balance plus outstanding cheques minus deposits in transit. That line is marked cleared, so when you start the account’s first reconciliation it is ticked for you, while the carried-over cheques and deposits stay unticked until they show up on a statement. Type the First rec beginning balance from the Bank math card (or the Bank accounts card on the Overview) as that reconciliation’s Beginning balance. See Banking.
Note — One person edits a record at a time. Editing an existing outstanding cheque or deposit in transit holds an edit lock while the dialog is open. If a teammate already has that item open, you see who is editing instead of the form, and Owners and Admins can take over. See Settings → Edit locks for how a lock is held and released.
Load inventory, fixed assets, and payroll year-to-date
The Other opening data card at the bottom of the Overview tab covers the three sub-ledgers that are not bank, customer, or vendor detail. Inventory and fixed assets are CSV imports — the same importers the QuickBooks wizard uses — dated the as-of date. An Inventory target on the draft is a sub-ledger target, so it is met by the stock you load and never posted from the grid.
- Inventory on hand — Import CSV loads sku, qty_on_hand, and unit_cost per item and posts one stock adjustment with the reason Opening balance (debit the inventory asset account, credit Opening Balance Equity). Stock on hand jumps to the inventory list to check the result. Set your costing method under Settings → Inventory first; it locks on the first movement. See Inventory.
- Fixed assets — Import CSV loads the register, one asset per row with its cost and accumulated_depreciation_to_date, and posts a journal entry that debits each asset account for cost, credits accumulated depreciation, and books the net to Opening Balance Equity. Fixed assets opens the register. See Fixed assets.
- Payroll year-to-date — not an import. The card counts how many employees have year-to-date opening figures and Employee setup takes you to the employee list, where each mid-year hire’s profile has a Year-to-date opening balances card for pensionable and insurable earnings and the deductions already taken. Nothing posts to the ledger; the figures only keep CPP and EI ceilings right. See Payroll.
Heads up — Import fixed assets before the trial balance. The fixed-asset import does not re-net the opening journal entry when it finishes. If your draft already has targets for the asset or accumulated depreciation accounts, those accounts are counted twice — once by the draft, once by the register — and the Unexplained balance is off by the same amount, with nothing on the page to flag it. The opening entry catches up the next time it is re-netted: the next target you add, change, or remove on the Trial balance tab; a trial balance import that adds, changes, or removes a target; a new as-of date; or the next outstanding cheque or deposit in transit you add, edit, or remove. The simplest way to avoid the gap is to load the fixed-asset register first and enter the trial balance afterwards.
Finalize and lock
Nothing locks on its own. When the Overview reads green — Unexplained balance at zero and nothing Still to explain — you can close the opening period so that day-to-day bookkeeping cannot drift into it.
To finalize the opening balances:
- Run the checks under Check your work below.
- On the Overview tab, select Finalize & lock and confirm “Finalize opening balances? This locks the books through the as-of date. You can un-finalize later.”
Finalizing sets the organization’s lock date to the as-of date — the same period lock described under Accounting — and records the change in the audit log. Every field in the workspace becomes read-only and a banner explains that the books are locked through that date. To change something later, select Un-finalize on the Overview tab: it re-opens the workspace and lifts the lock, but only if the lock date is still the one this workspace set. If you have since closed a later period, that lock is left alone. See Accounting → Period locking.
If you change something later
Until you finalize, the workspace is a living draft. Correct a target and the opening entry is re-posted in place; remove one and the books are re-netted without it; edit an outstanding cheque and its posting is re-posted; remove a deposit and it is voided. Your accountant sends a revised year-end three months in? Re-import the trial balance and the ledger follows. Each change is written to the audit log, and the opening journal entry itself shows in the Journal like any other entry, with its lines labelled “Opening balance target” per account and “Opening Balance Equity (plug to balance)”.
Heads up — When the ledger cannot follow. Two things stop the opening entry from being re-posted: a lock date on or after the as-of date (set by a period lock, or by a finished QuickBooks migration), and a bank line that a completed reconciliation has already cleared. Your save still goes through, but a red banner appears at the top of every tab — “The ledger could not be updated to match the draft” — with the reason and a Retry button. Lift the lock or undo the reconciliation, then select Retry.
Check your work
Before you finalize, confirm the ledger against the closing reports from your old system. Run each report as of the as-of date:
- Trial Balance — every account should match your draft line for line, and Opening Balance Equity should show zero (or only the amount you deliberately left there).
- Balance Sheet — total assets, liabilities, and equity should agree with the old system’s year-end balance sheet.
- AR Aging and AP Aging — the per-customer and per-vendor totals should match the old aging reports, with no “Unattributed” line.
- Open Invoices — lists each opening invoice under the number you gave it.
- General Ledger for Opening Balance Equity — shows every opening posting in one place, handy for tracing a stubborn Unexplained balance.
All of these are described under Reports.