The Fundraising area is where you track the money your organization raises: donations (cash or gifts in kind), grants from funders, and — for registered charities — the official donation receipts donors need at tax time. Each record links to the journal entry it creates, so you can always trace a gift from the donor through to your financial statements. The examples below use our sample charity, Demo Community Society — the demo organization with Donations & grants switched on — rather than the for-profit Demo Company Inc.
Turn on Donations & grants
Fundraising is an opt-in module, and any organization type can switch it on. The choices that shape how gifts are booked — your contribution accounting method, fund accounting, and your CRA charity registration number — live on the same settings page but only appear for a club, non-profit, or charity.
To turn on fundraising:
- Open Settings → Organizations and open your organization. You need to be an Owner or Admin.
- Under Features, switch on Donations & grants. If the switch is missing, the person running your LineLedger site has turned the section off site-wide — see Site administration.
- On the Non-profit & charity card, set your Legal structure. Choosing Registered charity reveals the CRA charity registration number field — your Business Number with its RR program account, such as 123456789RR0001.
- Choose a Contribution accounting method: Deferral method or Restricted fund method. Picking Restricted fund method reveals the Fund accounting switch; turning it on seeds a default General Fund.
- Select Save. A Fundraising group appears in the sidebar with Donations and Grants. Donation receipts joins the group once the organization is a registered charity — the Charity organization type, a Canadian jurisdiction, and a CRA registration number on file. Demo Community Society is set up this way.
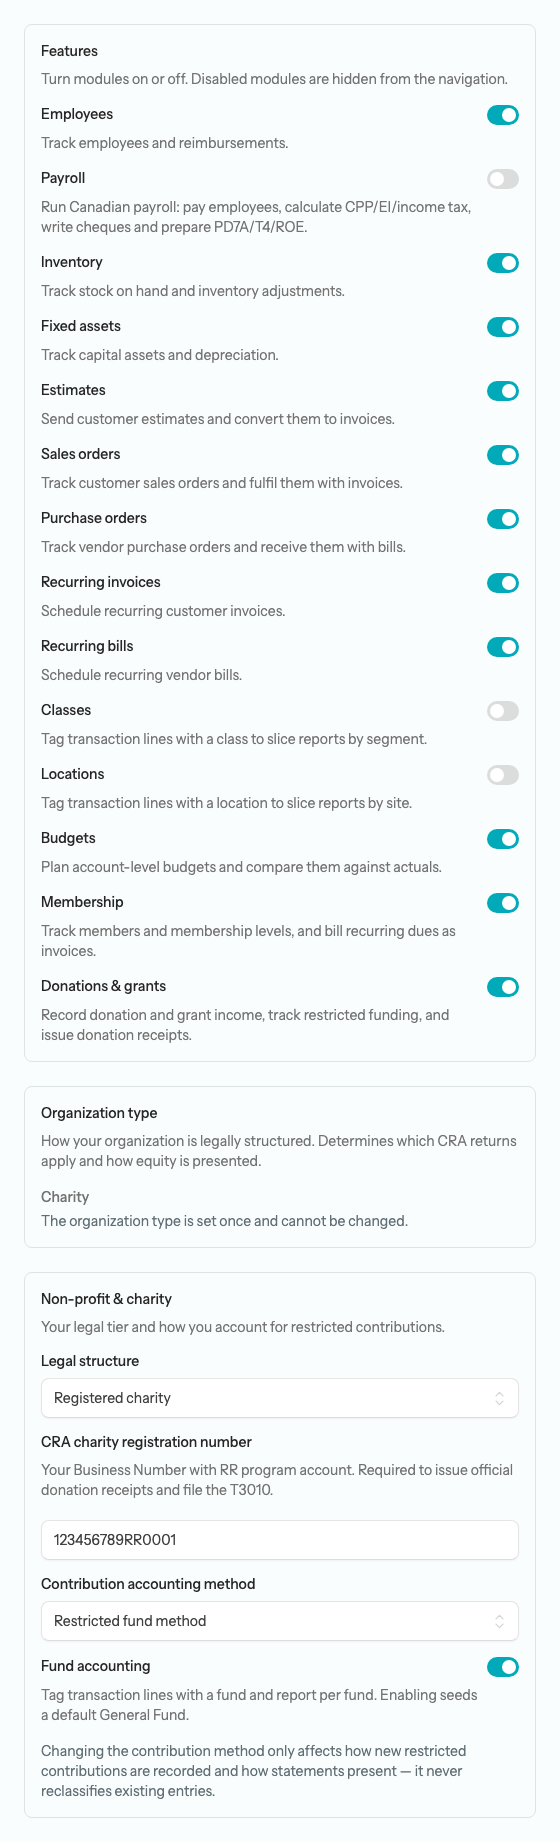
Note — Funds: restricted vs unrestricted. Donations and grants can be tagged to a Fund so you can report on money the donor restricted to a specific purpose separately from your general, unrestricted giving. Set your funds up first — the Funds list has no entry in the Settings sidebar yet, so see Funds under Lists for how to reach it. The Fund picker then appears on the donation and grant forms whenever you mark a gift restricted. The Fund dimension is available only when your organization uses the Restricted fund method with Fund accounting on (how Demo Community Society is set up, with a General Fund, a Building Fund, and an Endowment). Under the Deferral method there is no per-gift fund tag; restricted gifts are held in a deferred-liability account instead. Changing the method later only affects new gifts — it never reclassifies entries already posted.
Who sees the Fundraising group is up to you: Owners, Admins, and Accountants reach it automatically, while a member with the Custom role sees it only when Fundraising is among their selected sections. Whoever sends the invitation — an Owner or Admin — ticks those sections when they invite; after that, only the Owner can change a member’s role or sections, from the Edit button on the member’s row. See Settings → Team and permissions.
Record a donation
A donation records a gift your organization received — a cash contribution or a gift in kind. Recording one books the gift as revenue and moves the money (or the donated asset) onto your books. Donations start as drafts you can keep editing; posting locks the amounts into the ledger.
To record a donation:
- Open Donations from the Fundraising group in the sidebar, then select Record donation.
- Choose the Donor. Leave it on “Anonymous / no contact” for an unattributed gift. Picking a contact flags them as a donor, and donors sort to the top of the picker from then on.
- Pick the Gift type — Cash for money, or Gift in kind for donated goods or property recorded at fair market value.
- Set the Date (it defaults to today, and a click anywhere in the field opens the calendar) and the Amount.
- In Deposit to / record against, choose the bank or undeposited-funds account for cash, or the asset account that receives an in-kind gift. The list also offers expense accounts, so a gift of supplies you will use straight away can be expensed rather than capitalized.
- Pick a Donation revenue account, or leave it on Default donation income account.
- Optionally switch on Restricted gift. Under the Restricted fund method a Fund picker appears; under the Deferral method a Deferred / restricted liability picker appears instead (leave it on Default deferred-grants account or choose one). Either way, note how the gift may be used in the Restriction box.
- Registered charities also see Create an official donation receipt while recording a new donation. Switch it on to spawn a linked draft receipt you can review and issue. The switch is not offered when you reopen a draft, and a donation never spawns a second receipt.
- Add any internal Notes, then select Save draft.
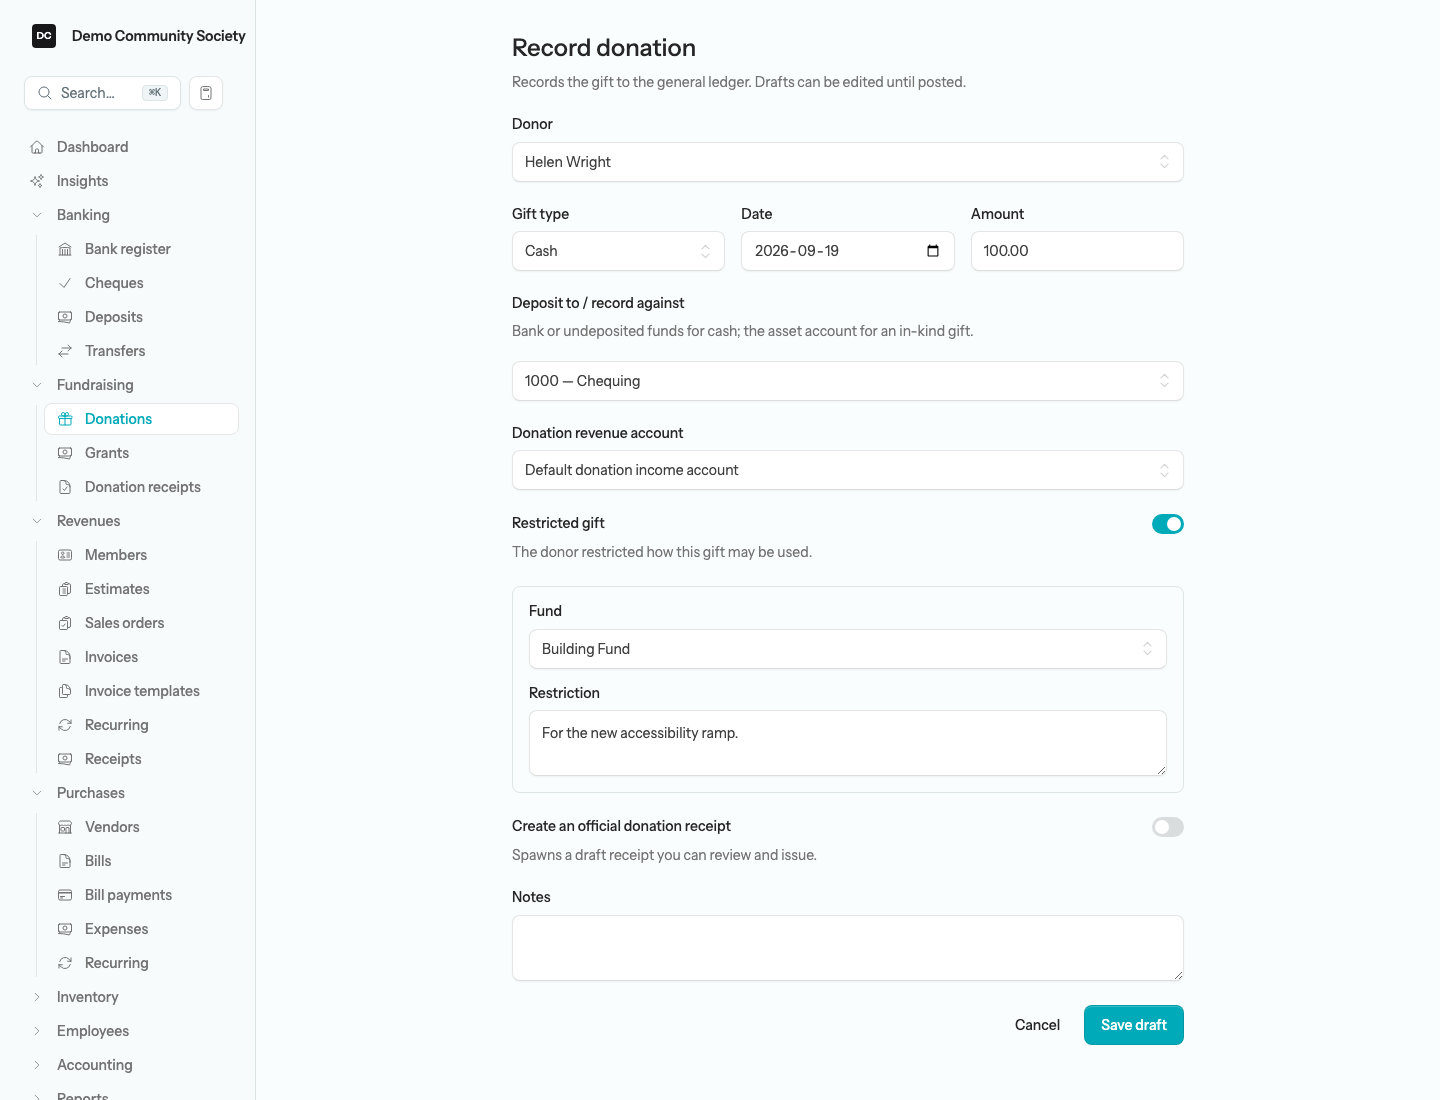
Saving leaves the donation as a draft. Its page shows an Edit button and a Post button; select Post to record it on the books. A posted donation shows its Gift type, Date, Amount, Deposited to account, Fund and Restriction, a View journal entry link to the entry it created, and a View linked donation receipt link if one was spawned. It also shows a Void button that reverses the journal entry if you need to back the gift out — the app asks you to confirm first.
Note — One person edits a record at a time. If a teammate already has a donation, grant, or receipt open for editing, you see who is editing instead of the form, and Owners and Admins can take over. While someone holds a record, Post, Void, Issue receipt, Reissue and Recognize revenue wait until they are done, and the same applies to the Funds list dialog. See Settings → Edit locks for how a lock is held and released.
Note — What posting does to your books. Posting a donation debits the deposit-to account (the bank, undeposited funds, or the asset or expense account receiving an in-kind gift) and credits donation revenue for the same amount. For a restricted gift under the Deferral method it credits the deferred / restricted-liability account instead, holding the money until it is spent; under the Restricted fund method it credits donation revenue tagged with the Fund. A receipt spawned from a donation carries no debit account, so issuing it never re-books the gift — there is no double count.
Tip — If posting is refused. The app refuses to post a donation dated on or before your closing date, one with no Deposit to / record against account, or one with a zero amount. When you leave a revenue or deferred picker on its default, posting looks for an active income account whose name contains “donation” or “contribution” (falling back to your lowest-numbered income account), and for a current liability named “deferred” or coded 2500. If neither exists, posting stops with a message telling you which account to set up.
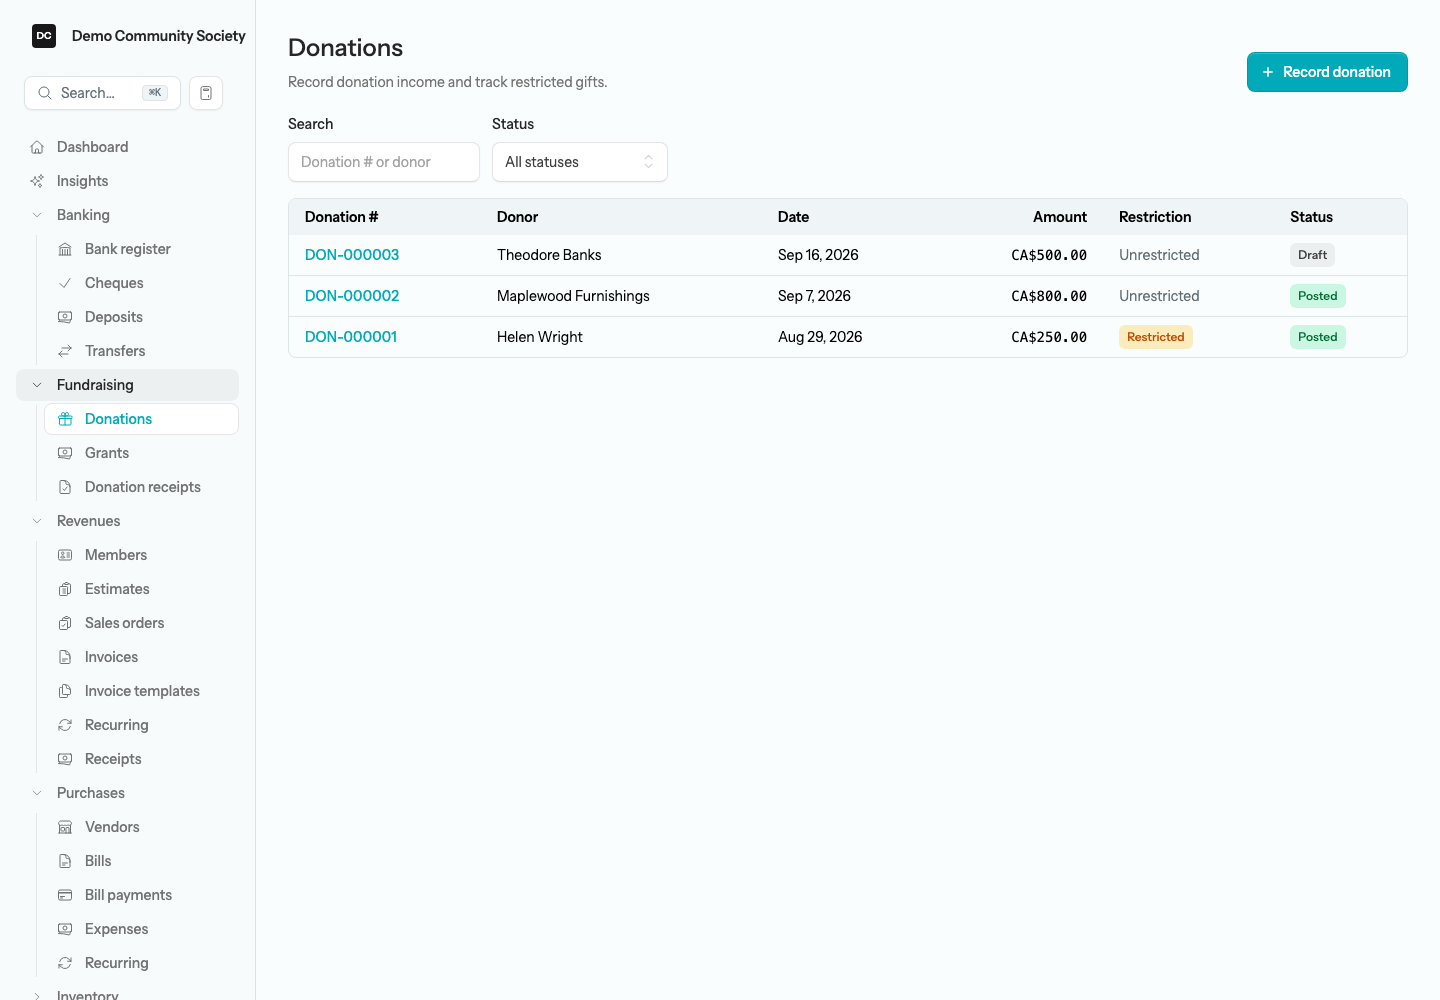
Open Donations from the sidebar to see the list. Each row shows the Donation #, Donor, Date, Amount, Restriction (a Restricted badge or Unrestricted), and Status — Draft, Posted, or Void. Search by donation number or donor, and use the Status filter to narrow the list.
Record a grant
A grant records an award from a funder — a foundation, a government program, or another organization. Grants are usually restricted to a purpose and, under the Deferral method, recognized as revenue over the funding period rather than all at once. Like donations, a grant starts as a draft and posts its award to the ledger when you are ready.
To record a grant:
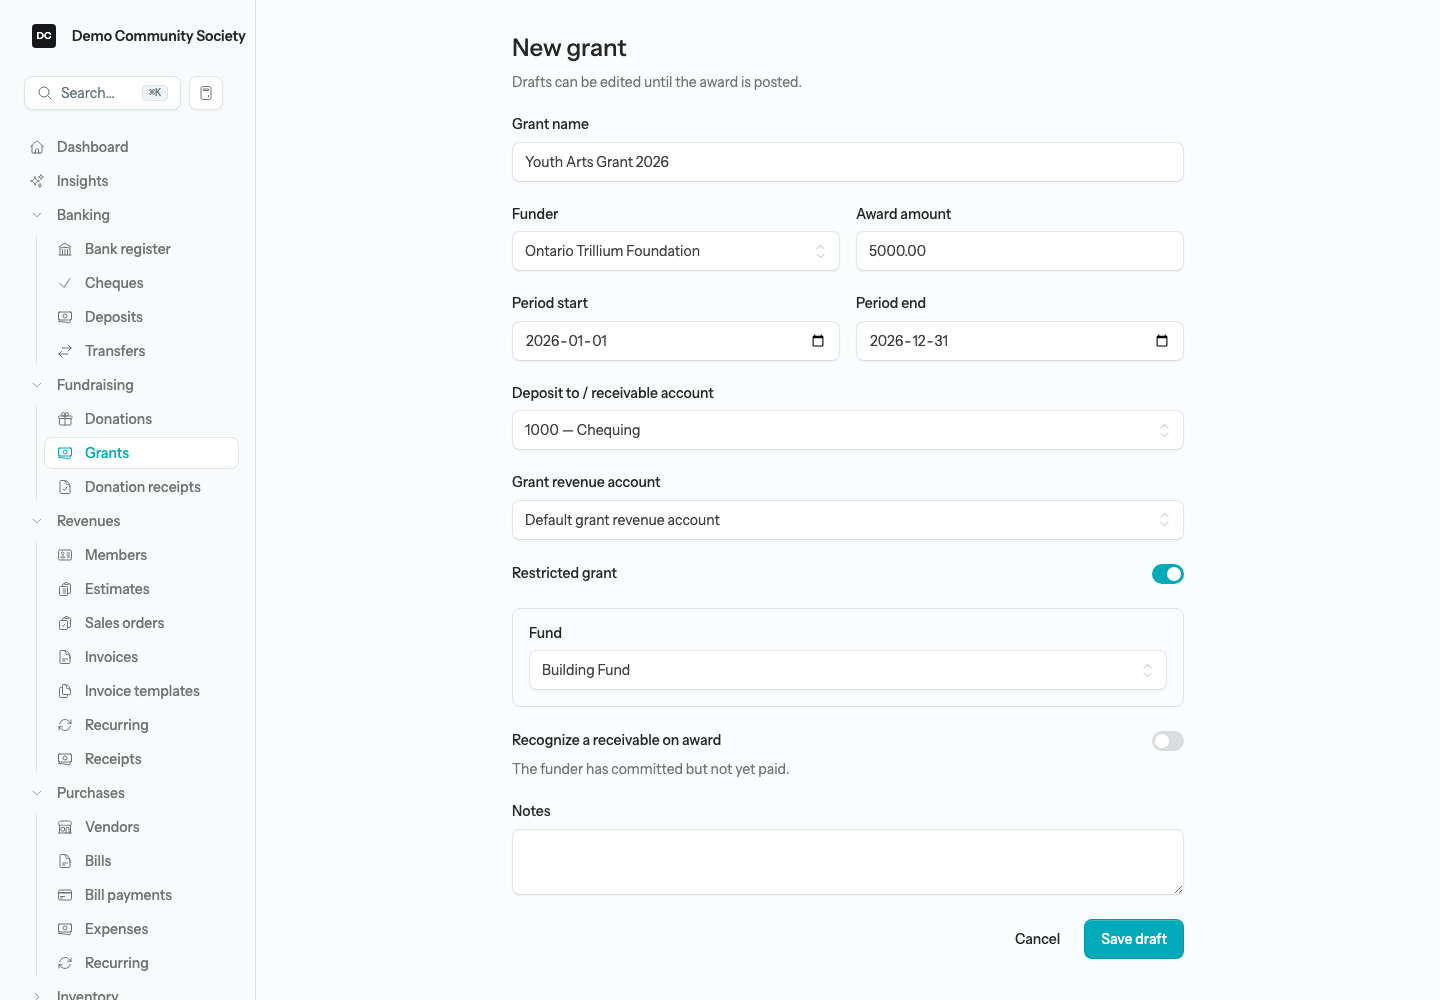
- Open Grants from the Fundraising group, then select New grant.
- Enter the Grant name, choose the Funder (or leave it on No funder), and enter the Award amount.
- Set the Period start and Period end — the window the grant covers. The award is posted with the Period start as its date, so a grant whose period starts on or before your closing date cannot be posted; with no period, the award is dated the day you post it.
- In Deposit to / receivable account, choose where the money lands — your bank if the funder has paid, or a receivable account if it has only committed. Pick a Grant revenue account, or leave it on Default grant revenue account.
- Leave Restricted grant on for a purpose-restricted award. Under the Restricted fund method a Fund picker appears; under the Deferral method a Deferred / restricted liability picker and a Recognition method appear instead.
- Under the Deferral method, choose a Recognition method — Manual, or Straight-line over the period — to record how you intend to release the funding. Whichever you choose, nothing posts on its own: each Recognize revenue dialog pre-fills an even monthly slice that you can accept or change (see below).
- Switch on Recognize a receivable on award to note that the funder has committed but not yet paid. Pair it with a receivable account in step 4 — the account you pick there is what puts the award into money owed to you.
- Add any Notes and select Save draft, then open the grant and select Post award to record it on the books.
Note — What posting does to your books. Posting a grant award debits the deposit-to or receivable account for the full award, dated the Period start. For a restricted grant under the Deferral method it credits the deferred / restricted-liability account, the grant’s status becomes Active, and the deferred balance waits there until you recognize it (see below). Under the Restricted fund method, or for an unrestricted grant, it credits grant revenue right away — the award is recognized in full at once, there is no deferred balance to release, and the grant goes straight to Completed. The same refusals apply as for donations: a locked period, no deposit-to account, a zero award, or no default revenue or deferred account (posting looks for an income account named “grant”).
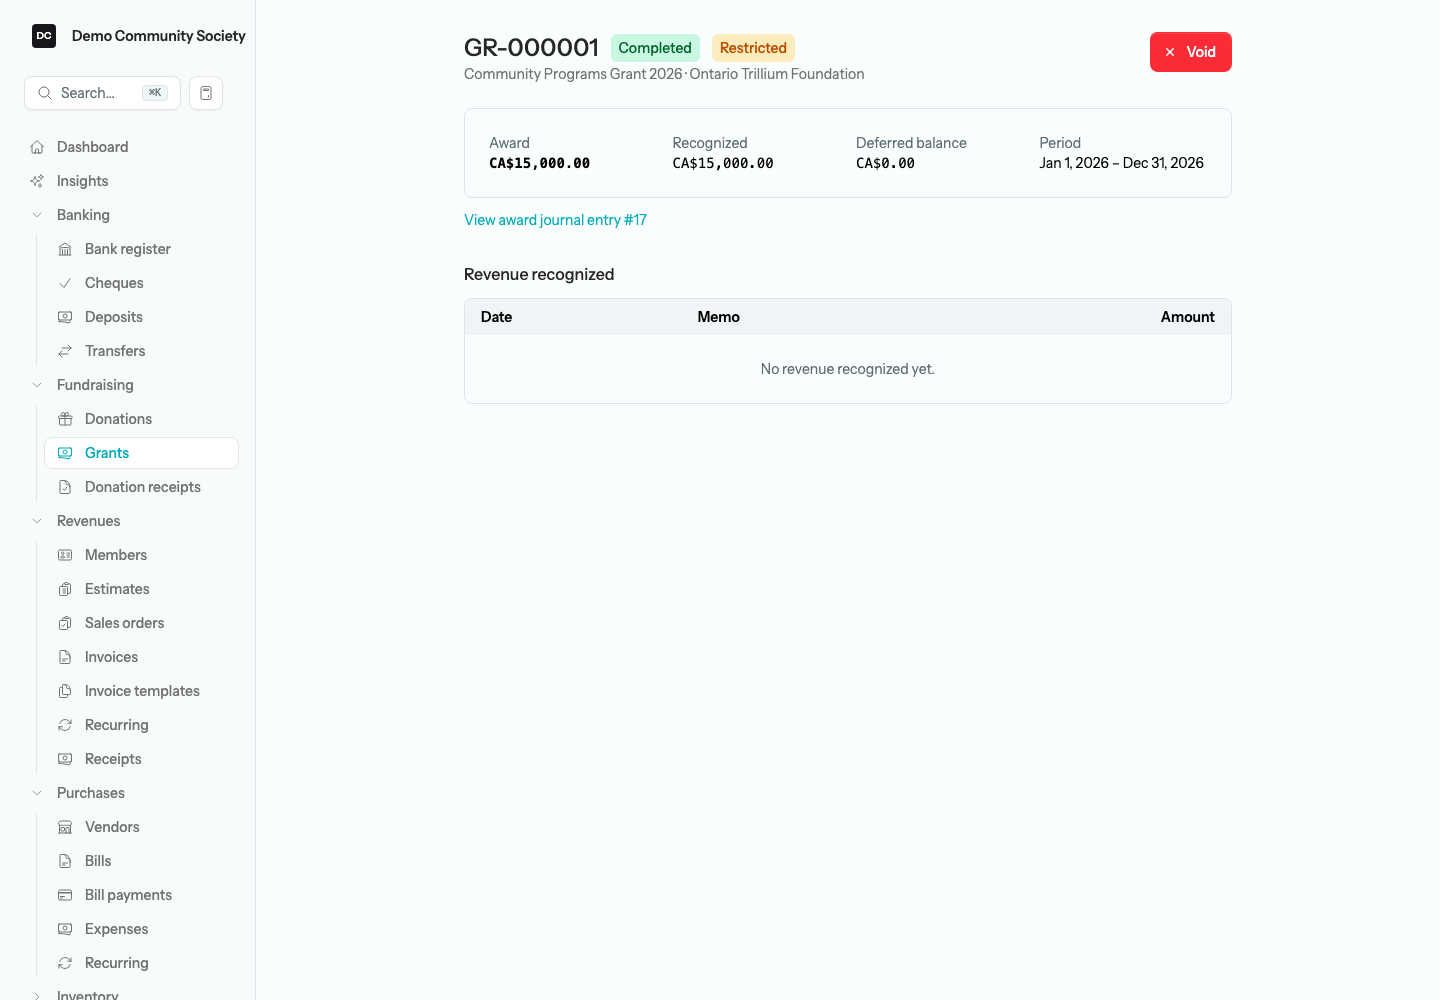
A posted grant’s page shows four tiles — Award, Recognized, Deferred balance, and Period — with a View award journal entry link beneath them and a Revenue recognized table listing each release. The Grants list shows the same Deferred balance beside each grant’s Grant #, Name, Funder, Award, and Status (Draft, Active, Completed, or Void), so you can see at a glance how much is still to be recognized.
Recognize deferred grant revenue
This step applies only under the Deferral method. After you post a restricted award, the whole grant sits in the deferred-liability account; you move it into grant revenue yourself as you spend the funding. There is no scheduler that does this for you — recognition is always a deliberate action, whichever Recognition method you chose. (Demo Community Society uses the Restricted fund method, so its grants are recognized in full at award and skip this step entirely.)
To recognize grant revenue:
- Open a posted, restricted grant that still has a Deferred balance. A Recognize revenue button appears in the top-right.
- Select Recognize revenue. In the Recognize grant revenue dialog, the Amount is pre-filled with an even slice — the award divided across the calendar months of the grant period, or the whole remaining deferred balance if the grant has no period. Accept it or type the amount you want to release; the final slice may need topping up to clear the balance exactly.
- Set the Date (it defaults to today) and select Recognize.
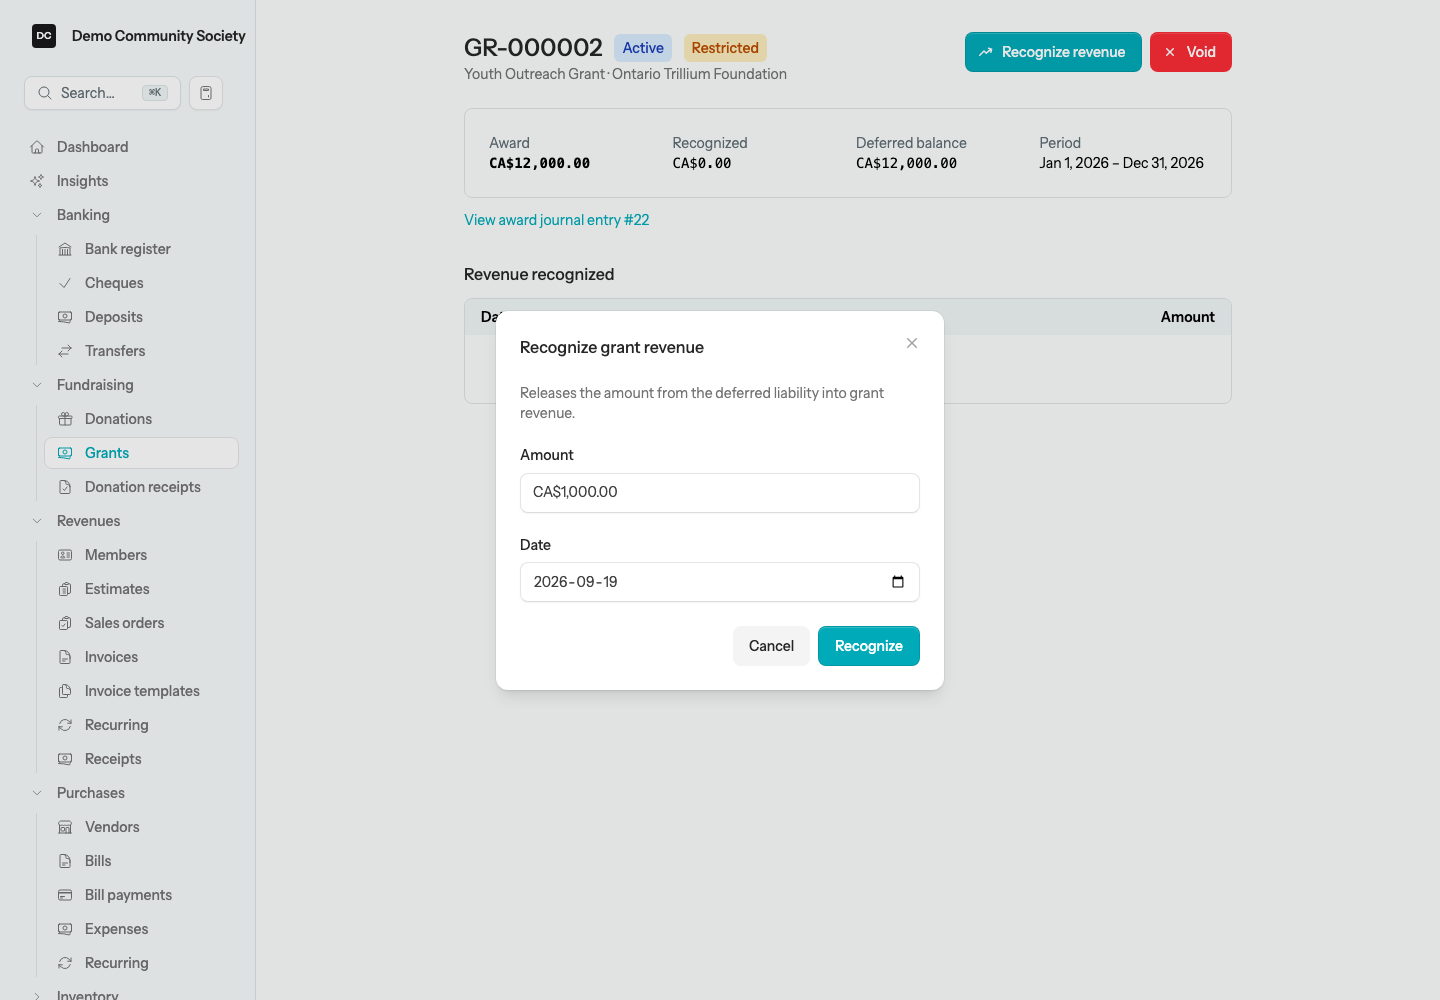
Note — What recognizing does to your books. Each recognition debits the deferred / restricted-liability account and credits grant revenue, adds a row to the grant’s Revenue recognized table, and advances its Recognized and Deferred balance figures. The app refuses to recognize more than the award total. When the full award has been recognized the grant’s status flips from Active to Completed.
Heads up. Voiding a grant reverses both the original award entry and every revenue recognition posted against it, then keeps the voided grant on file for your audit trail. The Void button is offered on any posted grant, Completed ones included, and asks you to confirm first. There is no delete: a posted grant cannot be edited or removed, only voided.
Issue an official donation receipt
An official donation receipt is the tax receipt a donor uses to claim their gift. Issuing one is reserved for registered charities — the Donation receipts page and its New receipt button only appear once the organization is set up as a registered charity. Each receipt gets its own serial number the moment the draft is saved, and freezes when issued, so the numbered audit trail the CRA expects stays intact.
To issue an official donation receipt:
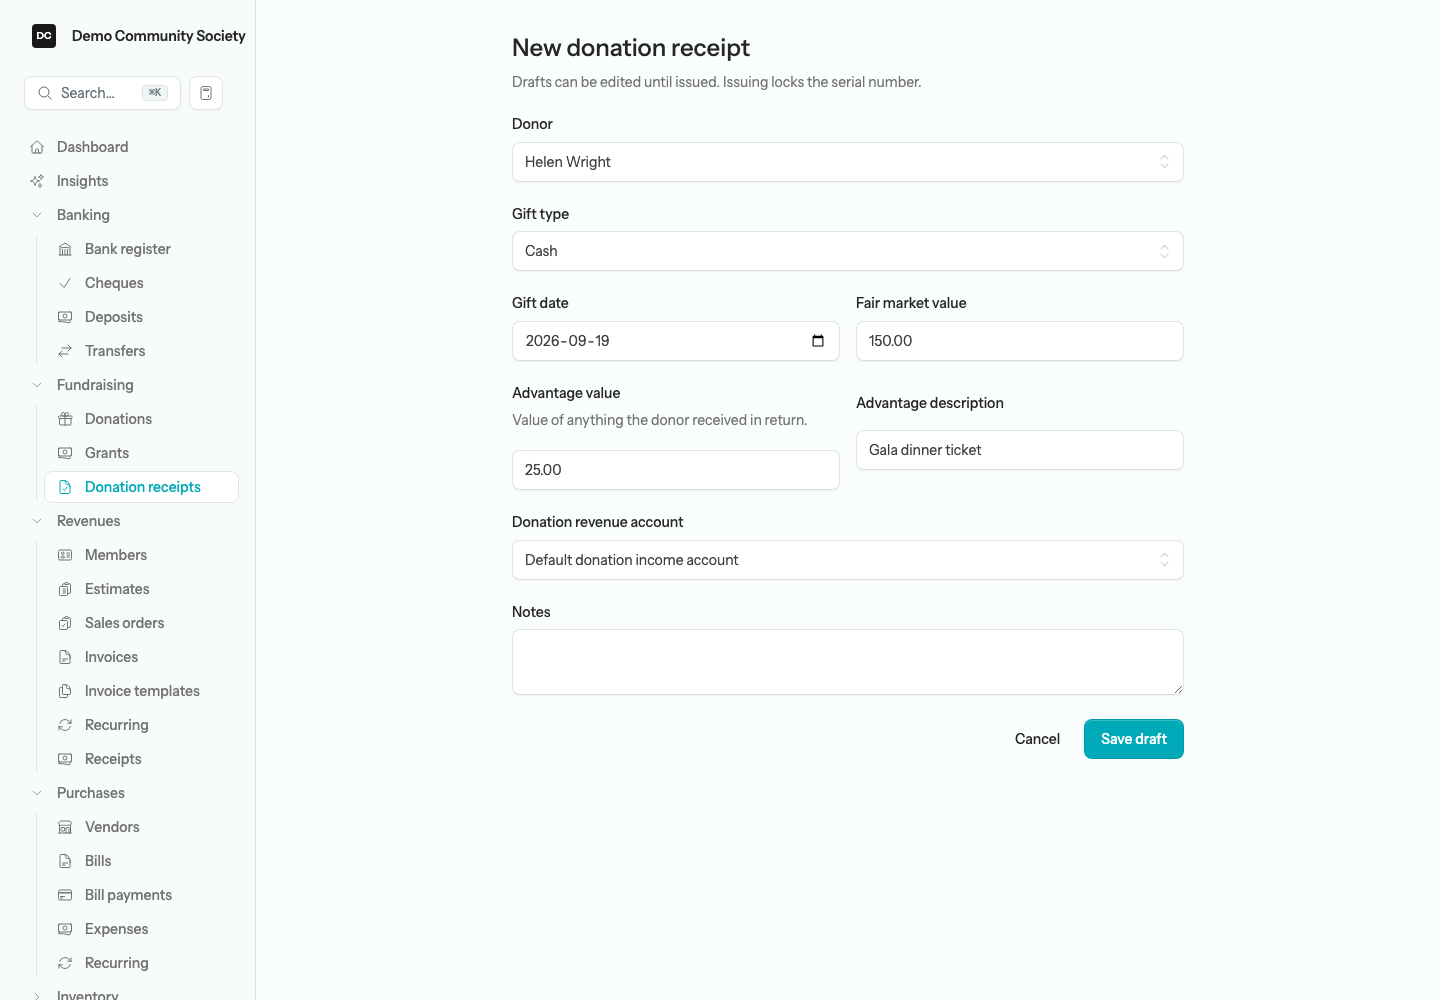
- Open Donation receipts from the Fundraising group, then select New receipt. (Switching on Create an official donation receipt when you record a donation spawns one of these drafts for you — open it from the donation’s View linked donation receipt link.)
- Choose the Donor, or leave it on No linked contact. Saving copies the donor’s name and billing address from their contact record onto the receipt, and that snapshot is what prints — so check the contact’s address before you save.
- Pick the Gift type and set the Gift date.
- Enter the Fair market value of the gift.
- If the donor received anything in return — a meal, a ticket, goods or services — enter its Advantage value and an Advantage description. The advantage reduces the amount the donor can claim.
- For a gift in kind, fill in the Gift in kind box: the Description of property, the Asset / expense account to debit at fair market value, and Appraised by with the Appraisal date. The app insists on the appraisal for a gift of $1,000 or more.
- Pick the Donation revenue account, or leave it on Default donation income account.
- Select Save draft. The receipt now carries its serial number, and the Eligible amount shown on its page is the fair market value minus the advantage.
- When everything is correct, open the receipt and select Issue receipt. Issuing freezes the receipt, records today as its issued date, fixes the eligible amount, and posts the in-kind ledger entry if there is one.
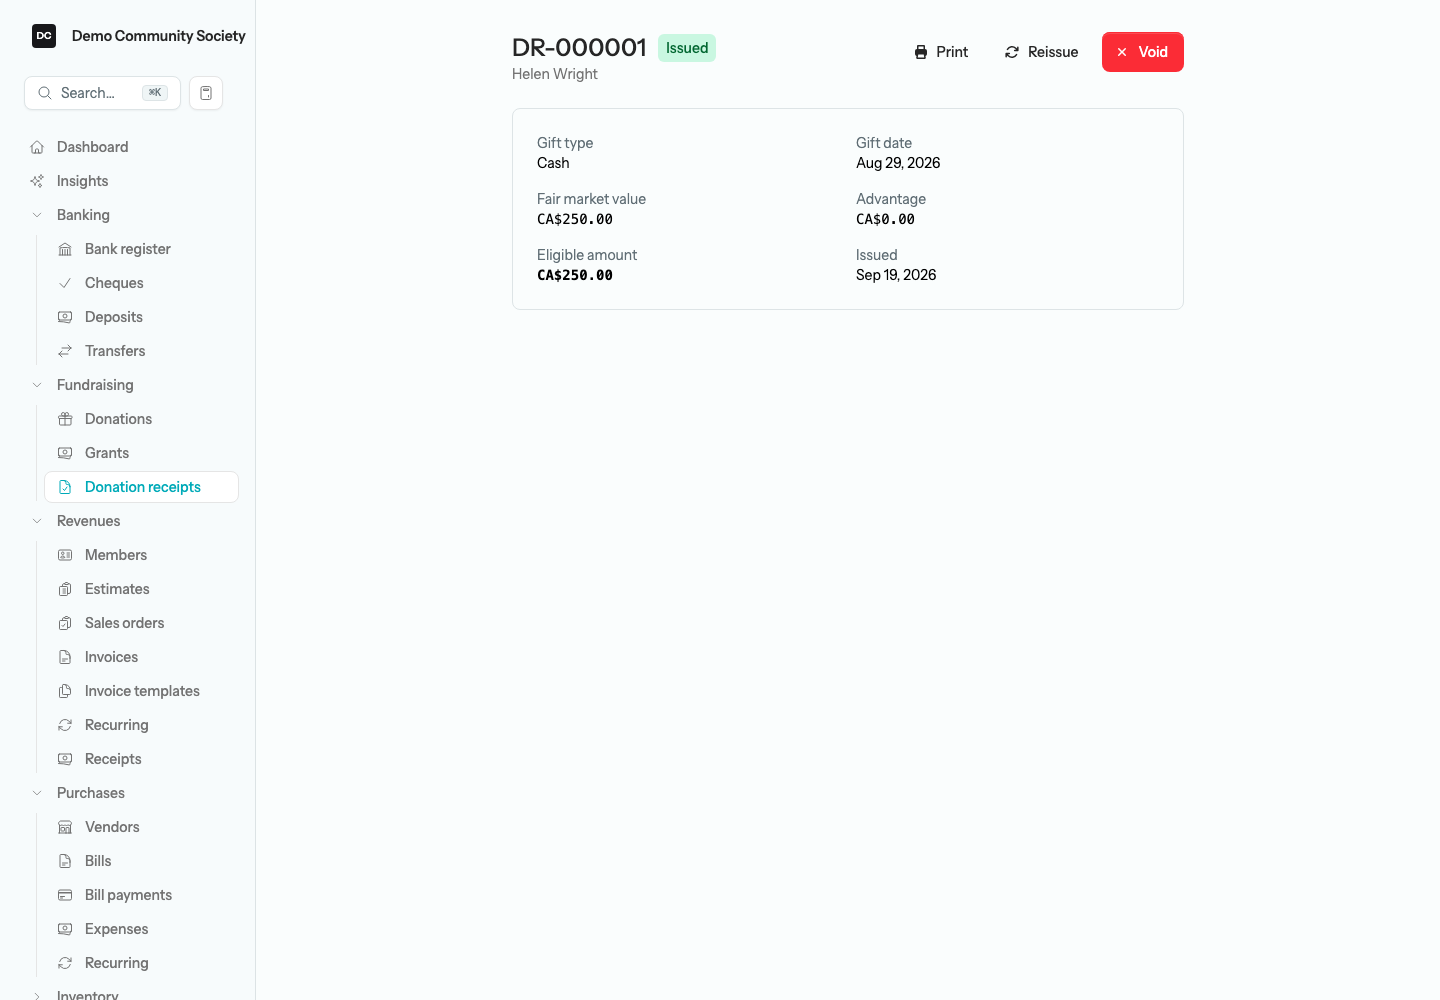
- Once issued, select Print to open the official receipt as a PDF in a new tab. It carries your charity’s name and registration number, the receipt number, the dates the gift was received and the receipt was issued, the donor’s name and address, the amount received, any advantage, and the eligible amount for tax purposes.
Note — What issuing does to your books. Issuing a cash receipt posts no general-ledger entry — the money was already booked when you recorded the donation or the deposit, so posting again would double-count the revenue. An in-kind receipt you create here with an Asset / expense account to debit is different: issuing it debits that account and credits donation revenue for the fair market value, putting the donated property on your books. A receipt spawned from an in-kind donation has no debit account, because the donation already booked the property; leave it that way unless the gift was never recorded elsewhere. Issuing also runs the CRA checks first — the eligible amount must be greater than zero, an advantage needs a description, and an in-kind gift needs its property description (plus an appraisal at $1,000 or more).
Cancel or correct an issued receipt
There is no delete anywhere in Fundraising, and an issued receipt cannot be edited. The CRA requires that cancelled receipts be kept so the numbered sequence has no gaps, so LineLedger gives you two ways to change one: void it, or reissue it.
To cancel an issued receipt:
- Open the receipt and select Void. The Void receipt dialog reminds you that the serial number is retained on the record, as the CRA requires, and that any in-kind ledger entry is reversed.
- Type a Reason — it is required — and select Void receipt.
- The receipt keeps its number, shows a Void badge and “Voided:” followed by your reason, and can still be printed: the PDF comes out stamped CANCELLED, so you can produce it if the CRA asks.
To correct an issued receipt:
- Open the receipt and select Reissue. The app voids the original with the reason “Reissued as a corrected receipt.” and opens a fresh draft on the next serial number, carrying over the donor snapshot, amounts, advantage, in-kind details, and accounts, and linked back to the cancelled receipt.
- Select Edit, fix what was wrong, and select Save draft.
- Select Issue receipt, then Print the corrected receipt for the donor.
The Donation receipts list shows each receipt’s Receipt #, Donor, Gift date, Eligible amount, and Status — Draft, Issued, or Void. Search by receipt number or donor name, and use the Status filter to find drafts still waiting to be issued.
Reports tied to this area
- Donations by Donor — posted donation revenue from each donor over a period.
- Donations by Fund — posted donations grouped by the restricted fund they were tagged to (only with Fund accounting on).
- Grants Summary — every grant except voided ones, with its award, recognized-to-date revenue, and deferred balance.
- T3010 Summary — for registered charities, the receipted donations, revenue, expenditures, and balance-sheet totals you need for the annual charity information return. It sits in the Accountant & Taxes group.
All of these are described under Reports.