The Inbox is a holding area for paper-trail documents — supplier receipts, vendor bills, expense slips — before they become real transactions. You drop a file in (or have it emailed straight to a private address), the app optionally reads the vendor, total, and date off it, and you promote the result in one click. For a bill, expense, or reimbursement that click only builds a draft, so nothing touches your books until you review and post it. The one exception is matching a receipt to an imported bank transaction, which records the expense on the spot — see below. The examples use our sample business, Demo Company Inc.
Open Inbox → Review queue from the sidebar; the Inbox group only appears for members whose role includes the Inbox section. Each row shows the Document (its file name, with Upload or Email beneath it to say how it arrived), the Vendor and Total once they have been read, and a Status badge tracking where the item is in its life. A row that is ready shows a Review button, and every row has Dismiss.
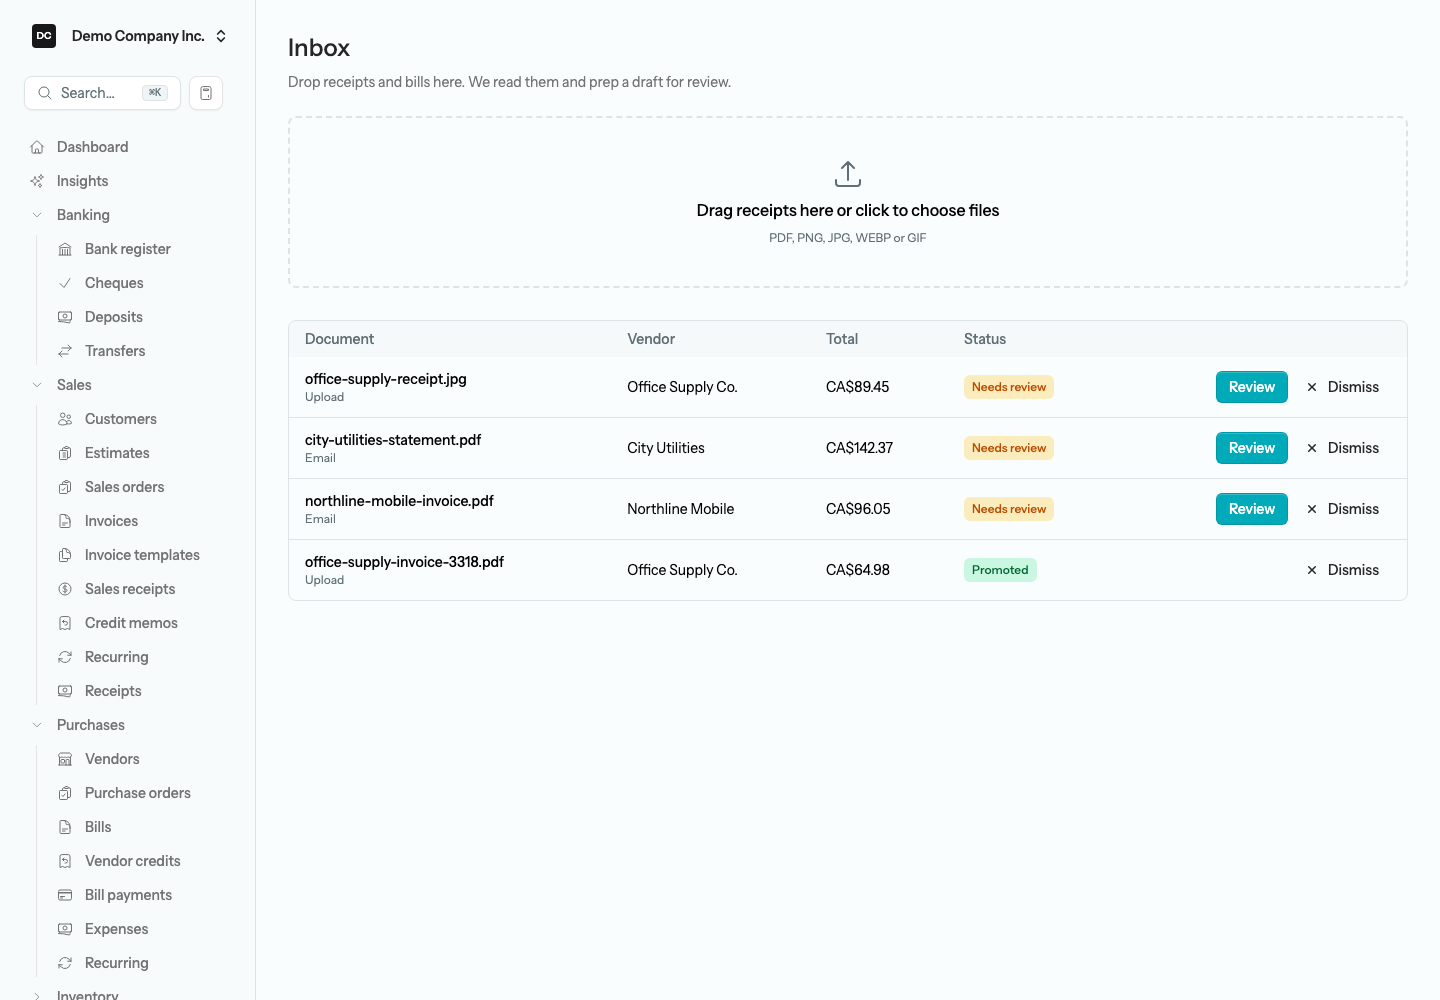
Add documents by drag-and-drop
The fastest way to get a receipt into the system is to drop the file onto the inbox. You can add several at once, and each one becomes its own item.
To upload documents:
- Open Inbox → Review queue from the sidebar.
- Drag one or more files onto the dotted drop zone, or click it to pick files from your computer.
- Select the Add to inbox button that appears once files are chosen — it counts them for you, for example Add 3 to inbox. A “Documents received” message confirms the upload.
Accepted file types are PDF, PNG, JPG, JPEG, WEBP, and GIF, up to 10 MB each by default (the person who runs your server can change that limit). Staged items show up immediately with a status of Pending or Reading…, and the list refreshes itself every few seconds until the reading finishes — you do not need to reload the page.
Note — What the status badges mean. Pending and Reading… mean the document is queued or being read. Needs review means it is ready for you — it is the only status that shows a Review button. Promoted means you have already turned it into a document; the row stays in the queue with a green badge until you dismiss it. Failed means the reading job itself crashed or timed out: the row offers only Dismiss, so dismiss it and upload the file again. A document the app simply could not make sense of does not fail — it still reaches Needs review, but with nothing read off it (the date starts at today and the amount at zero) and no notice on the review screen to say so, so enter the details by hand.
Reading receipts automatically
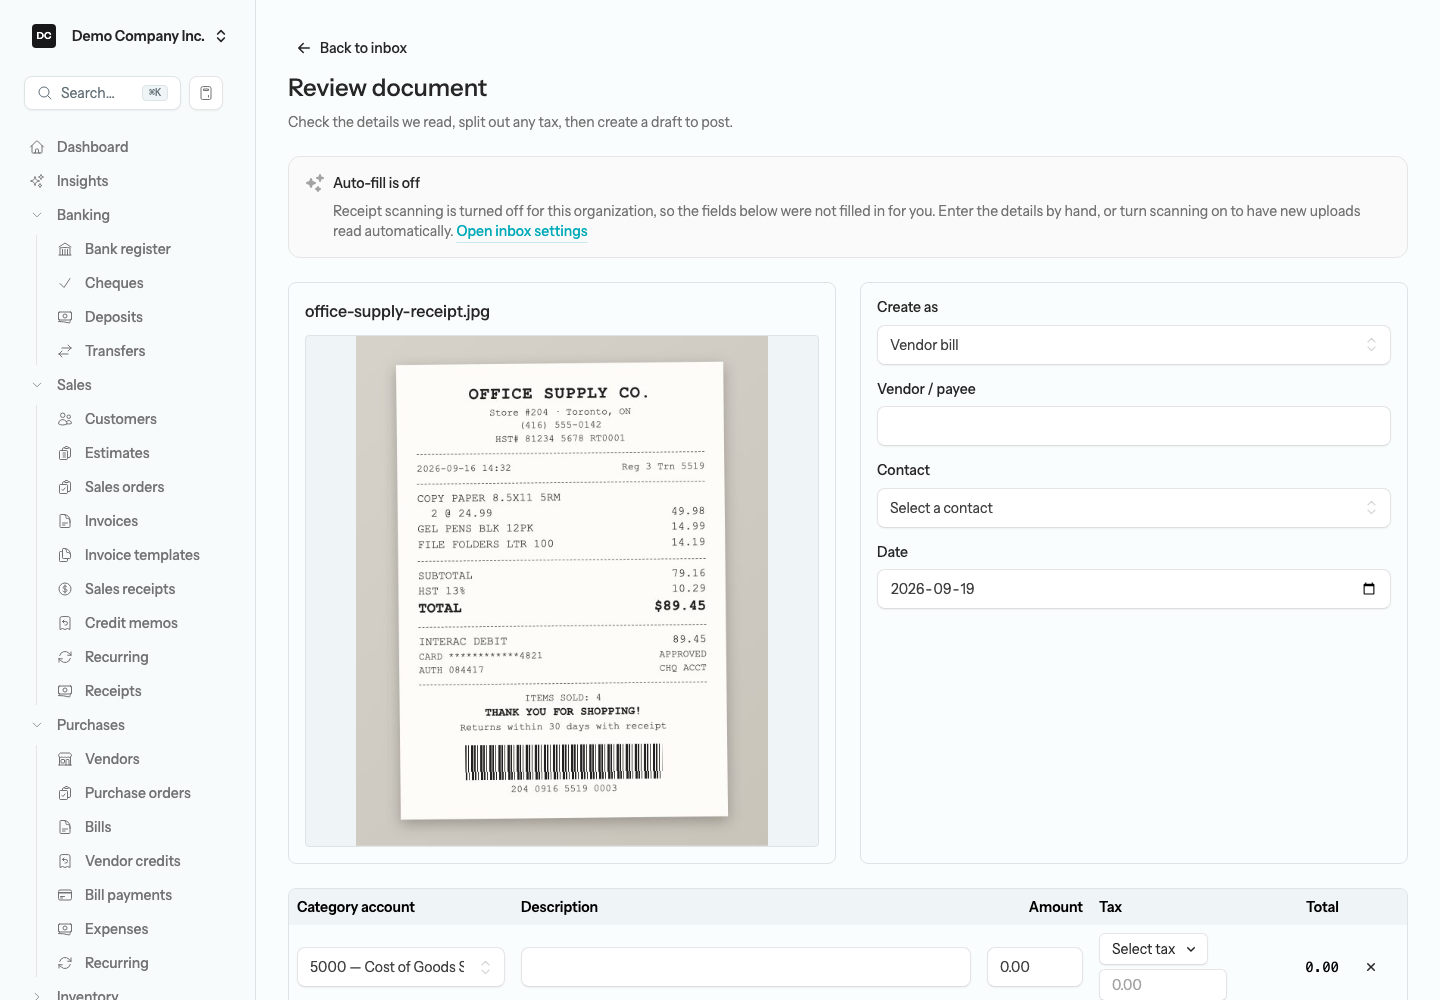
When automatic reading is switched on, the app uses AI to pull the vendor, the total, and the date off each document and pre-fill the review form for you. It also tries to match the vendor name to a contact you already have, so the draft points at the right supplier, and pre-selects a category account for the spend (see Category suggestions below). Reading is entirely optional: with it off, every document still lands in the queue ready for manual entry — you just type the details yourself.
To turn on automatic reading:
- Sign in as an Owner or Admin — Settings → Inbox email is only open to those roles; anyone else is refused with a “403” page.
- Open Settings → Inbox email. It is not listed in the Settings menu: go to /settings/inbox-email directly, or follow the Open inbox settings link in the Auto-fill is off notice on a review screen — the link appears only when the switch that is off is your organization’s.
- Switch on Read receipts automatically.
- Select the Save button beneath the switch — each switch on this page has its own Save.
Note — Reading is doubly opt-in. Documents are only ever sent for automatic reading when two switches agree: the person who runs your server has to enable the feature there (and supply an AI key), and your organization has to flip its own Read receipts automatically switch. Until both are on, nothing leaves your books for analysis and every document simply waits in Needs review for you to fill in.
You do not have to remember which switch is missing. When a document reaches Needs review without being read, the top of the review screen shows an Auto-fill is off notice that names the gate that is off. If it is your organization’s switch, the notice includes an Open inbox settings link; if it is the server, it asks you to enter the details by hand for now and have an administrator enable the scanning service.
Forward documents by email
Most receipts and bills arrive in your email in the first place. Instead of saving each one and dropping it in by hand, you can give Demo Company Inc. a private forwarding address and email documents straight into the inbox. Each attachment in an accepted format (PDF, PNG, JPG, JPEG, WEBP, or GIF) becomes its own inbox item, marked Email in the queue with the sender’s address recorded on it. Attachments in any other format — a Word file, a HEIC photo, a ZIP — are skipped without a warning, and the message text itself is not kept, so make sure the receipt is attached as a PDF or image.
To set up email forwarding:
- As an Owner or Admin, open Settings → Inbox email (see above for how to reach it).
- Switch on Accept documents by email.
- Select Save. A Forwarding address appears, in the form inbox+yourtoken@your-domain, with a copy button beside it.
- Copy that address and forward (or auto-forward) your receipts and bills to it — from the email address you sign in with.
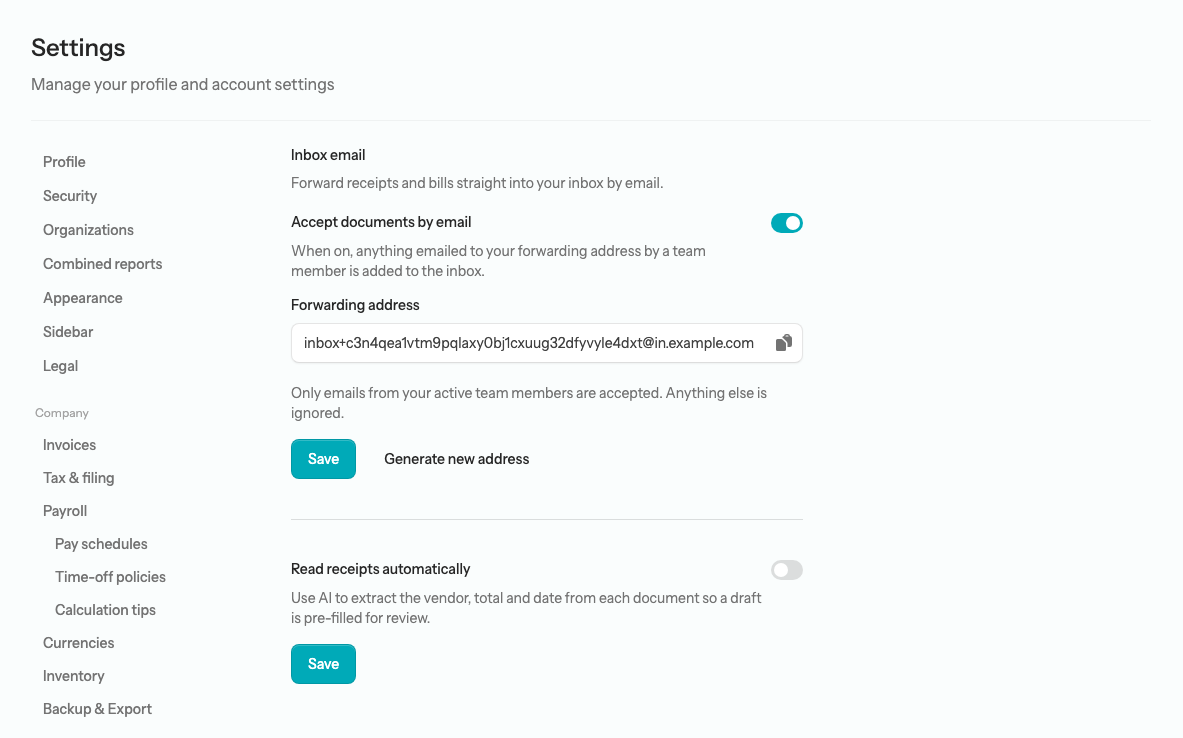
Heads up — Only your team can email in. For security, the forwarding address only accepts mail sent from the email address of a member of your organization — the same address that member signs in with. Anything from an unknown sender is refused, so a leaked address cannot be used to stuff your books with junk. The check is membership alone: an account a site administrator has disabled can still email documents in until that person is removed from the organization. If the address does get out, select Generate new address and confirm — the old one stops working immediately.
Note — What your operator has to set up. Email forwarding depends on two things only the person who runs your server can configure: an inbound mail domain and a signing secret for the mail provider’s webhook. If the domain is missing, Settings → Inbox email says “Inbound email is not configured on this server” the moment you switch Accept documents by email on. If the domain is set but the secret is not, the page still shows an address — but every forwarded email is refused, with no warning on the page. So if forwarded documents never appear in the queue, ask your operator to check both; drag-and-drop uploads keep working regardless. For the operator: these are the INBOUND_DOMAIN and INBOUND_EMAIL_SIGNING_SECRET settings, and automatic reading needs INBOX_OCR_ENABLED and ANTHROPIC_API_KEY — all four are listed under Optional subsystems in the LineLedger README.
Review a document and create a draft
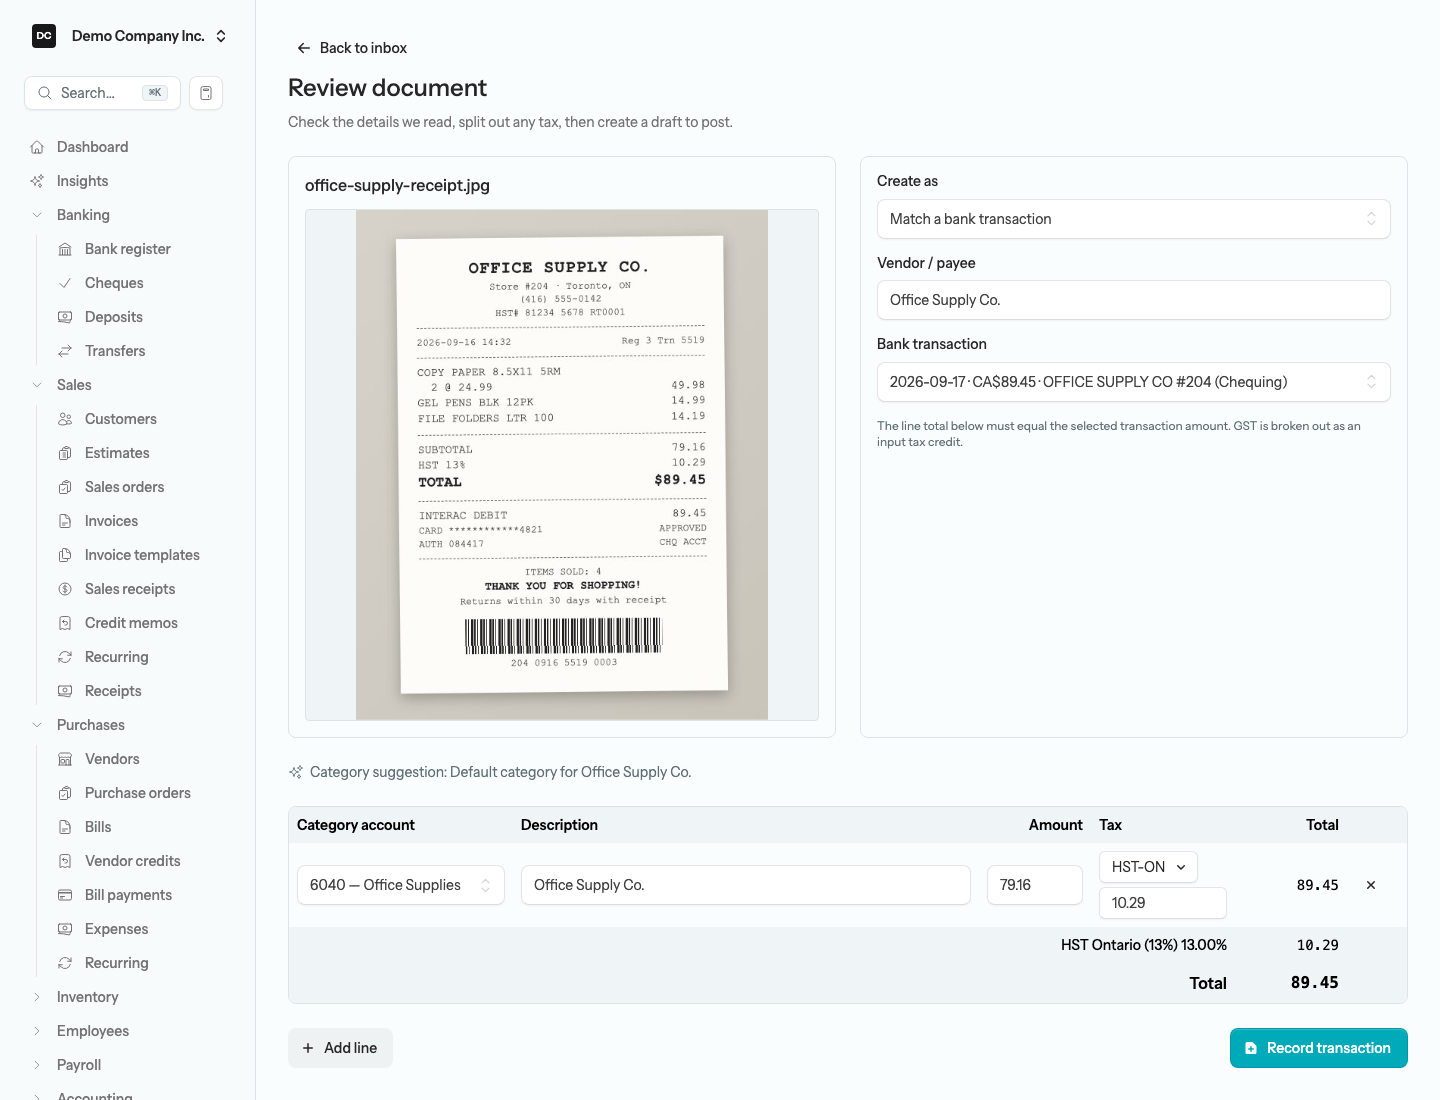
Once an item reaches Needs review, you check what was read and turn it into a transaction. Select Review on its row in the queue to open the review screen. The document sits on the left — an image previews inline and opens full-size in a new tab when you click it, while a PDF gets an Open document button that opens it in a new tab — and the form on the right holds the details to confirm, with a category-and-tax line grid below it. Back to inbox (or the Escape key, which asks first if you have typed into the form) returns you to the queue.
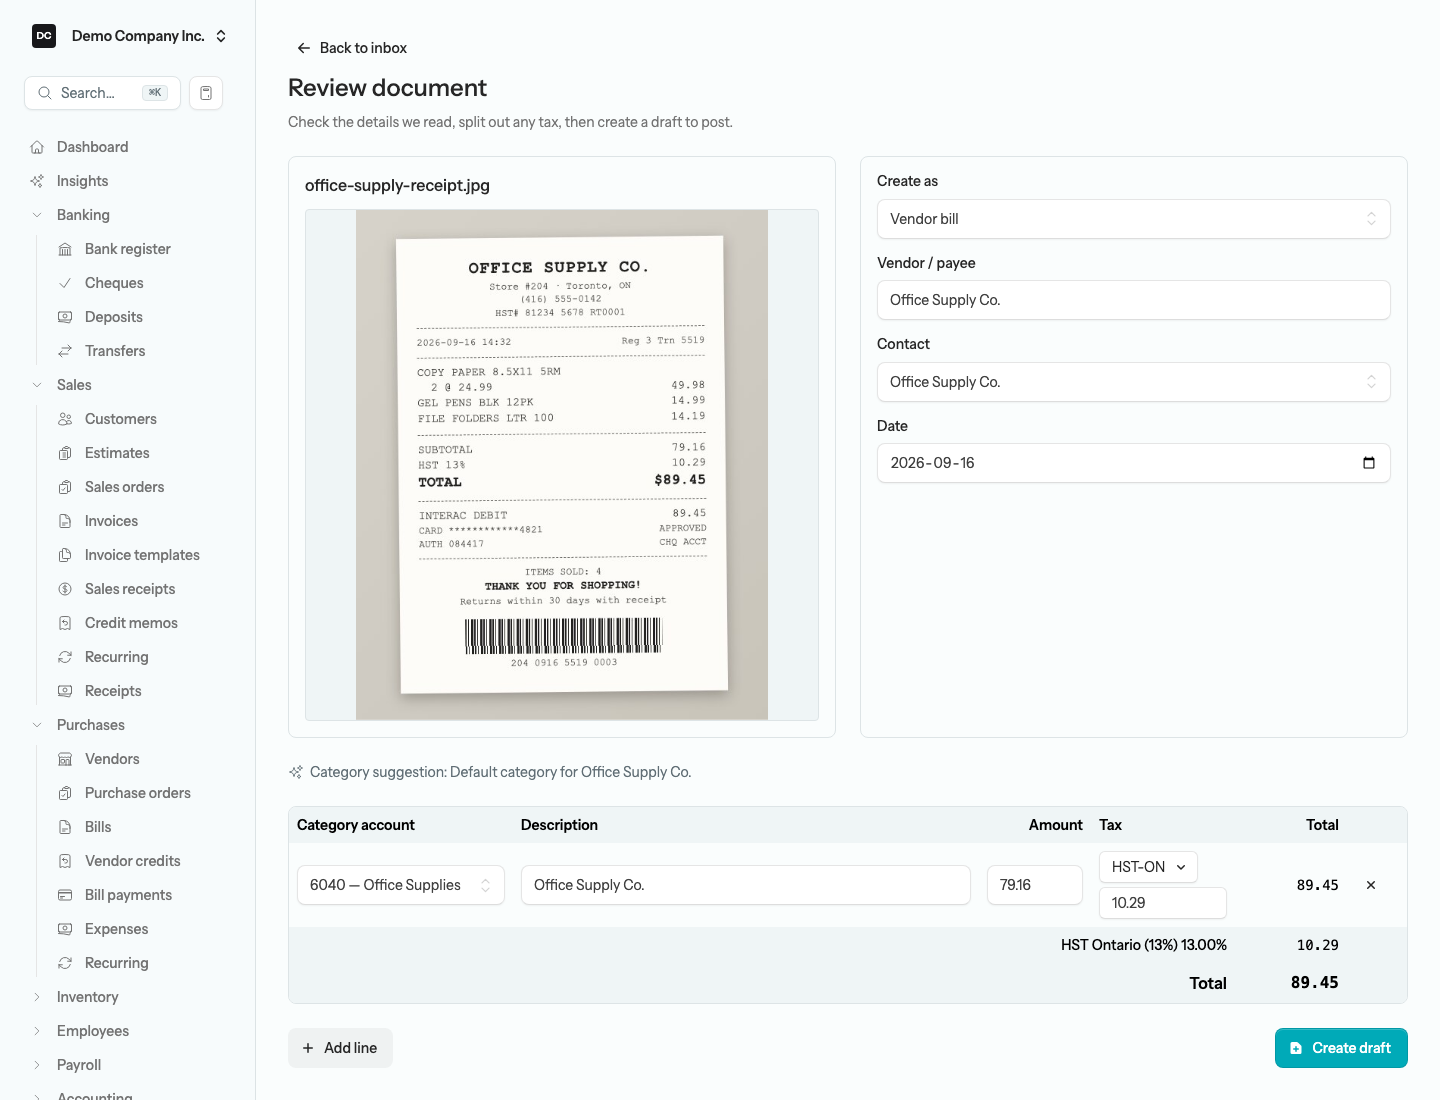
To promote a document:
- In Create as, choose what to build: Vendor bill (something you will pay later), Expense (paid now), Employee reimbursement (money an employee or owner is owed back), or Match a bank transaction (record the receipt against an imported statement line — see A bank match posts immediately below).
- Check the Vendor / payee name. Below it, a bill needs a Contact and a reimbursement needs an Employee / owner — the same field, relabelled and narrowed to contacts marked as employees, with an Add an employee link if there are none yet. An expense can stand on the typed payee name alone, and a bank match has no contact field.
- Check the Date, correcting it if it was misread — a click anywhere in the field opens the calendar. There is no Date on a bank match: the transaction’s own date is used.
- On each line, set the Category account the spend should land in — for example Office Supplies or Meals & Entertainment — a Description (it is carried onto the draft’s line and, once posted, into the journal entry), the pre-tax Amount, and the Tax. The Tax menu lets you tick up to two codes (for example GST and PST), and each is shown on its own row in the totals; the box beneath it shows the calculated tax as a placeholder and accepts a typed figure when the receipt says otherwise. Use Add line to split one receipt across several categories, and the × at the end of a line to remove it.
- For an expense, also choose Paid from — the bank, credit-card, or other current-asset account (such as petty cash) the money came out of. For a bank match, pick the Bank transaction to clear.
- Select Create draft — or Record transaction for a bank match.
Tip. Every dollar cell on the review screen — the Amount and the tax box on each line — doubles as a calculator with + − × ÷. Type 45.99*3 or 120/4 and a tape shows each step; press Enter or click away to commit the result.
Category suggestions
When a document has been read automatically, the app pre-selects a category for the line and a Category suggestion line above the grid explains the pick. It tries four sources in order and uses the first that fits: the Default expense account set on the vendor’s record (“Default category for …”); the account you have used most on that vendor’s recent posted bills and expenses (“You usually file … here”); how you categorized an imported bank line with the same description — the exact wording first (“Matches how you categorized … before”), then the same merchant with reference numbers, dates, and amounts ignored (“Looks like …, which you filed before”); and finally a single AI guess (“Suggested by AI — please confirm”). Change the account whenever the pick is off — a suggestion never posts anything on its own. With reading off, the first expense account in your chart is pre-selected instead and you choose the right one.
Tip — Teach it where a vendor belongs. If the same supplier keeps landing in the wrong account, fix it once at the source: open Purchases → Vendors, edit the vendor, and set Default expense account under More details. That default outranks every other suggestion for that vendor on the review screen from then on (it does not pre-fill a bill you start by hand). See Vendors.
Creating the draft takes you straight to the new document with a “Draft created. Review and post it when you are ready.” message. The original file rides along automatically and is attached to it, so the receipt and the transaction stay together. Back in the queue the item is marked Promoted with a green badge; it stays listed until you select Dismiss on it, so the queue doubles as a record of what you have already handled.
Note — Promoting does not post to your books. Creating a draft bill, expense, or reimbursement from an inbox item never touches the general ledger — it only builds an unposted document for you to check. Your accounts move only when you post that draft afterwards: posting a vendor bill debits the category account (with any recoverable GST/HST broken out to its tax account) and credits Accounts Payable; posting an expense debits the category account and credits the account it was paid from; posting a reimbursement debits the category account and credits Employee Reimbursements Payable.
Heads up — A bank match posts immediately. Match a bank transaction is different. When you select Record transaction, the app creates the expense, pays it from the account the statement line belongs to, dates it to the transaction, and posts it on the spot: it debits the category account, breaks any GST out as an input tax credit, and credits that bank or credit-card account. In the same step the statement line is linked to that entry, so it drops out of the For Review feed, and on the Import statement screen it shows a blue Add badge. There is no draft to review afterwards, so check the figures first. A transaction that has already been recorded, or one dated on or before your closing date, is refused.
The Bank transaction list offers only unmatched money-out lines from your imported statements, up to 50 in all: any whose amount equals the total read off the receipt come first, whatever their date, followed by the most recent of the rest, newest first within each group. The line total below must equal the transaction amount exactly; the screen tells you the amount if they differ. If the list is empty, the screen offers an Import a statement link. The For Review feed — from the Bank register, open Actions → Import statement and select Go to For Review at the top — is the other place to categorize the same lines, without a receipt; see Banking.
Tip. The review form pre-fills with whatever automatic reading found, but your edits always win. Even with reading turned off, the inbox is still useful: it gives you one organized place to keep every receipt waiting to be entered, and promoting it builds the draft and attaches the file in a single step.
Dismiss items you do not need
Not every document belongs in your books — duplicates, junk, a receipt you have already entered another way, or a Promoted row you have finished with. Select Dismiss on its row to clear it from the queue. Dismissing does not delete anything from your accounting; it simply hides the item so the review queue only shows work that still needs doing. There is no list of dismissed items and no undo in the app, so if you dismiss the wrong document, upload it again.
Where promoted documents end up
- Vendor bills — Purchases → Bills, ready to review and post, then pay later.
- Expenses — Purchases → Expenses, as a draft recorded against the account you chose in Paid from.
- Employee reimbursements — Employees → Reimbursements, ready to review and post, then pay the employee back.
- Bank matches — already posted as an Expense under Purchases → Expenses, with the statement line cleared.
Note — One person edits a record at a time. The review screen itself is not locked, but the bill, expense, or reimbursement it creates is: if a teammate opens that draft to edit it, you see who is editing instead of the form, and Owners and Admins can take over. See Settings → Edit locks for how a lock is held and released.