The Vendors area is where you track everyone you buy from and the money you owe them. It is the mirror image of the Customers area: instead of recording what people owe you, it records what you owe your suppliers. Each vendor record links to a full history of bills, vendor credits, payments, cheques, and expenses, so you can always answer “what do we owe this vendor?” from one place. The examples below use our sample business, Demo Company Inc.
Open Purchases → Vendors from the sidebar to see the list. Each row shows the vendor’s Open balance — their Accounts Payable balance, the same figure the AP Aging report and their AP statement show. Select the vendor’s Name to open the Vendor Activity report, which lists every posted transaction with them, or select the Open balance to open their AP statement. Both drills live in Reports, so a teammate without Reports access sees plain text instead of links.
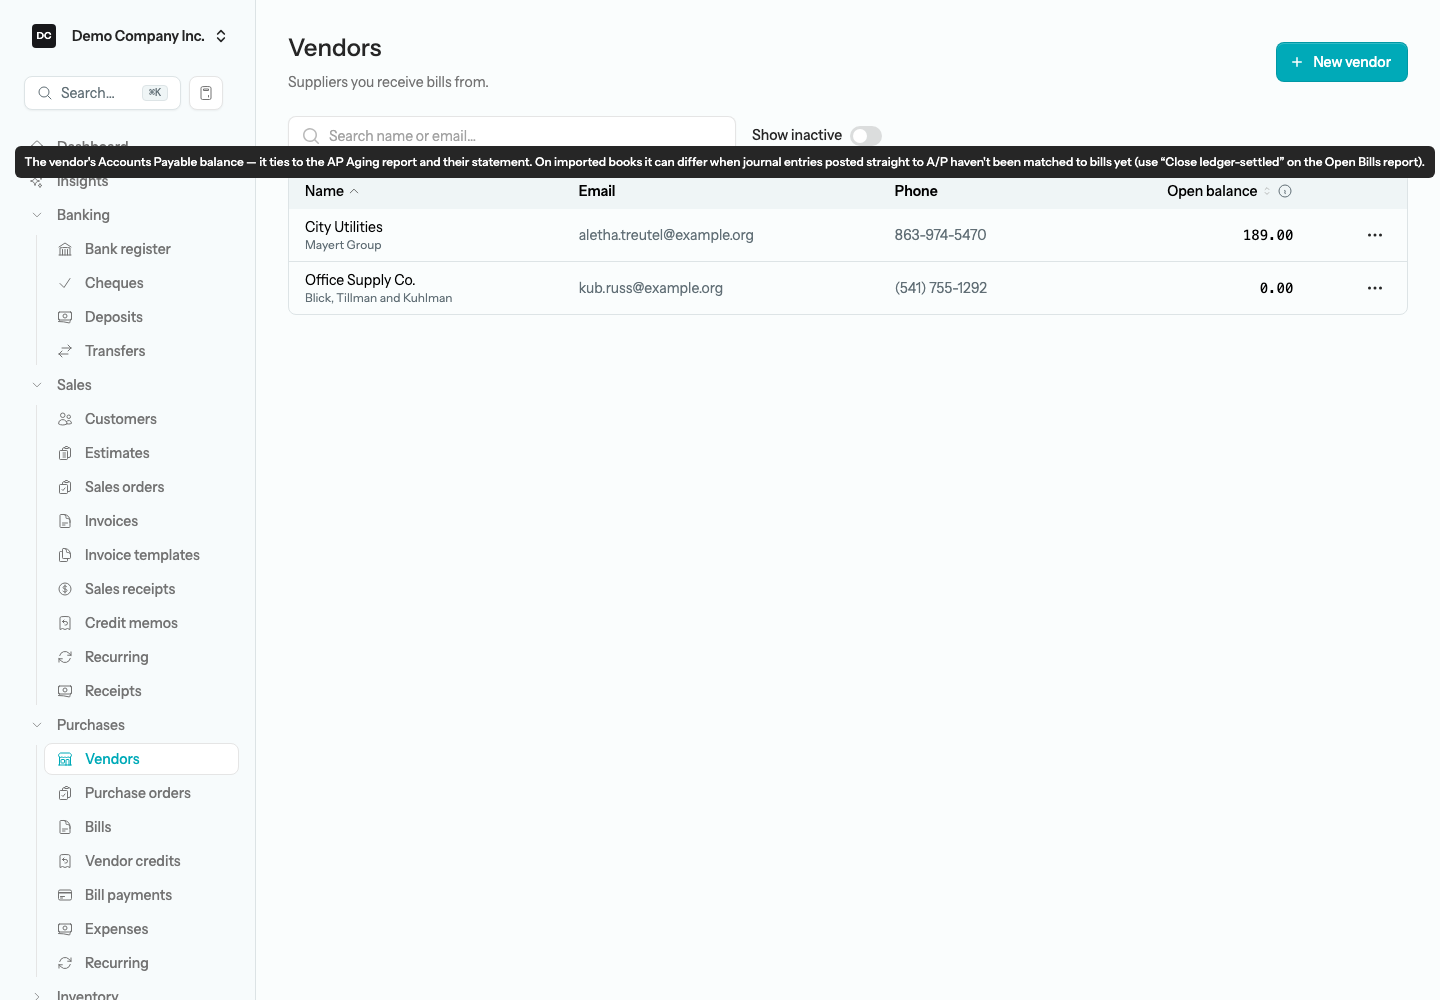
Note — Open balance vs. open bills. The Open balance is the ledger’s Accounts Payable balance for that vendor, not simply the sum of their unpaid bills. On books imported from another system the two can differ when journal entries posted straight to A/P have not been matched to bills yet — the Close ledger-settled button on the Open Bills report tidies that up.
Note — One person edits a record at a time. Every form in this area — the vendor dialog, bills, bill payments, vendor credits, and expenses — is held by whoever opens it first. Anyone else who opens the same record sees who is editing instead of the form, and actions such as posting or voiding wait until they are done. Owners and Admins can take over. See Settings → Edit locks for the details.
Add a vendor
Before you can enter a bill, the supplier needs a vendor record. You only set this up once — every future bill, payment, and expense reuses it.
To add a vendor:
- Open Purchases → Vendors from the sidebar.
- Select New vendor in the top-right corner.
- Enter a Display name — this is what you will pick from lists everywhere else in the app. If an active contact already uses that name, a warning appears under the field so you do not create a duplicate.
- Fill in any contact details you have: Company name, Account no., Email, and Phone. Under More details you can add the contact person’s name, job title, mobile number, and a billing address.
- Optionally set Default terms and a Default tax code so they prefill on every new bill for this vendor, and a Default expense account for the app to propose when a bank statement line is matched to them.
- Select Save.
Fields worth setting
- Account no. — your account number with this supplier. It prefills the Memo when you choose the vendor on the Pay bills form, or pick them as the payee on an expense or cheque, and the Memo prints in the memo line of a printed cheque, so the supplier can match your payment to your account. Payments made with Pay multiple suppliers carry the batch’s own Memo instead.
- Default terms and Default tax code — prefill the due date and each line’s tax on new bills, so a recurring supplier takes two clicks instead of ten. Default expense account — the account the app proposes when an imported bank statement line is matched to this vendor.
- Currency — leave it on your home currency unless the supplier bills you in another one. It locks once the vendor has posted transactions. See Multi-currency.
- Attachments — the vendor dialog has its own Attachments panel for paperwork that belongs to the supplier rather than to one bill: contracts, insurance certificates, W-8 or W-9 forms.
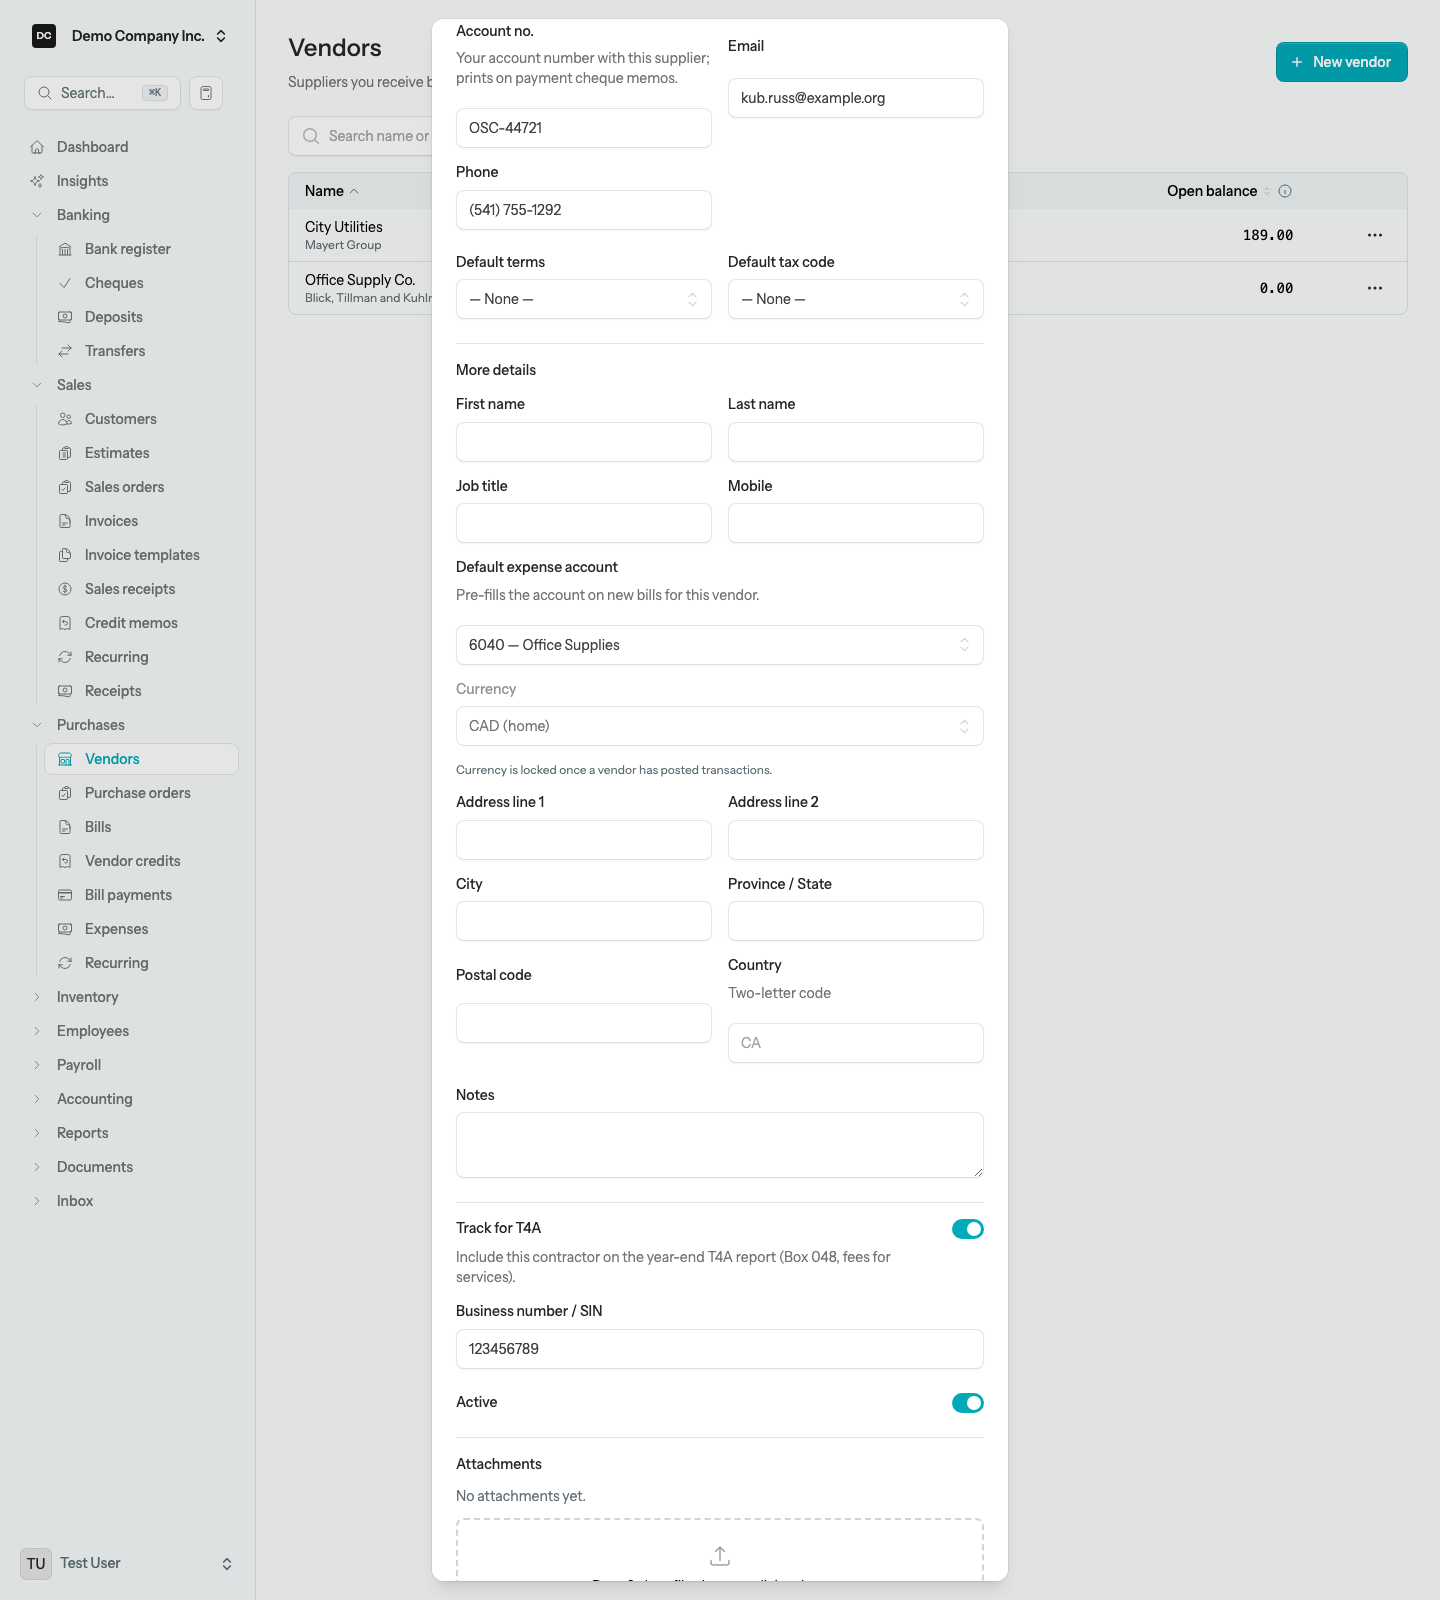
Note — Contractor tax tracking (T4A and 1099). Canadian organizations can flag a vendor with Track for T4A and record their Business number / SIN. Once flagged, everything you pay that contractor — bill payments, cheques, and posted pay-now expenses coded to expense — feeds the year-end T4A Slips report (Box 048, fees for services). US organizations get the equivalent instead — Track for 1099-NEC with a Tax ID (EIN or SSN), feeding the 1099 Summary report. Only the option that matches your organization’s country appears.
Deactivate or merge a vendor
When you stop buying from a vendor, open the row’s actions menu (the … button) and choose Deactivate instead of deleting: they disappear from selectors but their history stays intact for your reports. Toggle Show inactive on the list to find them again, and choose Activate to bring them back.
If the same supplier was entered twice — “Office Supply Co.” and “Office Supply Company” — choose Merge… on the duplicate, pick the vendor to Merge into (only active vendors in the same currency are offered), tick I understand this cannot be undone, and select Merge. All bills, payments, and other history move to the vendor you chose, and the duplicate is deactivated and removed from the list.
Heads up. Merging cannot be undone. Check the summary in the dialog — it tells you how many bills and payments will move — before you confirm.
Attachments and notes
Bills, vendor credits, pay-now expenses, and the vendor record itself each have an Attachments panel where you can drop the supplier’s PDF, a scanned receipt, or any supporting paperwork — PDF, images, or Office documents up to 10 MB each. Files appear with their original name and size, and the × button removes one you added by mistake. On a bill the panel is on the form and on the posted bill’s page, so you can attach the paperwork whenever it turns up.
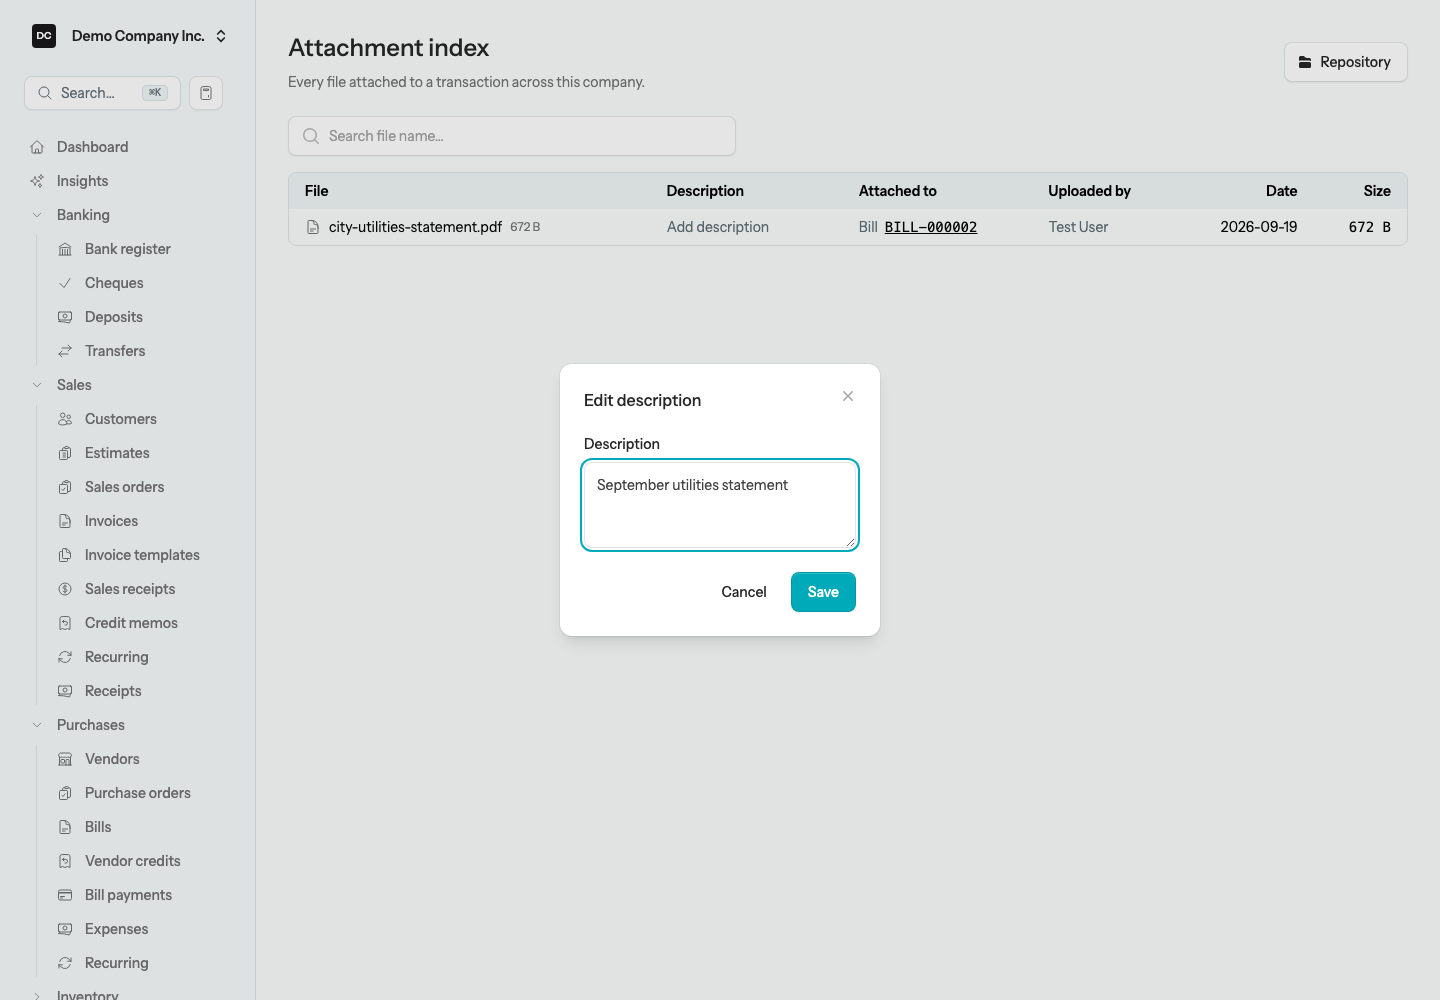
To label a file so a teammate can tell at a glance what it is, open Documents → Attachment index, which lists every file attached to a transaction. Select the description text (or “Add description”) in the Description column, type a note of up to 500 characters, and save.
Tip. For files that are not tied to a single transaction or supplier — year-end working papers, board minutes — use the Documents area instead. It gives you folders, sharing controls, and the same attachment plumbing.
Enter a bill
A bill records something you owe a vendor — a utility statement, a supply order, a service invoice. Entering one adds the amount to what you owe and, once posted, flows straight into your financial reports.
To enter a bill:
- Open Purchases → Bills from the sidebar, then select New bill.
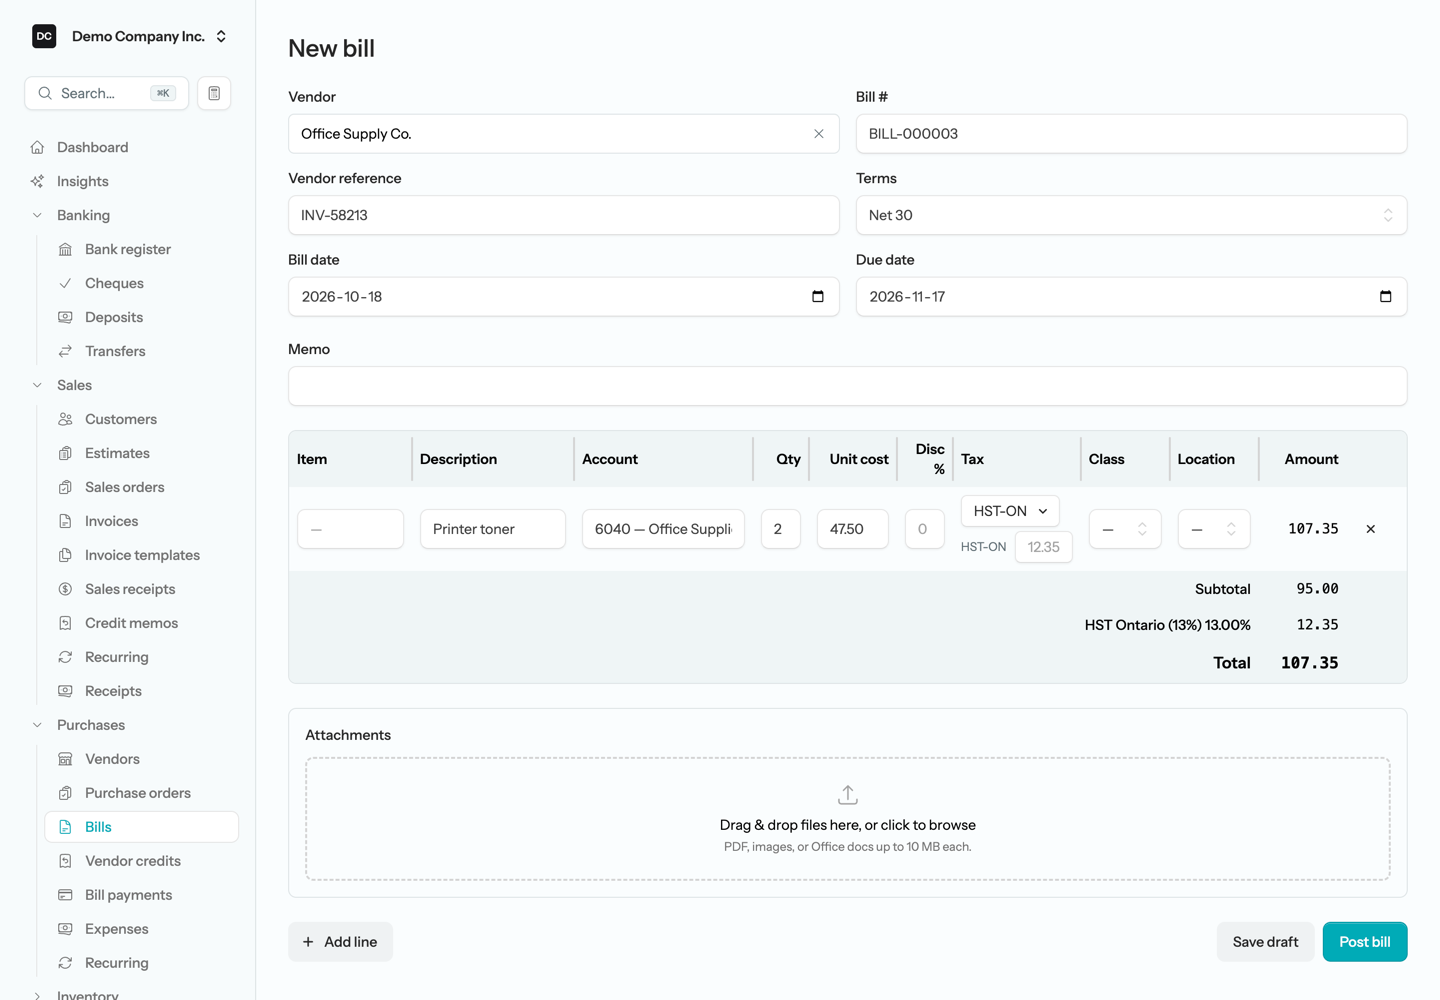
- Choose the Vendor — start typing to search, or type a new name and the vendor is created when you save. The Bill #, Bill date, and Due date (30 days out) fill in automatically; adjust them if you need to. A click anywhere in a date field opens the calendar.
- Enter the Vendor reference (their invoice number) and pick the Terms if you want the due date calculated for you. Add a Memo if it helps.
- On the first line, pick an Item or an Account, type a Description, and enter the Qty and Unit cost. The line Amount calculates as you type.
- Choose a Tax code for the line if the purchase is taxable. Add a Disc % or a Class and Location if you track them.
- Select Add line for more than one thing on the same bill.
- Select Post bill to finalize it, or Save draft to keep working on it later.
Tip — Every dollar cell is a calculator. Unit cost, the tax override, an expense Amount, the Apply column on Pay bills, the Payment column on the batch screen — every money field in this area doubles as a calculator. Type an expression such as 1050+52.50 or 3*49.99 (+, −, × and ÷ all work, with the usual precedence), watch the tape pop up showing each step, and press Enter to commit the result. Dividing by zero shows Error on the tape and leaves the cell alone.
Tip. Each line can carry up to two tax codes — handy where GST and PST (or QST) are charged separately. Every code you tick gets its own small amount field under the tax picker, labelled with the code and showing its calculated amount as the placeholder. If the supplier’s tax does not match to the penny, type the exact figure in that tax’s field — on a GST + PST line you can correct the GST, the PST, or both, each on its own. Leave a field blank to keep the calculated amount. With no tax code ticked there is nothing to correct, so no field shows.
Note — Bill numbers and duplicate warnings. Two different numbers live on a bill. The Bill # is your own sequence — you can edit it, but it must be unique within the organization, and a number already in use is rejected. The Vendor reference is the supplier’s invoice number, and the app can use it to catch a bill you have likely already entered: if the chosen supplier already has a non-void bill carrying the same Vendor reference, saving opens a “Possible duplicate bill” prompt with Cancel and Save anyway. It is only a heads-up — it never blocks the save — and it stays quiet when the reference is blank or the vendor is new. The check is on by default; to turn it off, switch off “Warn if duplicate bill number is used” under Settings → Organizations.
Note — What posting does to your books. Posting a bill debits the expense or asset accounts on each line and any recoverable sales tax, and credits Accounts Payable for the total — so the amount you owe is recorded the moment the bill arrives. Non-recoverable tax stays on the expense line. The journal entry carries your line descriptions as the memo on each expense leg, so the ledger reads the way the bill does. If a line uses an inventory-tracked item, posting also increases that item’s quantity on hand at the cost you paid and adds the value to the inventory asset account, ready to be costed out when you sell.
What you can do with a posted bill
A posted bill shows its status — Posted, then Partial and Paid as payments land, or Void — with a link to the GL entry it created and a running Balance due. The Payments applied panel lists each payment against it. The Pay bill button records a payment; everything else is on the Actions menu:
- Print — opens a printable PDF copy of the bill in a new tab.
- Edit — reopens the bill form. On a posted bill the button reads Save changes, and saving reposts the same journal entry in place; no new entry, no void-and-replace.
- Duplicate — starts a new bill for the same vendor with the same terms, memo, and lines, dated today with the next Bill #. Handy for a supplier who sends the same bill every month.
- Close settled balance — appears only when a journal entry has already paid down the bill’s balance in the ledger (typical after a migration). It closes the bill without posting anything new.
- Void — reverses the ledger entry (and any stock received) and keeps the voided bill on file.
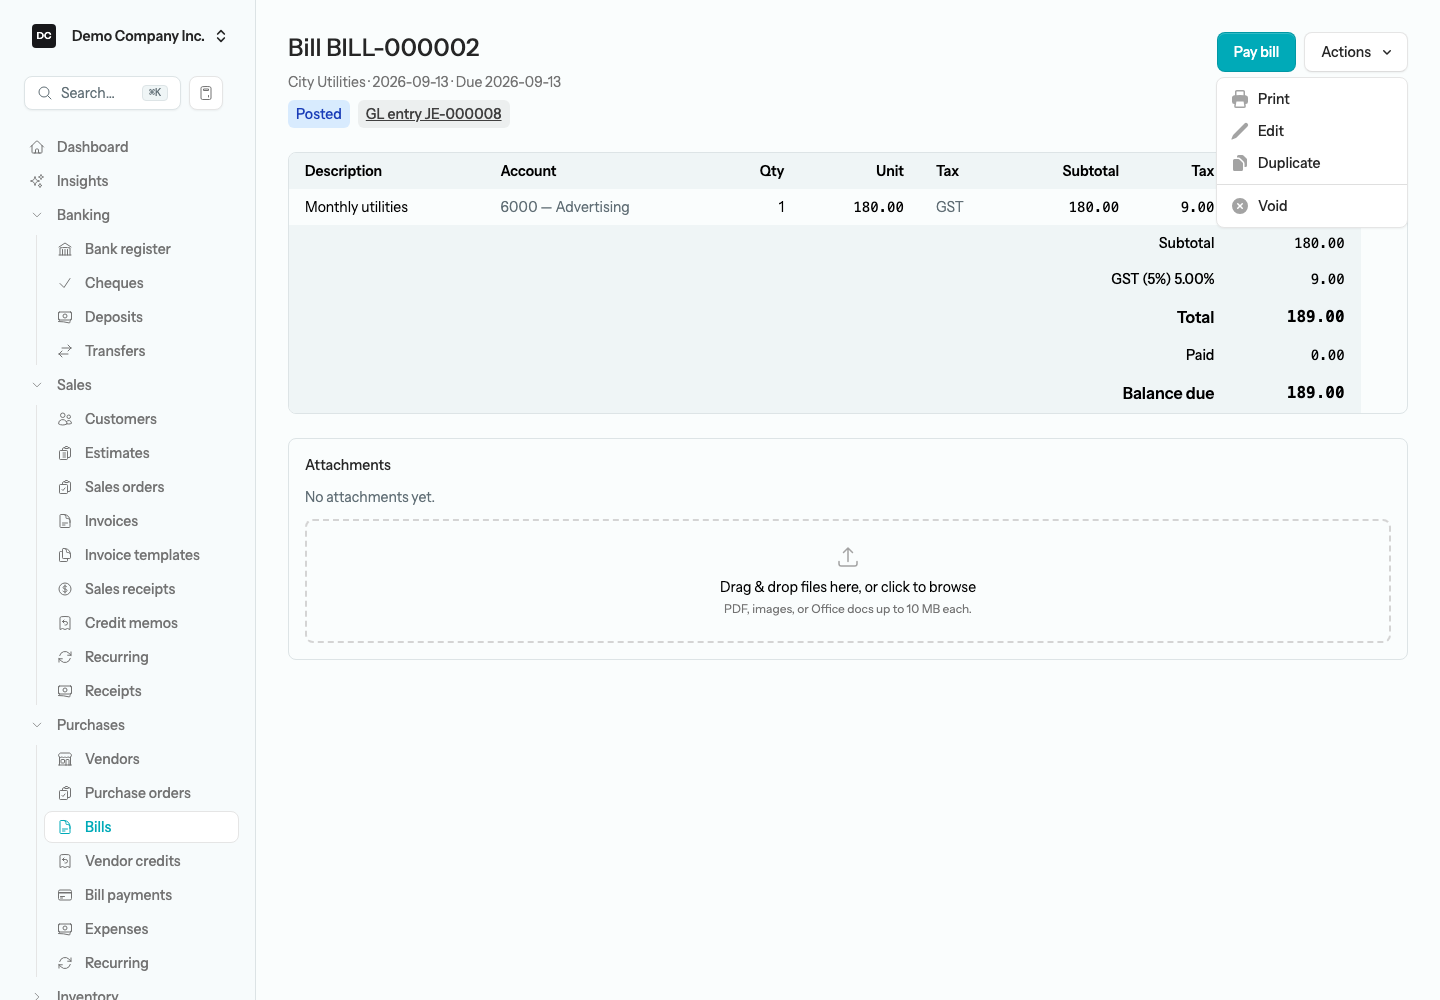
Heads up. A posted bill should never simply be deleted — that would leave a gap in your records. To cancel a posted bill, void it: the app reverses the ledger entry (and any stock it received) and keeps the voided bill on file for your audit trail. A voided bill cannot be edited.
Note. Class and Location are available on every bill, vendor credit, expense, and cheque line — turn them on under Settings → Organizations once and the selectors appear on each row, so you can slice spending by department, project, or storefront on your reports. A bill line coded to a fixed-asset account also gets a Create asset record button on the posted bill; see Fixed assets.
Receiving against a purchase order
When you fulfill a purchase order, the app generates a Draft bill that already lines up with the PO — each bill line is linked back to its purchase-order line, so quantities received stay tied to the original commitment. Open the draft, adjust the cost or Qty if the vendor shipped something different, then post it. Posting the bill is what actually increases stock and credits Accounts Payable. See the Purchase orders page for the full receiving flow.
Pay a bill
When you send money to a vendor, record a bill payment to clear the bill from what you owe and move the money out of your bank.
To pay a bill:
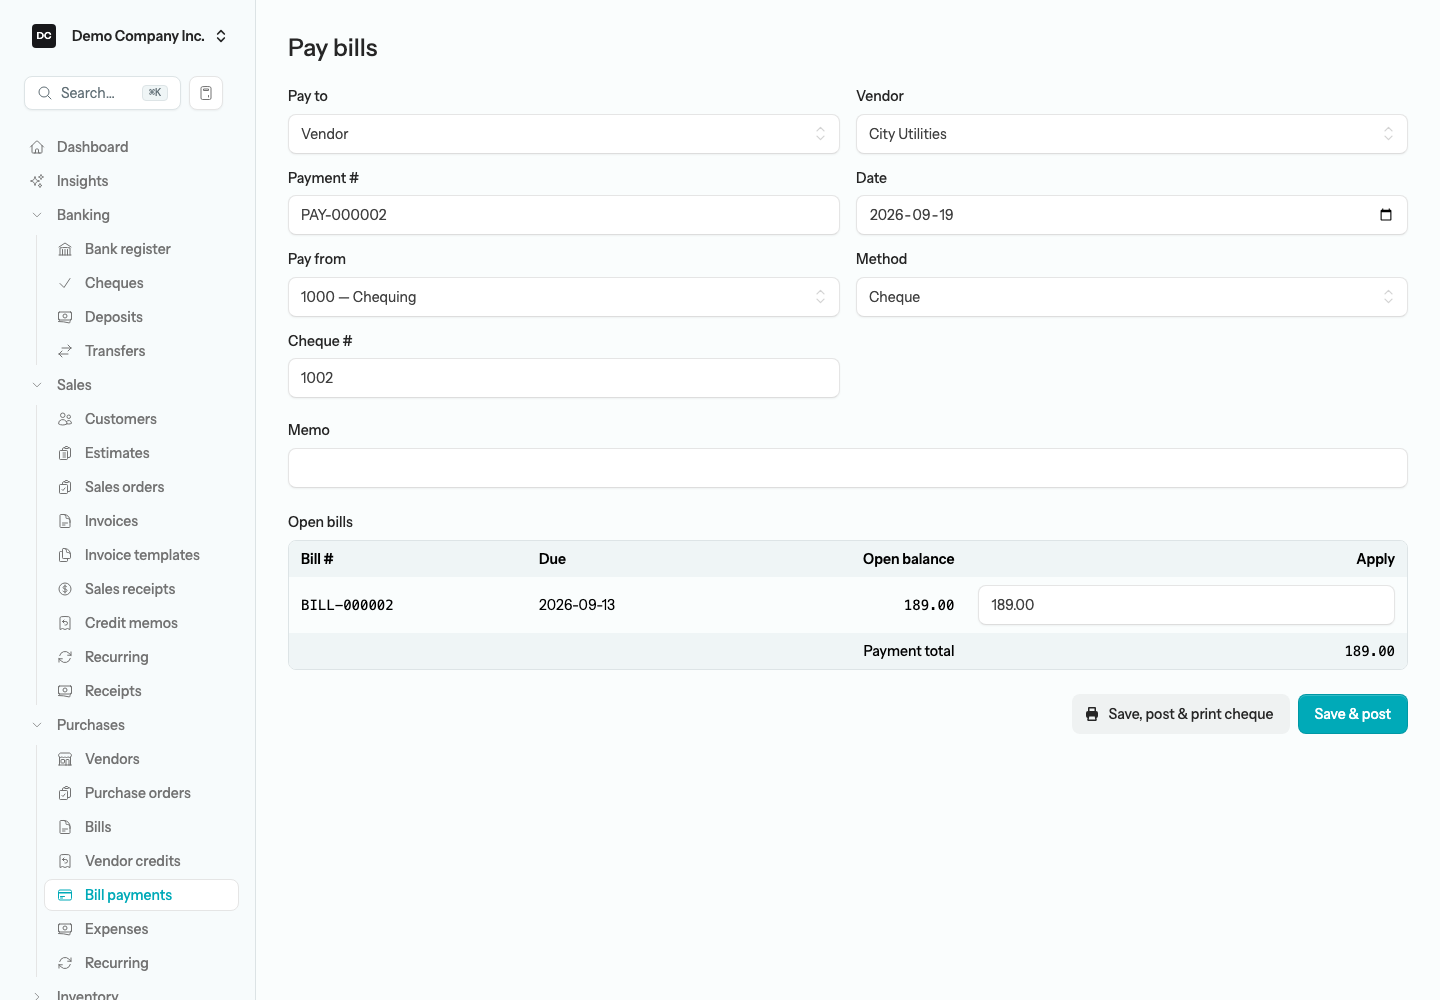
- Open Purchases → Bill payments and select Pay bills — or open a posted bill and select Pay bill to start with that bill’s vendor already chosen and their open bills listed.
- Leave Pay to set to Vendor, then choose the Vendor. Their open bills appear in the Open bills table below.
- Check the Payment # (it fills in automatically and must be unique), set the Date, and in Pay from choose the bank or credit-card account the money came out of.
- Choose a Method. For most methods the Reference is optional; when the Method is a cheque method, the field becomes Cheque # and is required.
- When you choose the vendor on this form, the Memo prefills with their Account no. — change it if you like. Starting from a bill’s Pay bill button skips this, so type the Memo yourself if you want it on the cheque.
- In the Apply column, type how much of the payment goes to each bill. Every Apply cell starts at 0.00 — even the bill you started from — so nothing is paid until you enter an amount. You cannot apply more than a bill’s Open balance, and the Payment total at the bottom is what leaves the account.
- Select Save & post. If you are paying by cheque, Save, post & print cheque does the same and opens the cheque PDF straight away.
Note — Paying an employee back. The same form settles employee reimbursements: switch Pay to from Vendor to Employee (reimbursement) and the list swaps to your employees and their open reimbursement claims. See Employees.
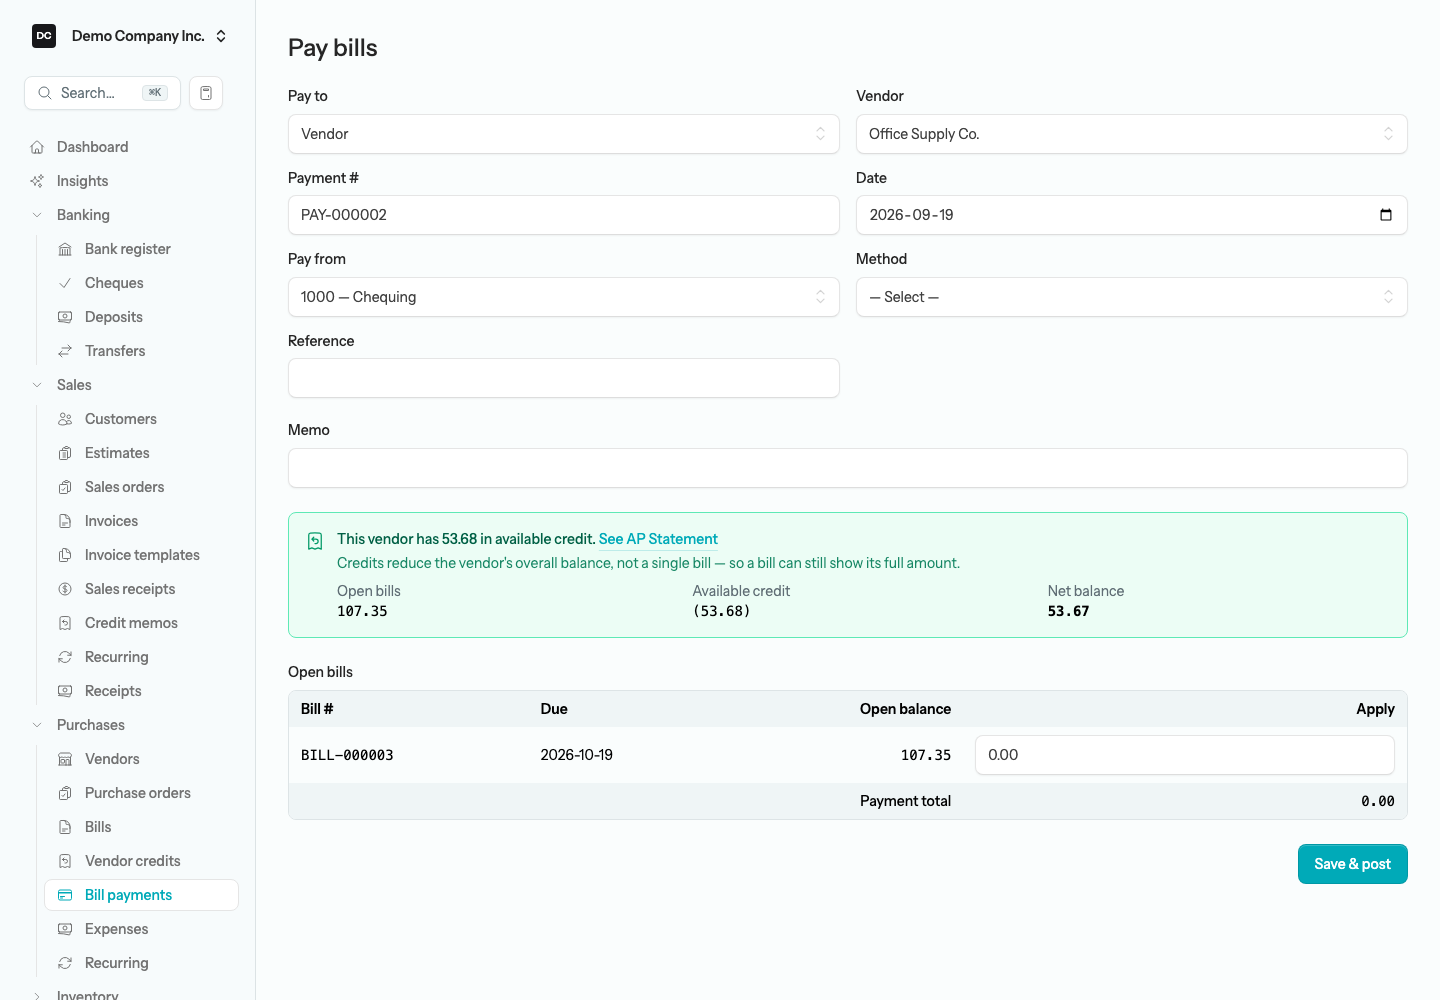
Note — Vendor credit summary. If the vendor you pick has credit on account — a posted vendor credit or an earlier overpayment — a summary appears between the Memo field and the Open bills table: “This vendor has … in available credit”, with the Open bills total, the Available credit, and the Net balance you actually owe. A See AP Statement link shows exactly which credits and bills make up that net figure. Credits reduce the vendor’s overall balance rather than one bill, so a bill can still show its full amount in the table; apply the smaller net amount and the ledger works out. A vendor with no credit sees no summary at all.
Note. A bill payment debits Accounts Payable and credits the bank or credit-card account you paid from, and moves each applied bill from Posted to Partial or Paid. Editing a posted payment reposts the same journal entry in place; voiding it reopens the bills it paid and posts a reversing entry. A payment made by a cheque method is printable: open it and choose Print cheque from the Actions menu to render a cheque-formatted PDF for pre-printed stock. If the print sits a little off your stock, nudge it under Settings → Organizations → Cheque print alignment (Horizontal offset and Vertical offset, in points).
Pay several suppliers at once
When it is time to run payables, you do not have to open each vendor one at a time. The batch screen lists every open bill across all your suppliers on a single page, so you can settle a whole stack in one pass.
To pay multiple suppliers at once:
- Open Purchases → Bill payments and select Pay multiple suppliers.
- Choose the Pay from account the money leaves, set the Payment date, and optionally a Payment method and a Memo that every payment in the batch will carry.
- Review the list of open bills. Each row shows the Supplier, the Bill #, its Due date, and its remaining Balance.
- In the Payment column, type the amount to pay on each bill you want to cover, or select Full to apply that bill’s entire balance. You cannot enter more than a bill’s balance; leave a row blank to skip it.
- Check the Total payment at the bottom, then select Record payments.
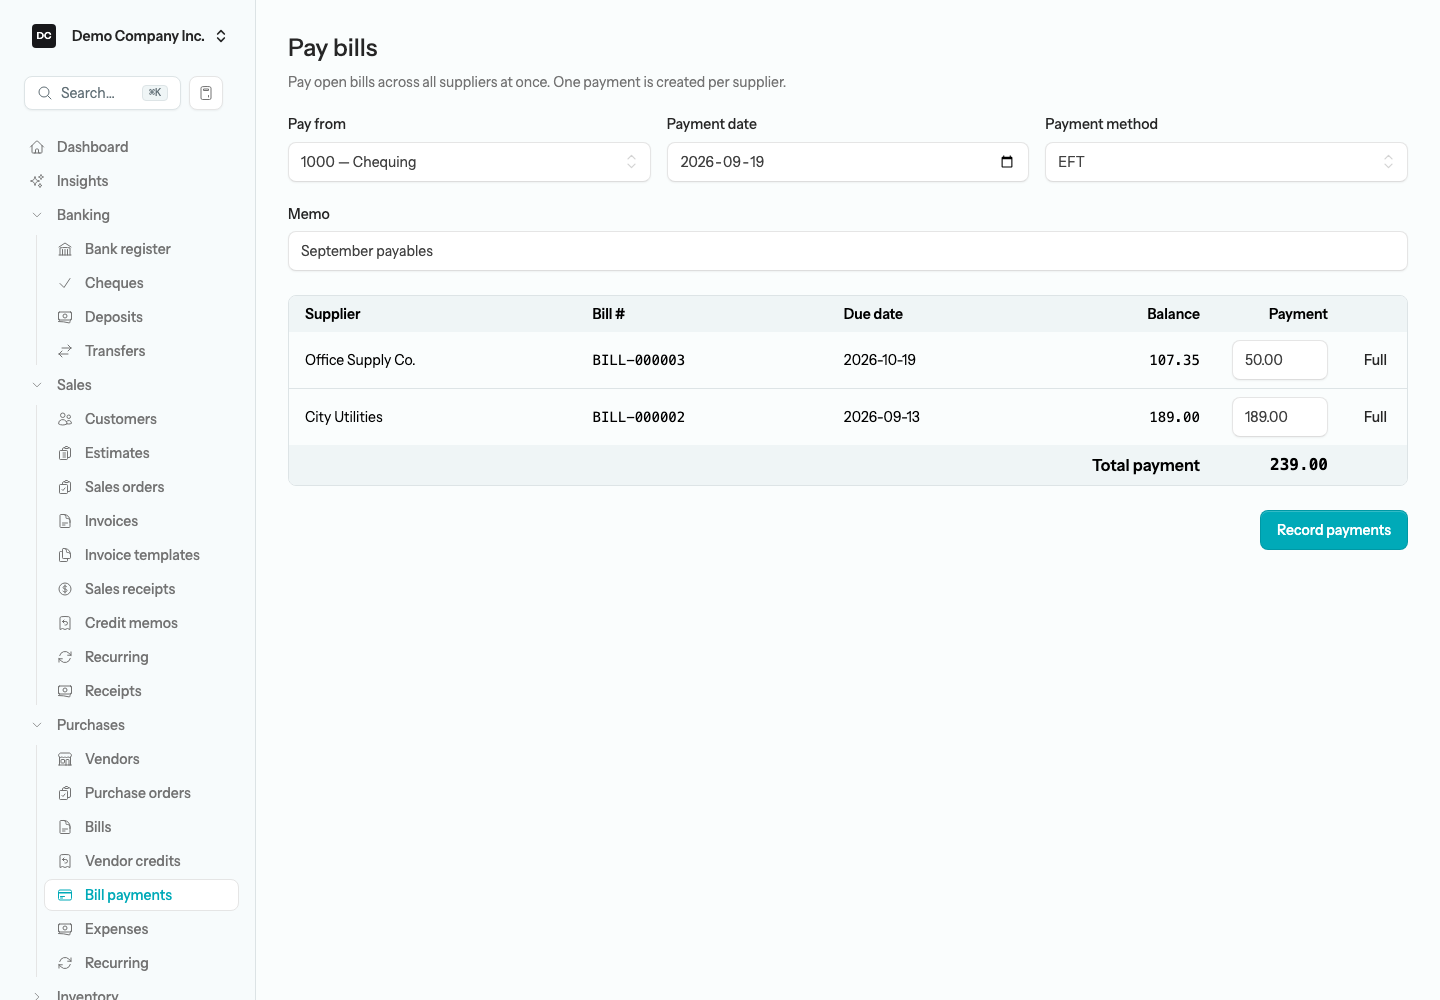
Note. The batch run groups the rows you filled in by supplier and posts one bill payment per supplier — each one debits Accounts Payable and credits the account you paid from. So a batch covering four bills from two vendors writes two payments, not four, keeping each vendor’s statement tidy.
Pay-now expenses
Not every purchase passes through Accounts Payable. When you pay on the spot — a company card at the supply store, an Interac transfer, an EFT, a debit tap, or petty cash — record it as an expense instead of a bill. There is no “owe then pay” step: the money leaves your account in a single entry.
To record a pay-now expense:
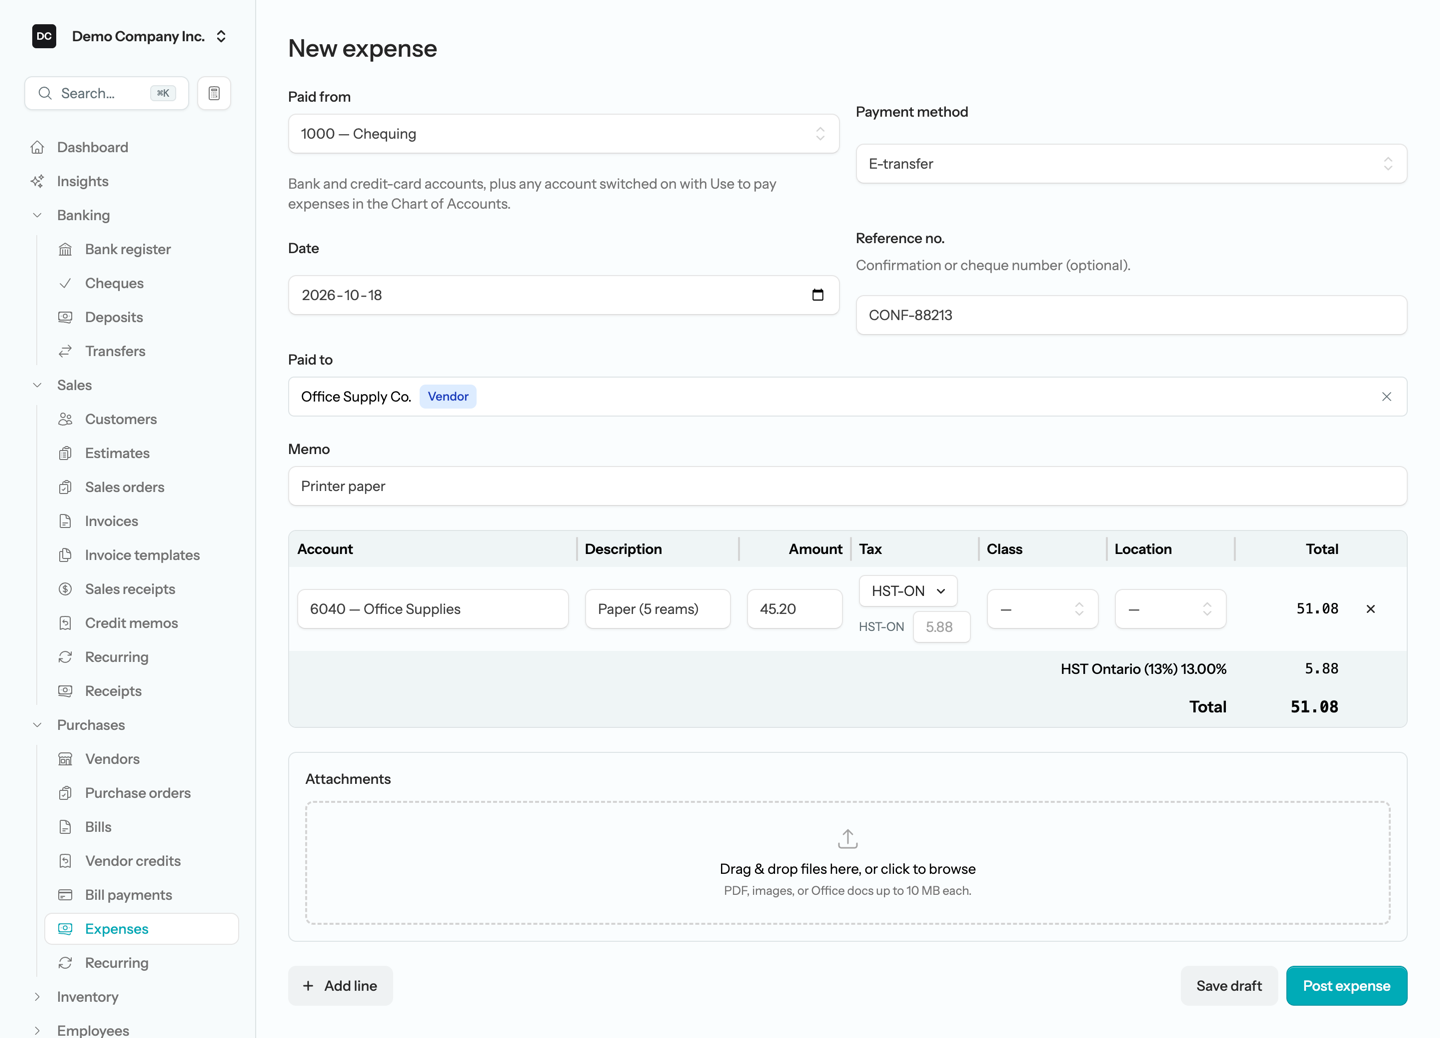
- Open Purchases → Expenses from the sidebar, then select New expense.
- In Paid from, choose the bank or credit-card account the money came out of, and pick a Payment method. If an owner paid personally, choose their Shareholder Loan instead — the expense is then owed to them rather than taken from the bank, in one entry with no clearing account. A liability appears here only once Use to pay expenses is switched on for it in the Chart of Accounts.
- Set the Date and add a Reference no. (a confirmation or cheque number) if you have one.
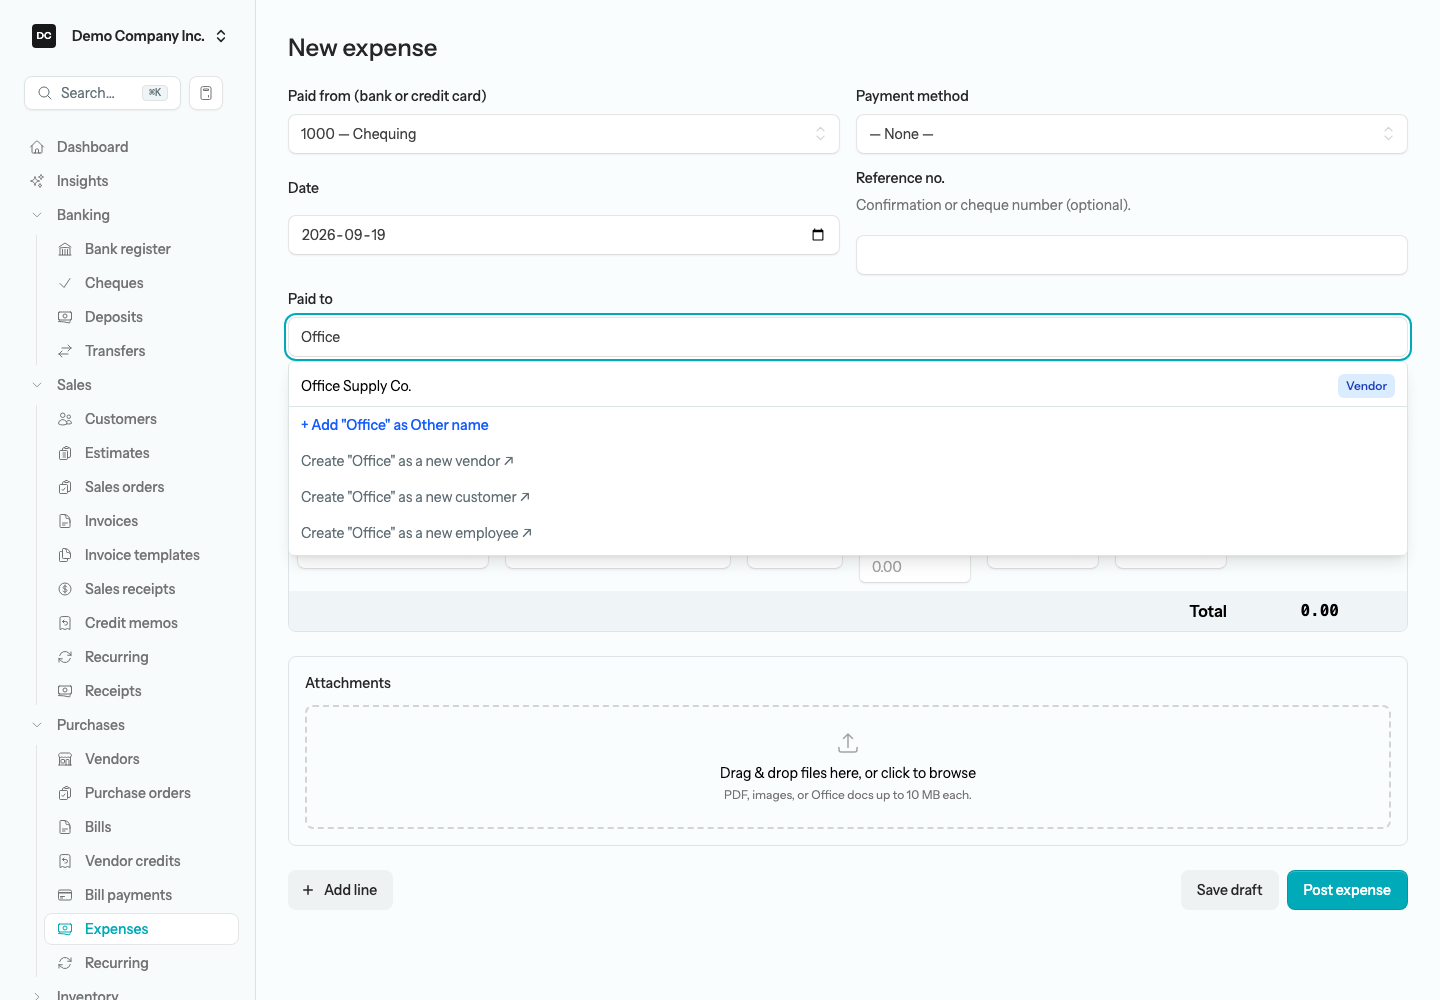
- In Paid to, start typing and pick who received the money — a vendor, customer, employee, or other name. For a one-off payee, choose Add “…” as Other name and it is created on the spot.
- The Memo prefills with the payee’s Account no. when they have one.
- On each line, pick an Account, type a Description and Amount, and choose a Tax code. Add a Class or Location if you track them.
- Select Post expense to finalize it, or Save draft to finish later.
Who you paid
Paid to is one searchable picker over your vendors, customers, employees, and other names, with a badge showing each match’s role. Picking a contact links the expense to them, so it shows up on their Vendor Activity, in the 1099 and T4A totals, and on Purchases by Vendor. The field is required: if nobody matches, the picker offers Add “…” as Other name, which creates a one-time payee without inventing a fake vendor, or Create “…” as a new vendor (or customer, or employee), which opens that page in a new tab with the name already filled in — come back and pick the new record. Other names live under Settings → Lists → Other names; see Lists.
Tip. Use a bill when you owe the vendor and will pay later; use an expense when the money is already gone. Both land the same cost in your books — the difference is whether it passes through Accounts Payable on the way.
Note. Posting an expense debits the account on each line and books any recoverable sales tax as an input tax credit (non-recoverable tax is folded into the expense), then credits the bank or credit-card account you paid from. Unlike bills, bill payments, and vendor credits, an expense has no repost path: a draft can be edited, but to fix a posted expense you void it and record a fresh one, which keeps the audit trail intact.
Tip — Recording vendor payments from a bank statement. You do not have to type every card purchase by hand. When you import a bank statement, an outflow you match to a vendor posts as a pay-now expense with the tax split out of the statement amount, and an outflow you match to open bills posts as one bill payment across them. See Banking → Import a bank statement.
Vendor credits
A vendor credit is what a vendor owes back to you — for a return, an overbilling, or a goodwill adjustment. It is the purchase-side mirror of a customer credit memo, and it reduces what you owe.
To create a vendor credit:
- Open Purchases → Vendor credits, then select New vendor credit.
- Choose the Vendor. The Credit # and Date fill in automatically; add a Memo and, if the supplier should see a note on the printed credit, a Vendor message.
- Add lines much as you would on a bill — Item or Account, Qty, Unit price, and Tax.
- Select Post, or Save draft to finish later.
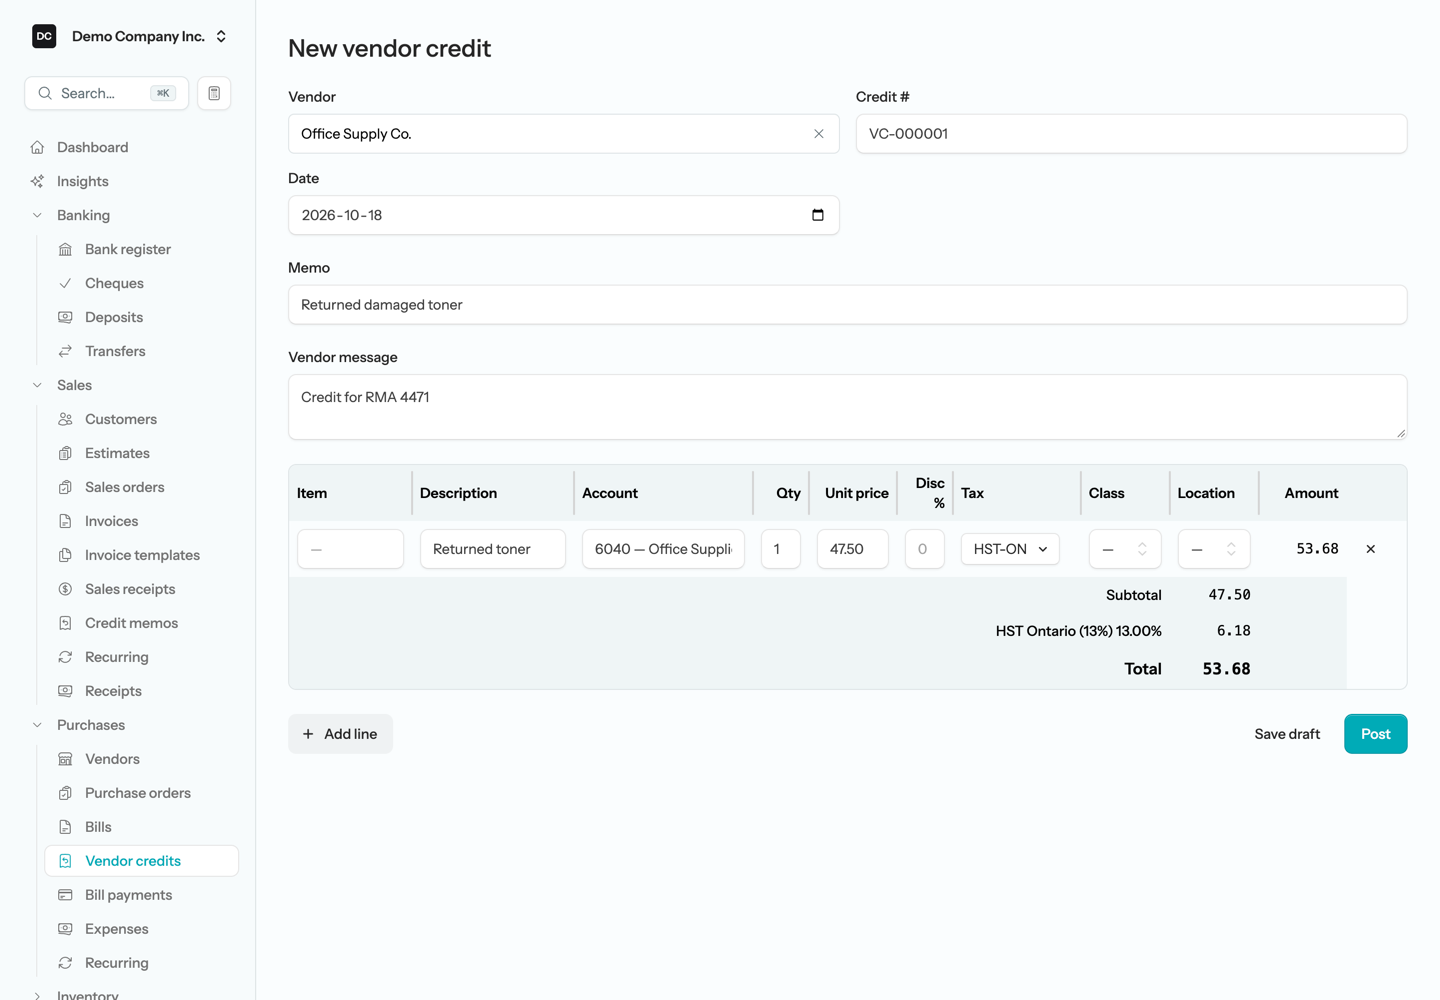
A posted vendor credit can be printed (Actions → Print), edited — the form’s button reads Update and reposts the same journal entry in place — or voided, which posts a reversing entry.
Note. Posting a vendor credit debits Accounts Payable and credits the original expense account on each line, reversing any recoverable tax. The credit nets against the vendor’s balance through the AP control account rather than being applied to one specific bill — so it lowers what the AP Aging and Open Bills reports show that vendor is owed, and the Pay bills form shows it as available credit the next time you pay them.
Purchase orders and recurring bills
A purchase order records what you have committed to buy from a vendor before the bill arrives. It never posts on its own — you fulfill it by generating bills against it, and those bills are what post and receive stock. Purchase orders are an optional feature you can switch on per organization. See the Purchase orders page for the full workflow.
For a supplier who bills the same amount every month — rent, a service contract, a retainer — set up a bill schedule under Purchases → Recurring. Each run generates a draft bill for you to review and post. See Recurring.
Reports tied to this area
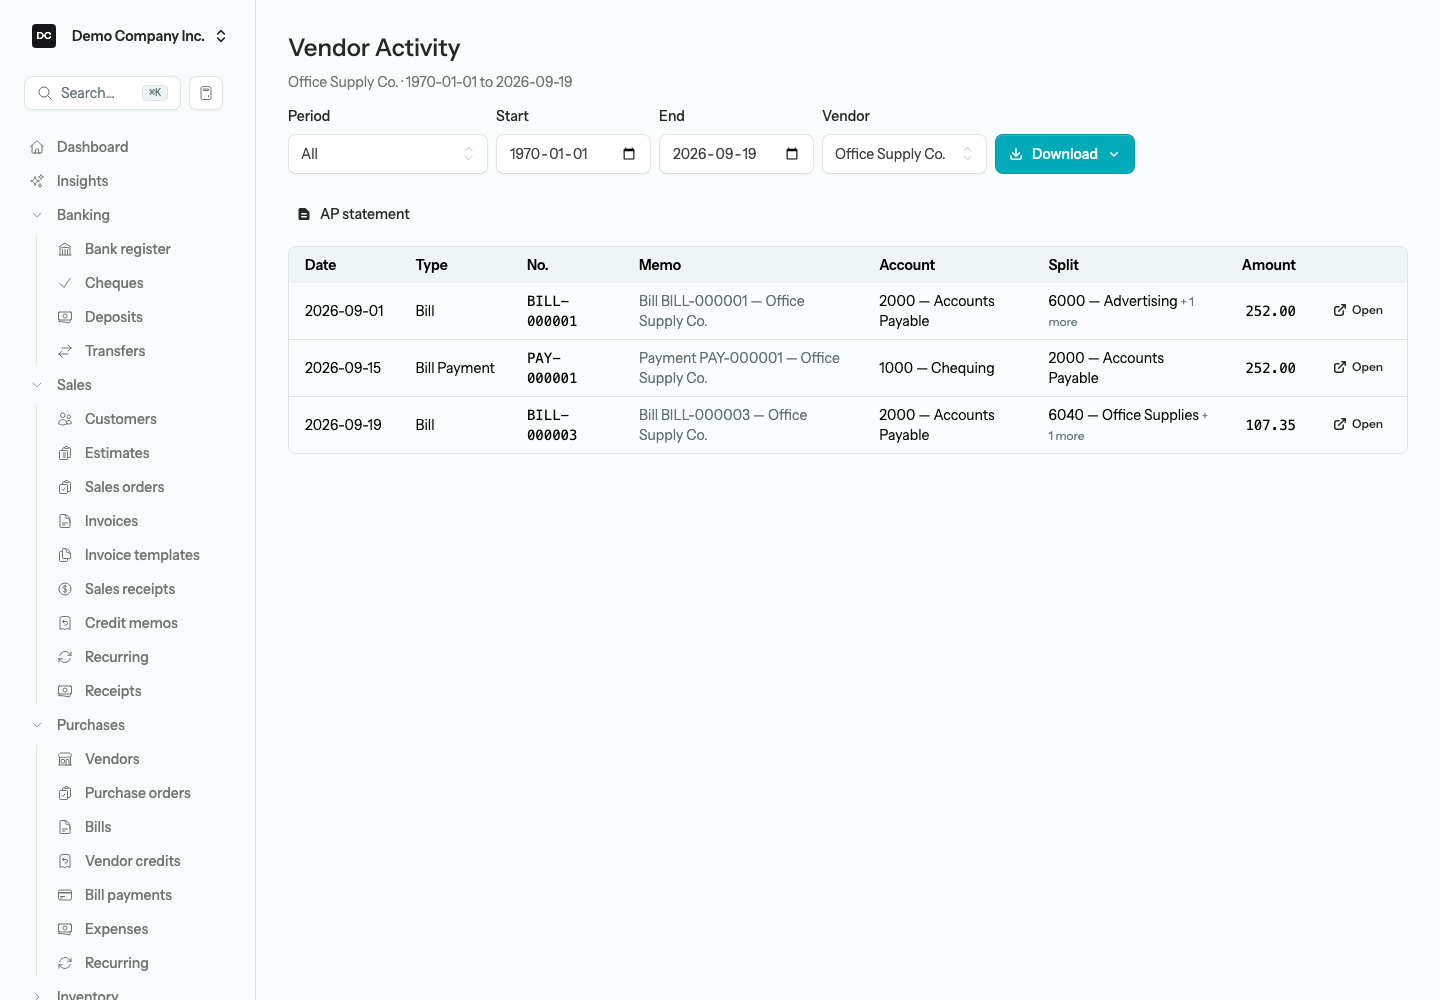
Vendor Activity is the one to reach for first: it lists every posted transaction with a vendor — bills, bill payments, vendor credits, cheques, expenses, and journal entries — including payments that never went through Accounts Payable, which the AP statement leaves out. Open it from the vendor’s Name on the Vendors list (all time, one vendor) or from Reports → Vendors & Payables (fiscal year to date, every vendor, with a Vendor picker). Each row shows the Type, No., Memo, the main Account, the Split, and the vendor’s share of the Amount; voided documents are struck through with a Void badge, and Open jumps to the document. Export it as CSV, XLSX, or PDF.
- AP Aging — open vendor balances bucketed by how overdue they are.
- Open Bills — every unpaid bill with its balance, plus a negative credit row per vendor so the net ties to AP Aging; Close ledger-settled closes bills a journal entry already paid.
- Vendor Activity — every posted transaction with a vendor, including cheques and expenses coded straight to expense.
- AP Statement — the vendor’s Accounts Payable account over a date range: bills, payments, and credits that touched A/P. Opened from the Open balance on the Vendors list.
- Purchases by Vendor — spend per vendor over a period, net of vendor credits and including posted pay-now expenses.
- Purchases by Item and Open Purchase Orders — what you bought by item, and which purchase orders are not yet fully received.
- Vendor Contact List — names, contact details, terms, and open balances, ready to export.
- Sales Tax — input tax paid on bills and expenses, ready for filing.
- 1099 Summary (US) and T4A Slips (Canada) — year-end totals paid to vendors flagged for contractor tracking; T4A Slips sits under Employees & Payroll.