Note. Roster Members are the people who belong to your organization and pay dues — the contacts you track here. They are different from your organization’s Team members, which are the users who can sign in to LineLedger. Settings → Team and permissions covers those sign-in accounts.
The Members area is where you keep your membership roster — who belongs to your organization, what level they hold, and the dues they owe. Each member record links to a contact and to a full history of dues invoices, so you can always answer “is this member paid up?” from one place. Membership is usually a non-profit or association need, so the examples below use our sample charity, Demo Community Society — the demo organization with Membership switched on — rather than the for-profit Demo Company Inc.
Turn on membership tracking
Members is an optional feature, so it stays out of the way for businesses that do not need it. To switch it on, open Settings → Organizations, open the organization, and turn on Membership under Features. You can also tick the same Membership switch while creating a new organization in the setup wizard. Either way, a Members item then appears in the sidebar — inside the Sales group, which is labelled Revenues for a non-profit organization — for every team member who has access to the Customers section.
Next, set up at least one Membership level under Settings → Lists → Membership levels. A level carries the default dues, the billing frequency, the revenue account dues are booked to, and optional default payment terms and tax code. Members inherit those defaults, so you only configure them once. See Lists for how to create one. Demo Community Society has two levels: Individual at $50 a year and Family at $90 a year.
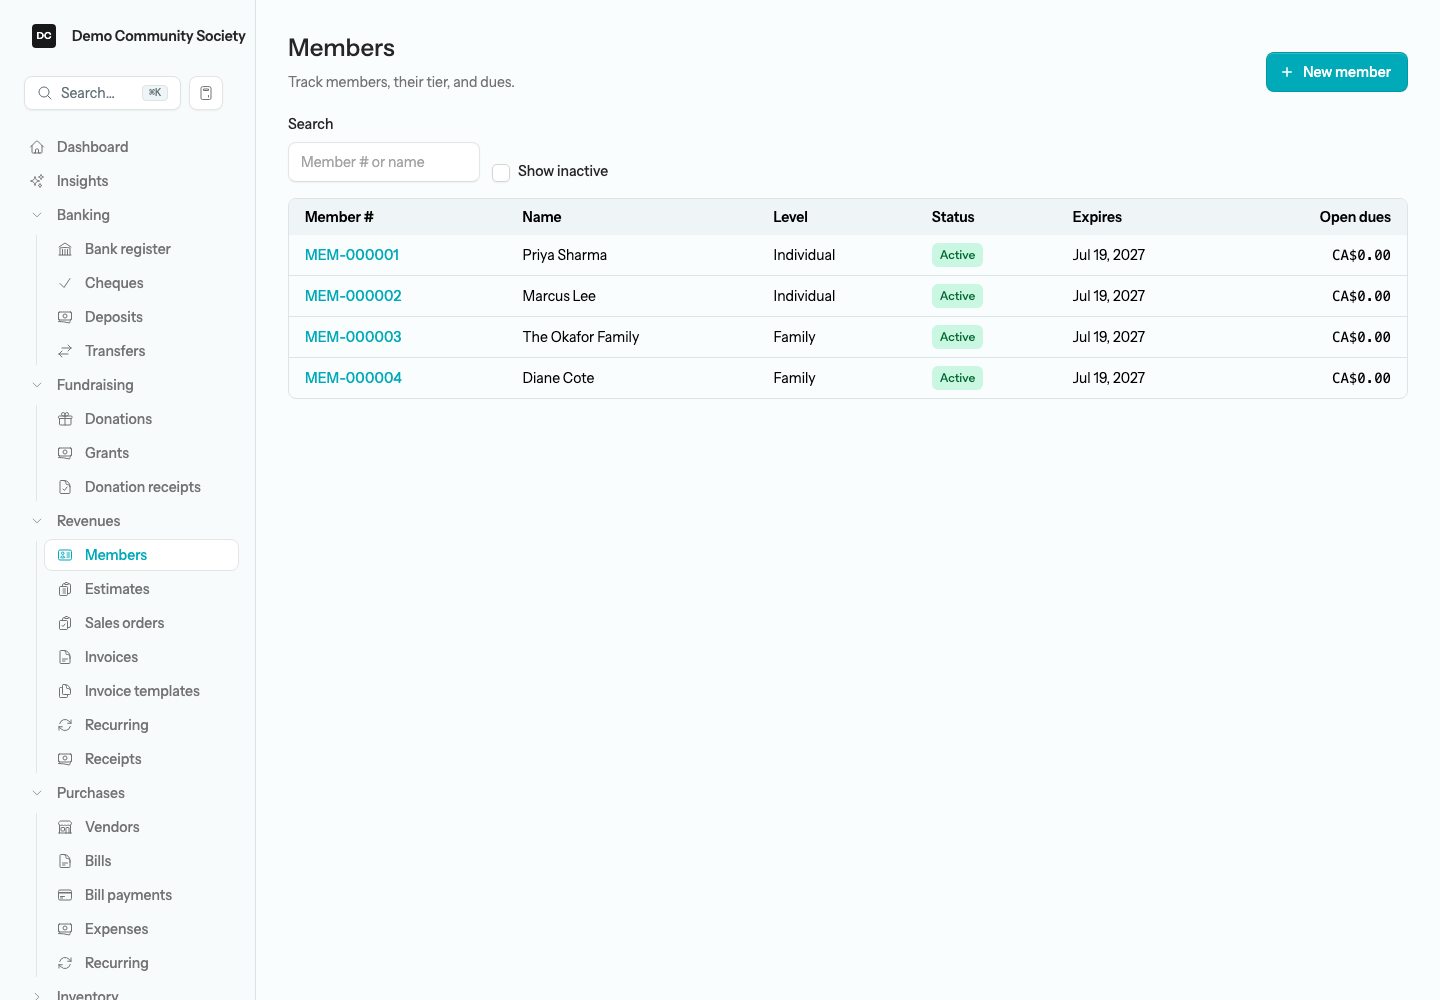
Open Members from the sidebar to see the roster. Each row shows the member number, the contact name, their level, a status badge, the expiry date, and the open dues still owed. Search by member number or name, and tick Show inactive to include members you no longer track — they appear dimmed so you can tell them apart.
Add a member
Every member is tied to a contact. You can create a brand-new contact as you add the member, or pick someone who already exists in your contacts.
To add a member:
- Open Members from the sidebar, then select New member in the top-right corner.
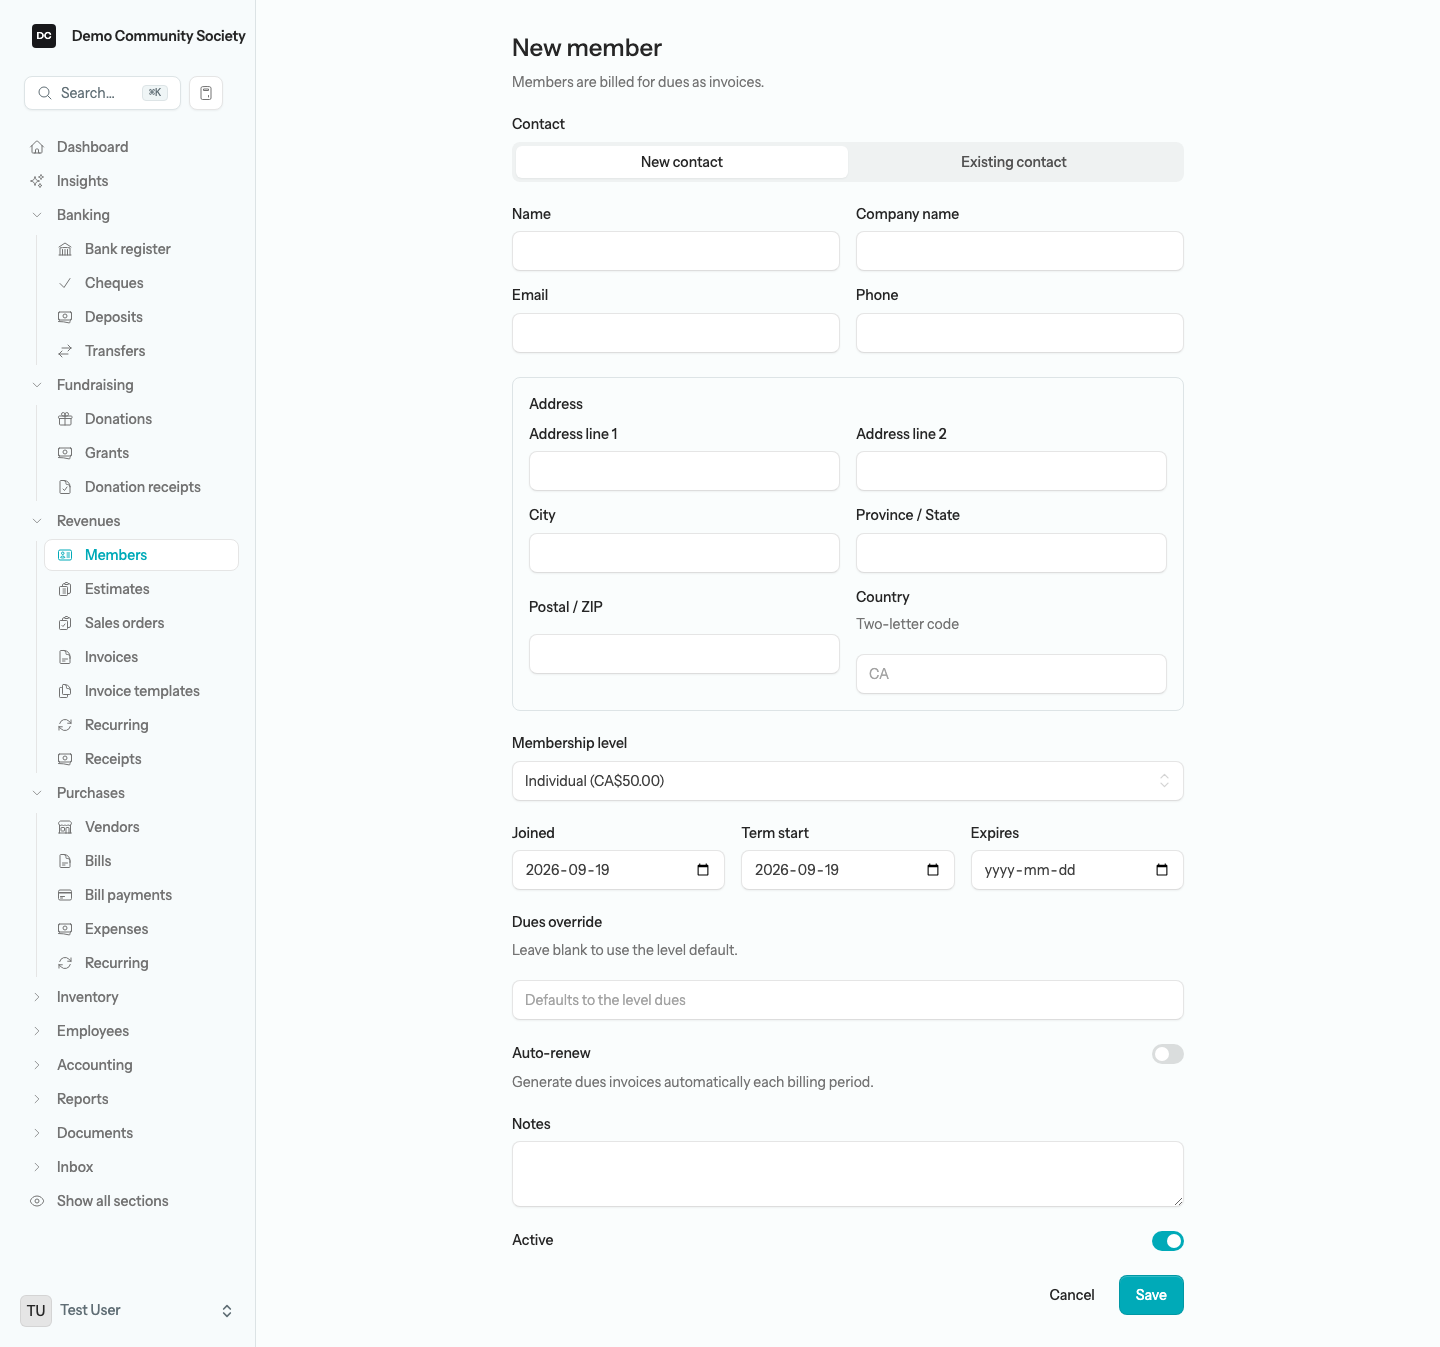
- Under Contact, choose New contact to enter their Name, Company name, Email, Phone, and Address, or Existing contact to pick someone you already have from the Select contact list.
- Choose a Membership level. The selector shows each level’s default dues so you can see what the member will be billed. (You can leave it on “No level”, but a level is required before you can bill dues.)
- Set the Joined, Term start, and Expires dates. Joined and Term start default to today; leave Expires blank for an open-ended or lifetime membership. A click anywhere in a date field opens the calendar.
- Optionally enter a Dues override to bill a different amount than the level default — leave it blank to use the level’s dues.
- Turn on Auto-renew to generate dues invoices automatically each billing period (see below).
- Add any Notes, leave Active on, and select Save.
When you save a new member, the app assigns the next member number automatically — it uses a MEM- prefix with a six-digit sequence, so your first member becomes MEM-000001. You never type the number yourself, and it stays with the member for life.
Note. Every member is also a customer, so their dues can be invoiced like any other sale — saving a member flags the underlying contact as both a member and a customer for you. A contact can hold only one membership per organization, so the same person cannot be added to the roster twice.
The member detail page
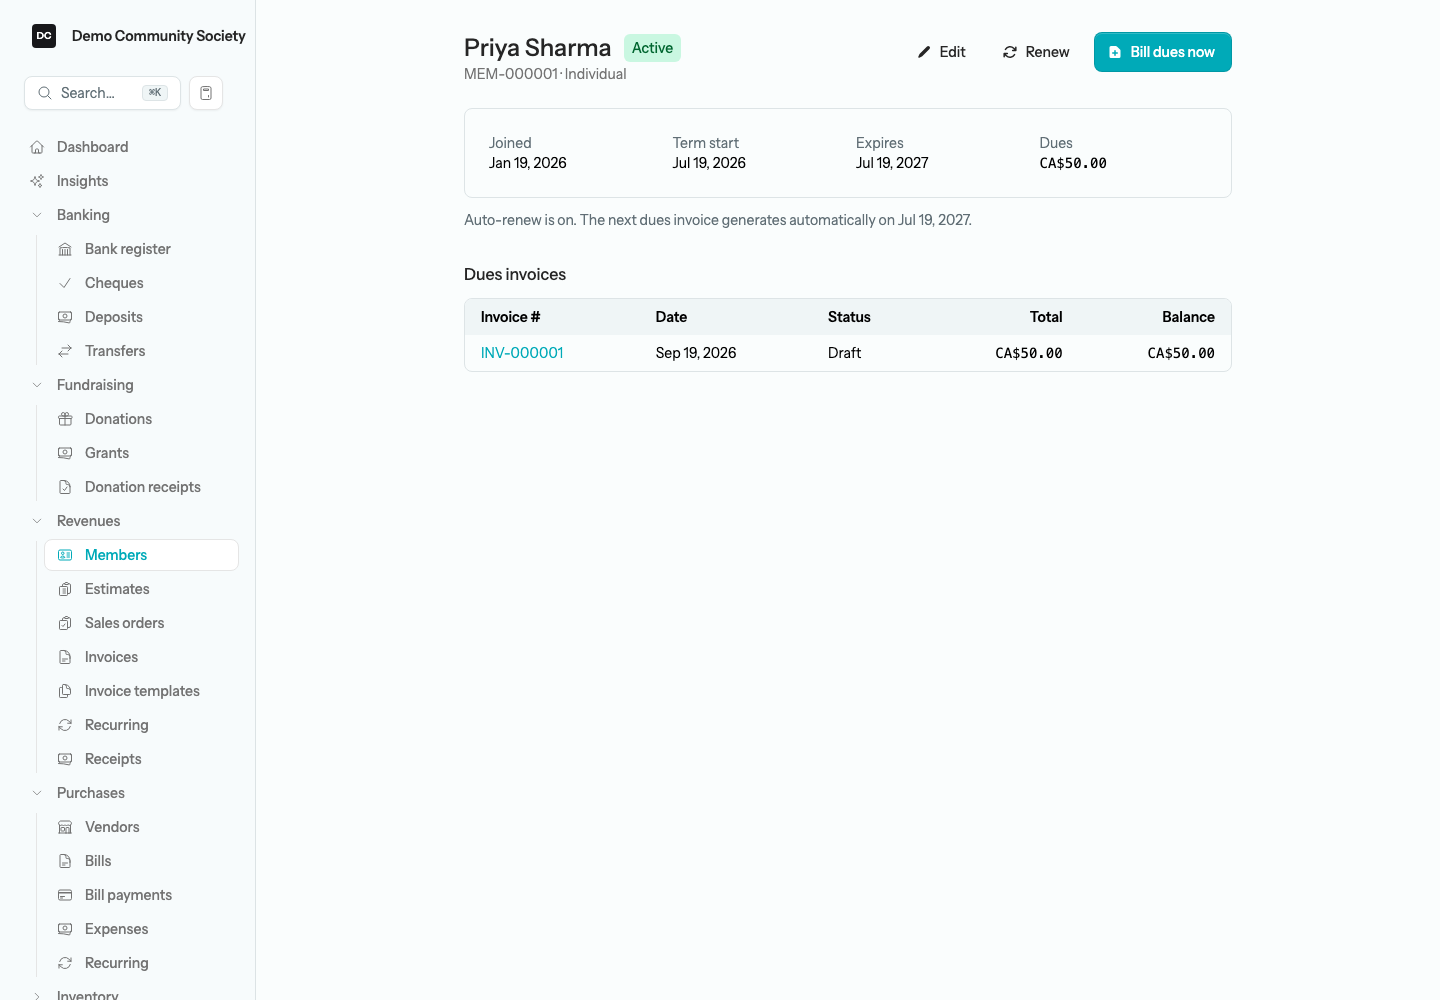
Select a member from the roster to open their detail page. The top card summarizes the Joined, Term start, and Expires dates and the effective Dues, with a status badge beside the name and the member number and level underneath. Below that, the Dues invoices table lists every dues invoice raised for the member, with its date, status, total, and remaining balance — each links to the full invoice.
Three actions sit in the top-right corner: Edit reopens the member form, Renew rolls the term forward (below), and Bill dues now raises a dues invoice on the spot.
Note — One person edits a member at a time. While a teammate has a member’s Edit form open, the member’s page shows who is editing, Renew waits until they are done, and anyone else who opens the form sees who is editing instead of it. Owners and Admins can take over. The Membership levels dialog under Settings → Lists works the same way. See Settings → Edit locks for the full rules.
To bill dues on demand:
- Open the member and select Bill dues now.
- The app creates a draft dues invoice dated today — one line for the member’s dues (their Dues override, or the level’s default if there is none), using the level’s revenue account, tax code, and default payment terms — and drops you straight into the editable draft.
- Adjust the lines, or the invoice number, if you need to (the app checks that a number you type is not already in use), then select Post invoice to finalize it.
Bill dues now needs the member to hold a level that has a revenue account, and the member’s dues must come to more than zero — that is their Dues override if they have one, otherwise the level’s default. If anything is missing, the app tells you what to fix instead of creating an empty invoice.
Note — What posting a dues invoice does to your books. A dues invoice is an ordinary sale: posting it debits Accounts Receivable for the total and credits the membership level’s revenue account, with any sales tax broken out to its own account. Everything downstream is the normal customer flow — the send dialog on a dues invoice reads Send invoice to member, you receive the payment exactly as you would for any customer, clearing the balance from Accounts Receivable, and you can send the member a statement from the Customers list. See Customers for sending, payments, and statements.
Renew a membership
Select Renew on a member to roll their term forward by one billing period — the level’s billing frequency, or one year if the member has no level. If the member has an Expires date, Term start moves to that date and Expires moves one period past it, so renewing early never shortens the current term. For an open-ended membership with no Expires date, both dates are worked out from today instead: Term start becomes today and Expires lands one period later. A confirmation tells you the new end date (“Membership renewed through …”). Renewing only updates the term — bill the dues for the new period with Bill dues now, or let auto-renew handle it.
Retire or reactivate a member
There is no delete or cancel button for a member — their dues invoices are part of your books, so the record stays. When someone leaves, open the member, select Edit, turn off the Active switch, and Save. An inactive member drops off the Members roster unless you tick Show inactive (they appear dimmed when you do), is left out of the Membership Roster report while its Active only box is ticked, and has their auto-renew schedule paused so no further dues invoices are generated. Nothing else changes: their contact, member number, and invoice history all stay put.
To bring a member back, edit them and turn Active on again. If Auto-renew was left on, their dues schedule resumes on the same save.
Membership status
Each member shows a status badge that the app works out from the term dates — it is never something you set by hand, so it is always current:
- Active — the term has not ended yet (Expires is today or later), or the membership is open-ended with no expiry date.
- Lapsed — the term ended within the last 30 days. This is the grace window for a renewal nudge before the membership is treated as fully expired.
- Expired — the term ended more than 30 days ago.
The badge describes the term, not whether you still track the member. The Active switch on the member form (see Retire or reactivate a member, above) decides whether they appear on the roster at all, and a retired member keeps whichever badge their dates give them.
How auto-renew works
Auto-renew bills a member their dues each term without you having to remember. It needs four things to be true at once: Auto-renew is on, the member is Active, they hold a level with a revenue account, and their dues come to more than zero. When they are, saving the member sets up a recurring invoice for that member, named “Membership renewal —” followed by the level name. The app then generates a fresh dues invoice from it at the start of each new term — the first one on the member’s current Expires date (or their Term start, or today, if there is no expiry), then every billing period after that at the level’s billing frequency, with no end date. Those invoices land as drafts, linked to the member and listed in their Dues invoices table, ready for you to review and post.
When auto-renew is running, the member detail page tells you the date the next dues invoice will generate. Turning Auto-renew off — or turning the member’s Active switch off — pauses the schedule rather than deleting it: on the Recurring list it shows a Needs attention badge, and opening the schedule shows a Paused — needs attention warning with the reason “Membership auto-renew turned off.” Switch Auto-renew (and Active) back on and the same schedule resumes on save, without you rebuilding anything.
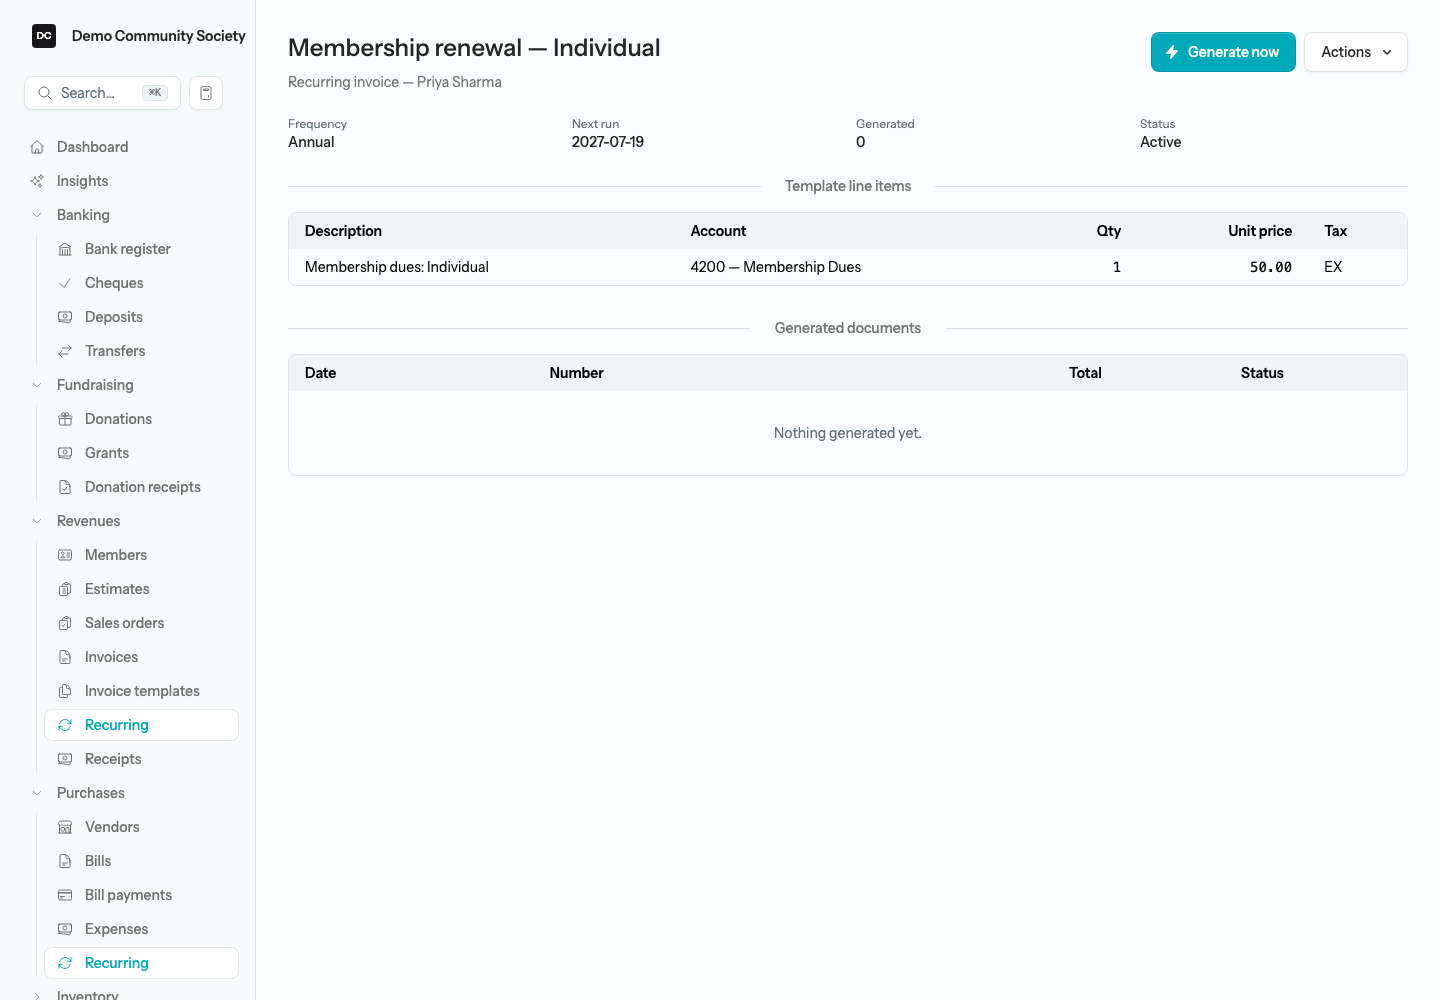
The schedule itself is an ordinary recurring invoice. Open Revenues → Recurring (Sales → Recurring on a for-profit organization) to see its frequency, next run date, how many invoices it has generated, the dues line it will bill, and every invoice it has produced. Generate now on that page creates the next dues invoice immediately instead of waiting for the scheduled date. See Recurring for how schedules run.
Heads up — The member record owns this schedule. Each time you save the member, the app rebuilds their dues schedule from the level and the member: the name, memo, frequency, start date, and the dues line are all reset, When each invoice is generated goes back to Save as a draft for review, and Runs on goes back to a specific day of the month. Anything you changed on the schedule’s own edit form — an automatic post or email setting, a last-day or last-business-day anchor, an extra line — is overwritten the next time that member is saved. Change the dues or the cadence on the level or the member instead. If a teammate has the schedule open for editing when the member is saved, their page tells them the record changed and asks them to reload rather than saving over the new values.
Reports tied to this area
Both reports live under Reports → Membership and only appear once membership tracking is on. See Reports for how the reports area works.
- Membership Roster — every member with their Member #, Name, Level, Status, Joined and Expires dates, and Open dues. Active only is ticked by default; untick it to include retired members. Export to Excel or PDF — both exports add a Total row for Open dues at the bottom — or bundle it into a Management report package, where it appears as “Membership List”.
- Dues Revenue by Level — dues income grouped by membership level over a From / To range that defaults to the current calendar year, with an invoice count per level. It counts dues invoices that are posted, partially paid, or paid, groups members who have no level under “No level”, and is an on-screen report with no export.