Everything you record elsewhere — invoices, bills, payments, deposits — eventually lands here as balanced entries against your accounts. The Accounting area lets you shape that ledger directly: organize your chart of accounts, post manual journal entries for things that do not fit the everyday forms, and lock finished periods so the numbers cannot move. The examples below use our sample business, Demo Company Inc.
The chart of accounts
The chart of accounts is the master list of categories your money flows through — the buckets behind every report. Each account has a code (a number you choose for sorting), a name, a type that decides where it appears on your financial statements, and a balance. Open Accounting → Chart of Accounts from the sidebar to see them grouped by type.
Search by code or name, and switch on Show inactive to include accounts you no longer use. Code and Name always show, and Subtype and Balance are on by default. The Columns menu switches Subtype, Balance, Description, and Account ID (API) on and off — plus GIFI when your organization files a T2, T5013, or T2125, and Currency once multi-currency is on — and remembers your choice. Built-in accounts carry a System badge, mapped accounts a GIFI badge, and a parent account’s balance also shows an “incl. sub-accounts” total. An account’s code and name are links to the General Ledger filtered to that account; the row menu offers the same View ledger, plus Edit, Deactivate, and Merge….
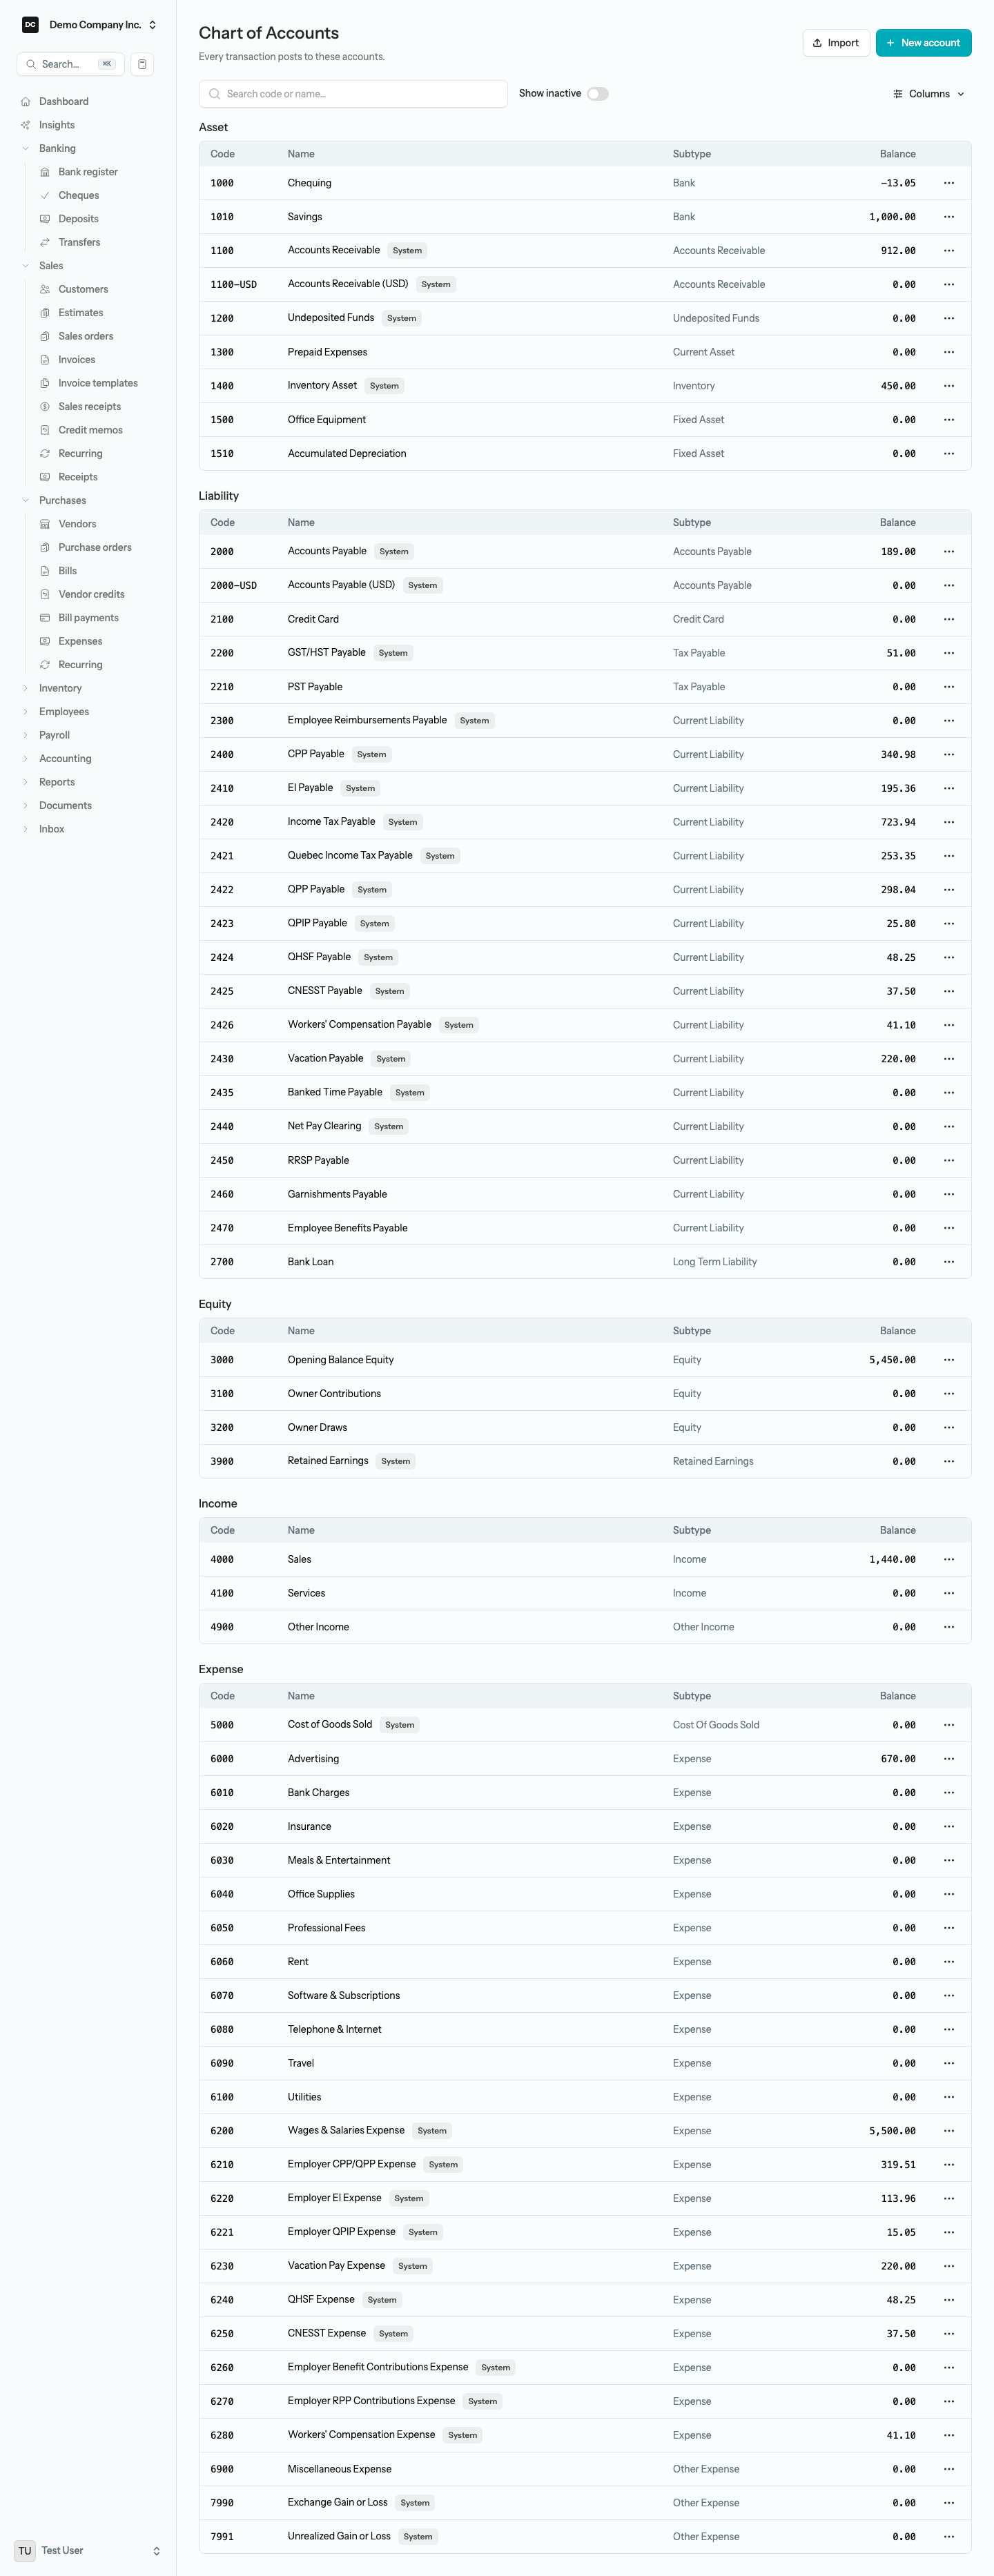
Accounts are organized into five top-level types. Within each type, a subtype tells the app exactly how the account behaves and where it belongs on the balance sheet or income statement.
| Type | Subtypes | What it tracks |
|---|---|---|
| Asset | Bank, Accounts Receivable, Undeposited Funds, Inventory, Current Asset, Fixed Asset, Other Asset | What you own or are owed — cash, money customers owe you, stock, and equipment. |
| Liability | Accounts Payable, Credit Card, Tax Payable, Current Liability, Long Term Liability, Other Liability | What you owe — money to suppliers, card balances, loans, and sales tax you have collected. |
| Equity | Equity, Retained Earnings — and for a non-profit, Unrestricted Net Assets, Restricted Net Assets, Endowment Net Assets | The owner’s stake — contributions, draws, and accumulated profit — or, for a society such as Demo Community Society, its net assets by restriction. |
| Income | Income, Other Income | What you earn — sales and any income outside your normal trade. |
| Expense | Cost Of Goods Sold, Expense, Other Expense | What you spend — the direct cost of what you sell, your running operating costs, and anything outside normal operations. |
To add an account:
- Open Accounting → Chart of Accounts from the sidebar and select New account in the top-right corner.
- Enter a Code (the number it sorts by) and a Name. If another active account already has that name, a warning appears under the field — it is only a heads-up, and you can still save.
- From the Type dropdown, pick the subtype that best describes the account. The options are grouped under the five top-level types, so you will see entries like “Asset: Bank” or “Expense: Cost Of Goods Sold”.
- Optionally pick a Parent account to nest it underneath another for grouped reporting, and add a Description.
- Leave Cash flow activity on “Auto (classify by type)” unless you want to force a balance-sheet account into a particular section of the Statement of Cash Flows.
- For a Canadian organization, map the account to a GIFI line — the CRA code it rolls up to on the GIFI statement when you file a T2, T5013, or T2125. For an Income or Expense account, pick a Default tax code to pre-select whenever a transaction line posts here.
- With multi-currency on, a Bank or Credit Card account also offers a Currency. It is fixed once the account has activity.
- For most balance-sheet accounts you can enter an Opening balance (optional) and the As of date it starts from — see Opening balances below.
- Switch on Include in transfers if this account should appear in the From / To dropdowns when recording a transfer (a line of credit, for example). Bank and credit card accounts are always included.
- On a current, long-term, or other liability, switch on Use to pay expenses if the account should appear under Paid from on an expense — a Shareholder Loan, for example, so a cost an owner paid personally posts straight to what the business owes them. Bank and credit card accounts are always offered; system accounts such as the payroll payables cannot be switched on.
- Leave Active on and select Save.
Tip. Group similar accounts with shared number ranges — assets in the 1000s, liabilities in the 2000s, equity in the 3000s, income in the 4000s, expenses in the 5000s and up. It keeps the chart easy to scan as it grows.
Heads up — An account’s type is fixed once it has transactions. As soon as an account carries a journal line — draft or posted — the Type dropdown is disabled on Edit, and the dialog says so: “This account has transactions, so its type can no longer be changed.” Retyping would rewrite how every past entry rolls up on the financial statements. If you coded something to the wrong kind of account, merge it into the right one or move the entries with a journal entry. When you stop using an account, mark it inactive instead of deleting it so its history stays intact.
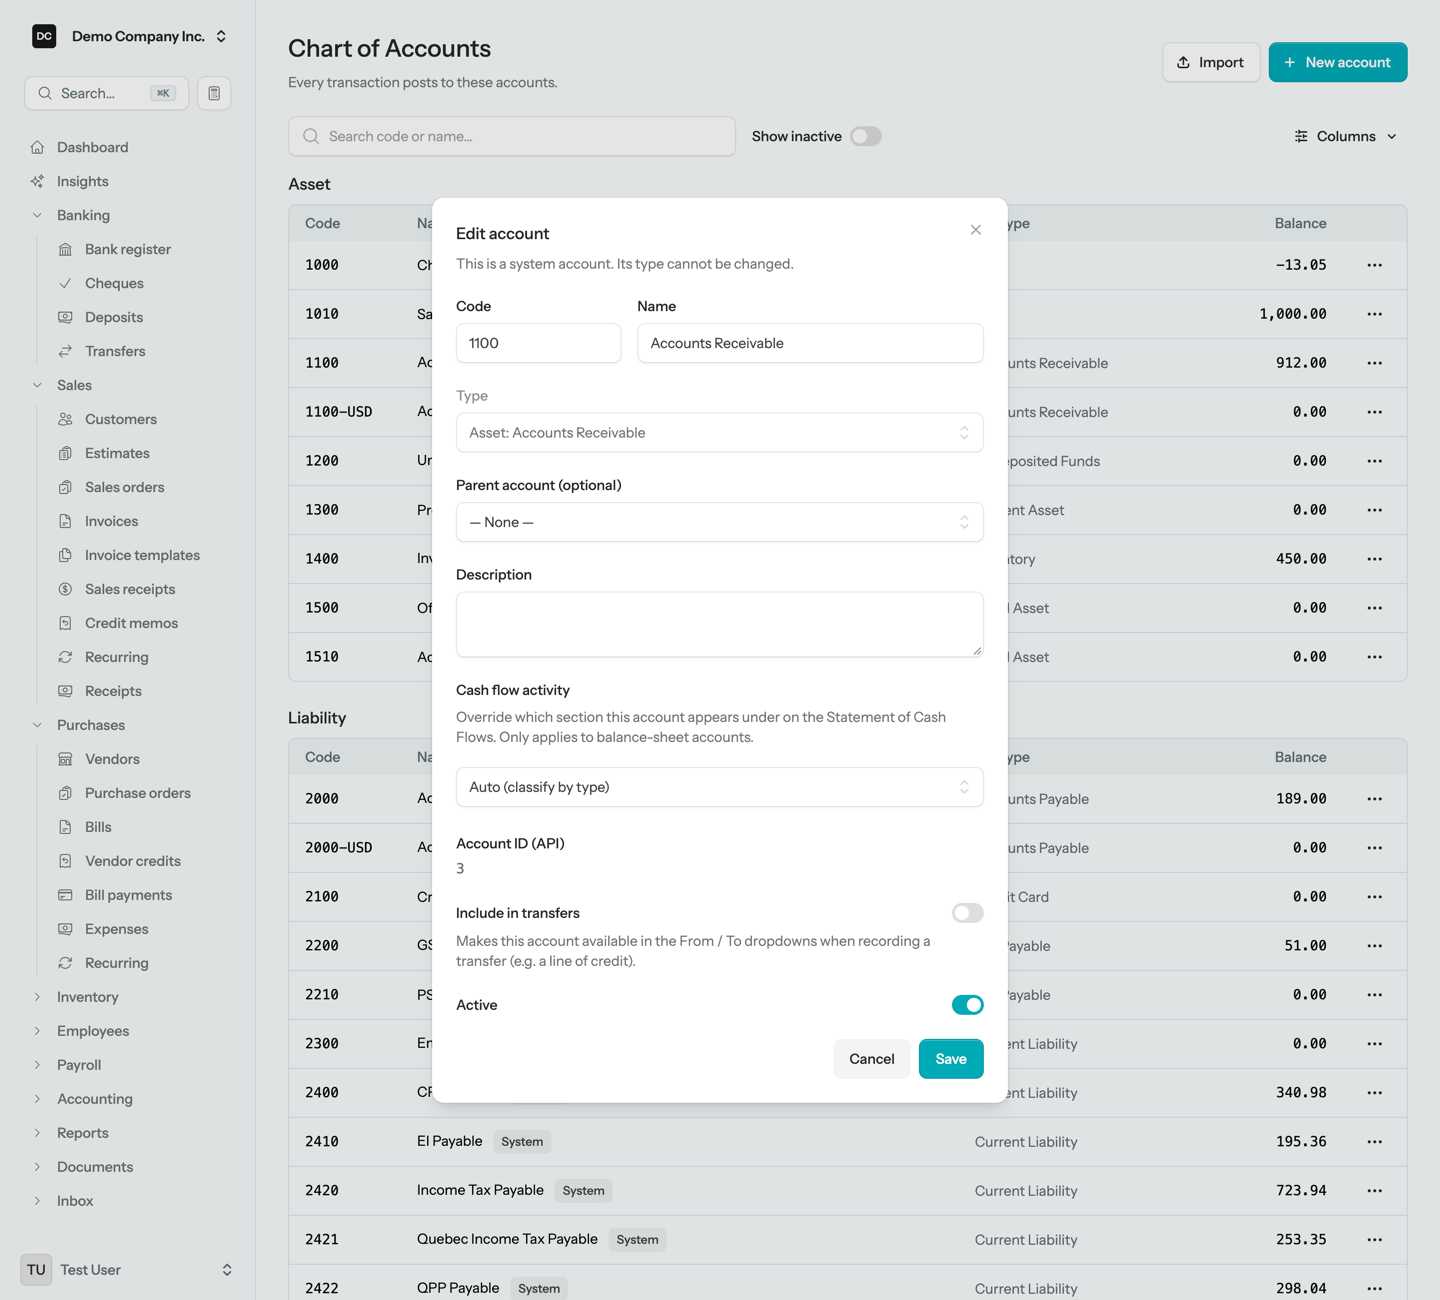
Note — System accounts can be renamed and recoded. Built-in system accounts — Accounts Receivable, Accounts Payable, Undeposited Funds, Retained Earnings, and the rest — let you edit the code and the name so you can match Demo Company Inc.’s numbering scheme. Their type is locked from the start (“This is a system account. Its type cannot be changed.”), because it drives every report and every posting rule the app relies on. A system account cannot be merged away, and its row menu offers only View ledger and Edit — no Deactivate or Merge. The Edit account dialog still shows the Active switch for a system account, though, and saving with it off does deactivate the account, so leave that switch on: the app’s own postings depend on these accounts.
Tip. Inactive accounts are hidden from the account pickers on invoices, bills, journal entries, and every other transaction form, so day-to-day entry stays uncluttered. Their history stays on every report. If you need to edit an older journal entry that posts to an account you have since deactivated, reactivate the account first so it is offered in the line’s Account picker again.
Every screen that shows an account balance can take you to what made it up. On the Chart of Accounts, the code and name open the General Ledger for that account, which defaults to the start of your fiscal year through today. On the Balance Sheet, Income Statement, Statement of Operations, and Cash Flow Statement, the account names are links to a Transactions report for that account — the income-statement style reports pass along the report’s date range and any class, location, or fund filter, while the Balance Sheet shows everything from inception through its as-of date, because a balance sheet has no starting date.
Import a chart of accounts
Starting from an existing set of accounts — a list exported from another program, or one handed over by your accountant? Import them in bulk from a CSV instead of adding each one by hand.
To import accounts:
- Open Accounting → Chart of Accounts and select Import in the top-right corner.
- Select Download template to get a CSV with the right columns, fill in one account per row, and save it.
- Choose your CSV file, then select Preview. The app checks every row and reports how many accounts it will create and how many it will skip.
- Review the preview, then select Import to create them.
Note. The subtype column takes the same subtypes as the New account dialog. To nest sub-accounts, put the parent’s code in the parent_code column and list the parent before its children. Codes that already exist are left untouched, so a re-run adds only what is new.
Opening balances
There are two ways to bring a starting balance into the books, and they suit different situations: a single field on the account for a one-off, and a dedicated workspace for moving a whole set of books across.
One account at a time
While you create a balance-sheet account — a bank account, a credit card, a loan, a piece of equipment — the New account dialog offers Opening balance (optional) and As of. Saving posts a journal entry dated As of: the account on its normal side (a debit for an asset, a credit for a liability or equity account) and Opening Balance Equity on the other, so the books stay balanced from the first day. The fields are only offered while creating, not on Edit; they never appear on Accounts Receivable, Accounts Payable, or Inventory accounts, whose balances have to come from their customer, vendor, and item detail; the amount must be zero or positive (post a journal entry for a contra balance); and a foreign-currency Bank or Credit Card account skips them — record its opening balance with a journal entry at the correct exchange rate.
The Opening Balances workspace
When you are carrying over a whole set of books — a trial balance, what each customer owed you, what you owed each vendor, cheques that had not cleared — use the Opening Balances workspace instead: Accounting → Opening balances in the sidebar, shown to the organization’s owner. It holds your draft trial balance as targets, records opening receivables and payables per contact, and re-nets one opening journal entry every time you save, so everything stays editable until you choose Finalize & lock. Once the workspace exists, the New account dialog reminds you it is there and links to it. See Opening balances for the full walkthrough. Coming from QuickBooks? The migration wizard has its own Opening balances mode that loads the trial balance for you — see Import from QuickBooks.
Merge two accounts into one
Ended up with duplicates — say two “Office Supplies” expense accounts? Merge one into the other so all of its history rolls into a single account instead of leaving the chart cluttered.
To merge an account:
- Open Accounting → Chart of Accounts and find the account you want to retire.
- Choose Merge… from its row menu.
- In Merge into, pick the surviving account — only active accounts of the same subtype and currency are offered.
- Read the summary of what will move, tick “I understand this cannot be undone.”, and select Merge.
Heads up. Merging is permanent. Every transaction, item default, recurring line, budget line, and sub-account on the account you retire moves to the one you keep, and the retired account is deactivated and dropped from the list. A few merges are refused: a system account cannot be merged away, an account cannot be merged into one of its own sub-accounts, a Bank or Credit Card account with reconciliation history cannot be merged away, and if both accounts have lines in the same budget the app names the budget and asks you to remove one side first. Because no amounts or dates change, a merge is allowed even in a locked period.
Journal entries
A journal entry is a raw double-entry transaction — debits on one side, credits on the other. Use one for adjustments that do not fit the invoice, bill, or payment forms: depreciation, accruals, reclassifying an amount between accounts, and year-end closing entries. Open Accounting → Journal to see every posting to your general ledger. Search by entry number or memo, and use the status filter to show All, Drafts, Posted, or Voided entries.
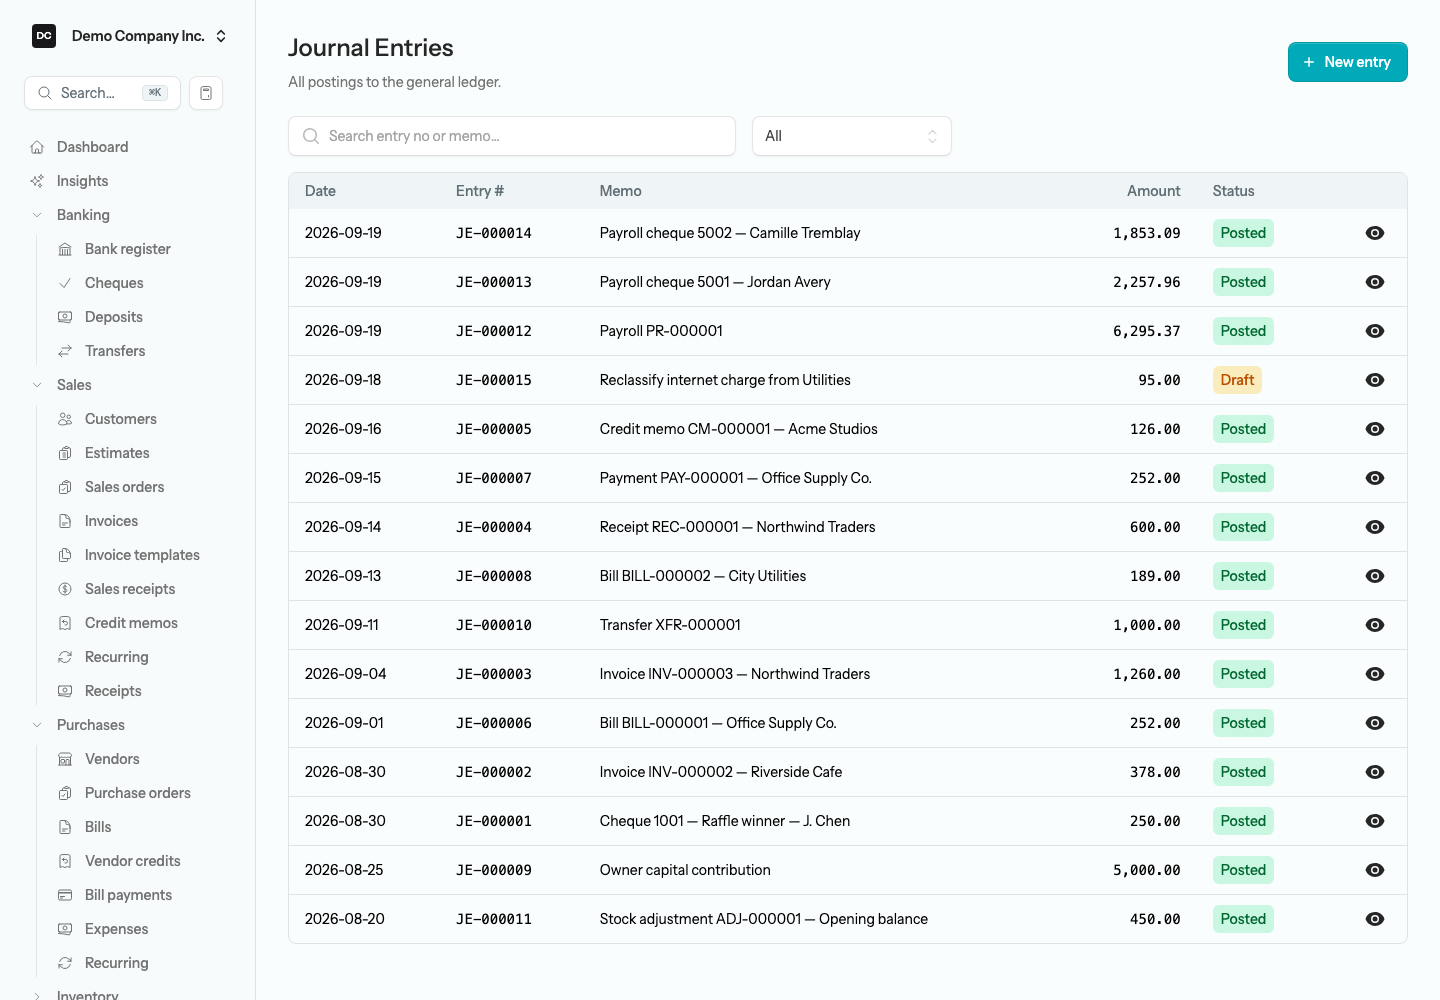
To create a journal entry:
- Open Accounting → Journal, then select New entry.
- If you have saved templates, a Template selector sits at the top — pick one to fill the lines (see Journal entry templates below).
- The Entry # and Date fill in automatically. The suggested Entry # is a preview: every posting in the organization shares the same JE numbers, so if someone posts while you are working, your entry takes the next free number when you save it. You can type your own number instead, but it must be unique within the organization. A click anywhere in the Date field opens the calendar.
- Type a Memo describing why you are making the entry.
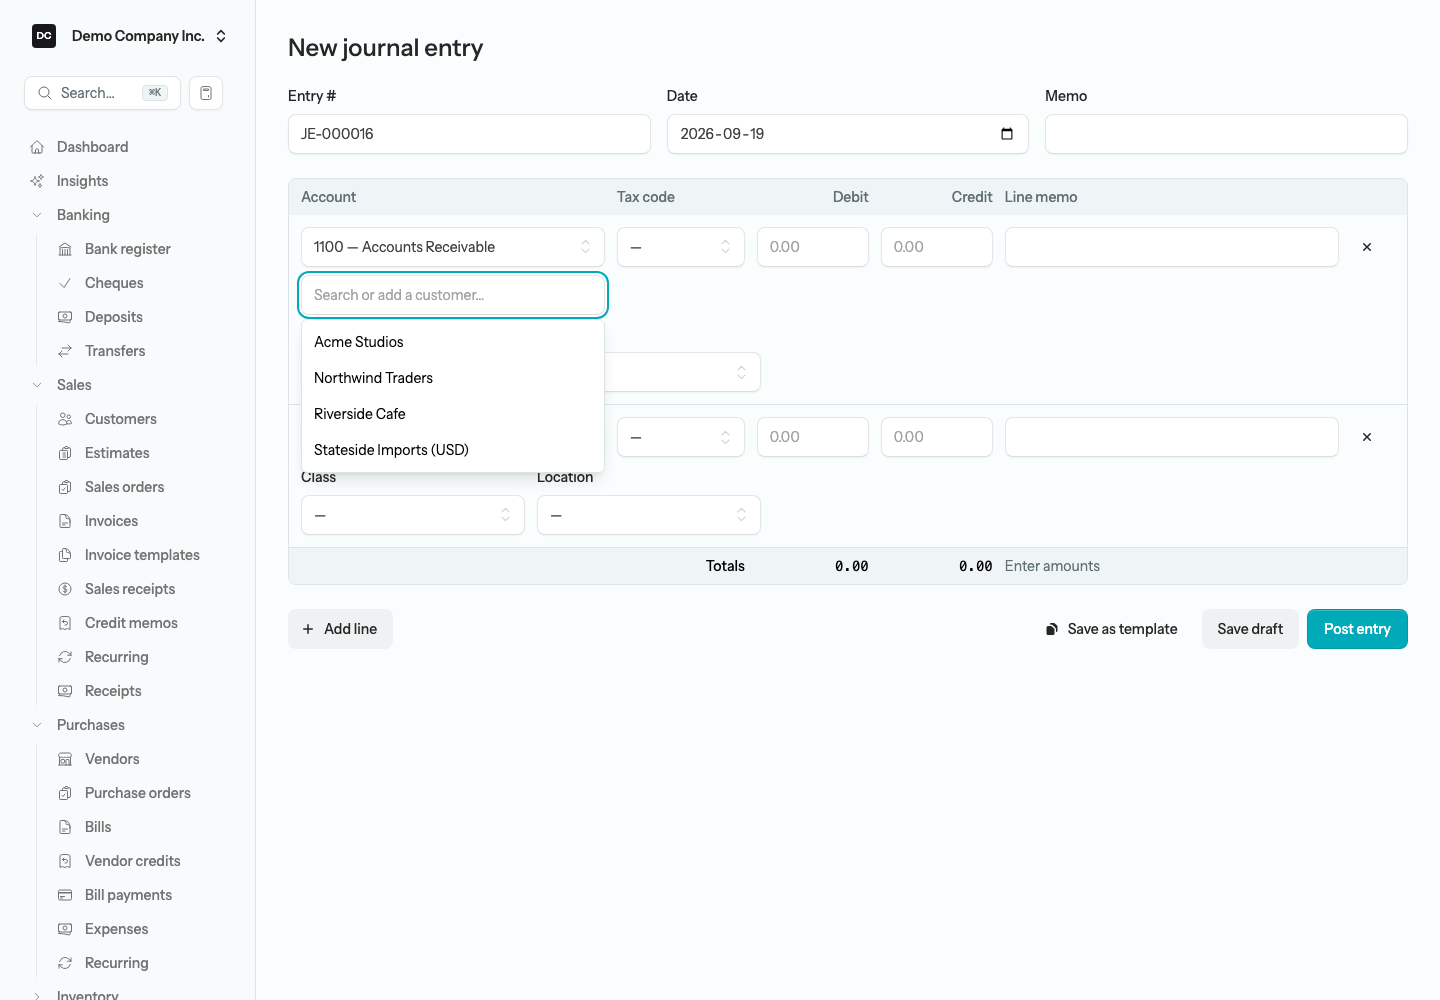
- On the first line, choose an Account. If it is your Accounts Receivable or Accounts Payable account, a “Search or add a customer…” (or vendor) box appears beneath it — pick the name the amount belongs to, or type a new name and add them on the spot.
- The Tax code fills in from the account’s default. It is a reporting tag only — it never calculates or changes an amount — so clear it or change it freely.
- Enter either a Debit or a Credit amount, plus an optional Line memo. Every amount cell doubles as a calculator: type 1250/12 or 400*1.05 and press Enter to commit the result.
- If your organization tracks Classes, Locations, or Funds (Settings → Organizations), a second row of selectors appears under each line.
- Select Add line and enter the offsetting amount on another account. The Totals row reads Enter amounts until you type one, then Balanced when debits equal credits, or “Out of balance by” the difference.
- Select Post entry to finalize it, or Save draft to keep working on it later.
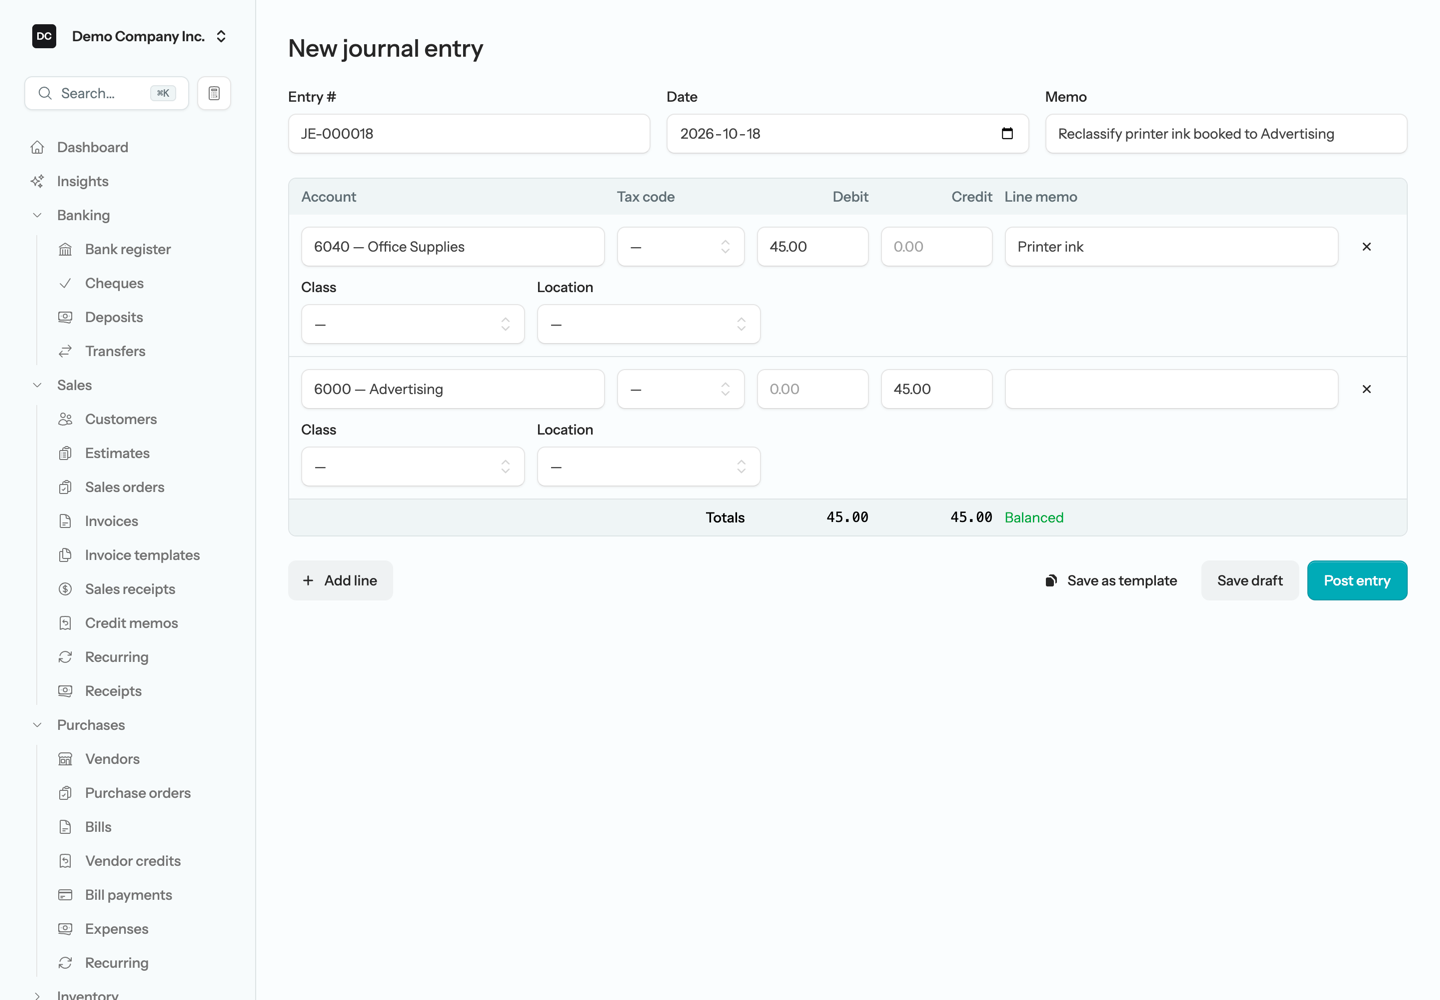
Note — Debits must equal credits. Every journal entry has to balance: total debits must equal total credits in your home currency. The app refuses to post an entry that does not balance, one dated in a locked period, or one that would disturb a reconciled bank statement. Posting writes the lines to the general ledger, where they flow into every report that touches the affected accounts; a draft, by contrast, changes nothing in your books until you post it.
Note — Lines that post to Accounts Receivable or Accounts Payable need a name. A journal line on a receivable or payable control account will not save until you pick the customer or vendor it belongs to. That name is what the AR and AP Aging reports, the contact statements, and each customer’s open balance read — a line without one would land in their “unattributed” catch-all. The rule applies to every AR or AP account, including a per-currency one.
Note — One person edits a record at a time. If a teammate already has a journal entry, template, schedule, or account open for editing, you see who is editing instead of the form, and Owners and Admins can take over. Posting, voiding, reversing, deleting a draft, or merging is refused while someone else is editing. See Settings → Edit locks for how a lock is held and released.
Editing or voiding a posted entry
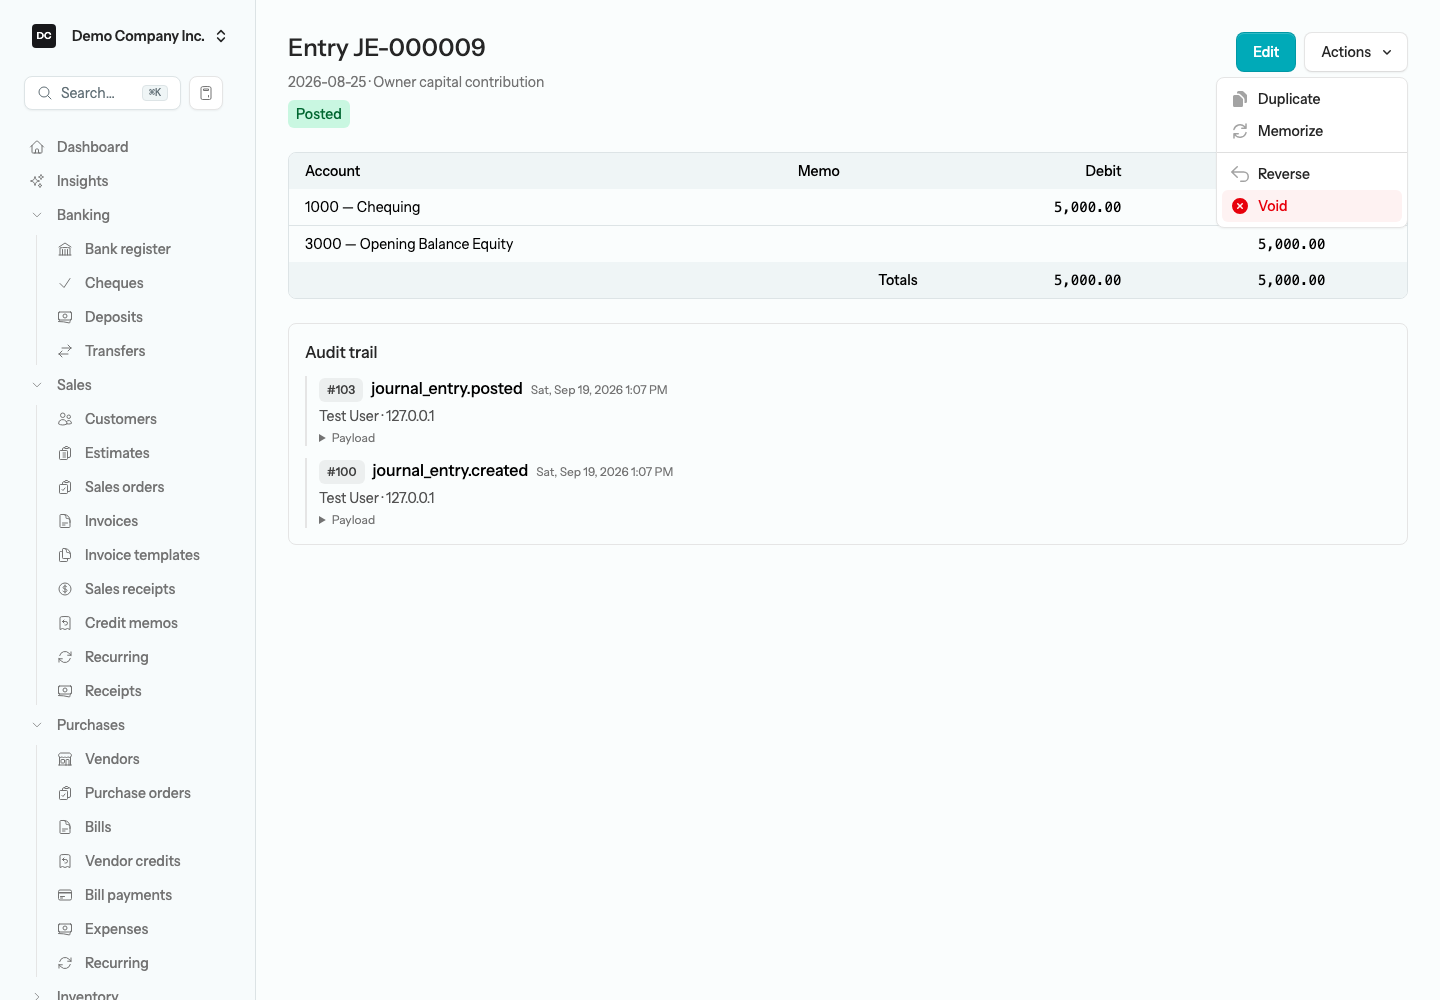
Open a manual entry and select Edit. The form warns that “This entry is posted. Saving overwrites it in place and changes already-reported balances.” The entry must still balance, both its original date and the date you save it with must fall after any lock date, and none of its bank lines may be ticked on a completed reconciliation (undo the reconciliation first). The Entry # field stays editable, so the entry keeps its number unless you change it there. Select Save changes; the before-and-after is written to the audit trail. To cancel an entry instead, choose Void from the Actions menu and confirm: the app posts a reversing entry dated today and marks the original Voided, so the ledger keeps both. A debit line to a Fixed Asset account also shows a Create asset record button on the entry page — see Fixed assets.
Deleting a draft entry
A draft never reached your books, so it does not need a reversing entry. Open a manual draft and choose Delete draft from the Actions menu, then confirm: the entry and its lines are removed and the deletion is recorded in the audit log. Delete draft appears only on drafts; once an entry is posted, Void takes its place. An entry created by another document is managed from that document instead.
Source-linked entries
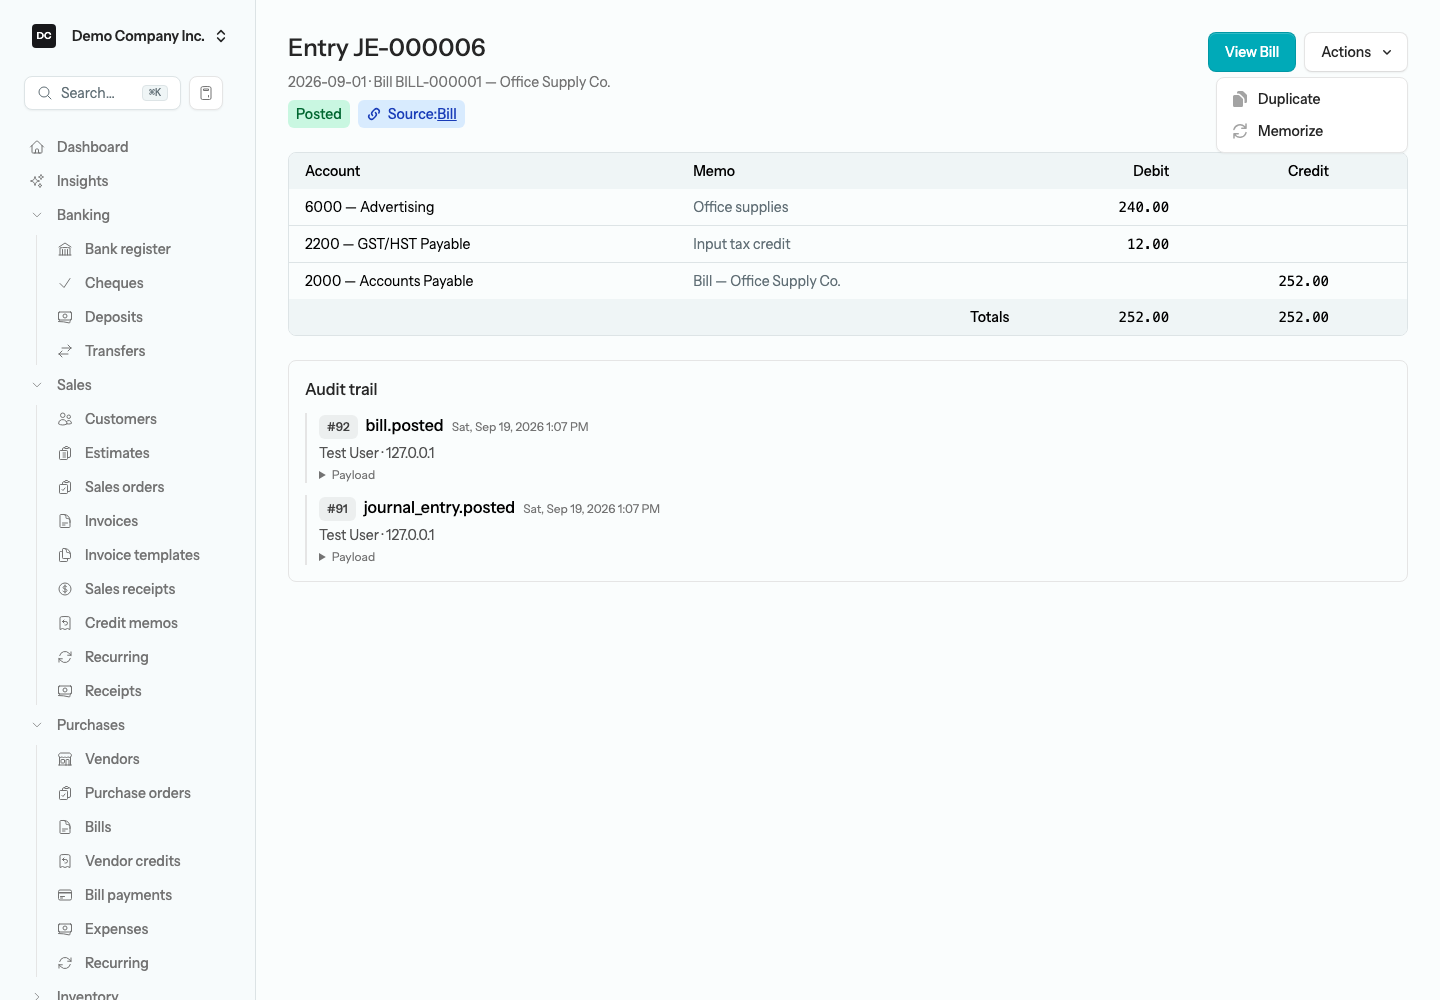
Most entries in the list were created automatically by another document — a posted invoice, bill, receipt, cheque, deposit, transfer, or bank reconciliation. Those show a blue Source badge on the entry page that links to the document, and the toolbar’s main button reads View followed by the source’s name, such as View Bill. Reverse and Void are withheld for them: the only correct way to back out a posted bill or invoice is to void or edit that bill or invoice, so the document and its ledger entry can never disagree. Memorize stays available on every entry, but Duplicate appears only when the source is a bill or a deposit — the two documents with a duplicate flow of their own.
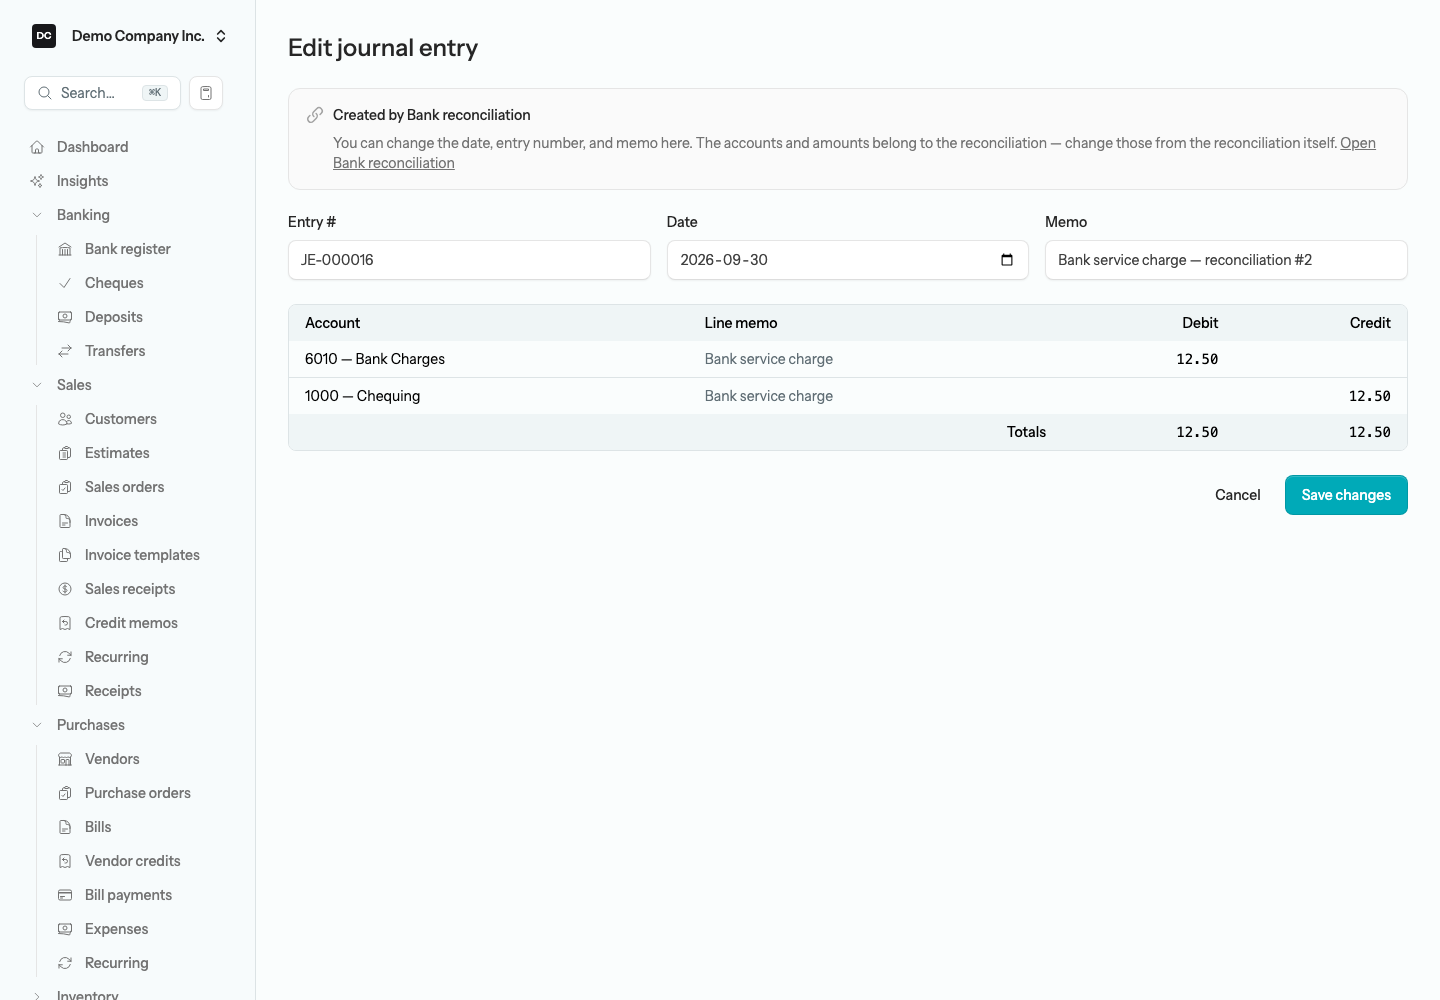
There is one exception. A bank reconciliation’s service-charge or interest adjustment has no editable form of its own once the reconciliation is complete, so its journal entry offers Edit alongside View Bank reconciliation. The edit is header-only: a “Created by Bank reconciliation” notice explains that you can change the date, entry number, and memo here while the accounts and amounts belong to the reconciliation, the lines appear read-only, and Save changes re-checks the period lock and the reconciliation lock on both the old and the new date. See Banking for the reconciliation side.
Tip — Duplicate to reuse the same entry. Open a manual entry and choose Duplicate from the Actions menu to start a new draft pre-filled with the same lines, accounts, and amounts — handy for one-off adjustments you make every month but did not turn into a recurring template. On an entry posted by a bill or a deposit, Duplicate opens a new bill or deposit pre-filled from that document instead, so you keep the original document type rather than creating a bare journal entry. Entries posted by any other document — an invoice, receipt, cheque, or transfer, for example — do not offer Duplicate here; a cheque has its own Duplicate on the cheque’s page.
Reversing an entry
Reversing a posted entry is the accrual-accounting way to back something out without erasing it. It creates a mirror of the original with the debits and credits swapped, dated whenever you choose — typically the first day of the next period. The original stays posted for your audit trail, and the reversal cancels it on the later date.
To reverse a journal entry:
- Open the posted entry you want to reverse and choose Reverse from the Actions menu.
- In the Reverse entry dialog, set the Reversal date. It defaults to the first day of the month after the entry.
- Select Create draft reversal. The new draft opens in the editor with the memo “Reversal of” the original number — the amounts are the same but the debit and credit sides are flipped.
- Review it, then select Post entry when you are ready.
Note. The reversal is created as a Draft so you can review it before it hits your books. The draft shows a Reverses badge linking to the original straight away; the original gains its Reversed by badge, linking back to the reversal, only once you post the reversal. Reverse is only offered on manual entries — back out a source-linked entry from its document.
Journal entry templates
A template is a saved set of journal lines you reuse to start new entries quickly — the same accounts, line memos, and even default debit and credit amounts, ready to drop onto a fresh entry. Reach for one when you post the same shape of entry often but on no fixed schedule: a payroll journal, a standard accrual, a reclass you book by hand. Open Accounting → Journal templates from the sidebar to manage them; the list shows each template’s name, line count, and Active or Inactive status, with a Delete button per row.
To create a template:
- Open Accounting → Journal templates, then select New template.
- Give it a Template name — for example, Monthly depreciation — and leave Active on so it shows up in the picker.
- Add the lines: pick an Account and any Debit, Credit, or Line memo you want pre-filled. Class, Location, and Fund selectors appear under each line when your organization tracks them. There is no tax code on a template line — it is filled from the account’s default when you apply the template.
- Select Add line for more rows, then Save template.
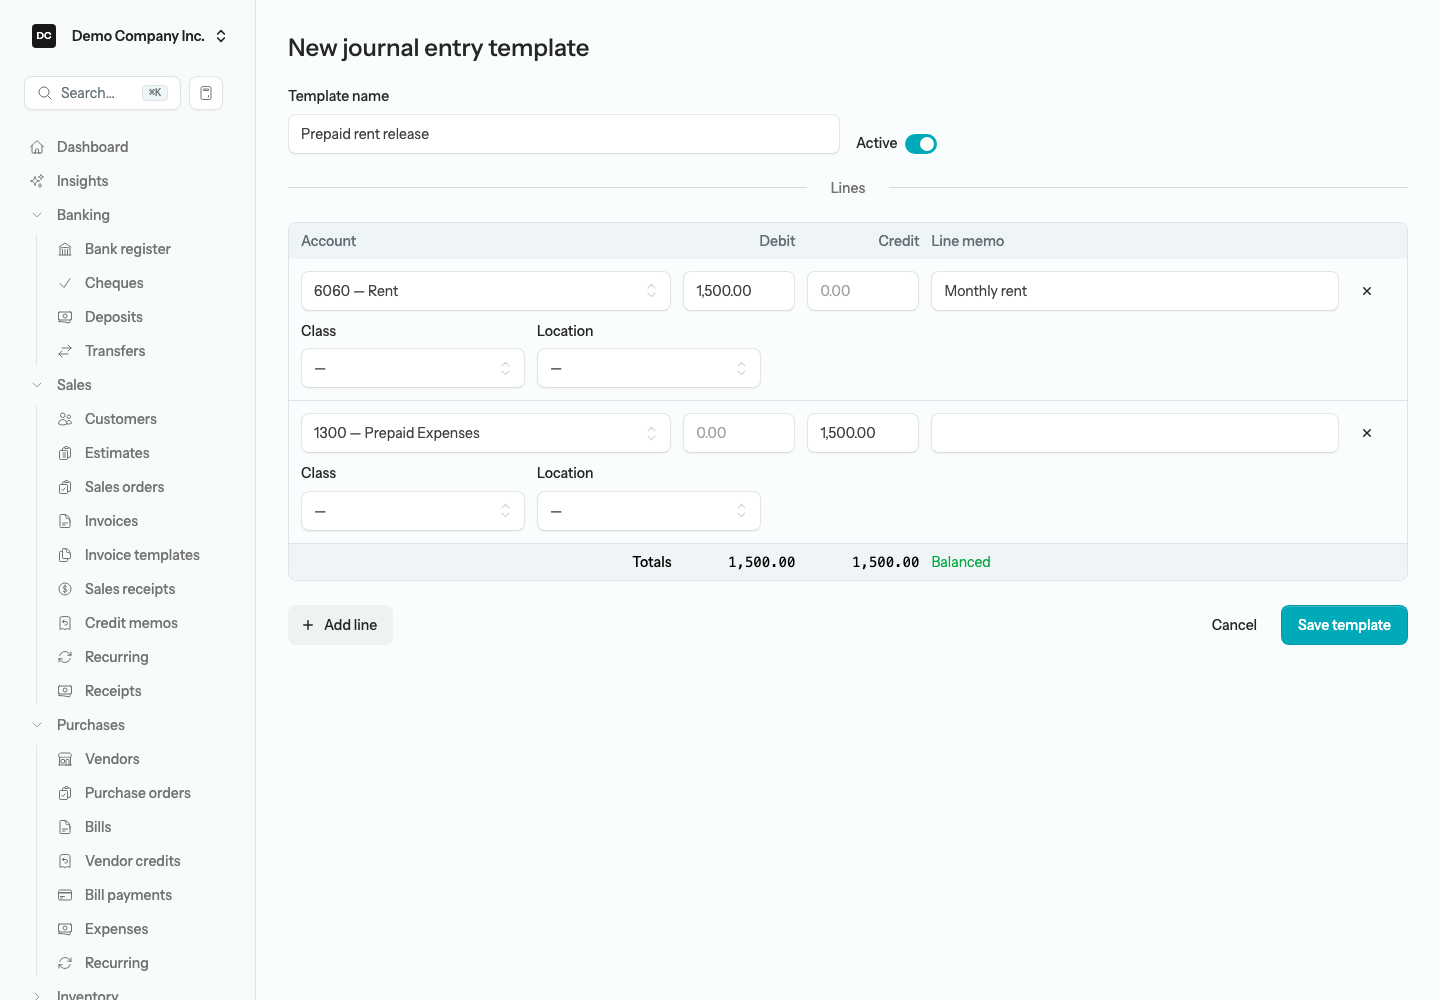
Note — Templates are scaffolding, not posted entries. A template never touches your books on its own — it only stores a line layout. It does not need to balance, the amounts can be zero, and nothing posts until you apply it to a real journal entry and post that. Deleting a template leaves every entry you already created from it untouched.
To start an entry from a template:
- Open Accounting → Journal, then select New entry.
- At the top of the form, choose your template from the Template selector. If the lines below are still blank they are replaced; if you have already typed some, the template’s lines are added after them. Each line’s tax code fills in from its account’s default.
- Set the Date and Memo, adjust the amounts so debits equal credits, and post as usual.
The Template selector only appears while you are creating a new entry, and only when you have at least one active template. Editing an existing entry hides it.
Tip — Save any entry as a template. Building an entry you will want again? On the journal entry form, select Save as template, give it a Template name, and select Save template — the current lines are stored as a reusable template, so you never have to retype them on the dedicated templates page.
Recurring (memorized) journal entries
Where a template helps you re-key an entry on demand, a recurring schedule puts it on a calendar: the app generates the entry for you on each due date, so a standing accrual or an amortization schedule shows up without you having to remember it. Open Accounting → Recurring entries from the sidebar to manage your schedules; the list shows each one’s Frequency, Next run, how many entries it has Generated, and its status — Active, Ended, or Needs attention.
To set up a recurring schedule:
- Open Accounting → Recurring entries, then select New memorized entry.
- Enter a Schedule name and the Memo applied to each generated entry.
- Choose a Frequency — Weekly, Monthly, Quarterly, Semi-annual, or Annual — and a Start date. For monthly and longer cadences, Runs on decides the day: “A specific day of the month” (with a Day of month; days past the end of a short month fall on its last day), “Last day of the month”, or “Last business day of the month” (the last Monday to Friday; statutory holidays are not skipped). The first run falls in the Start date’s own month — on the Start date itself for a specific day, or on that month’s last day or last business day — and each later run comes one period after the one before, so a Quarterly schedule on day 10 that starts January 10 runs on January 10, then April 10, then July 10.
- Under Ends, leave it on “Never (until paused)”, or choose On date with an End date, or “After number of occurrences” with a Number of occurrences.
- Add the Template lines: an Account, a Debit or Credit, and an optional Line memo on each, plus Class and Location selectors when your organization tracks them. The grid is simpler than the one-off entry form — there is no Tax code column, Fund selector, or customer and vendor picker. Unlike a template, a schedule must balance before you can save it; select Save schedule when the Totals row reads Balanced.
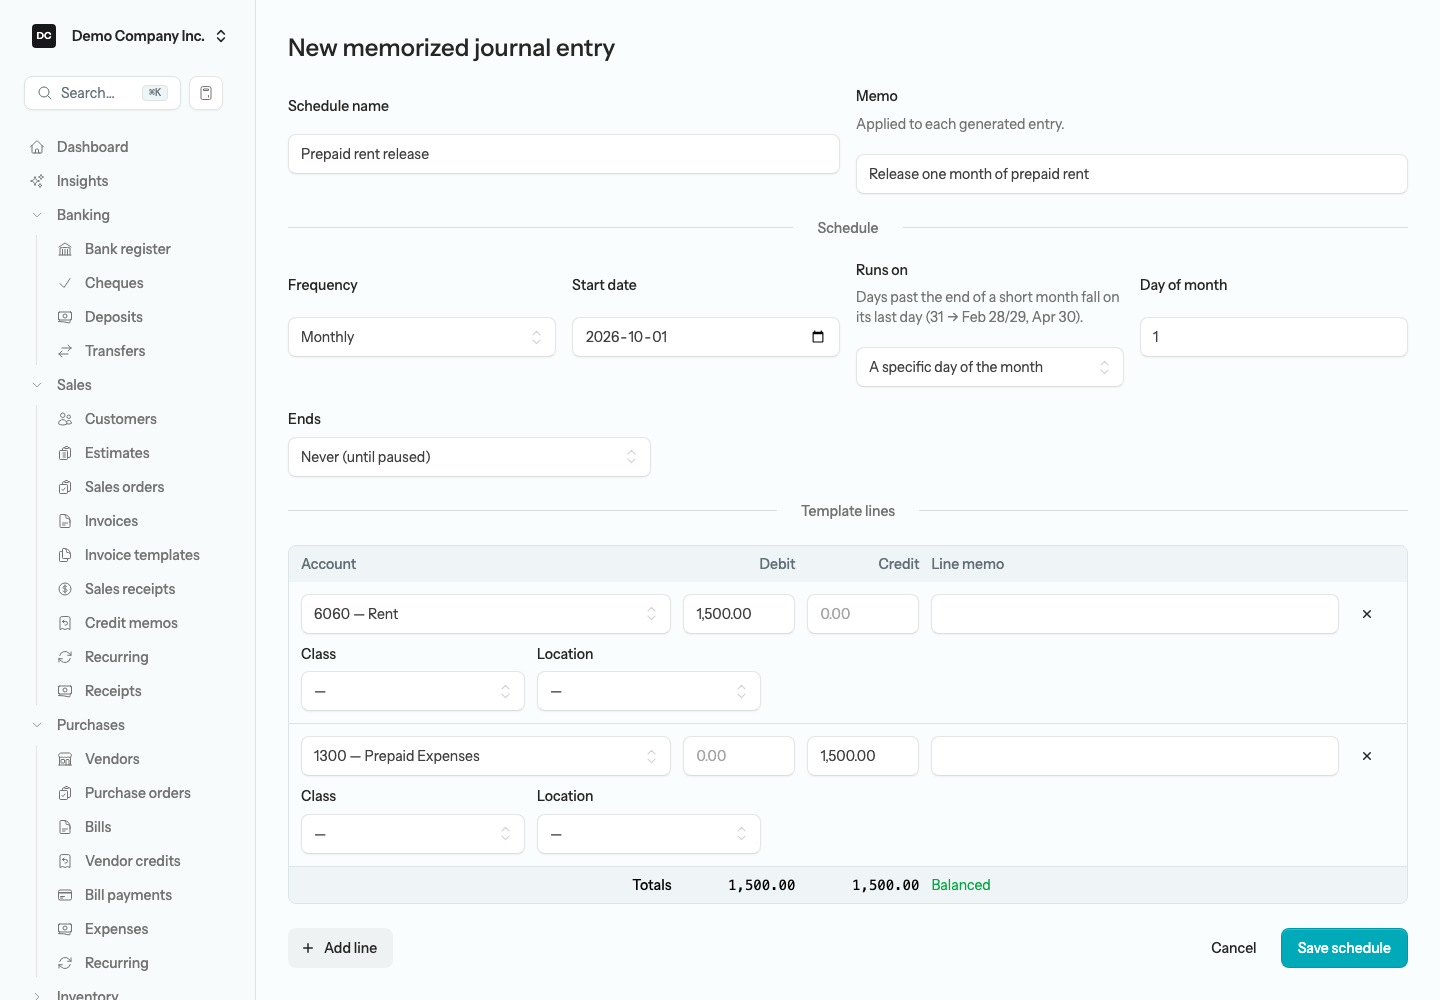
Note — Generated entries are always drafts. A schedule never posts on its own — each due date produces a Draft journal entry for you to review and post, so nothing hits your books unseen. Open a schedule to see its Next run and Generated counters and a Generated entries table linking every entry it has produced. Select Generate now to create the next one early, or use the Actions menu to Edit, Pause, Resume, or Delete it. If an account the schedule depends on is deleted, the schedule pauses itself, shows a red Needs attention badge, and records the reason on its page rather than failing quietly.
Tip — Memorize an entry you already have. Open a journal entry you post regularly, choose Memorize from the Actions menu, and the schedule form opens pre-filled with that entry’s lines — the quickest way to put a repeating one-off onto a calendar without retyping it.
Period locking
Once a period is finished — books reviewed, taxes filed — lock it so the numbers cannot shift underneath you. A lock date guards every transaction dated on or before it, across every workflow: invoices, bills, payments, cheques, transfers, and journal entries. You choose how strict it is:
- Block — the default. The app refuses the change. An Owner or Admin who tries it is offered an override: enter your account password and that one transaction goes through.
- Warn and confirm — the app shows a warning that the date is in a closed period, and anyone who can use the form may continue after confirming.
Either way, every transaction let through is recorded in the audit log with who confirmed it and the dates it touched. The API, the AI assistant, and scheduled jobs such as recurring transactions never override the lock in either mode.
To lock a period (Owners and Admins):
- Open Settings → Organizations and select Edit organization next to your organization.
- Scroll to the Close the books card. It reads “The books are open. No closing date is set.” or “Books locked through” the current lock date.
- Select Close the books (or Change lock date if a lock already exists).
- Enter the Lock date — the last day of the period you are closing — choose Block or Warn and confirm, enter Your account password, then select Confirm.
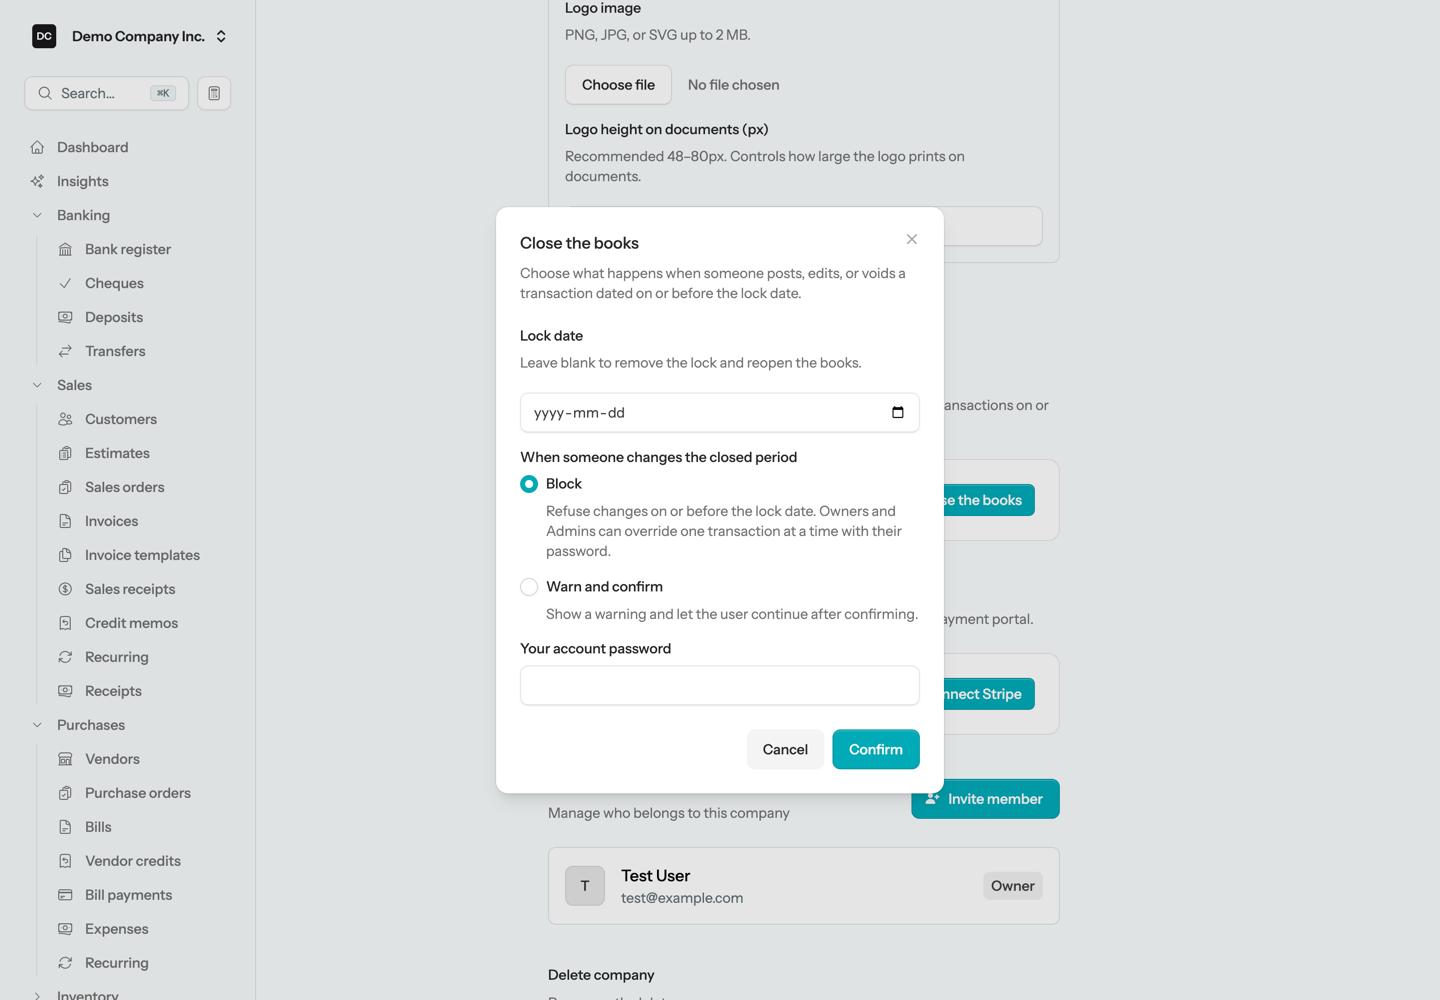
Heads up. In Block mode, without an override, the app will not post anything dated on or before the lock date, and it refuses to edit a posted invoice, bill, payment, or manual journal entry when either its original date or its new date falls on or before it. Voiding is the one action checked only against a new date: it is checked against the void date, which is today, so a posted entry or document dated inside the locked period can still be voided and its reversing entry lands today. To reopen the books, choose Change lock date, leave the Lock date blank, and confirm with your password. Every change to the lock date is recorded in the audit log. Finishing the Opening Balances workspace with Finalize & lock sets the same lock date through your conversion date.
Tip — Year-end adjusting entries from your accountant. A common rhythm: keep working in the new year while your accountant finishes the old one, post their adjusting entries on the year-end date when they arrive, then lock the books through that date. The journal entry form asks you to confirm whenever an entry lands in a prior fiscal year or inside a completed bank reconciliation. If a late adjustment turns up after you have locked, an Owner or Admin can override Block mode for that one entry, or switch to Warn and confirm while the year is being finalized.
Reports tied to this area
- General Ledger — every posting to every account over a date range; defaults to fiscal year to date and is where the Chart of Accounts links drill to.
- Trial Balance — each account’s ending debit or credit balance, proving the books balance.
- Balance Sheet and Income Statement — the financial statements your account types roll up into.
- Transactions — the account-level detail the financial statements drill into.
All of these are described under Reports.