Banking is where your cash transactions live. Use it to review a running register of any bank account, import the statement your bank gives you and match it against your books, work a feed of imported transactions waiting to be categorized, set rules that categorize them for you, reconcile at month end, move money between your own accounts, write cheques outside the bill workflow, and bundle customer receipts into the single deposit that lands at the bank. The examples below use our sample business, Demo Company Inc.
The bank register
The register is a chequebook-style view of one bank account: every transaction that hit it, in date order, with payments and deposits in separate columns. Use it to confirm a payment cleared, drill into an entry, or spot a duplicate before you reconcile. Open Banking → Bank register from the sidebar and pick an account from the Account selector at the top. The Memo column shows each document’s own memo — “Deposit: August 2026 Interac Deposits” rather than a bare “Deposit” — so you can tell which row is which without opening it. The Actions menu in the top-right is your gateway to the rest of Banking — Reconcile, Import statement, and Bank rules all open from there.
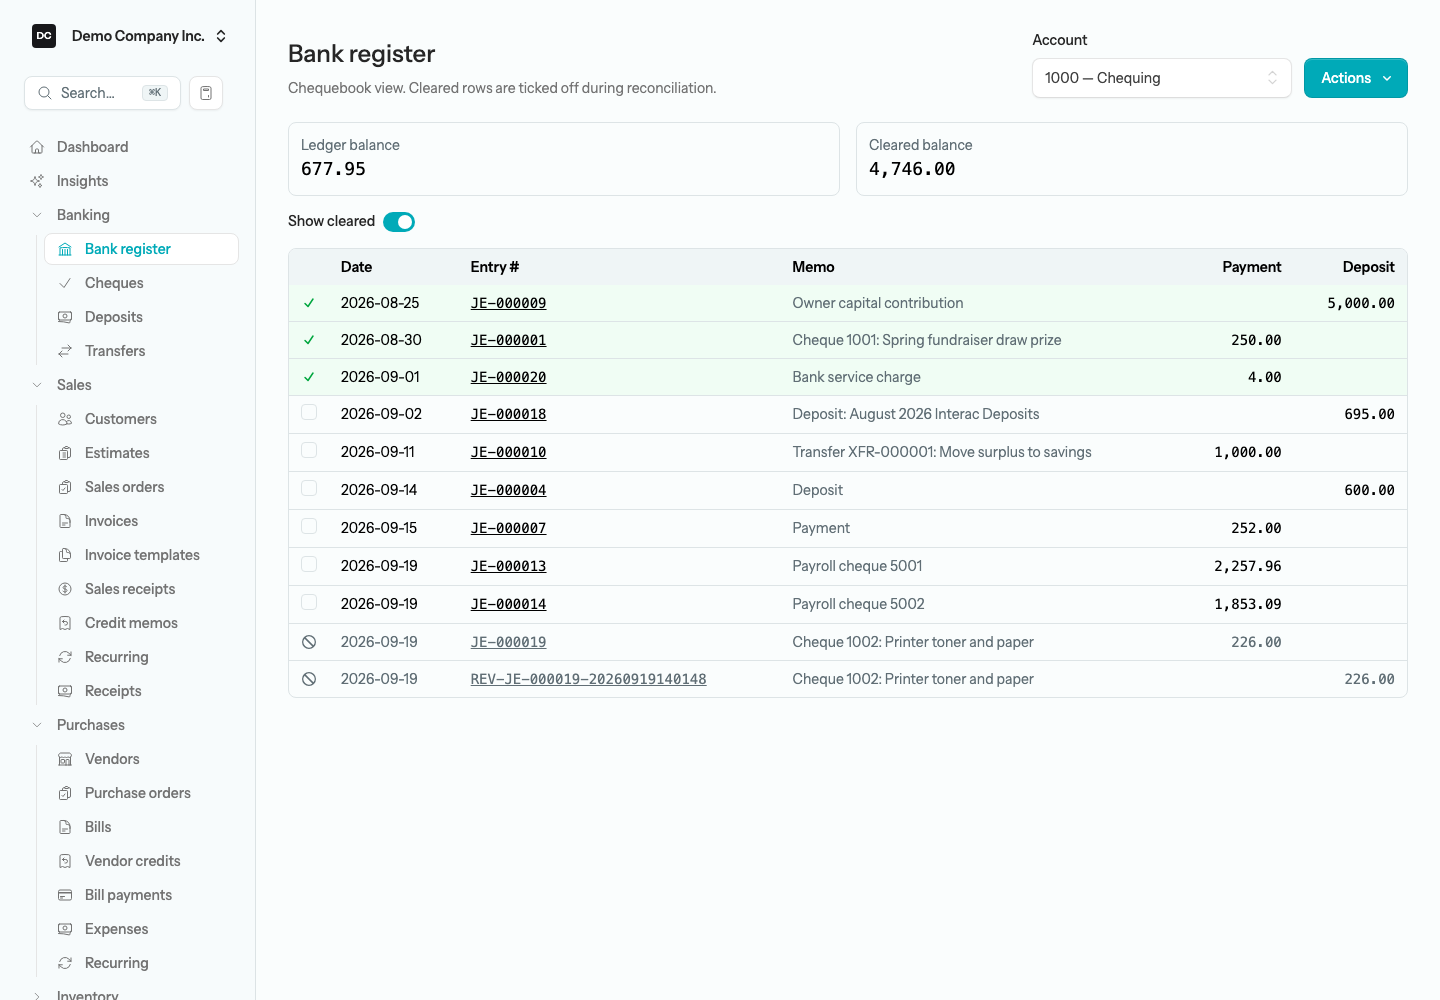
The register is read-only: a green tick means the row has been cleared, and rows are ticked off during reconciliation rather than here, so there is nothing to keep in step by hand. Toggle Show cleared to hide the rows you have already accounted for. A voided cheque and the reversing entry its void posted are greyed out with a void mark instead of a box: they cancel each other out and never reach the bank, so they are not waiting to clear, and hiding cleared rows hides them too. When you are ready to work through the statement, choose Reconcile from the Actions menu.
Import a bank statement
Instead of ticking off every row by hand, upload the statement file your bank gives you and let the app match it against your books. Matched transactions are cleared for you, brand-new ones can be added with a single category pick, and duplicates are skipped — so by the time you reach the reconciliation screen most of the work is already done. Open the Bank register, choose Import statement from the Actions menu, and pick the account at the top.
To import a statement:
- From the Bank register, choose Actions → Import statement, then pick the bank or credit-card account from the Account selector.
- Select the statement file and choose Upload & analyze. CSV, Excel, OFX/QFX/QBO, and PDF are all accepted.
- If the app needs help reading a CSV or Excel file, map the columns (see below) and select Apply mapping. Structured OFX/QFX/QBO files skip this step.
- Review the matched, to-add, suggested, and duplicate lines. For anything new, pick a category from the Add to… selector, optionally the vendor it was paid to, and the sales tax included in the amount — the app splits the tax out of the statement total for your return. Lines the app has seen before — a payee you categorized last month, a bank rule, or an AI guess — arrive pre-filled and marked Suggested; select Confirm to accept each one (or Confirm all suggestions in the summary bar), Change to adjust it, or Skip.
- Select Import & reconcile. The app pre-ticks every matched and added line and drops you on the reconciliation screen to finish.
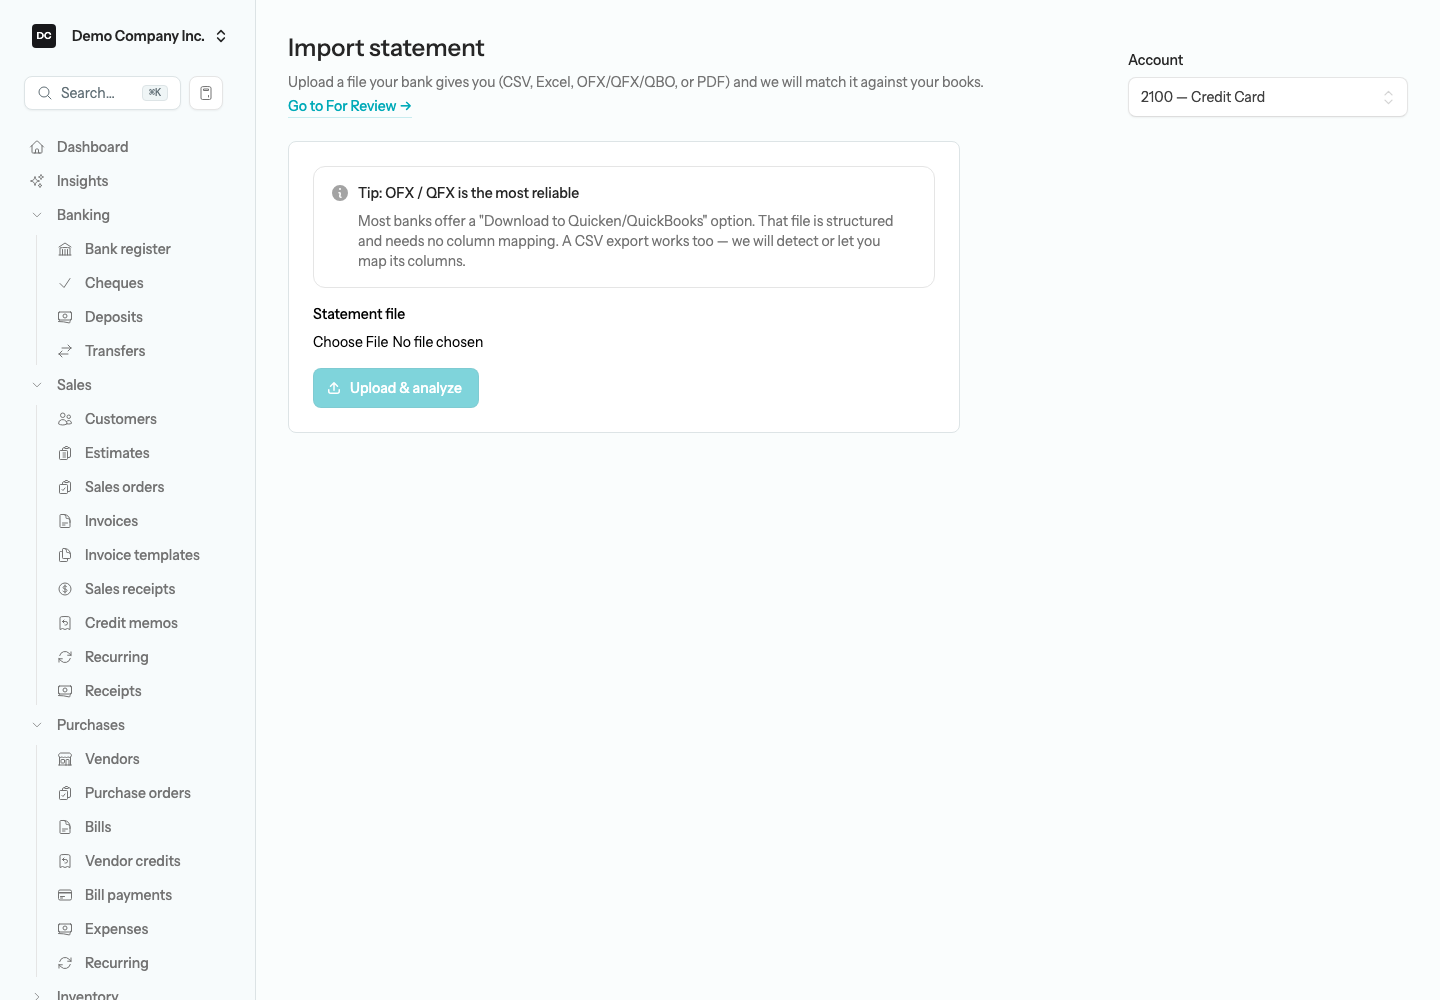
Tip — OFX / QFX / QBO is the most reliable. Most banks offer a “Download to Quicken” or “Download to QuickBooks” option. That file is already structured, so it needs no column mapping and imports cleanly. A CSV or Excel export works too — the app detects the columns where it can and lets you map the rest.
Mapping columns (CSV and Excel)
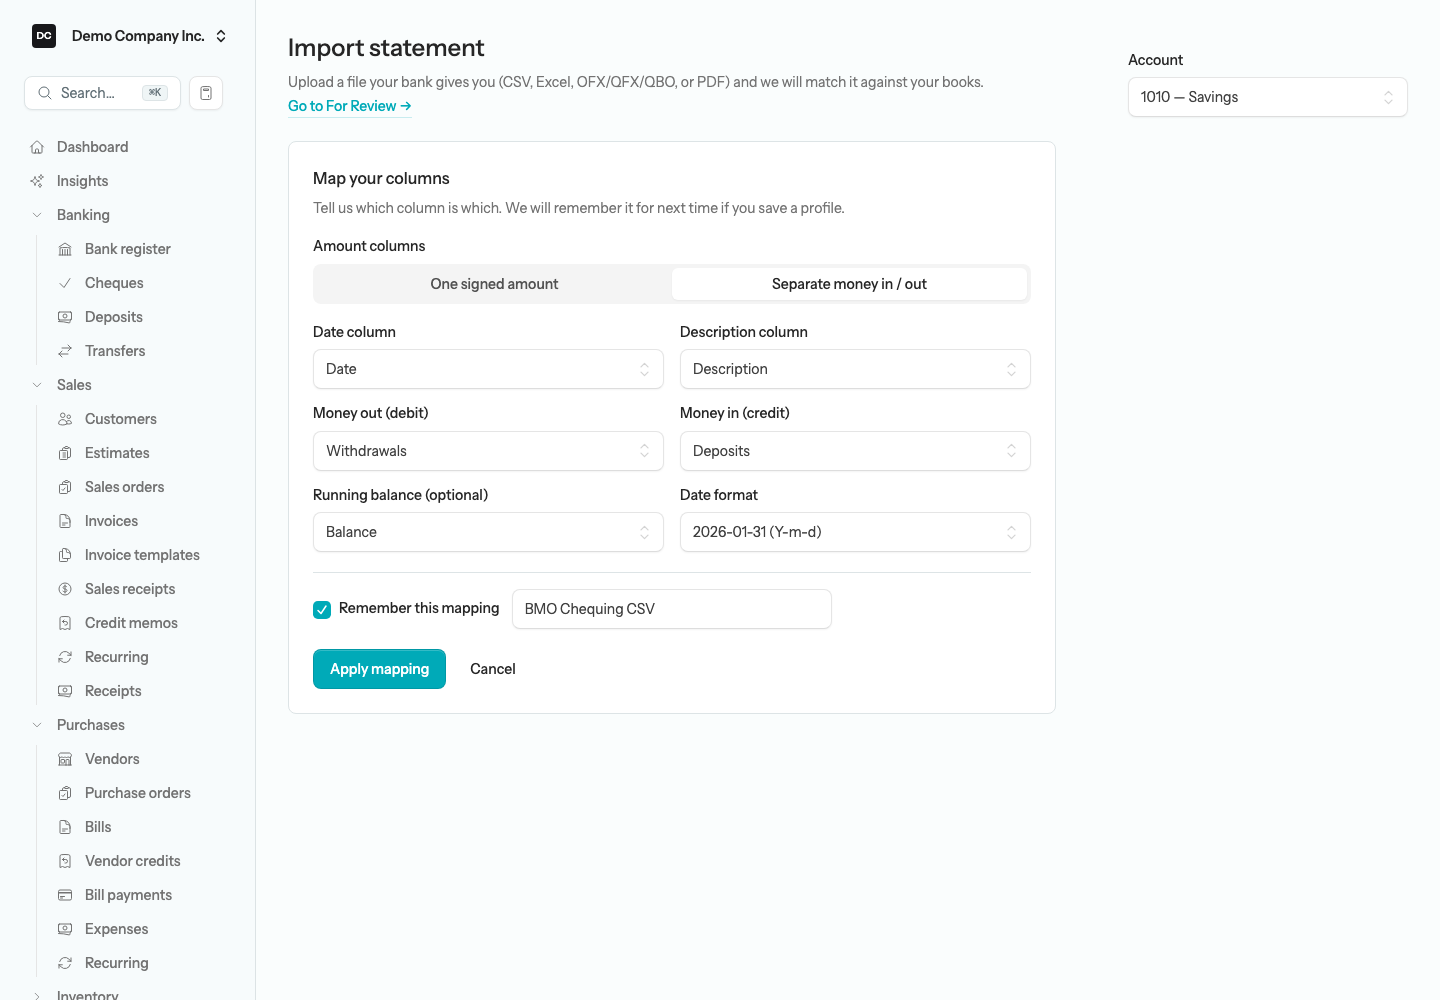
A spreadsheet export does not label its columns the way the app expects, so it asks you which is which. You only do this once per bank format — tick Remember this mapping and give it a name, and the next file from the same bank maps itself.
To map a statement’s columns:
- Under Amount columns, choose One signed amount or Separate money in / out.
- Pick the Date column and the Description column.
- Pick the Amount column (or the Money out (debit) and Money in (credit) columns), and the optional Running balance column.
- Set the Date format to match the file. For a single signed column, tick “This column is positive for withdrawals (flip the sign)” if the bank writes withdrawals as positive numbers.
- Optionally tick Remember this mapping, name it (for example “BMO Chequing CSV”), and select Apply mapping.
Note — Your statement stays on your server by default. Out of the box the importer is fully deterministic — it reads and matches your statement on your own server, and nothing leaves it. The person who runs your server can turn on an optional AI assist for statement import, and then parts of your statement go to the AI service. For a CSV or Excel file the app cannot map on its own, only the column headings and a small sample of rows (15 by default) are sent, to work out which column is which; the file itself is still read on your server, and if the AI service is briefly unreachable you simply map the columns by hand. For a PDF your server cannot read — secured, scanned, or in a layout it does not recognise — the whole PDF is sent, so the AI can pull out every transaction. The AI category guess on the review screen has its own switches: it runs only when the server’s receipt-reading AI is on and your organization has turned on Read receipts automatically under Settings → Inbox email (see Inbox). It sends the description of every new line that your bank rules and history left without a category, along with your account codes and names, and marks each pick “Suggested by AI — please confirm.”
Reviewing matches
The review screen lists every transaction the file contained with a status badge, so you can see at a glance what the app did with each one before you commit anything:
- Matched — the line already exists in your books; importing will clear it on the reconciliation. Choose Don’t clear to leave it untouched.
- Unmatched — a transaction the file has but your books do not. Pick a category in the Add to… selector and the badge changes to Add — the app posts the line for you when you import — or select Skip to ignore it (the badge reads Ignored, and Undo brings it back). The summary bar counts these picked lines as “to add”. Choosing a vendor records the line as an Expense to that vendor; if the vendor has an open bill for the same amount you can choose Pay bill instead, which records a bill payment — or select Pay bills… to settle several open bills (or a reimbursement owed to an employee) with the one payment; the amounts you apply must add up to the transaction, and a bill may be paid in part. Picking a vendor with a default expense account or tax code fills them in for you; picking one without remembers what you choose as that vendor’s defaults.
- Suggested — the app has filled in the category (and vendor, when it knows one) from how you categorized the same payee before, from a bank rule, or from AI, and tells you which. Nothing posts until you Confirm the line. If you try to import with unconfirmed suggestions, the app asks whether to confirm them all or leave them waiting in For Review.
- Possible match — a likely match to a transaction already in your books that the app is not certain about. Confirm it to treat it as matched, or Skip.
- Duplicate — a line that is already accounted for; it is skipped automatically so you never import it twice.
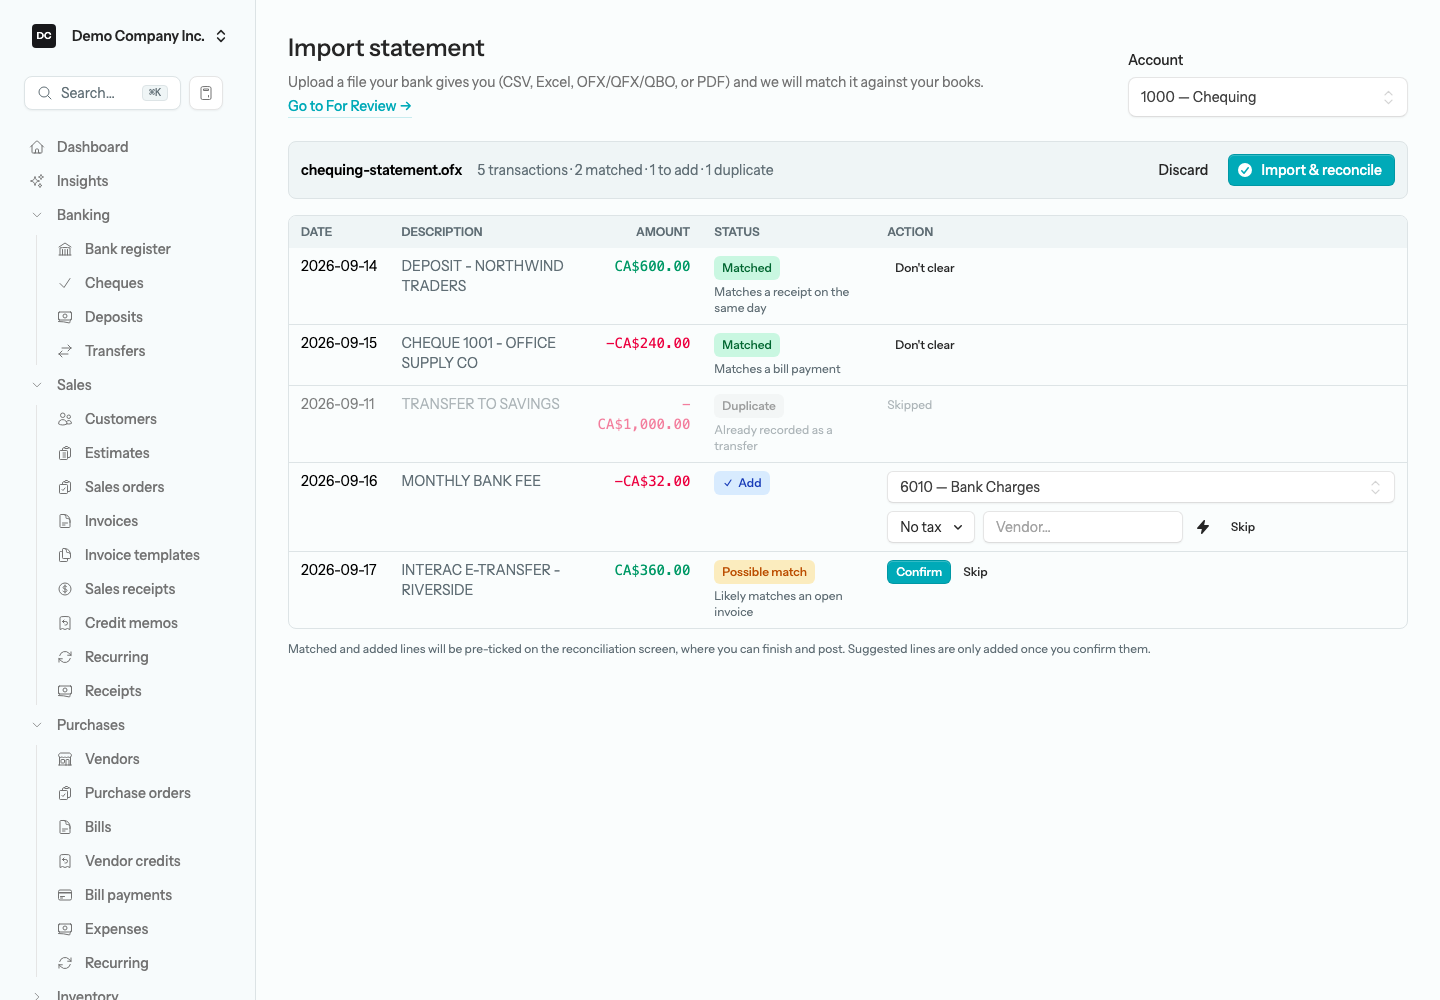
Tip — Always do this. Once a line has a category (and vendor), select the lightning-bolt Always do this button beside it. The app writes a bank rule for that payee — matching on the payee part of the description, so next month’s reference number or date does not matter — and pre-fills it the same way on every future import. The rule appears under Bank rules, where you can rename it, tune the pattern, or turn it off.
Note — Reading a PDF statement. PDF statements are supported, but they need a little more from the server. When the poppler toolkit is installed the app uses it to read the PDF’s layout accurately; otherwise it falls back to a pure-PHP reader. When your server cannot read a PDF’s transactions itself — a secured or scanned (image-only) file, or a layout it does not recognise — what happens next depends on the AI assist. With it on, the whole PDF goes to the AI service to read (see the note above). With it off, or when the AI cannot read the file either, the import stops with a “We could not read this statement” message that says why; for a secured or scanned file with the AI assist off, it suggests enabling AI extraction — something only the person who runs your server can do — or uploading the CSV or OFX export instead. The file is read the moment you upload it, so nothing waits on a background worker.
Bank rules
A bank rule categorizes an imported transaction automatically when its description matches a pattern you set — so the coffee-shop charge that lands every week is filed to the same expense account without you choosing it each time. A rule can also name the vendor, so the line is recorded as an expense to that vendor rather than a bare journal entry. Rules only suggest; they never post anything on their own, so you stay in control. Open the Bank register and choose Bank rules from the Actions menu.
To create a bank rule:
- From the Bank register, choose Actions → Bank rules, then select New rule.
- Give it a Rule name you will recognize.
- Choose how to Match the description — Contains, Starts with, Equals, Matches regex, or Same payee (which ignores reference numbers, dates, and amounts) — and type the Pattern. Matching is always case-insensitive.
- Pick the account to Categorize to account, and optionally the Vendor / contact (optional) the payee belongs to.
- Set a Priority if you have overlapping rules — lower numbers win first — and leave Active on.
- Select Save.
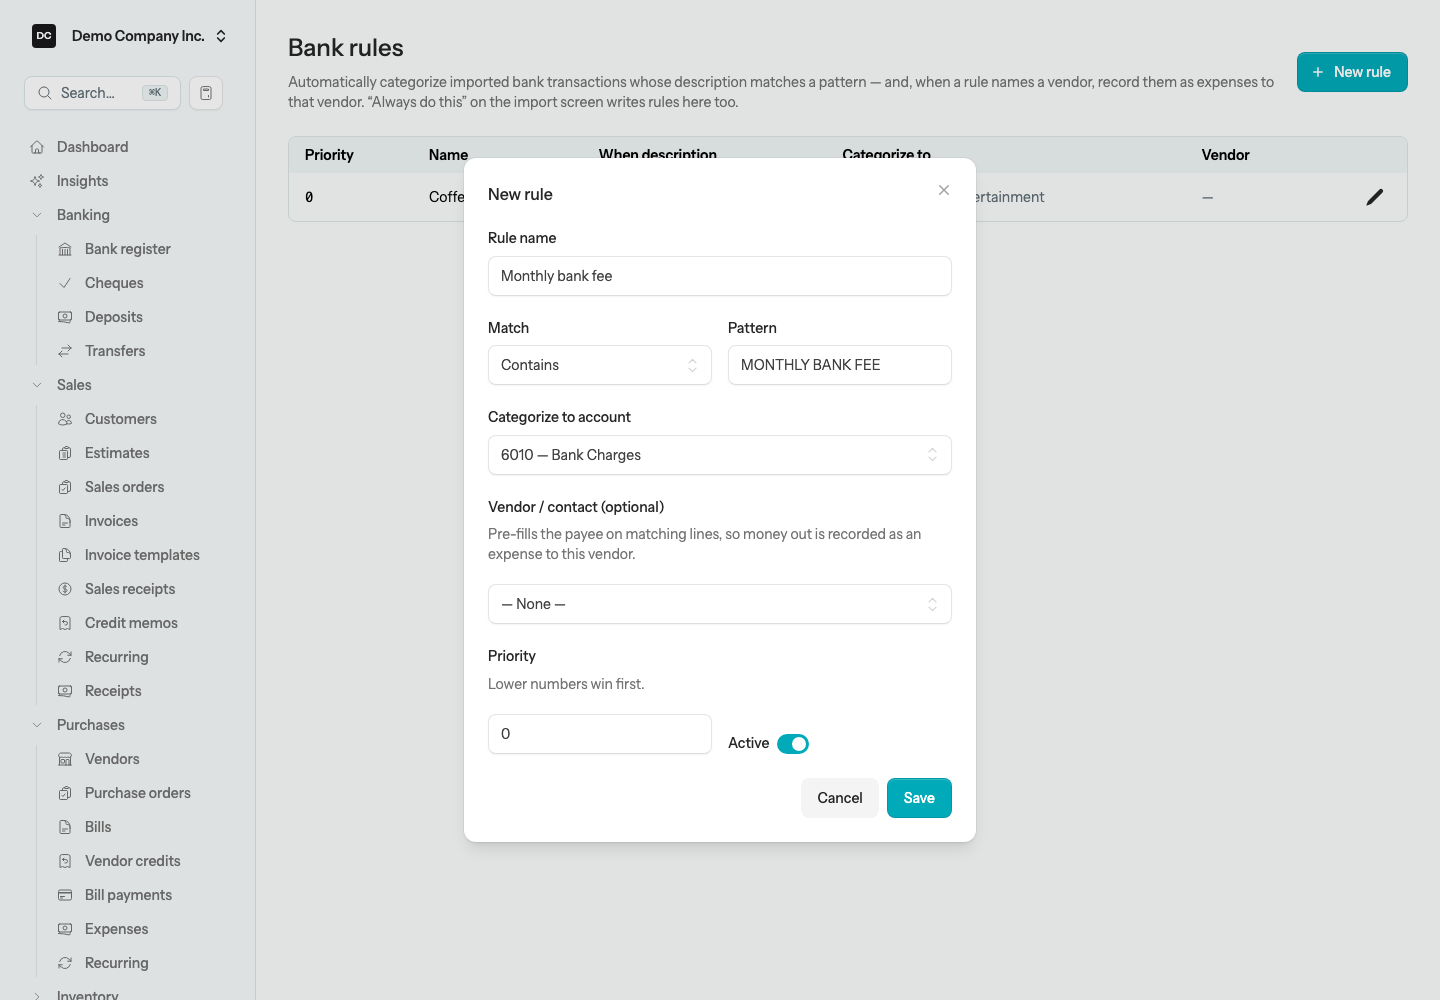
Note. Rules apply to imported lines your books do not already have. The first active rule that matches, in priority order, wins and pre-fills the category — you still confirm the line before anything posts. When two rules share a priority, the more specific one wins (Equals, then Same payee, Starts with, Contains, Regex). Editing a rule never touches transactions you already categorized. Rules you create with Always do this on the import or For Review screens are listed here too.
The For Review feed
For Review is a standing queue of imported bank transactions, across every account, that are still waiting to be categorized. Any line you left Unmatched or Suggested when you imported a statement waits here until you decide what it is — so you can import now and categorize later. Open the Import statement screen and select Go to For Review at the top.
To work the For Review feed:
- Open For Review. Narrow to one account with the Account selector if you like.
- For each line, pick a Category, optionally the Vendor it was paid to (money in: the customer) and the tax included in the amount, then select Accept — or Confirm, when the app has pre-filled the line for you — to post it. When the vendor has open bills, a selector under the Category lets you choose Pay bill (one bill for the same amount) instead of Record as expense. To settle several bills, or an employee’s reimbursement, select the document icon in the Actions column — its tooltip reads “Pay one or more open bills with this transaction”.
- Select Split to divide one transaction across several categories, each part with its own tax if needed — the parts must add up to the total before you can save. A split outflow is recorded as an expense to the vendor chosen on the row.
- Select Exclude to set aside a line you do not want on the books; flip the Excluded toggle to see excluded lines and Include them again.
- Tick several lines and use the bulk bar to Categorize them all at once — optionally to one vendor — or Exclude them.
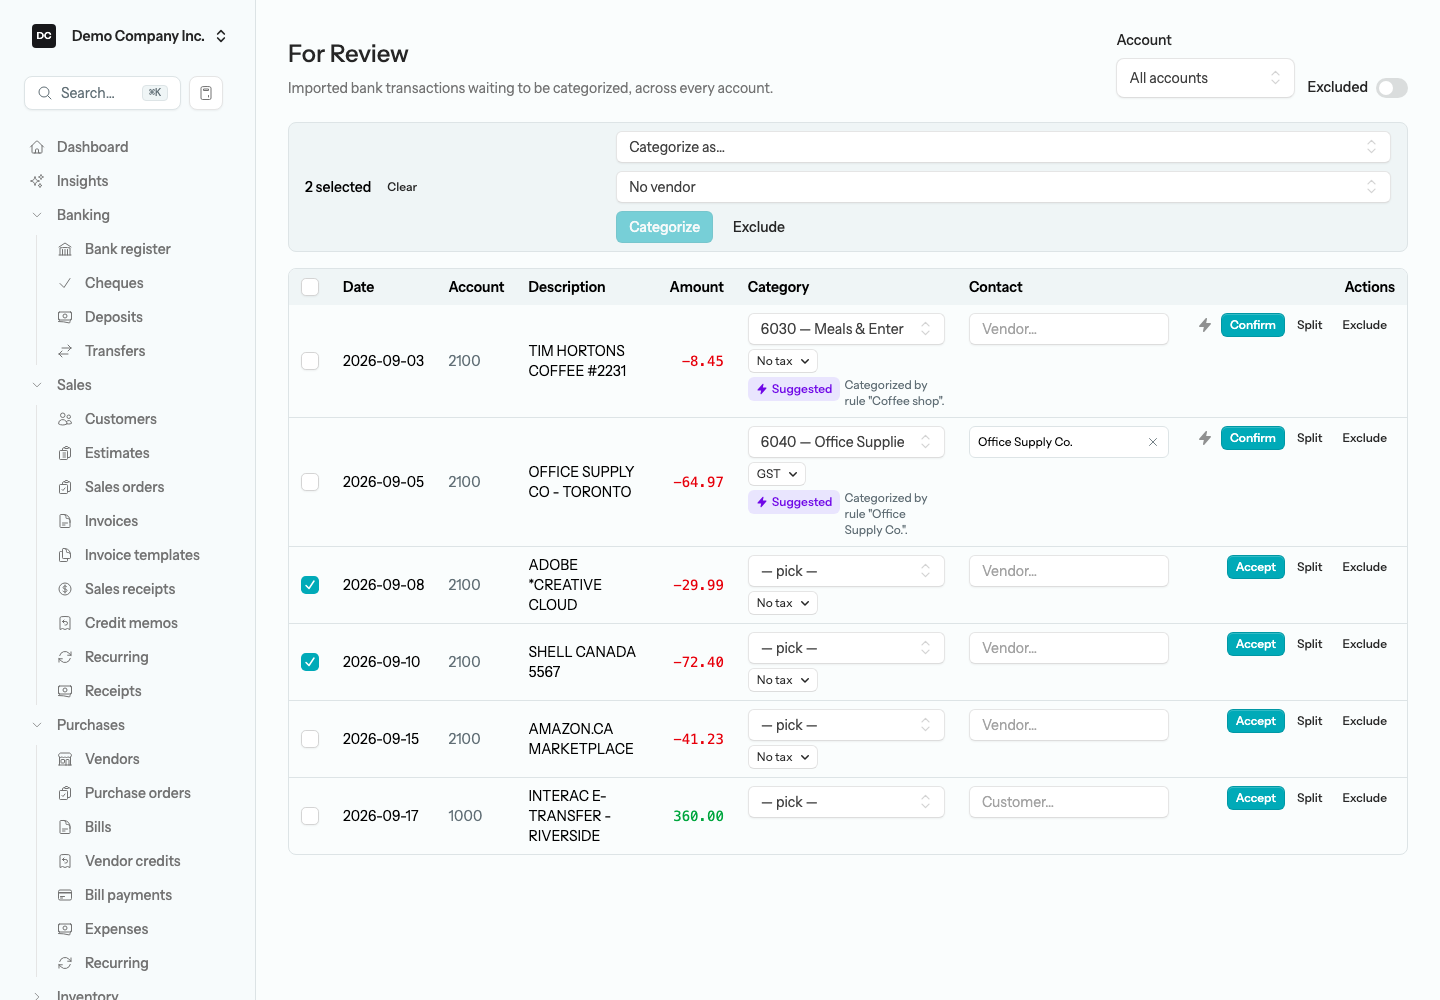
Tip — Suggested transfers. When the feed holds a withdrawal from one account and a matching deposit into another a few days apart, the app surfaces them together as a Suggested transfer. Select Record transfer to book both sides as one transfer instead of two separate transactions — handy for money you moved between your own accounts.
Note — What Accept does to your books. Accepting a line with no vendor or tax posts a balanced journal entry: money in debits the bank account and credits the category you chose; money out debits the category and credits the bank. Accepting an outflow with a vendor or a tax code records an Expense — the statement amount is treated as including the tax, so the tax is split out for your return and the payment still equals the statement to the cent. Choosing Pay bill, or paying several bills from the document icon, records one bill payment applied across the chosen bills (an employee reimbursement posts to Employee Reimbursements Payable). Bulk Categorize never applies tax or pays bills: with a vendor chosen in the bulk bar each outflow is recorded as an Expense to that vendor, while with No vendor — and for money coming in either way — the line posts as a plain journal entry. Every entry is linked back to the import for your audit trail, and the line leaves the queue.
Reconcile an account
Reconciling proves your records match the bank. You enter the statement’s ending balance and tick off every transaction the bank cleared; when the two agree, you complete the reconciliation and that period is confirmed. Past reconciliations stay listed on the Reconcile screen — open one to see exactly which lines were cleared and to download that list as CSV, Excel, or PDF.
To reconcile an account:
- From the Bank register, choose Reconcile on the Actions menu — it opens on the account you were viewing.
- Select Reconcile. In the Begin reconciliation dialog, enter the Statement date and Ending balance (the Beginning balance carries over from the last reconciliation), plus any Service charge or Interest earned with its date and account, and choose Continue. The service charge and interest dates follow the statement date until you change them, and the accounts you pick are remembered for that bank account next month.
- Tick each transaction that appears on your statement — payments in the Cheques and Payments pane, deposits in Deposits and Other Credits. Mark all and Unmark all work per pane, and you can sort each pane by Date, Entry, or Amount — the Cheques and Payments pane also sorts by Payment method. The Difference figure shows how far off you still are.
- Keep ticking until the Difference reads 0.00.
- Select Reconcile now to complete it and lock the period in. Leave keeps the reconciliation in progress for later; Cancel discards it.
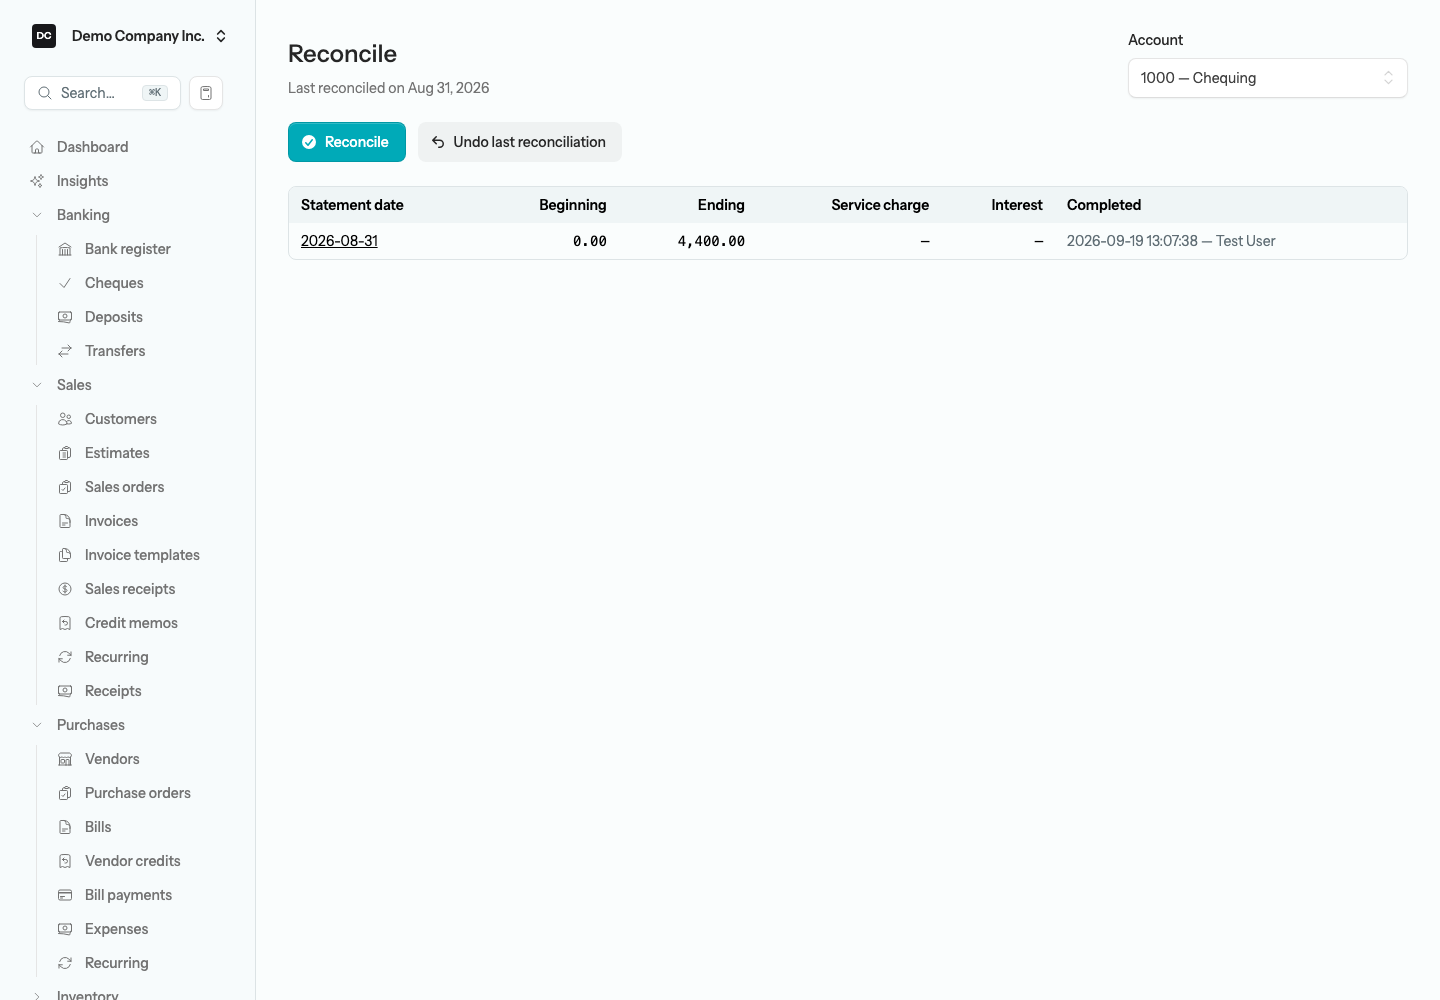
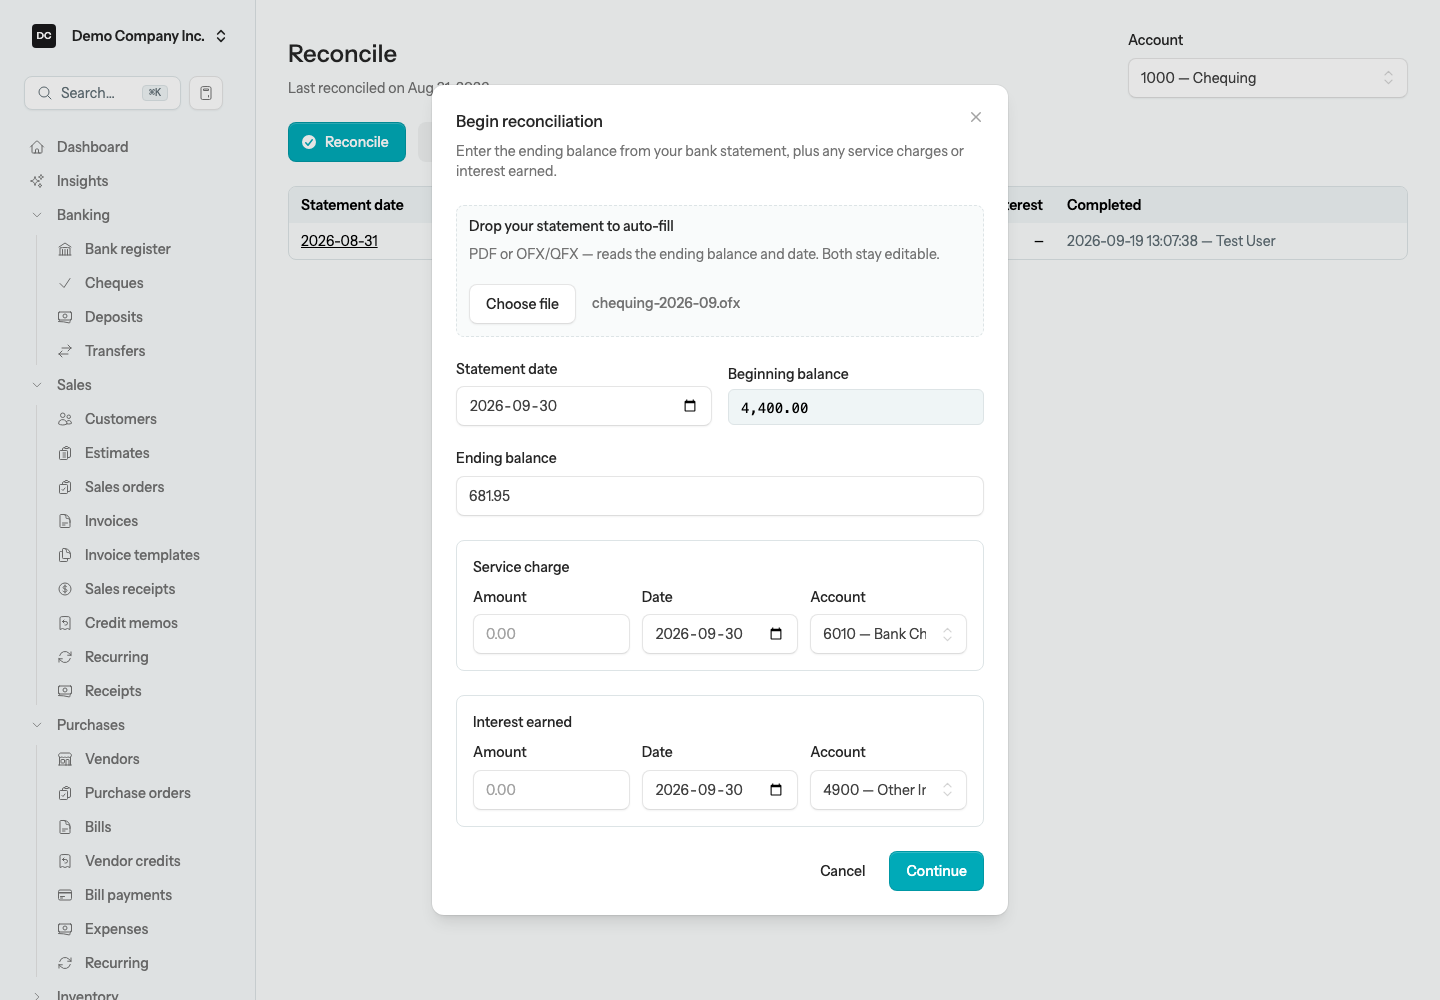
Tip — Drop your statement to auto-fill the figures. In the Begin reconciliation dialog, drop your bank statement (PDF or OFX/QFX) onto “Drop your statement to auto-fill” and the app reads the ending balance and statement date for you — both stay editable, and the file is kept to attach to the reconciliation.
Note. A reconciliation balances only when the Difference is 0.00 — that means every cleared transaction adds up to the statement balance you entered. If you cannot get there, look for a transaction you forgot to record, or one cleared by mistake.
Note — Voided cheques are left off. A voided cheque was never cashed, so it is not on your statement — the reconcile list leaves out both the voided cheque and the reversing entry the void posted. They cancel each other out in the books. The one exception: if either half was already ticked or cleared before the void, both stay on the list so you can settle them. Statement import will not match a voided cheque or its reversal either, and the Cash Flow Forecast does not count them as outstanding.
Heads up — Completing a reconciliation locks the transactions you ticked. When you complete a reconciliation, every transaction you ticked is locked to it: the app will refuse to edit or void a cheque, deposit, receipt, bill payment, transfer, or journal entry whose bank line that reconciliation cleared, so a finished reconciliation can never drift. To change one, use Undo last reconciliation first. Transactions you did not tick stay editable — they were never part of the reconciled balance.
Adjustments after you have reconciled
You can still post a new transaction dated inside a reconciled period — for example, an adjusting entry your accountant hands you for a July 31 year end after you have reconciled through September. Because you never ticked it, it changes no completed reconciliation: it simply shows up as an uncleared item the next time you reconcile that account. The journal entry form asks you to confirm before posting into a reconciled period or a prior fiscal year.
- The adjustment hits the bank account (a stale-dated cheque written off, a duplicate reversed, a cut-off correction): post it on the date your accountant gives you, then tick it on your next reconciliation — usually alongside the outstanding item it offsets, so the two net to zero.
- The adjustment only recodes a reconciled transaction (a cleared cheque charged to the wrong expense account): post a journal entry between the two non-cash accounts and leave the bank alone. The reconciled cheque stays exactly as the bank cleared it.
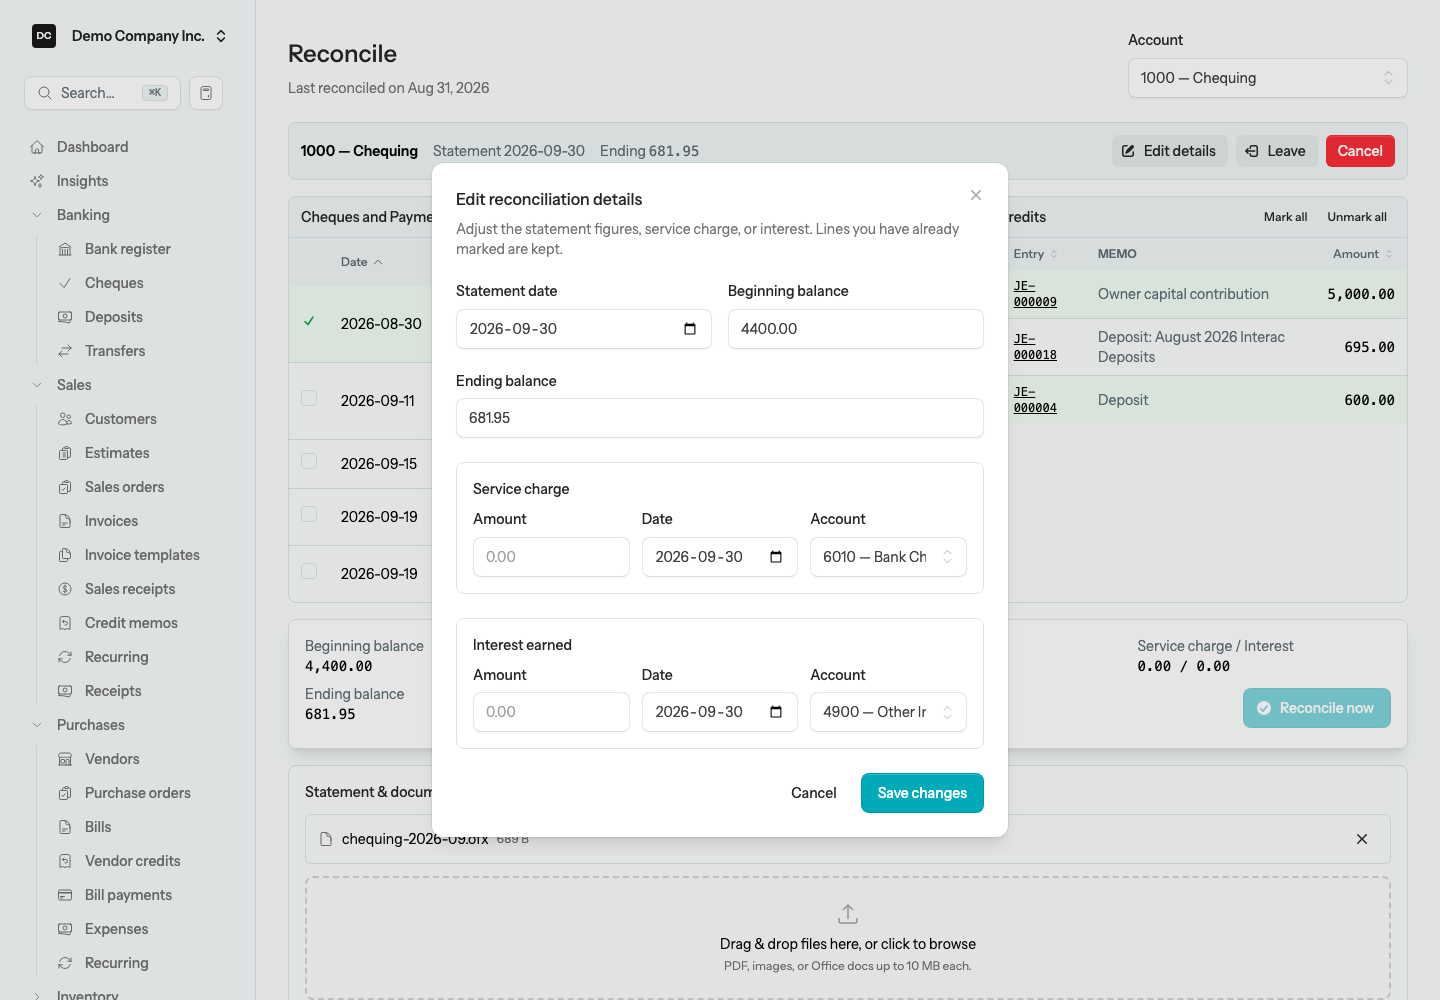
Tip — Edit the starting figures mid-reconciliation. Caught a typo in the statement date or opening balance after you have already ticked off twenty transactions? Select Edit details on the reconciliation panel and change the statement date, beginning balance, ending balance, service charge, or interest in place — your cleared ticks are kept. Saving without touching the service charge or interest leaves those entries exactly as they are — no reversal, no re-post. Change an amount, date or account and the app voids the old adjustment entry and posts a new one so the books stay correct; the voided entry and its reversal never reach the bank, so they drop off the reconcile list. Only the date wrong? You can also open the adjustment’s journal entry from the bank register and edit its date, number, or memo there — the accounts and amounts stay locked to the reconciliation.
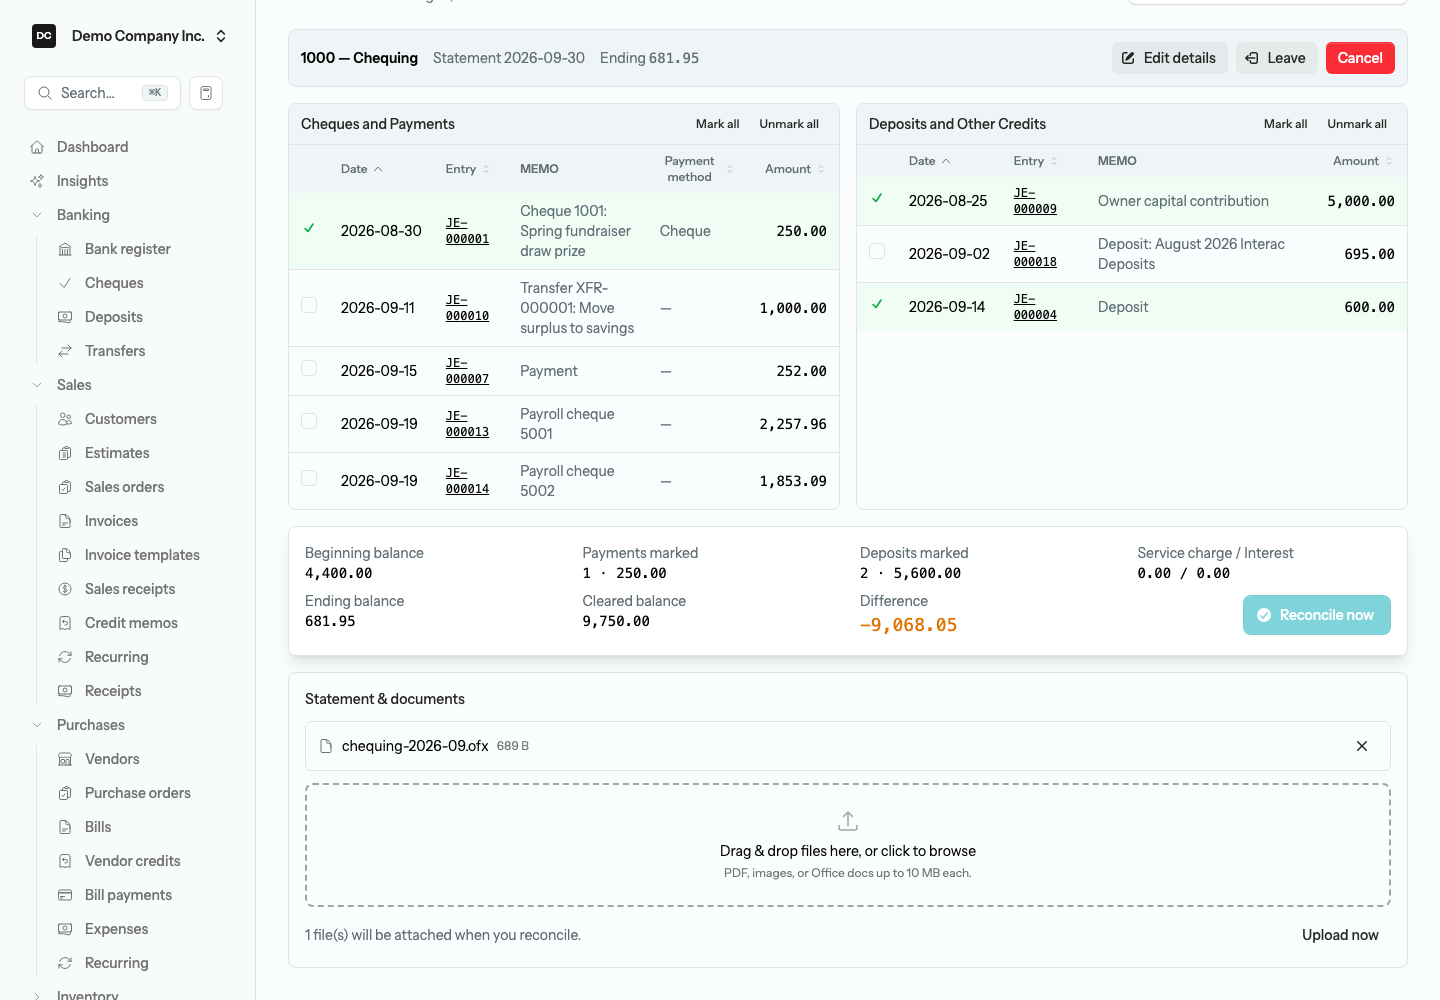
Tip — Attach your bank statement. Drop the bank-statement PDF (or any supporting file) into the Statement & documents box under the reconciliation panes. The file waits there and attaches itself when you select Reconcile now — the box tells you how many files will be attached when you reconcile — or select Upload now to attach it straight away. Either way it stays as a regular attachment on the reconciliation record for your audit trail.
Transfers
A transfer moves money between two of your own accounts — chequing to savings, or a bank to a credit card. No income or expense is recorded; it is pure movement of cash you already have.
To transfer between accounts:
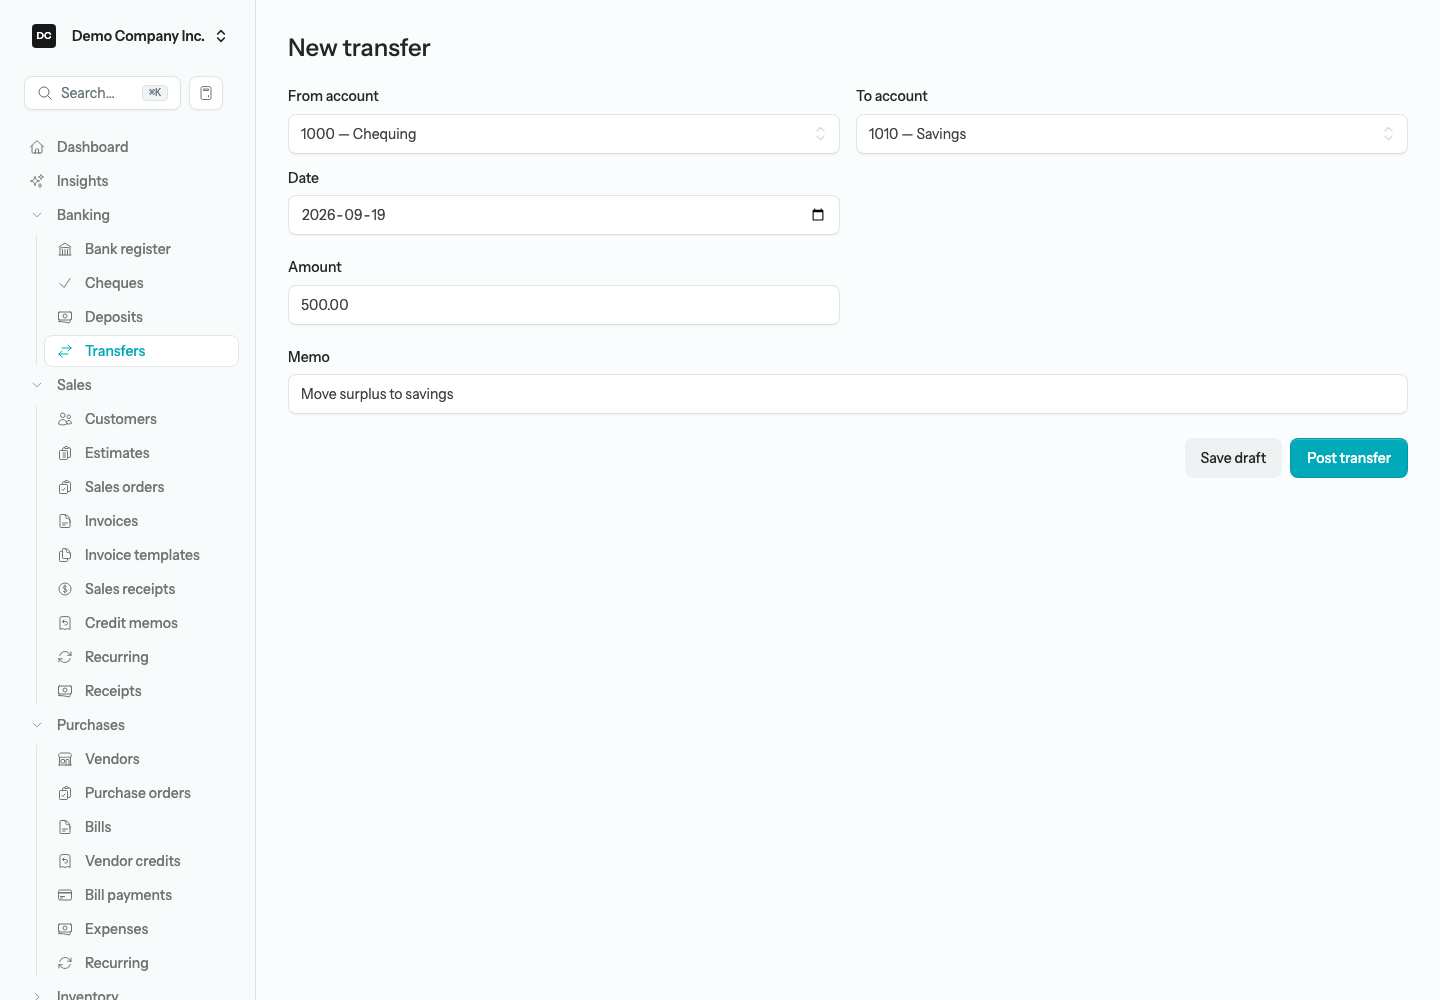
- Open Banking → Transfers, then select New transfer.
- Choose the From account (where the money leaves) and the To account (where it lands).
- Enter the Date and the Amount, plus an optional Memo.
- Select Post transfer to finalize it, or Save draft to keep working on it later.
Note. Posting a transfer debits the destination account and credits the source account in one entry. If the two accounts hold different currencies, the form asks for both the Amount sent and the Amount received, converts each to your home currency at the transfer date’s rates, and books any spread to Exchange Gain or Loss.
Note. Bank and credit-card accounts always appear in the From and To lists. To move money to or from another account — a line of credit, say — turn on “Include in transfers” for that account in the Chart of Accounts.
Heads up. A posted transfer cannot be edited. To correct one, void it and create a new transfer with the right details.
Cheques
Write a cheque for a payment you made straight from a bank account without a vendor bill — a service fee, an owner draw, a refund, or a one-off purchase. Each cheque has a payee, a date, and one or more expense lines, and it can be printed onto pre-printed cheque stock. Open Banking → Cheques to see every cheque with its date, number, payee, bank, amount, and status; search by number or payee.
To write a cheque:
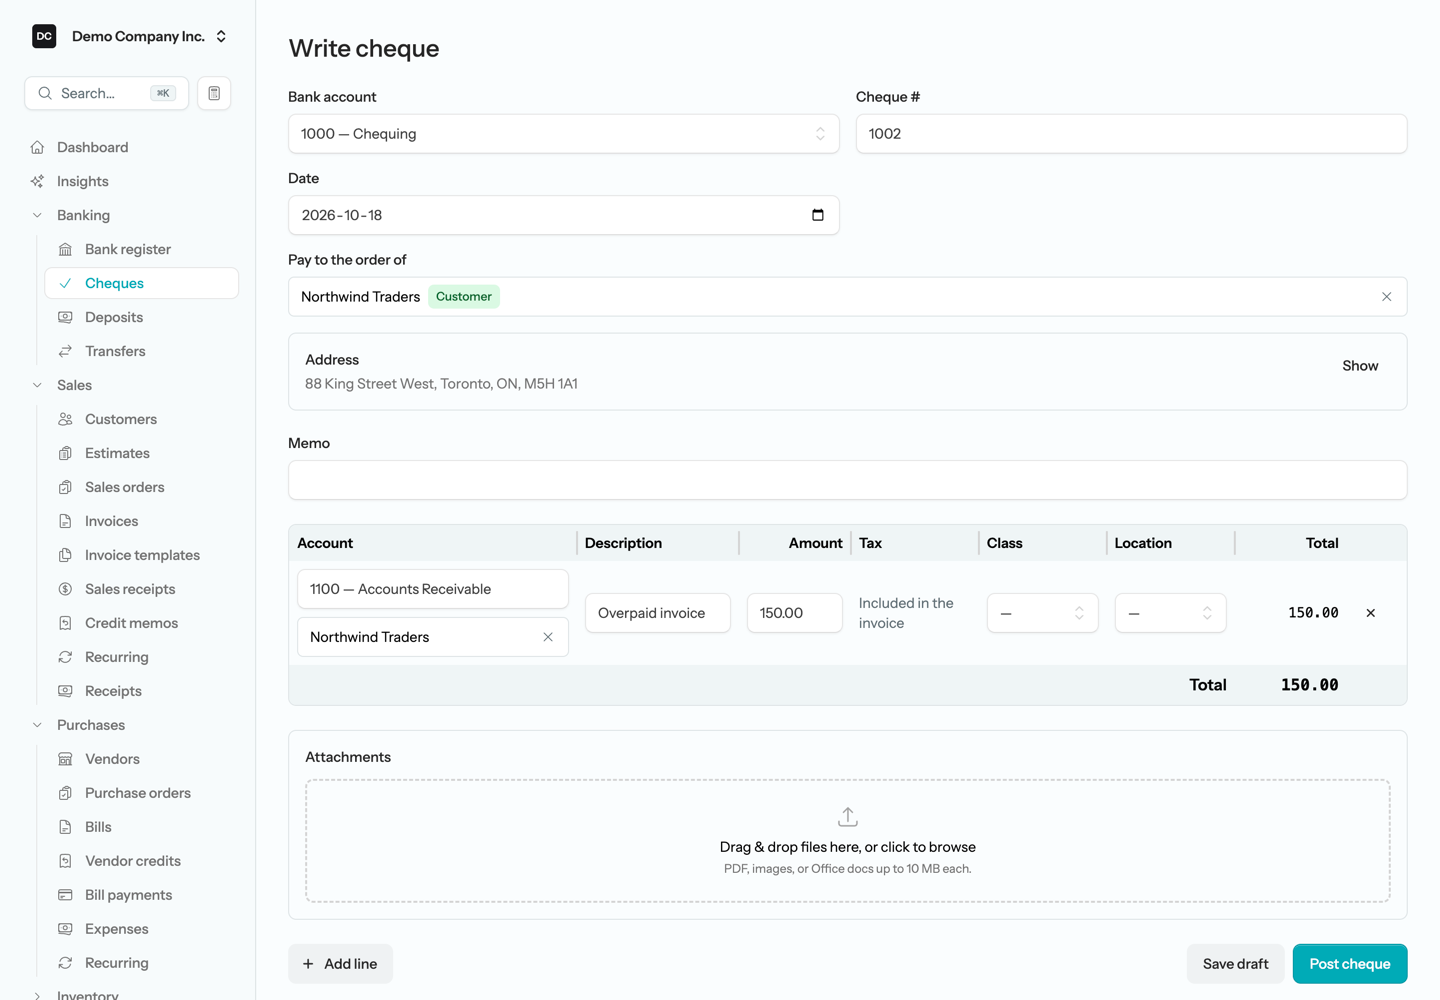
- Open Banking → Cheques, then select Write cheque.
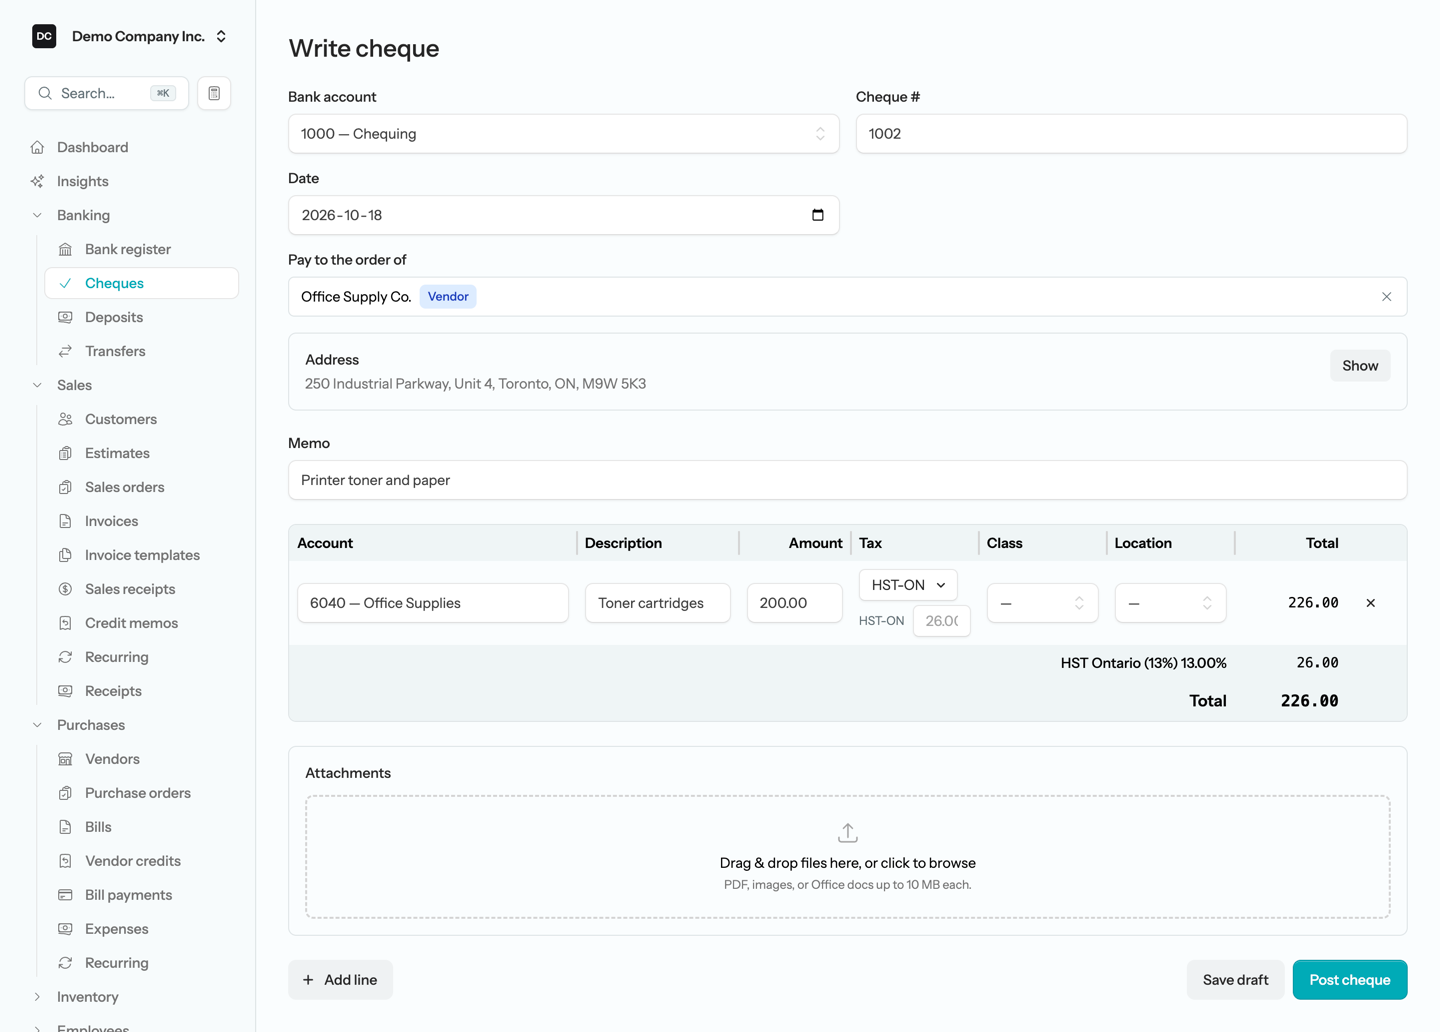
- Choose the Bank account it is drawn on. The Cheque # fills in with the next number for that account; type your own if you need to. Unlike other document numbers, a cheque number may repeat on the same account — handy for labels like “DD”, “EFT”, or “e-transfer” on payments that never involved paper. When the number is already used on that account (payroll cheques and voided ones count), an amber note under the field says so: fine for an electronic payment, worth a second look if this is a paper cheque.
- Set the Date — a click anywhere in the field opens the calendar. In Pay to the order of, start typing and pick the vendor, customer or employee. For a one-off payee choose Add … as Other name — it is created on the spot. To set up a full vendor, customer or employee record instead, choose Create … as a new …, which opens that page in a new tab; come back and pick the new name.
- Check the Address. It fills in from the payee’s record and prints on the cheque, so it can be mailed in a window envelope. The block stays folded to a one-line summary of that address (or “No address”) — select Show to open the fields, and Hide to fold them away again; a field that fails a check opens it for you. Edit it for a one-off delivery — a care-of address, an estate — and the cheque keeps your version. If the change looks like a correction, saving asks whether to update the payee’s record too (Update address) or keep it on this cheque only (Just this cheque); the cheque keeps its own copy either way, so reprinting an old cheque always shows the address it was actually mailed to.
- On each line, choose the Account, type a Description, and enter the Amount before tax. If the purchase was taxed, pick up to two codes in the Tax cell (an account with a default tax code fills one in for you). The app works out the tax on that amount and adds it on top: the calculated tax appears in the box beneath, where you can type over it to match the receipt, and the line’s Total is the Amount plus tax — the figure the cheque pays. Don’t enter a tax-included amount, or the tax is counted twice. If you track Classes or Locations, those columns appear here too.
- Select Add line for more than one expense, and check the Total.
- If you code a line to Accounts Receivable or Accounts Payable, a Customer or Vendor picker appears under the account — fill it in before posting. That line moves one person’s balance, and it is often not the payee: refunding a beneficiary on a client’s account, the cheque is made out to the beneficiary while the receivable belongs to the client. Whoever you pick is who the amount shows against on AR/AP Aging, their statement, and their balance in the Customers or Vendors list. When the payee already holds the right role, it is filled in for you. The Tax cell on such a line simply reads “Included in the invoice” or “Included in the bill”: the tax was recorded on the original document, so settling it is never taxed again.
- Drop a receipt or other supporting file into Attachments (PDF, images, or Office docs up to 10 MB each); it attaches when you save.
- Select Post cheque to finalize it, or Save draft to keep working on it later.
- The bank account you pick is remembered — the next cheque, deposit, register or reconciliation you open starts on that same account.
Note. Posting a cheque credits the bank account it is drawn on and debits the expense (or other) accounts on its lines — with any sales tax you picked debited to the tax account — so the payment reaches your books right away.
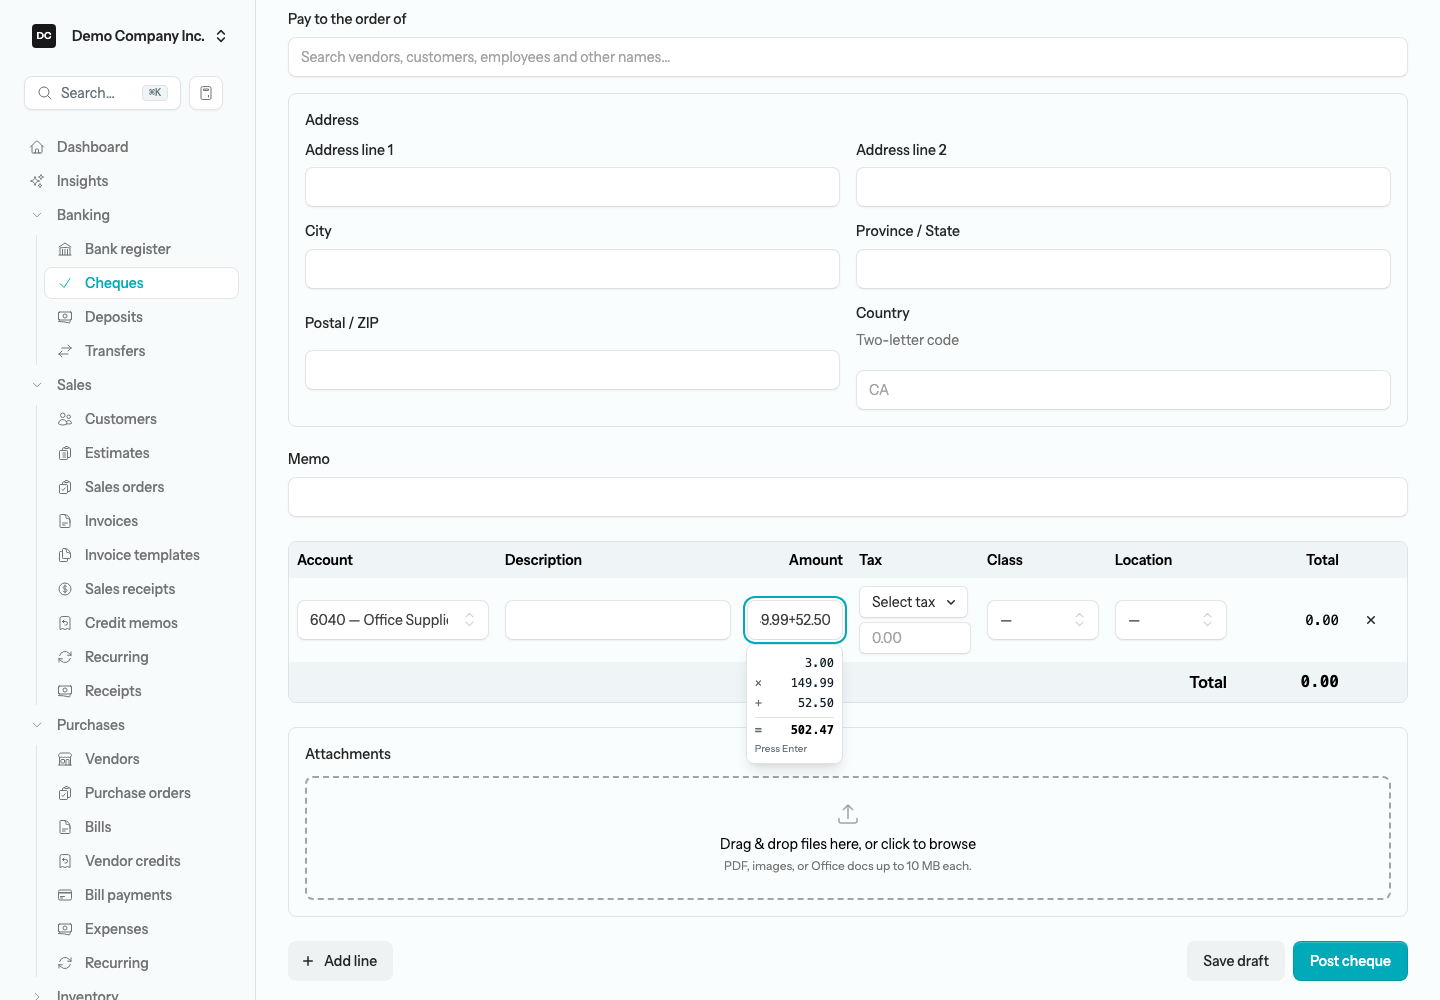
Tip — Do the math right in the amount field. Each Amount cell on the cheque is a quick calculator with + − × ÷. Type an expression like 1050+52.50 or 3*149.99, watch the tape pop up showing each operation, and press Enter to commit the final value. Handy when you are splitting a single cheque across several expense lines and only know the line totals. It works the same on deposit lines, transfer amounts, and every other dollar cell in the app.
Print onto pre-printed cheque stock
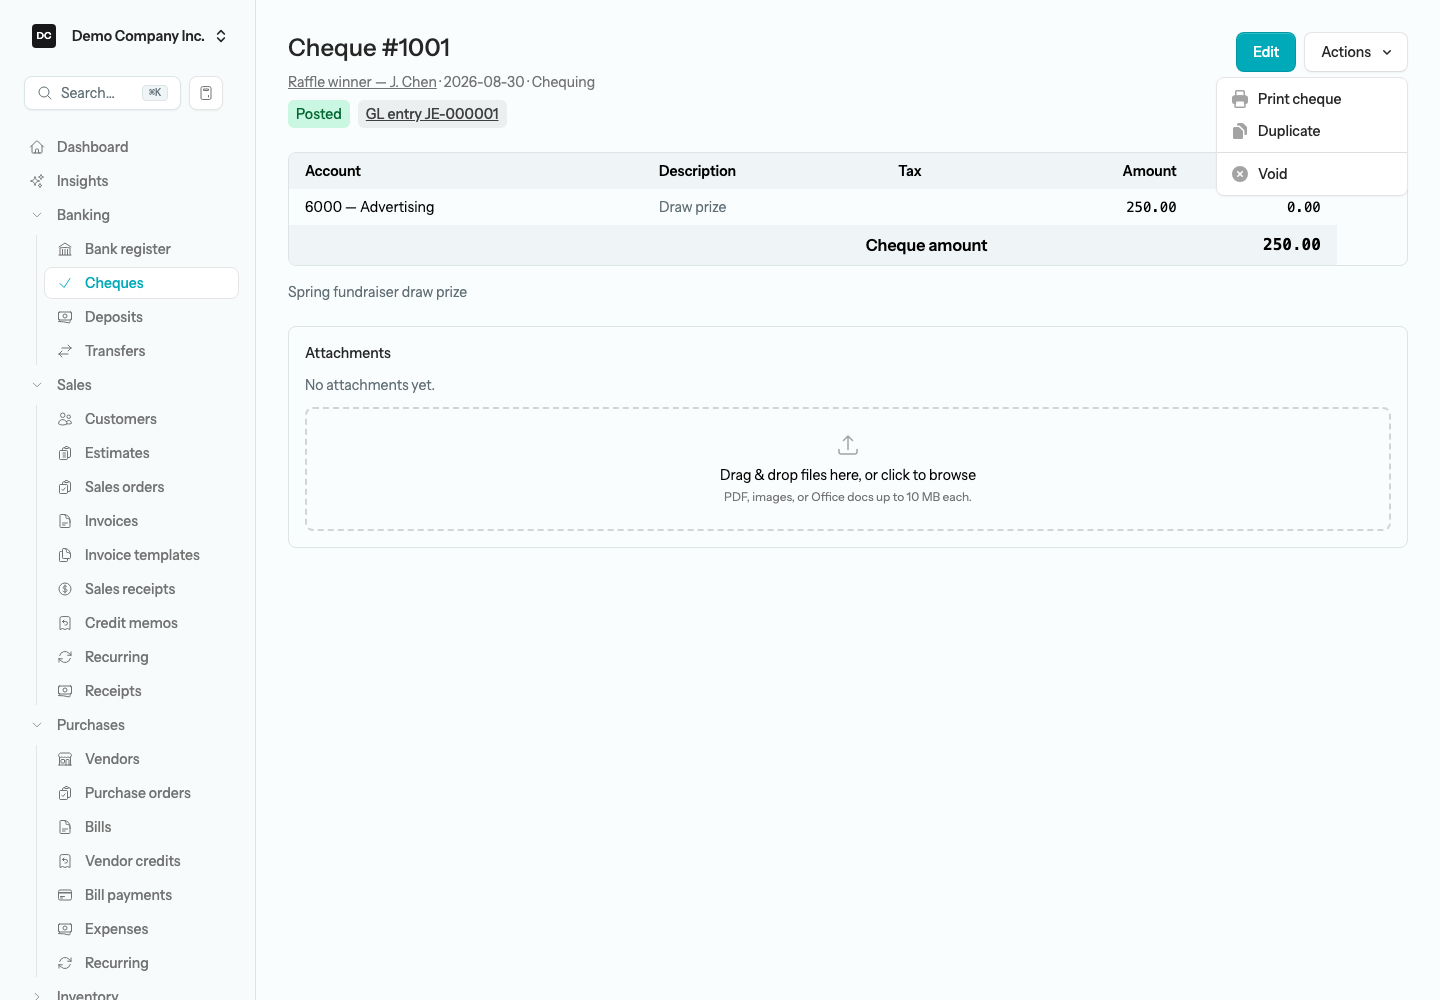
Open the cheque and choose Actions → Print cheque. A PDF opens in a new tab, laid out for standard letter-size voucher cheques — the cheque on top and two stubs below, as sold for QuickBooks and other Intuit-compatible stock. The date prints in the eight-box comb in year-month-day order with a Y Y Y Y M M D D legend beneath it, the amount in words is guarded by five stars, the payee’s address block sits under the name for a window envelope, and each stub lists the lines with the account name and description.
To line the print up with your stock:
- Print one cheque on plain paper and hold it against a blank cheque from your stock. Measure how far the text sits from where it should be.
- Open Settings → Organizations, select your organization, and find Cheque print alignment.
- Enter a Horizontal offset and Vertical offset in points (1 pt = 1/72 in; a positive value moves everything right or down). Leave both blank for the default. Save, then print again to check.
Note — Labels on pre-printed stock. By default the PDF also draws the static DATE and MEMO labels and the Y Y Y Y M M D D legend under the date comb, which is what you want on blank paper or for an archive copy. If your stock already carries them, ask the person who runs your server to switch them off. There is no setting for this in the app: it lives in the config/cheque.php file on the server, where draw_static_labels set to false leaves the labels off, and date_comb_format (Ymd, year-month-day, by default) sets the order of the eight date digits — the legend follows it. If the server caches its configuration, a change takes effect only once that cache is rebuilt.
To correct a posted cheque:
- Open Banking → Cheques and select the cheque you want to change.
- Select Edit. The original lines load into the cheque form.
- Adjust the bank account, cheque number, date, payee, address, memo, or expense lines as needed.
- Select Save changes to repost the cheque.
Note — What a repost does to your books. Reposting an edited cheque rebuilds the lines on the same journal entry it originally created — no new entry, no void-and-replace, and the audit trail records the before and after. If either the old or the new date falls inside a closed period, a filed sales-tax period, or a completed reconciliation, the app blocks the change until you undo that lock. To retire a cheque altogether rather than correct it, open it and choose Actions → Void, which posts a reversing entry.
Note — One person edits a record at a time. If a teammate already has a cheque, deposit, transfer, or bank rule open for editing, you see who is editing instead of the form, and actions such as voiding or posting wait until they are done. Owners and Admins can take over. See Settings → Edit locks for how a lock is held and released.
To duplicate a cheque:
- Open the cheque and choose Actions → Duplicate, or select the Duplicate icon at the end of its row on the Cheques list.
- A new Write cheque form opens with the bank account, payee, address, memo, and lines copied across. It is dated today and takes the next cheque number for that account — never the original’s, which is already spent.
- Adjust what changed and select Post cheque.
Note — What shows in the cheque list. The Cheques list gathers the cheques you write here alongside any printed payroll cheques, which link back to the pay run that produced them and cannot be duplicated from here. For a payment against a vendor bill, use Bill payments instead — those don’t appear here; see Vendors. Cheques that were still outstanding when you switched to LineLedger belong in Opening balances, so they can clear on your first reconciliation.
Tip — Payees and other names. Every payee you pick is linked to the cheque, so its name is a link on the cheque list and on the cheque itself — select it to see everything paid to that name (the link only shows when you have access to that payee’s area). Other names are one-time payees that aren’t vendors, customers or employees; they live under Settings → Lists → Other names, where you can rename one, mark it inactive, or convert it into a vendor, customer or employee once it turns out to be more than a one-off. See Lists.
Deposits
A deposit bundles several customer receipts (and any other cash inflows) into the single line that shows up on your bank statement. If you walk three cheques to the bank and they appear as one $1,250 deposit, group those three receipts together so reconciliation matches the statement line for line.
To record a deposit:
- Open Banking → Deposits, then select Make deposit.
- Choose the bank account in Deposit to. The Deposit # and Date fill in automatically; you can type your own number, but it must be unique within the organization.
- Under Undeposited receipts, tick each receipt that is part of this deposit. A new deposit starts with nothing ticked; use the checkbox in the header to select or clear them all. Every column sorts — Date, Receipt #, From, Payment type, Ref, and Amount — so you can group the day’s cheques together, and each Receipt # opens that receipt in a new tab if you need to check it.
- Use Add line under Other deposits for any cash that did not come from a receipt — interest, a tax refund, an owner contribution. Enter a negative amount to net out a bank or merchant fee. Class and Location columns appear here when you track them.
- A card refund to a customer shows in the receipts list as a negative amount and nets out of the deposit. When refunds outweigh the receipts — or a refund settles on a day with no card sales — the deposit total is negative: it posts as money out of the bank and lists with the payments when you reconcile, matching the card processor’s debit.
- Check the Deposit total, then select Save & post — or Save draft to post it later.
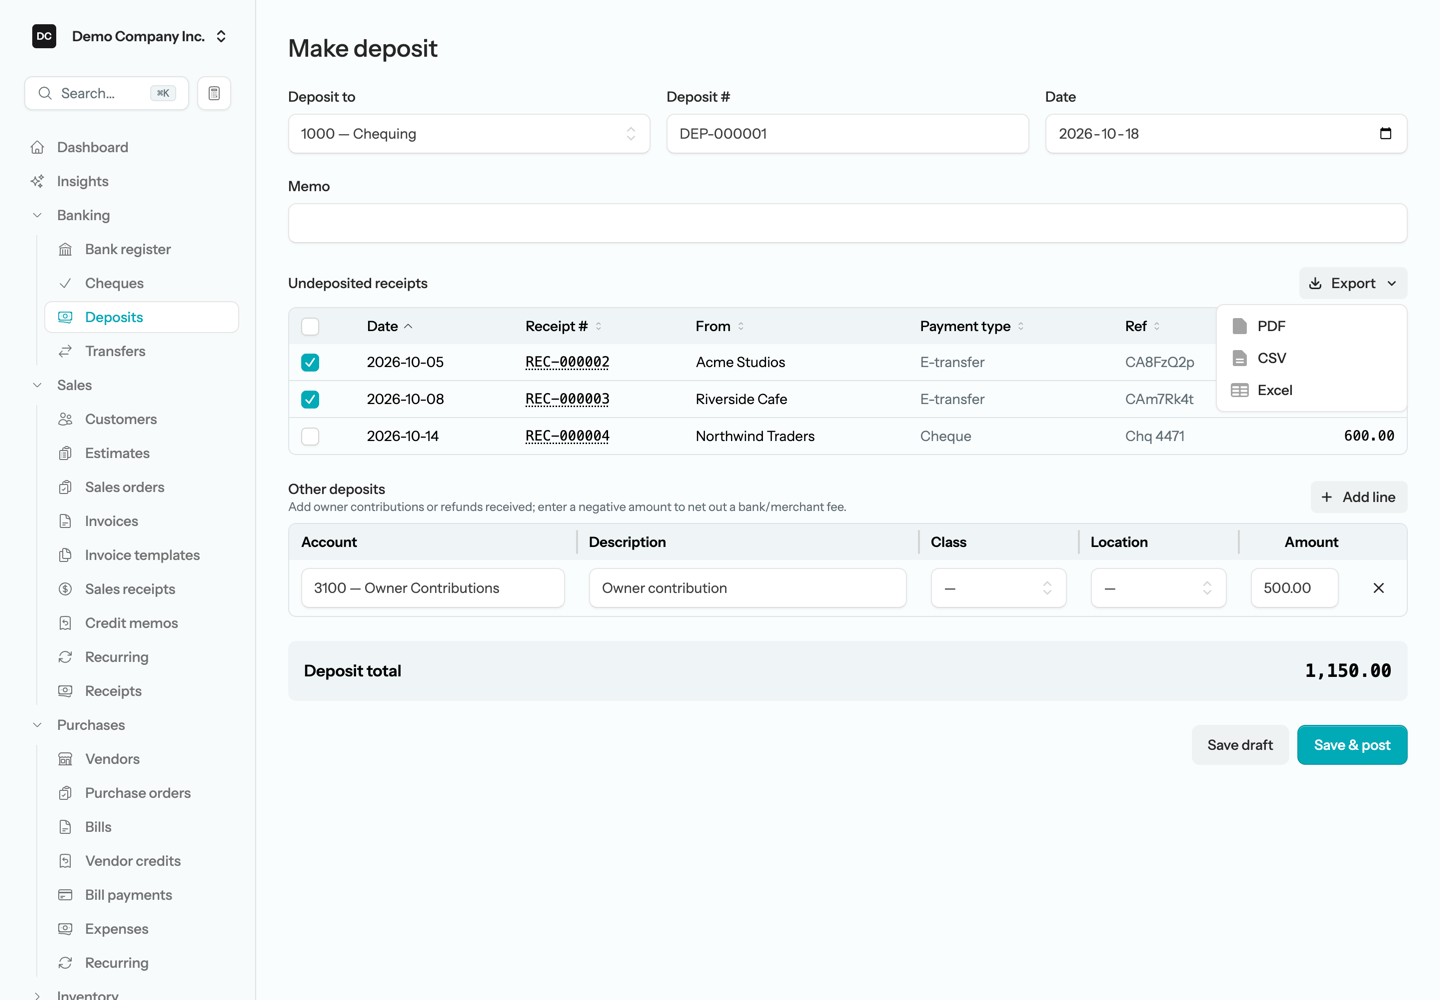
Tip — Export the list as a deposit slip. Select Export beside the Undeposited receipts heading to download the list as PDF, CSV, or Excel. The file follows the sort on screen and records which rows are ticked, so it doubles as the deposit slip you take to the bank; the PDF and Excel versions also note the Deposit to account and how many of the receipts are selected.
Note — Why undeposited funds matter. When you receive a customer payment, you can send it to Undeposited Funds instead of straight to the bank. Those receipts wait here until you make a deposit, which then posts one combined line to your bank account — exactly the way the bank records it. That is what lets your books line up cleanly when you reconcile. Posting a deposit debits the bank account and credits Undeposited Funds for the receipts (and the account you chose on each other-deposit line). See Customers for recording the receipts themselves.
Edit or duplicate a posted deposit
A posted deposit can be edited in place when you need to correct an amount, swap a line, or move it to a different date. You can also duplicate one when a similar deposit lands the following week — the form opens pre-filled so you only adjust what changed.
To edit a posted deposit:
- Open Banking → Deposits and select the deposit you want to change.
- Select Edit. The original lines load into the deposit form, with its own receipts already ticked.
- Adjust the Date, Deposit to account, receipts, or other-deposit lines as needed.
- Select Save changes to repost the deposit.
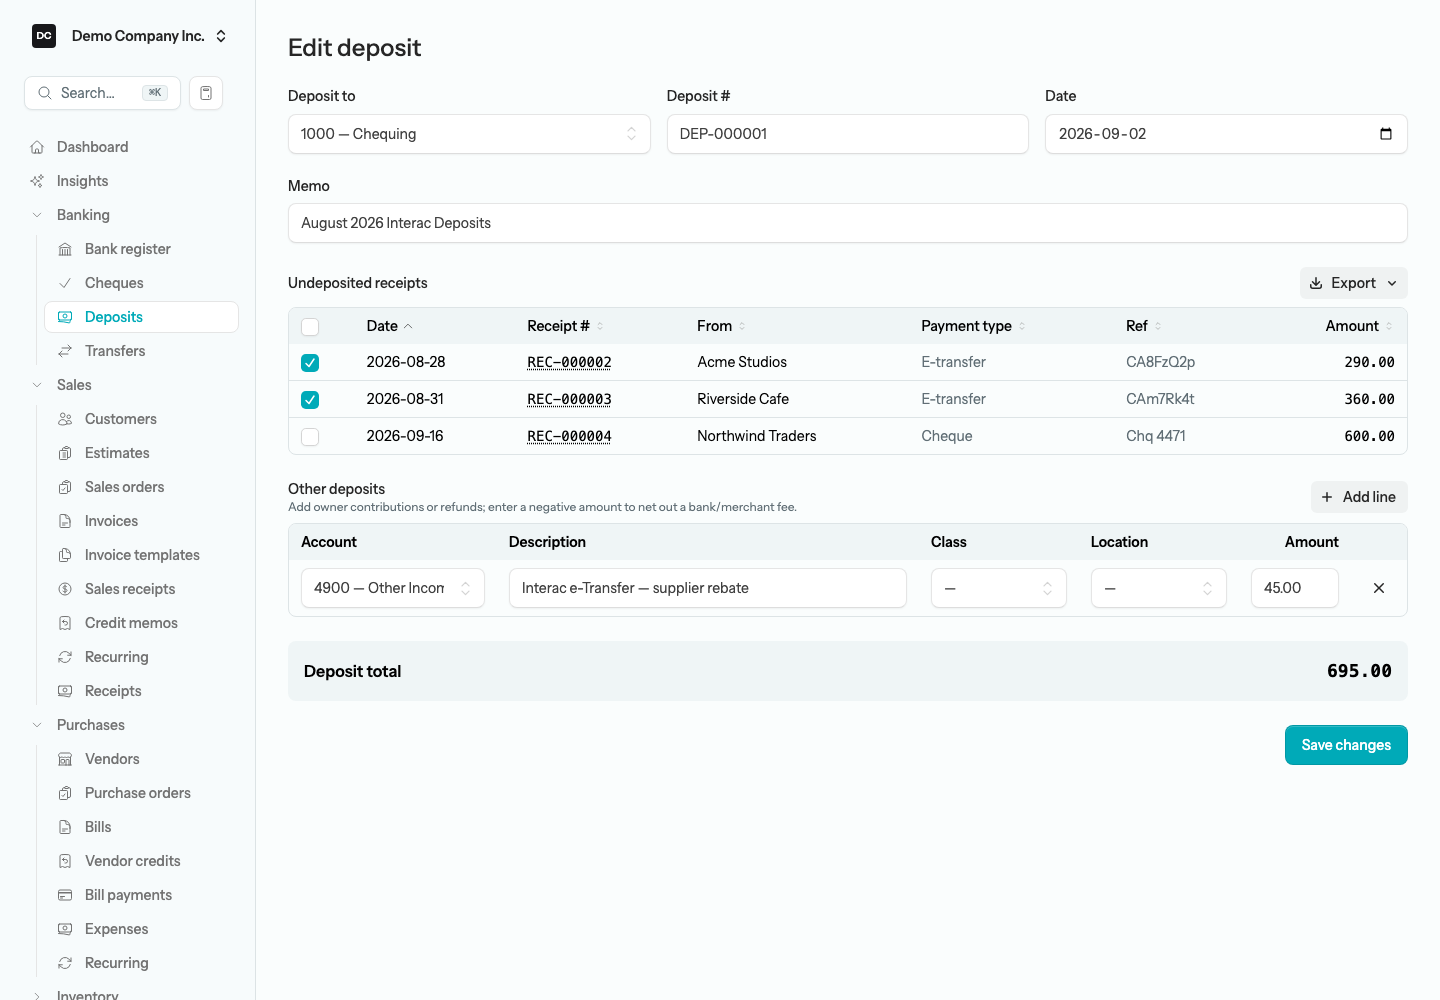
Note — What a repost does to your books. Reposting an edited deposit rebuilds the lines on the same journal entry it originally created — no new entry, no void-and-replace. The source link from each receipt stays intact, so the receipt still shows as deposited. If either the old or new date falls inside a completed reconciliation, the app blocks the change until you undo that reconciliation.
To duplicate a deposit:
- Open the posted deposit you want to copy.
- Select Duplicate. A new deposit form opens with the bank account, memo, and other-deposit lines copied across.
- Pick the undeposited receipts that belong on the new deposit, adjust the date, and select Save & post.
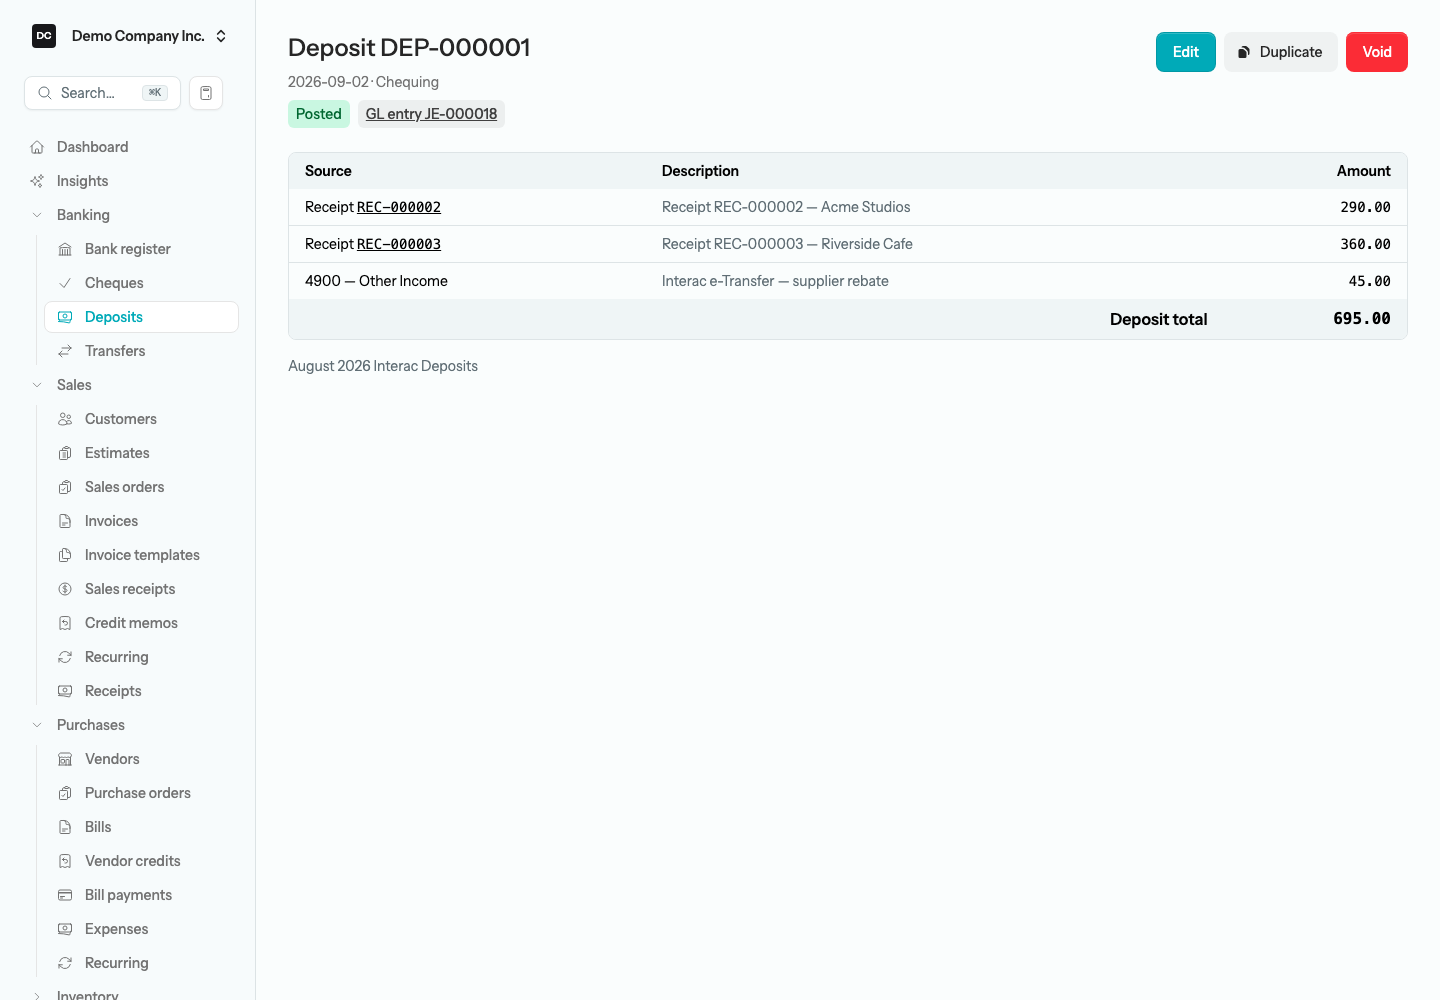
Note — Source-linked journal entries are read-only. Every cheque, deposit, transfer, invoice, bill, and receipt creates the journal entry behind it. When you open one of those entries directly, you will see a blue Source badge linking back to the document, a View button named for it (View Deposit, View Cheque), and no Void or Reverse. Make changes on the document itself and the journal entry follows along. The one entry that keeps an Edit button is a reconciliation’s service-charge or interest adjustment, where you can change the date, number, or memo but not the accounts or amounts.
Reports tied to this area
- General Ledger — every posting against a bank account over a date range.
- Cash Flow — how cash moved in and out across the period.
- Cash Flow Forecast — where your cash is headed over the next quarter, counting outstanding cheques and deposits in transit.
- Cash on Hand — every bank and undeposited-funds account that makes up your cash balance.
Past reconciliations are not a report: they live on the Reconcile screen, and each one opens to the list of lines it cleared. For the reports themselves, see Reports.