A LineLedger account starts empty. The setup wizard appears automatically the first time you sign in, asks a few quick questions, and uses your answers to tailor the chart of accounts, sales-tax setup, and terminology to your organization. The whole thing takes a couple of minutes, and you can change almost everything later in settings.
You will meet the wizard again every time you add another organization — one login can keep the books for as many businesses, clubs, or charities as you like, each fully separate. Reach it later from the organization switcher at the top of the sidebar by choosing New organization. Picking one of your other organizations in that same menu opens it in a new browser tab, so the page you were working on stays put.
To create an organization:
- Enter your organization info — name, country, region, currency, timezone, and fiscal-year start.
- Tell the wizard how your organization is organized — sole proprietorship, corporation, non-profit, and so on.
- Pick your industry and chart-of-accounts style.
- Choose what you want to track by turning feature modules on or off.
- Set up sales tax — whether you charge federal (and any provincial) sales tax and your registration numbers.
- Choose how to start — fresh, by importing from QuickBooks, or by restoring a backup.
- Review the proposed chart of accounts and uncheck anything you do not need.
- Confirm the summary and create the organization.
A side panel tracks your progress through the eight steps. You can step back to any earlier answer with Back or by selecting a completed step in the panel; Continue moves you forward, validating the current step as it goes. The button changes its name where the path branches — it reads Begin import or Upload backup on step 6 when you choose one of those routes, and Create organization on the last step. The sections below walk through each step in turn.
Heads up — Your answers live only in the open page. The browser’s Back and Forward buttons walk the wizard one step at a time, just like the Back button in the page. A refresh, a bookmark, or a pasted link is different: it starts the wizard over at step 1 with empty fields, because nothing is saved until you select Create organization. Finish the wizard in one sitting.
Step 1 — Organization info
Start with the basics about your organization. These settings establish the jurisdiction, money, and calendar your books run on. Some fields may already be filled in when you arrive: the wizard guesses your Country from your connection and your Province or State from your browser’s timezone. Check them before moving on.
To enter your organization info:
- Type the Organization name — the legal or trading name your customers will recognize. It appears on invoices, statements, and emails.
- Choose your Country — Canada, the United States, or the United Kingdom. This sets jurisdiction-specific accounts and tax wording.
- Pick your Province (Canada), State (United States), or Nation (United Kingdom) from the list.
- Select your Base currency — Canadian dollars, US dollars, or pounds sterling. It is pre-filled to match the country.
- Set your Timezone. The wizard takes it from your browser; transaction dates default to today in this zone.
- Choose your Fiscal year start month. The wizard shows the matching year-end date as you pick. It starts at January in Canada and the United States and at April in the United Kingdom, to match the UK tax year — change it to your company’s accounting reference date if that differs.
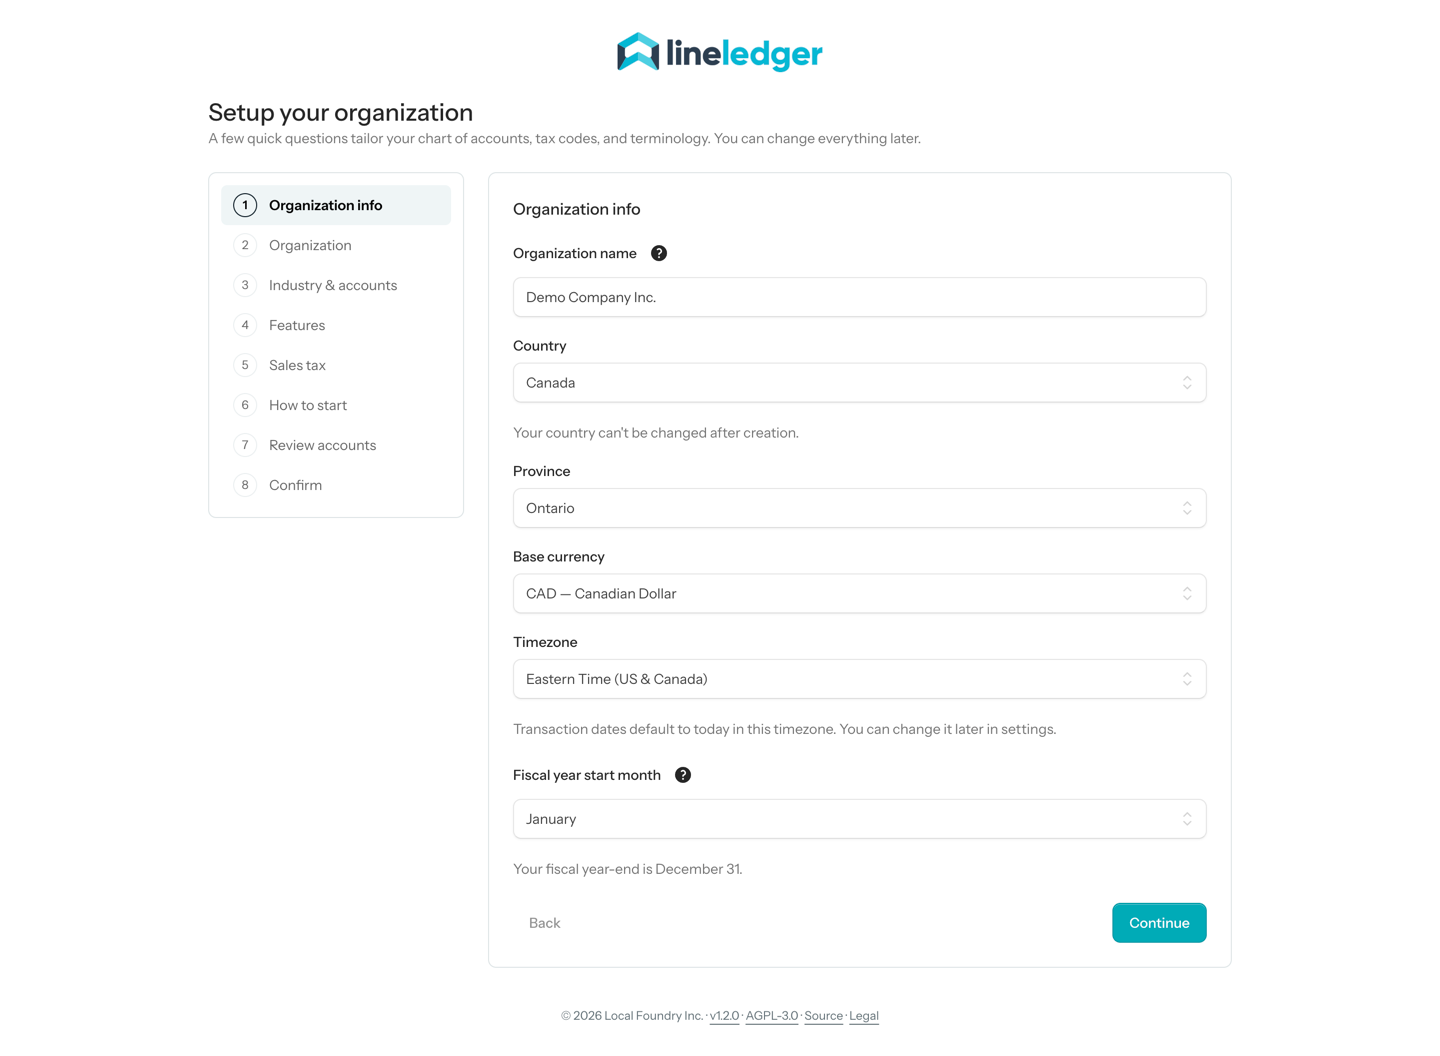
Heads up — Country is permanent. Choose your country carefully — it cannot be changed after the organization is created. It determines the core chart of accounts, the sales-tax model (GST/HST in Canada, Sales Tax in the United States, VAT in the United Kingdom), and which features are offered. Everything else on this step can be adjusted later in settings, but the country is fixed for the life of the organization.
Step 2 — How your organization is organized
This step decides how your equity section is named and whether you get non-profit fund accounting. There are seven organization types: Sole proprietorship, Partnership, Corporation, Club / Association, Non-profit, Charity, and Other / None. In the wizard the three not-for-profit types are collapsed into a single “Non-profit or charity” choice, and a follow-up question pins down which one.
To set how your organization is organized:
- Choose the category that fits. For a for-profit business (sole proprietorship, partnership, corporation) or Other / None, your choice is the organization type — you are done with this step.
- If you choose Non-profit or charity, a second question — What is your legal structure? — asks for your tier: Unincorporated association, Non-profit corporation, or Registered charity.
- Pick Registered charity and the wizard asks for your CRA charity registration number (a Business Number with an RR program account, like 123456789RR0001). You can add it later in settings to start issuing donation receipts.
- Pick Unincorporated association and the books are set up for member dues using the Deferral method — no grants or restricted funds. The other two tiers ask How do you account for restricted contributions? and let you choose between the Deferral method and the Restricted fund method.
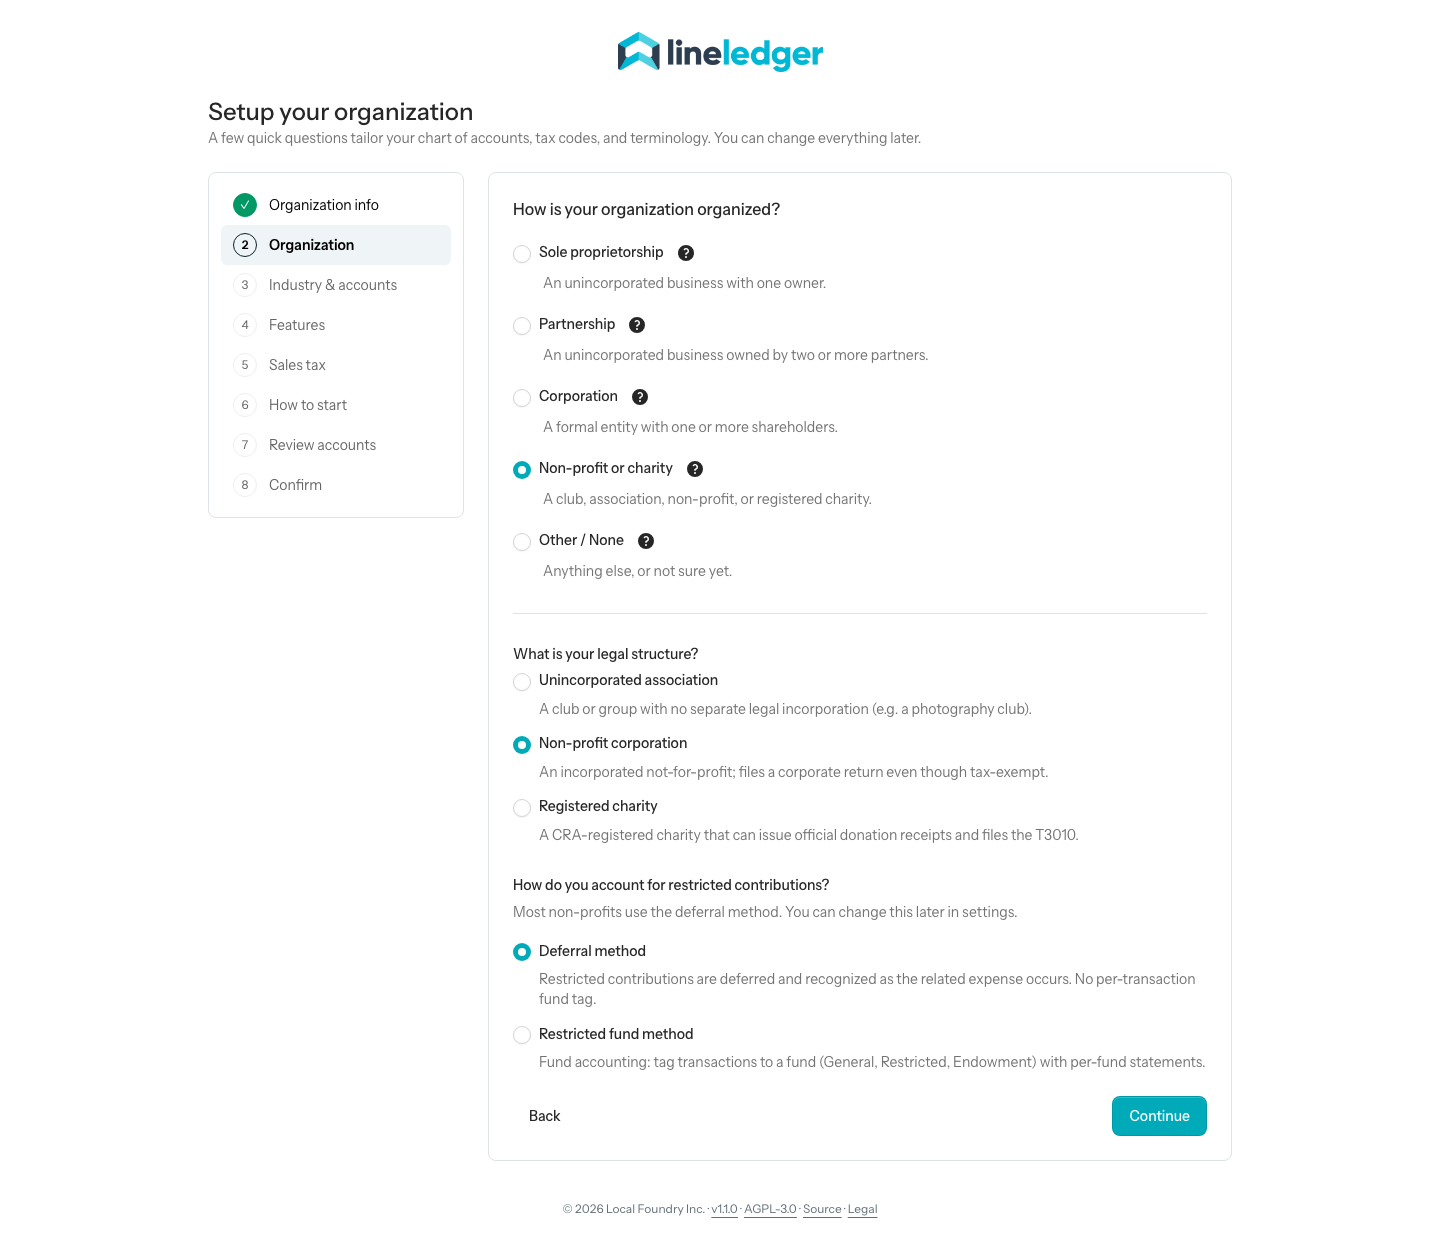
Note. The hover help (the question-mark icons) explains each option in plain language if you are unsure of the legal terms. Outside Canada the choice is simply “Non-profit”, and the Registered charity tier and the CRA wording are hidden, since they are Canada Revenue Agency concepts.
Note — A new non-profit starts with a leaner sidebar. Because most not-for-profits do not sell to “customers”, a new club, non-profit, or charity hides five sales-oriented sidebar links for its owner: Customers, Sales receipts, Credit memos, Purchase orders, and Vendor credits. Nothing is switched off — the features are all still there. To bring any of them back, open Settings → Sidebar and turn the link on again.
Step 3 — Industry & accounts
Now choose how to build your chart of accounts. A segmented control at the top of the step offers three ways to start, and the rest of the step changes to match your pick.
To choose your chart of accounts:
- Standardized accounts — start with a complete, industry-tailored chart, then select your industry from the list below. This is the usual choice.
- Copy an existing organization — reuse the chart from another organization you already keep books for. Choose it under Copy accounts from, and the wizard copies its account codes, names, descriptions, GIFI codes, and sub-account nesting so you can review and trim it on the next steps. If you do not belong to any other organization, this option simply tells you there is nothing to copy.
- Start minimal — I’ll add my own — create only the required system accounts (bank, receivables, payables, tax, and equity) and build the rest by hand.
When you choose Standardized accounts, the wizard offers ten industries: General business, Contractor / Construction, Non-profit, Manufacturing, Retail, Professional services, Health & Wellness, Restaurant / Food & Beverage, Real estate / Property management, and Freelancer / Creative. Your industry choice also pre-selects sensible defaults on the next step — for example, a manufacturer starts with inventory turned on. You can override every one of those toggles.
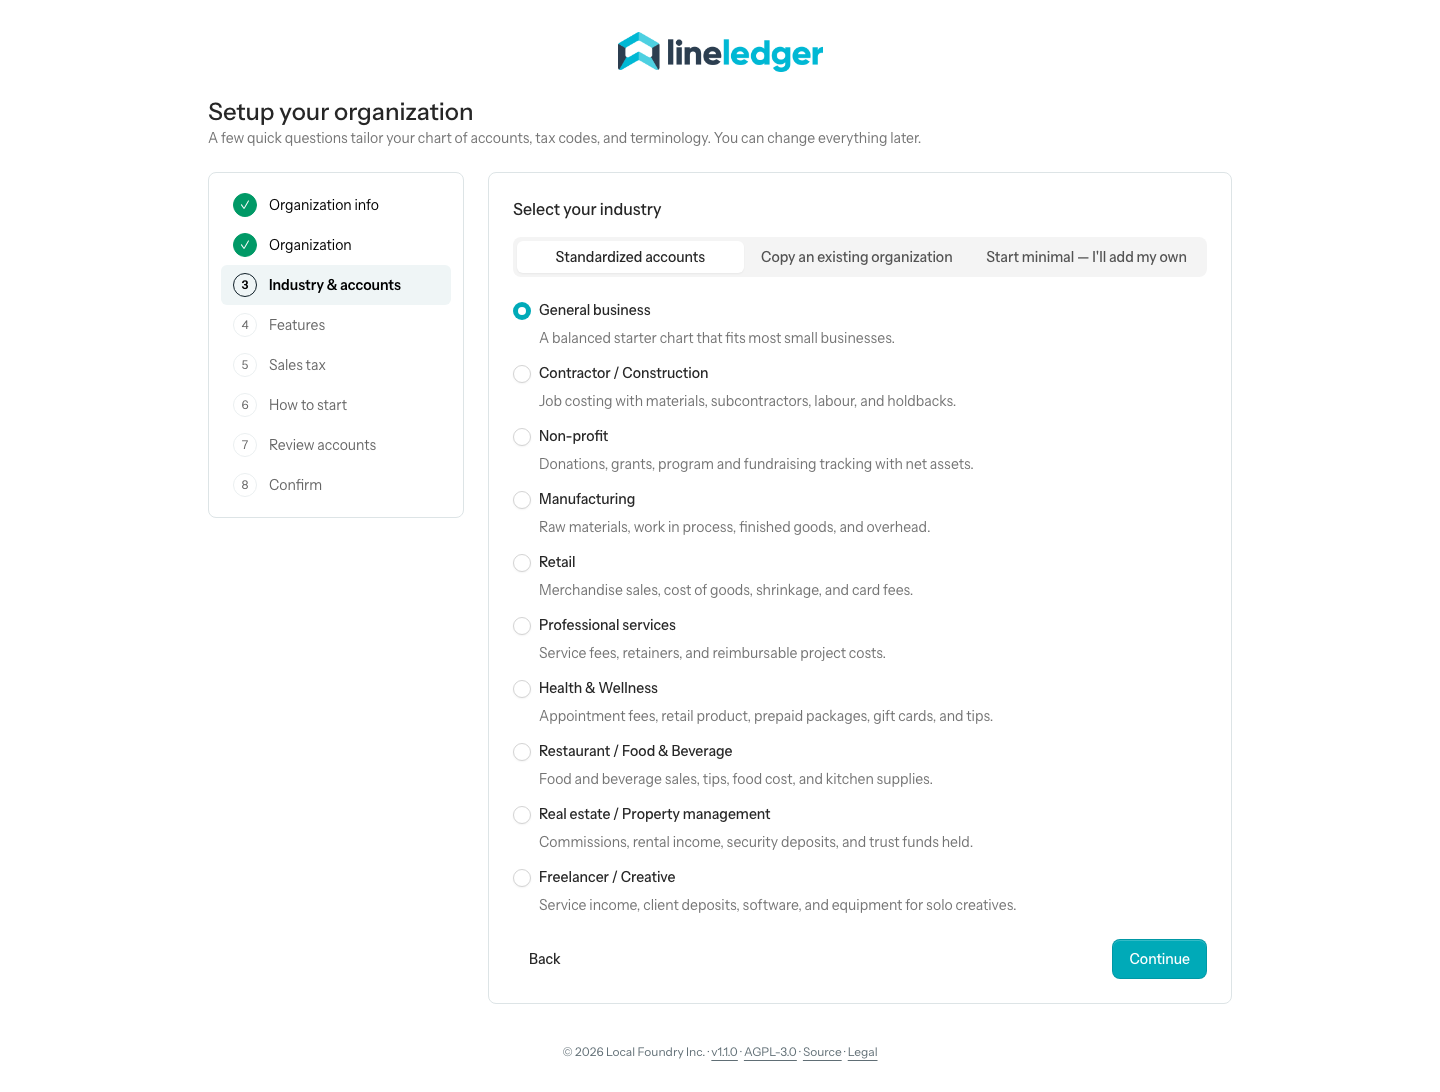
Tip. Not sure which industry to pick? Choose the closest match, or use General business. The chart is just a starting point — you can add, rename, and deactivate accounts at any time, so nothing here locks you in.
Note. A copied chart brings over every account the source organization still has, including ones it has made inactive — and those arrive active in the new organization. Accounts it deleted or merged into another account are left out. The organization type, sales-tax and feature answers you give in this wizard do not reshape a copied chart the way they reshape a standardized one. Trim it on step 7, then deactivate or tidy the rest under Accounting → Chart of Accounts afterwards.
Step 4 — What do you want to track
Turn on the modules your organization needs. Each switch adds a feature area to the app; leaving one off keeps the interface lean. Every toggle can be changed later under Settings → Organizations.
To choose what you track:
- Review the suggested toggles — the wizard pre-sets them from the industry you picked.
- Switch each module on or off to match how you work.
The switches are arranged in four groups, in this order:
Sales & Income
- Estimates — send customer estimates and convert them to invoices.
- Sales orders — track customer sales orders and fulfil them with invoices.
- Recurring invoices — schedule recurring customer invoices.
Costs & Expenses
- Inventory — track stock on hand, costing, and cost of goods sold.
- Employees — track employees and reimbursements.
- Payroll — run Canadian payroll: pay employees, calculate CPP/EI/income tax, write cheques and prepare PD7A/T4/ROE. Offered for Canadian organizations only.
- Fixed assets — track capital assets and depreciation.
- Recurring bills — schedule recurring vendor bills.
Non-Profit & Associations
- Membership — track members and membership levels, and bill recurring dues as invoices.
- Donations & grants — record donation and grant income, track restricted funding, and issue donation receipts.
Planning & Accounting
- Budgets — plan account-level budgets and compare them against actuals.
- Locations — tag transactions with a location to slice reports by site, branch, or property.
- Classes — tag transactions with a class to slice reports by segment, department, or program.
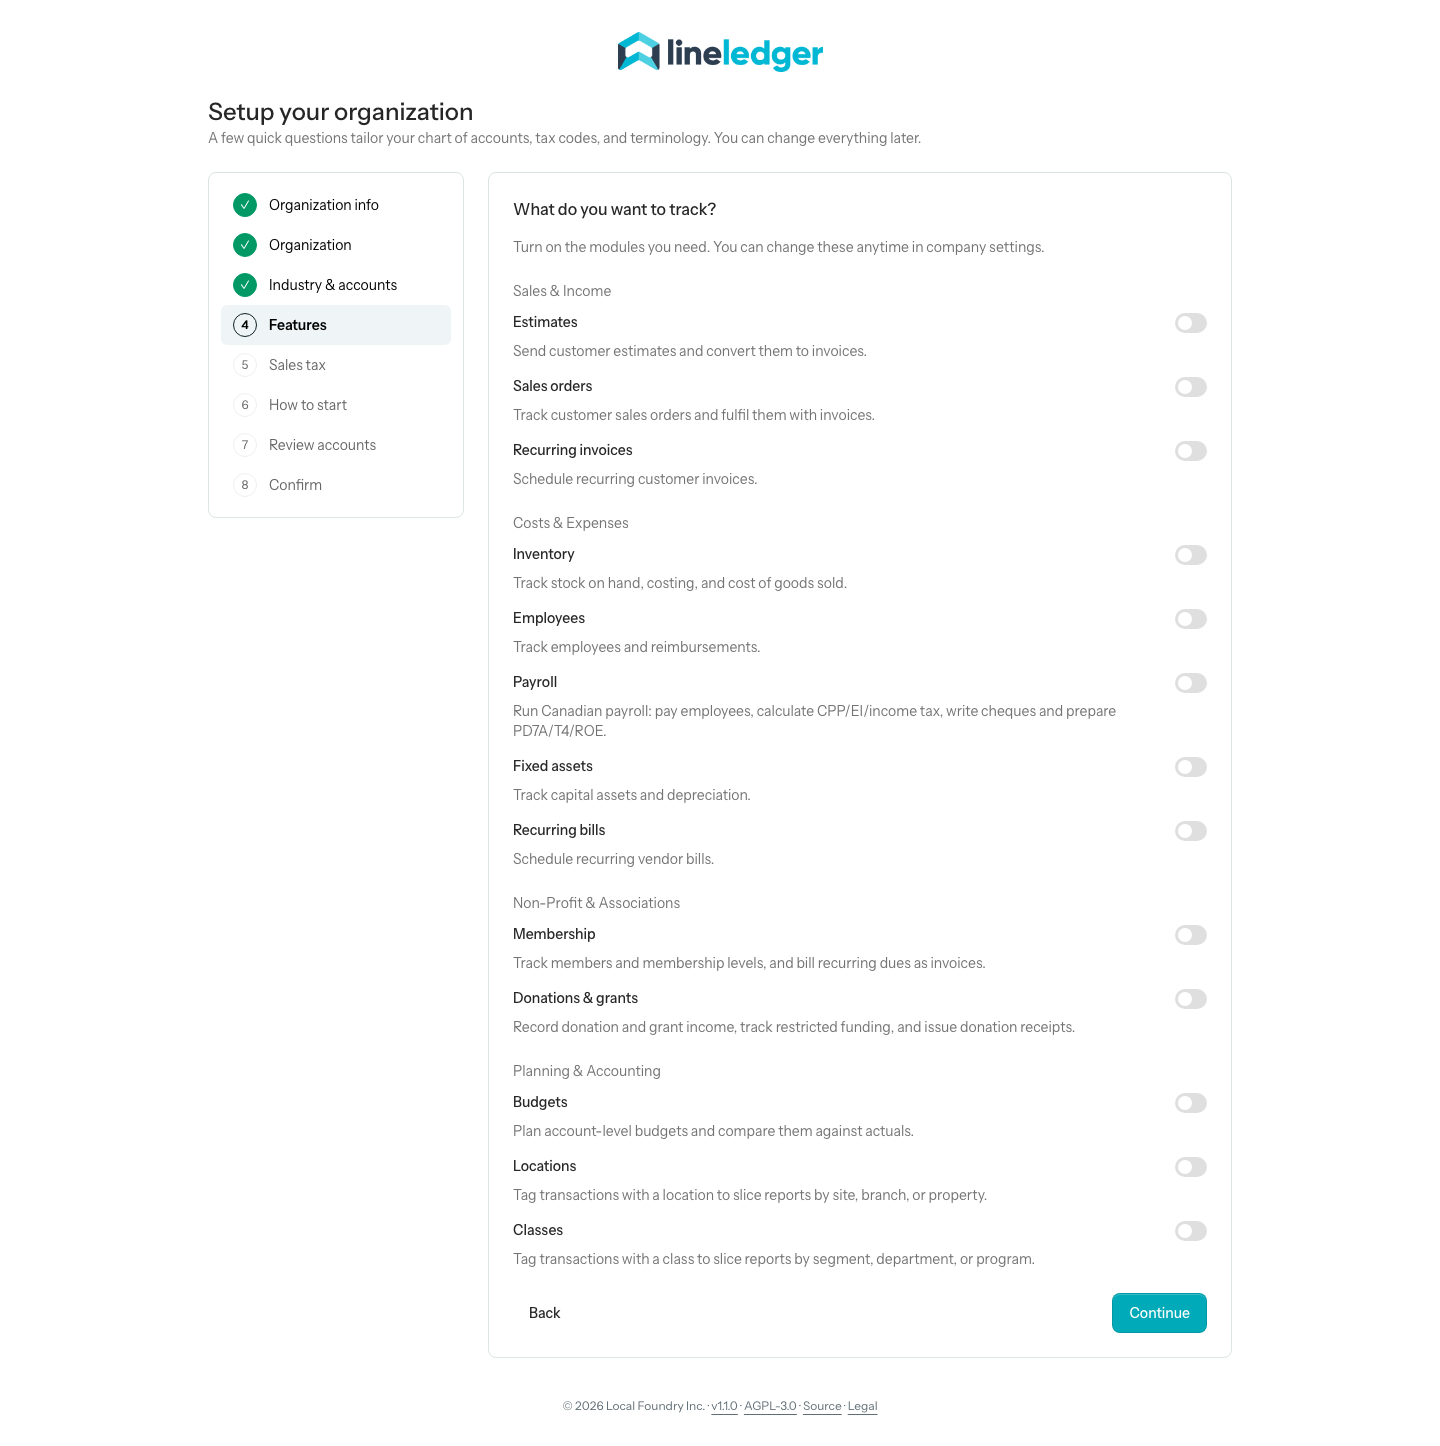
Note — Switches you may not see — and two you will not. If the person running your LineLedger site has turned a section off site-wide, its switch disappears from this step: that can happen to Inventory, Employees, Payroll, and Donations & grants. Two modules are also never asked about here. Purchase orders is on for every new organization, and Fund accounting only appears once your contribution method is the Restricted fund method. Both live with the other toggles under Settings → Organizations.
Step 5 — Sales tax
Tell the wizard whether you charge sales tax so it can set up the right tax codes and payable accounts. The wording follows your country: Canada asks about GST/HST, the United States asks about Sales Tax, and the United Kingdom asks about VAT.
To set up sales tax:
- Turn the I charge GST/HST switch on if you charge federal sales tax, or off if you do not.
- If your province also levies its own provincial sales tax — PST in British Columbia and Saskatchewan, RST in Manitoba, or QST in Quebec — a second switch appears. Turn it on to add a provincial tax-payable account and tax code for that province.
- In the United Kingdom the step asks whether you are VAT-registered. Switched on, it adds a VAT Payable account, HM Revenue & Customs as your VAT agency (Isle of Man Customs and Excise for a company on the Isle of Man), and Standard 20%, Reduced 5%, Zero-rated and Exempt tax codes. Your VAT registration number is checked for the GB format (for example GB123456789) and printed as “VAT No.” on your invoices.
- When a tax is switched on, you can enter its account number: GST/HST account number (Sales Tax in the United States, VAT in the United Kingdom), plus a separate field for the provincial tax when that switch is on. Both are optional. The GST/HST number becomes your organization’s tax number, which prints in the footer of your invoices and other printed forms. The provincial number is kept on the provincial tax agency for your records and does not print on the forms you send.
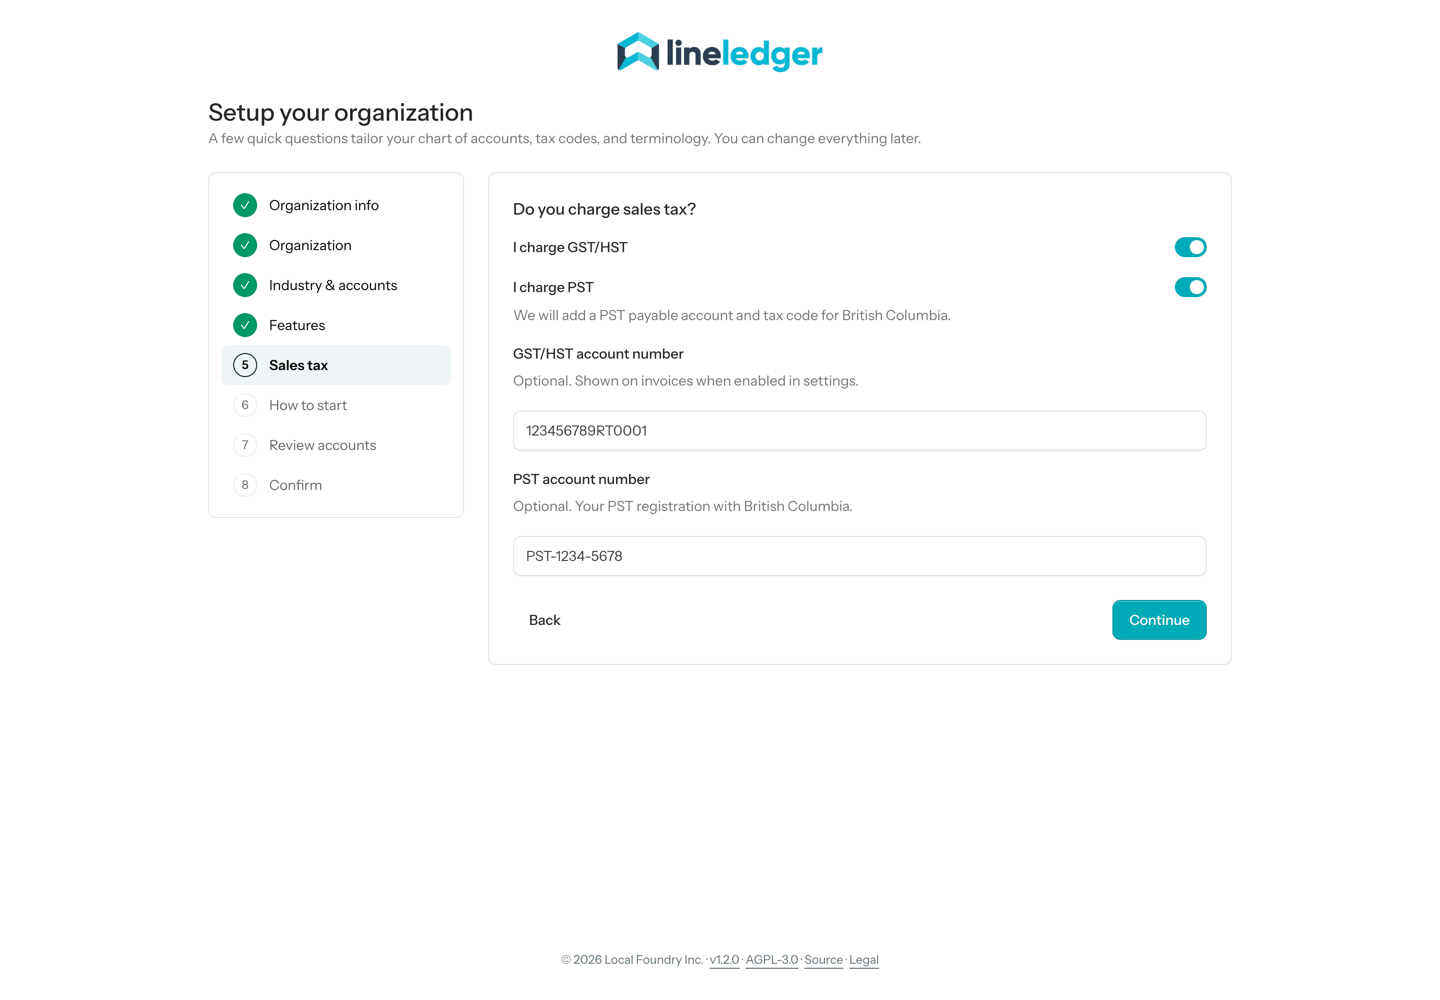
Note. The provincial switch only appears for provinces that actually levy a separate tax. HST provinces (such as Ontario) and GST-only provinces (such as Alberta) collect everything through the single GST/HST line, so no second switch is shown. In the United States and the United Kingdom the step asks a single Sales Tax or VAT question.
Setting up in the United Kingdom or on the Isle of Man? The UK organization types, the Companies House number, VAT numbers, and the VAT Return are covered on United Kingdom & VAT.
Step 6 — How do you want to start
Choose how to bring your books to life: begin from scratch, import from QuickBooks, or restore a backup from another LineLedger instance.
To choose how to start:
- Start fresh — begin from a Start date with the chart of accounts you just chose. Set the date, usually the beginning of your fiscal year or today. If you have history to carry over from a previous system, this is still the right choice: bring the balances in afterwards with the Opening balances workspace described below.
- Import from QuickBooks — bring in your existing data. Under What do you want to import?, pick Opening balances / trial balance to load lists and balances as of a conversion date, or Full transaction history to replay every QuickBooks transaction into the ledger. The wizard seeds only the required accounts and the import supplies the rest.
- Restore from a backup — upload a backup ZIP exported from another LineLedger instance to rebuild an organization here. You choose the file on the next screen.
Note. The import and restore paths branch off here, and the main button changes to match. Begin import creates the organization and opens the QuickBooks import right inside the wizard, where you can choose “Finish later” to do it from the dashboard instead. Upload backup takes you to the Restore from backup screen. The Fresh path continues to the chart review in step 7. Migrating from QuickBooks covers the import itself.
Step 7 — Review chart of accounts
The wizard shows the exact chart it will create, grouped by Asset, Liability, Equity, Income, and Expense. The equity group is titled for your organization type — Net Assets for a non-profit, for example. This is your chance to trim the chart before any accounts exist.
To review the chart of accounts:
- Scan each group of accounts.
- Uncheck any account you do not need. Required system accounts are locked on and marked System or Required — they cannot be removed.
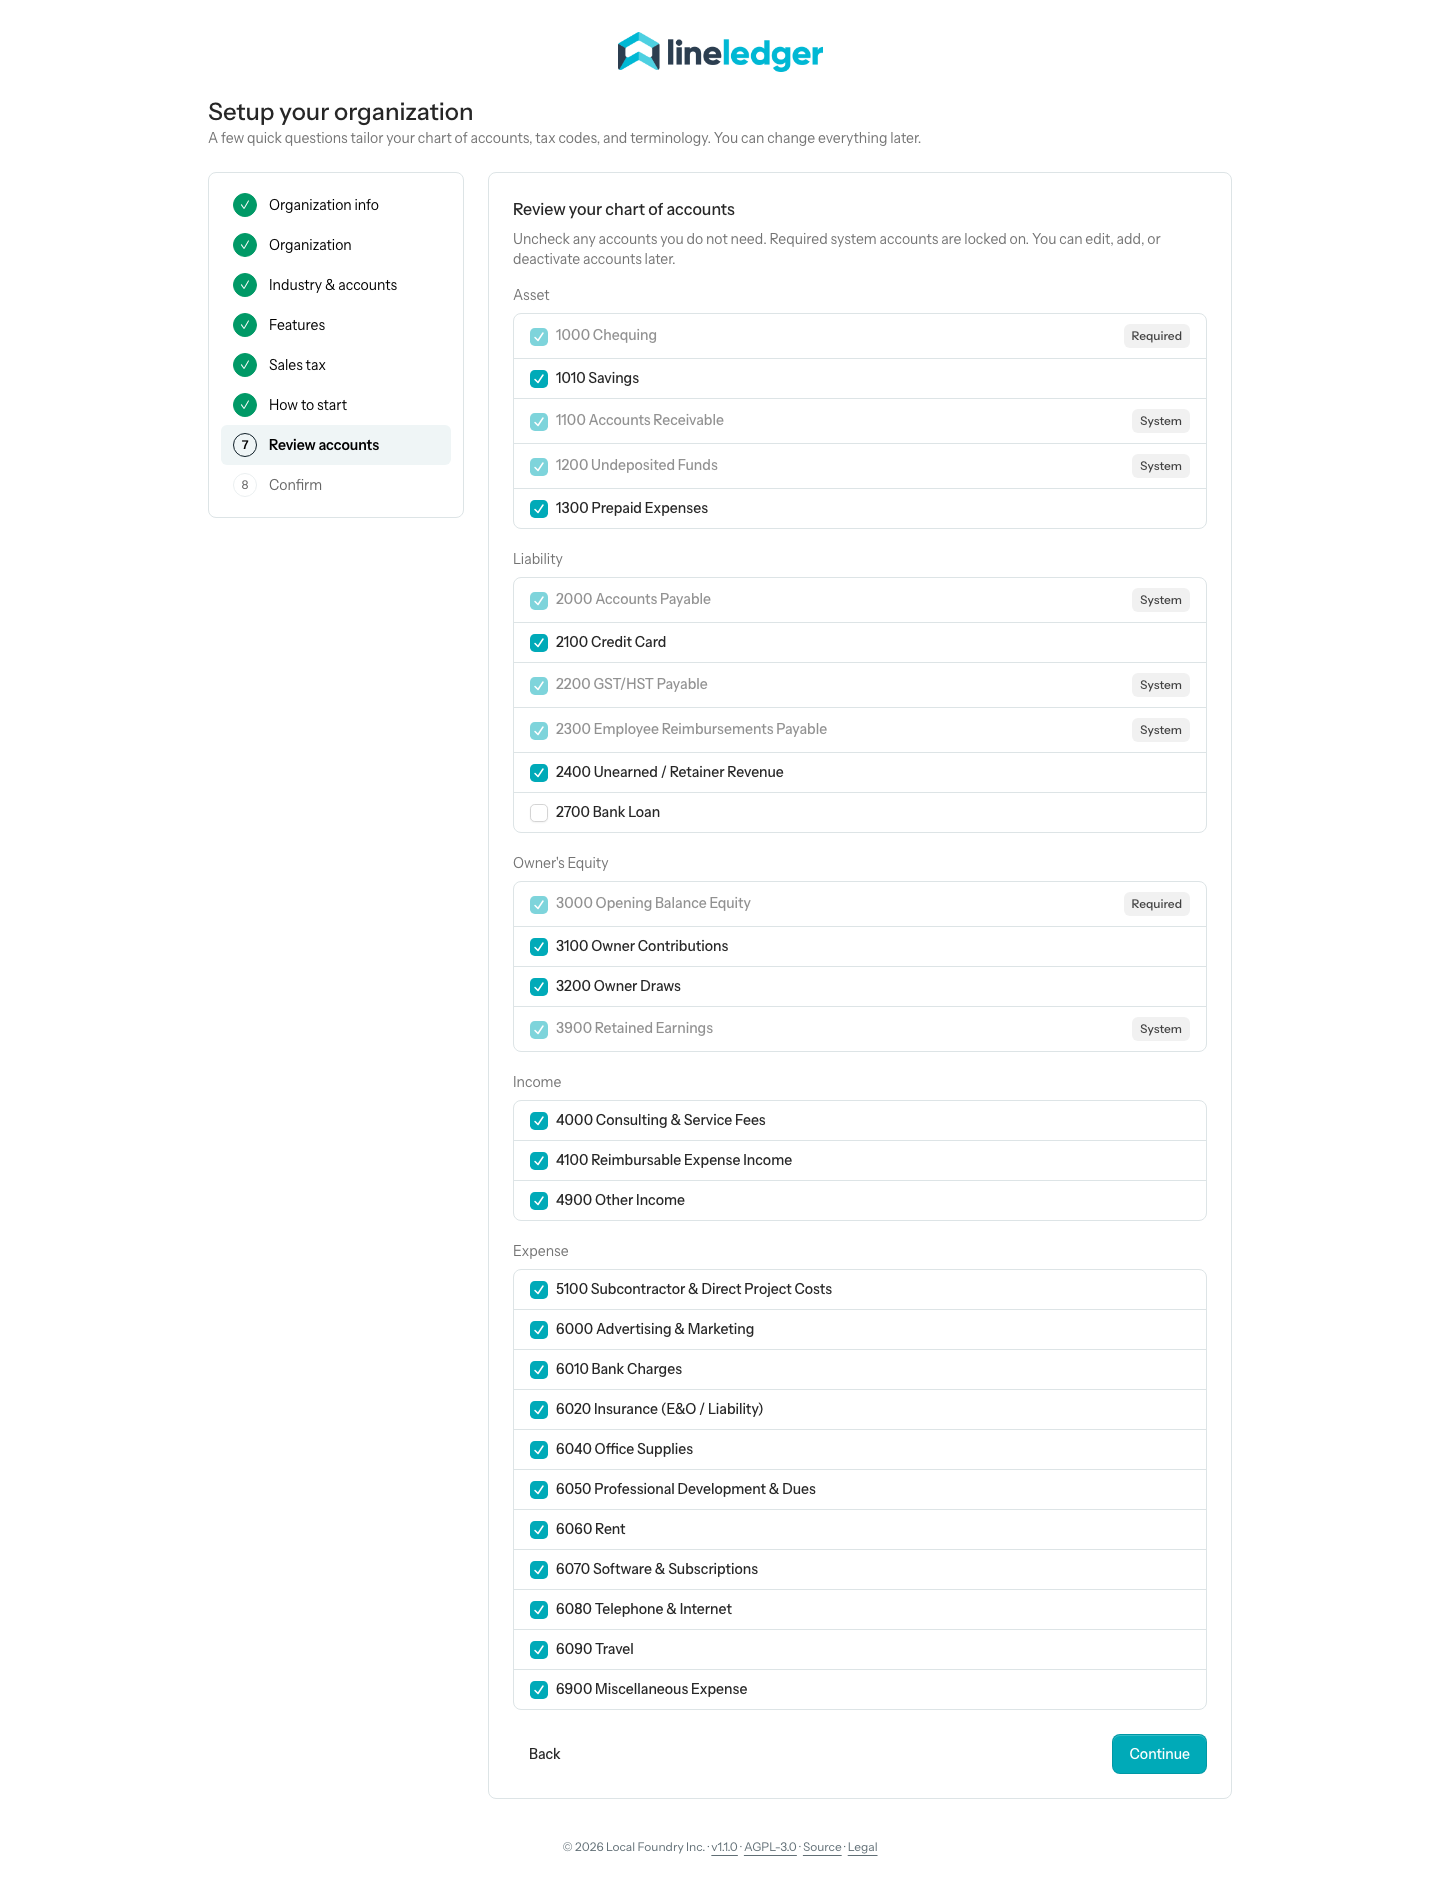
You can always edit, add, or deactivate accounts later, so trimming here is purely to keep the starting chart tidy. On the minimal-chart path a for-profit organization sees only the locked required accounts — there is nothing to uncheck. A minimal non-profit still receives its fund-accounting scaffolding (the deferred-contribution liabilities and net-asset classes listed in the examples below), and those rows can be unchecked. The QuickBooks import path skips ahead instead: the organization is created at step 6 and the import opens right away, since QuickBooks supplies the operating accounts.
Step 8 — Ready to create
The final step, Ready to create your company, summarizes your choices in rows labelled Company, Jurisdiction (the country and currency, such as Canada · CAD), Organization, Legal structure and Contribution method (non-profits only), and Chart of accounts — the industry, the organization it was copied from, or Minimal — with a count of selected accounts.
To create the organization:
- Check the summary. Use Back or the step panel to fix anything that is off.
- Select Create organization. The wizard builds the chart of accounts, applies your settings, and drops you on the new organization’s dashboard.
Creating the organization seeds more than the chart. You also get a starter set of payment methods: Cash, Cheque, E-transfer, EFT, Wire, and Credit card in Canada; Cash, Check, ACH, Wire, and Credit card in the United States; or Cash, Cheque, BACS, Faster Payments, Direct Debit, Wire, and Credit card in the United Kingdom. If you turned on I charge GST/HST (I charge Sales Tax in the United States, I charge VAT in the United Kingdom), you get your main tax agency — the Canada Revenue Agency, a State Department of Revenue agency in the United States, or HM Revenue & Customs in the United Kingdom — and its starter tax codes; with that switch off, no main tax agency or tax codes are created. Turning on the provincial tax adds the provincial agency and its tax code. Those two switches work this way on a standardized or minimal chart, but a copied chart ignores them: you get the main agency and its codes whenever the copy includes the source’s system tax-payable account (GST/HST Payable, Sales Tax Payable, or VAT Payable), which is locked on, and a provincial agency whenever it includes a tax-payable account coded 2210 (such as PST Payable) and your province levies its own sales tax — the agency and code are your province’s, whatever the copied account was for. The QuickBooks import path always starts with the main agency and its codes and no provincial agency, whatever the switches say. The account numbers you typed are saved on the matching agencies, so a provincial number is kept only when a provincial agency was created. The dashboard opens with a getting-started tips box that points you to the next things worth setting up, such as customizing your sidebar and the bank register; close it when you are done, or bring it back later with Show tips under Settings → Organizations.
After the wizard — bringing in opening balances
If you chose Start fresh but are moving from another system, your first job is to load the balances you are carrying over. Open Accounting → Opening balances from the sidebar — the link appears only for the organization’s Owner. The workspace keeps a draft trial balance as your target and quietly maintains one opening journal entry to match it, so you can enter figures in any order and come back to correct them.
To bring in your opening balances:
- On the Overview tab, set the Conversion date — the As of date your balances are carried over, usually your last fiscal year-end in the old system — and select Save.
- Open the Trial balance tab and enter the closing balance of each account, or select Import to load them from a CSV.
- Use Customers (AR) and Vendors (AP) to enter what each customer owed you and what you owed each vendor. Each figure becomes a real opening invoice or bill, so it ages and can be paid like any other.
- Record any Outstanding cheques and Deposits in transit that had not cleared the bank on the conversion date, so your first reconciliation matches the statement.
- Back on the Overview tab, watch the Unexplained balance card fall to zero, then select Finalize & lock.
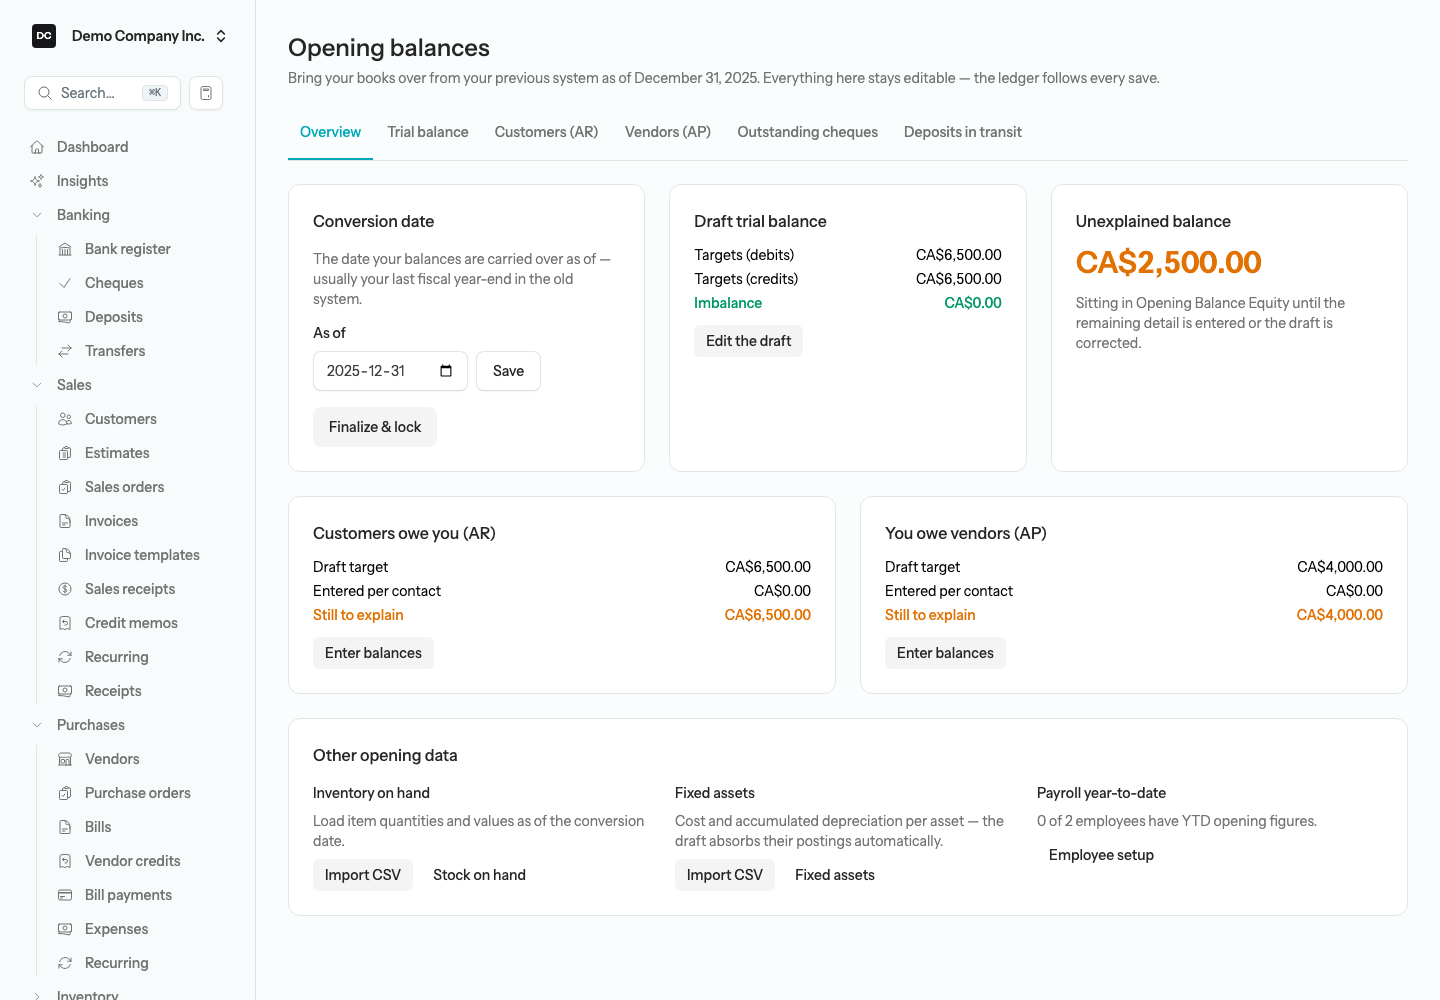
Note — What this does to your books. Every save re-posts a single opening journal entry dated on your conversion date: each account is debited or credited up to its target, and whatever the detail documents have not yet explained sits as a plug in Opening Balance Equity (Opening Balance Net Assets for a non-profit). Finalize & lock sets the organization’s period lock to the conversion date so nothing can be posted into the history you just closed; Un-finalize lifts that lock again if you need to fix something.
The Overview tab also carries Inventory on hand and Fixed assets importers and a Payroll year-to-date pointer, for the balances that live outside the general ledger. Opening balances has the full walkthrough, including the CSV layouts.
Examples by organization type
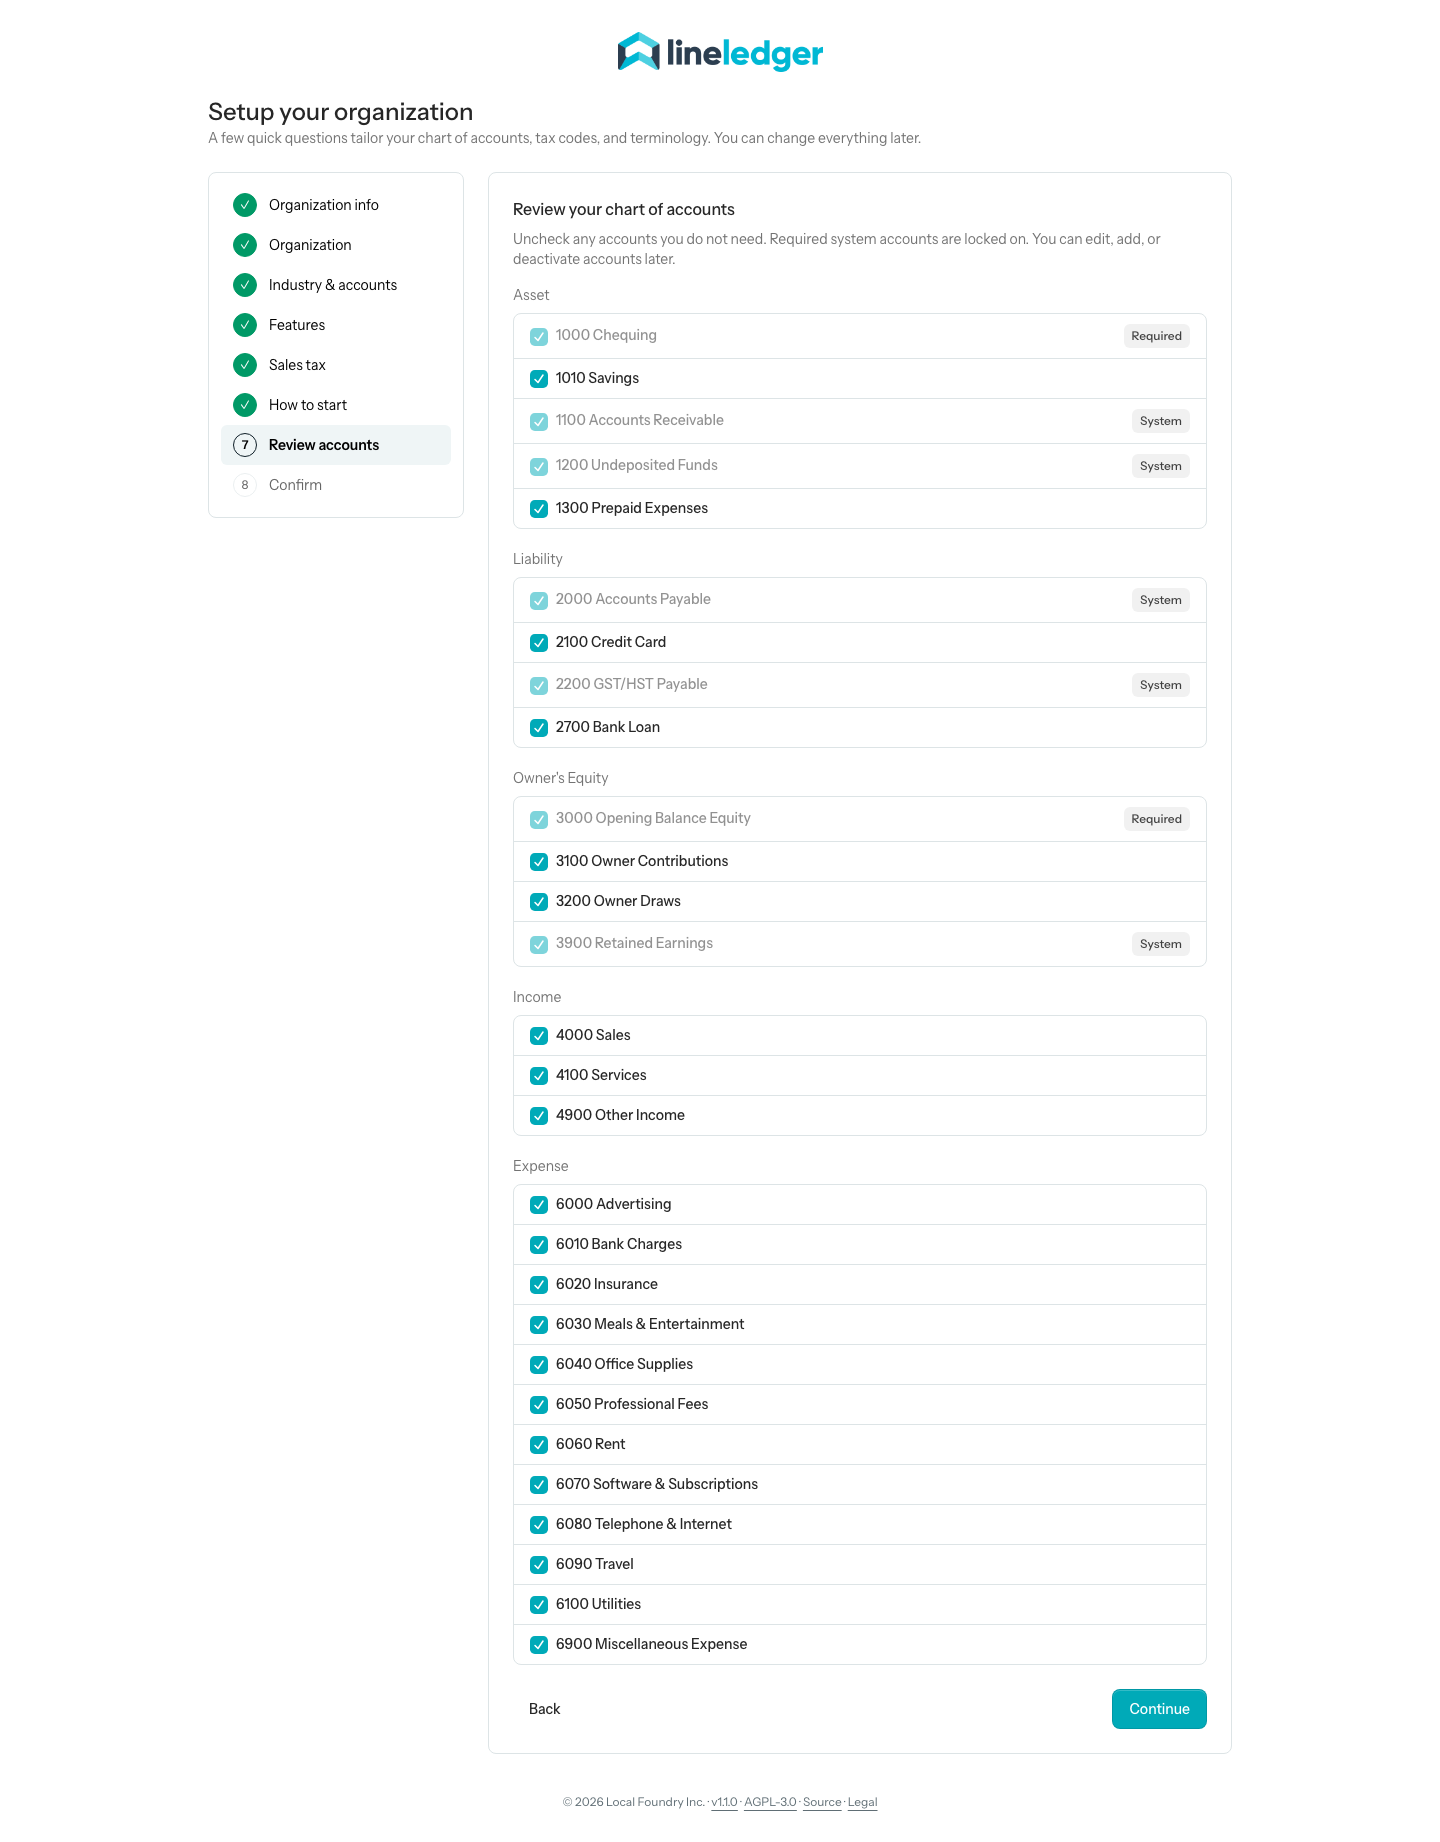
Your Step 2 answers reshape the equity section of the chart — and, for non-profits, add fund-accounting accounts. Here is what four common setups produce. So you can compare them side by side, every example uses the General business industry, and each screenshot shows the whole proposed chart on step 7, Review your chart of accounts, with the equity group titled for the organization type. Picking a different industry — Non-profit, say — changes the other lines around these accounts, not the accounts listed below.
Sole proprietorship
Choose Sole proprietorship in Step 2. The equity section is named for a single owner:
- 3100 Owner Contributions
- 3200 Owner Draws
Alongside the locked core accounts (3000 Opening Balance Equity and the system 3900 Retained Earnings). A partnership is identical except the lines read Partner Contributions and Partner Draws.
Corporation
Choose Corporation in Step 2. The equity section uses share-capital terminology that follows your country:
- 3100 Common Shares (Canada), Common Stock (United States), or Ordinary Shares (United Kingdom)
- 3200 Shareholder Distributions
Again sitting beside 3000 Opening Balance Equity and the system 3900 Retained Earnings.
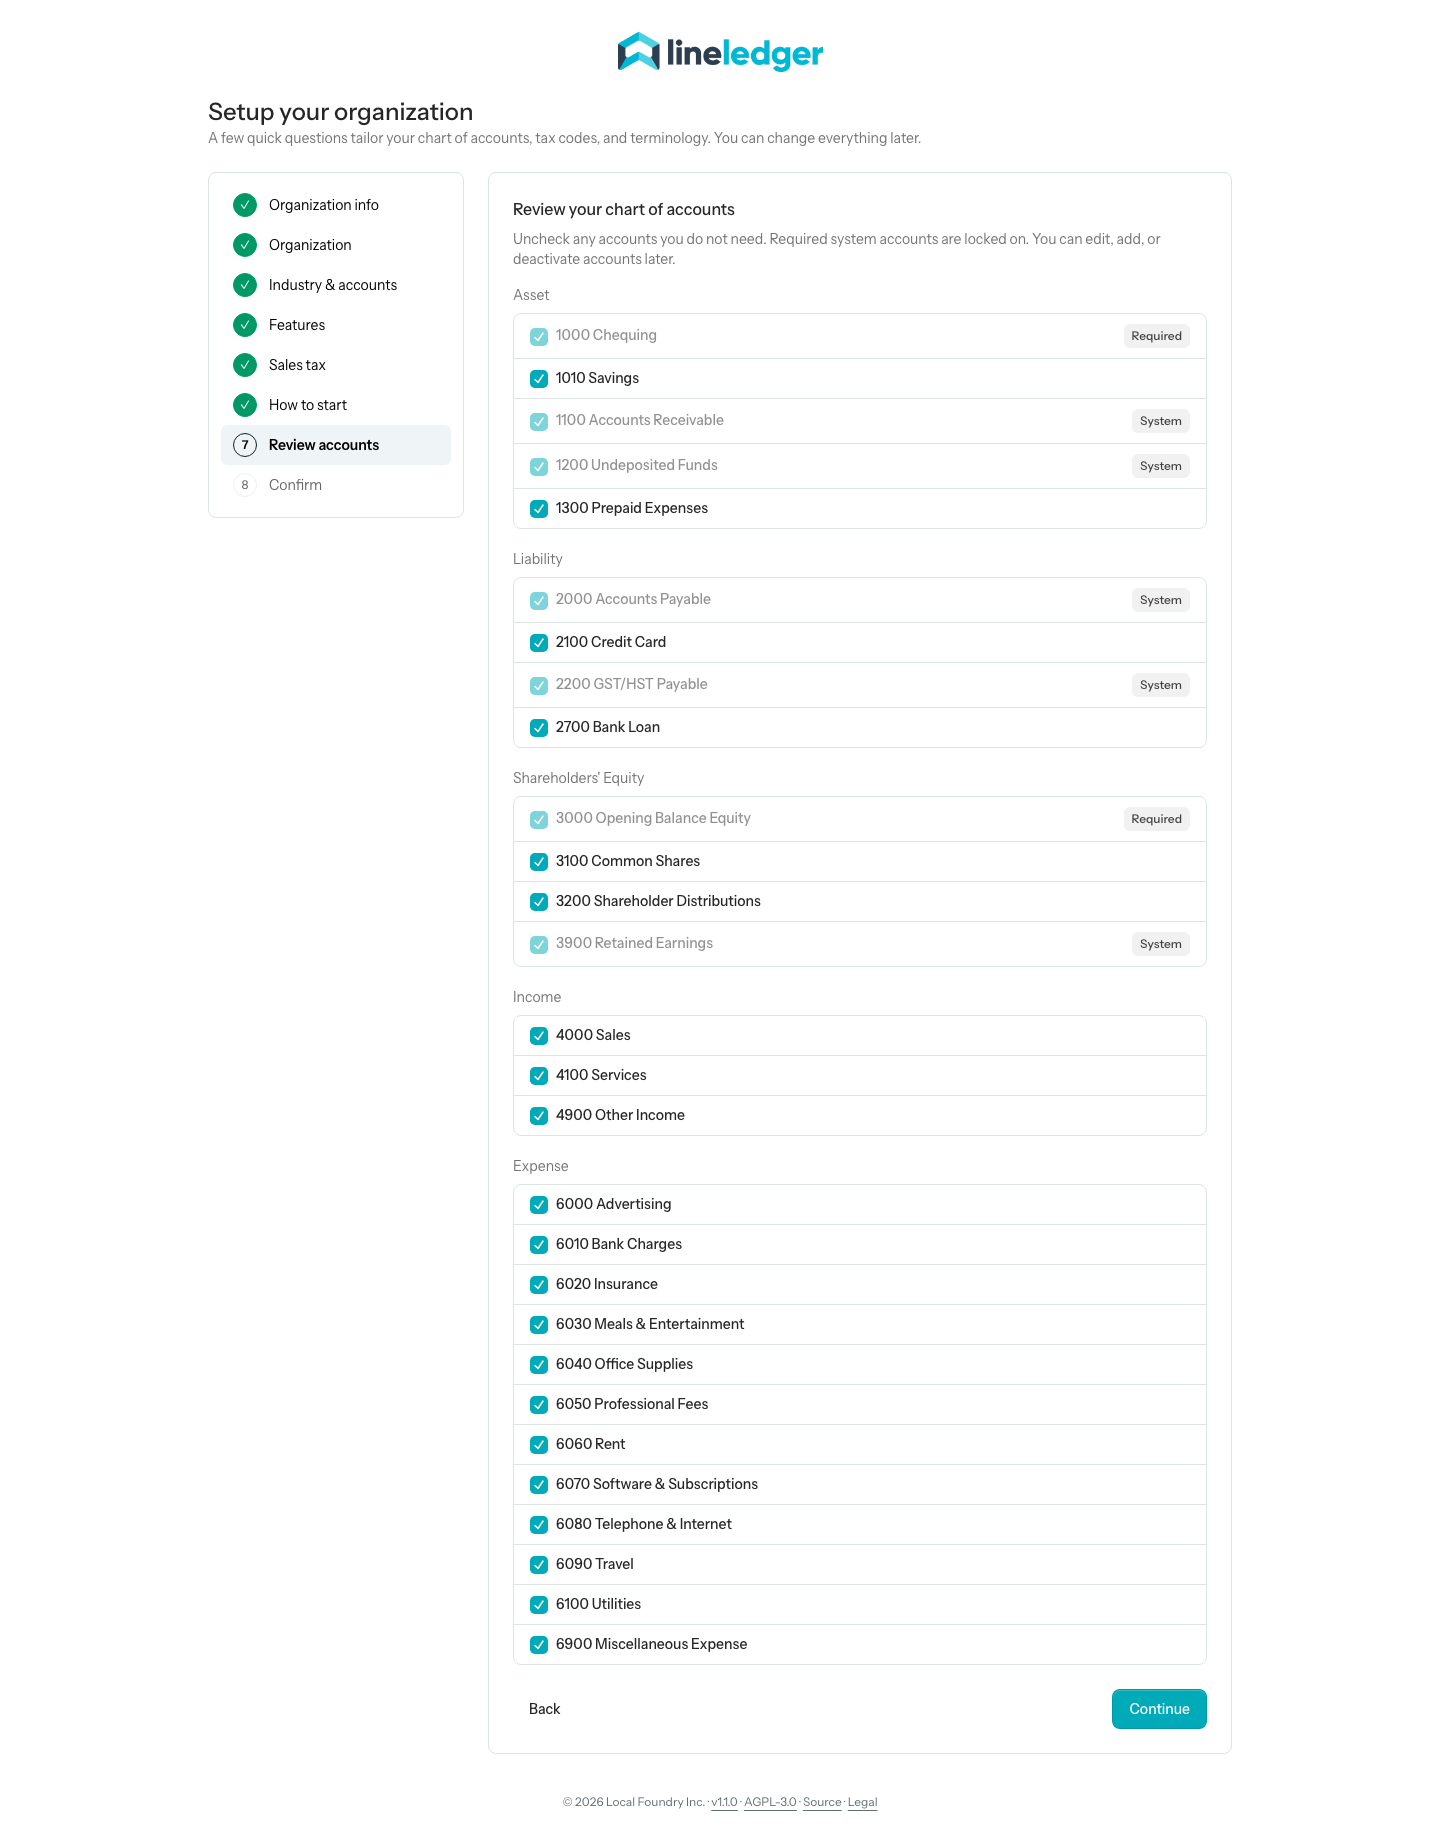
Non-profit corporation
Choose Non-profit or charity in Step 2, then the Non-profit corporation tier. The chart switches to fund accounting: the system 3900 line is relabeled Net Assets, 3000 becomes Opening Balance Net Assets so the word “Equity” never appears on your statement of financial position, and the wizard adds net-asset classes and deferred-contribution liabilities:
- 2500 Deferred / Restricted Grants
- 2510 Deferred Membership / Program Revenue
- 3100 Unrestricted Net Assets
- 3200 Restricted Net Assets
A registered charity gets the same set plus 3300 Endowment Net Assets and a CRA registration number for issuing donation receipts. Demo Community Society is set up this way.
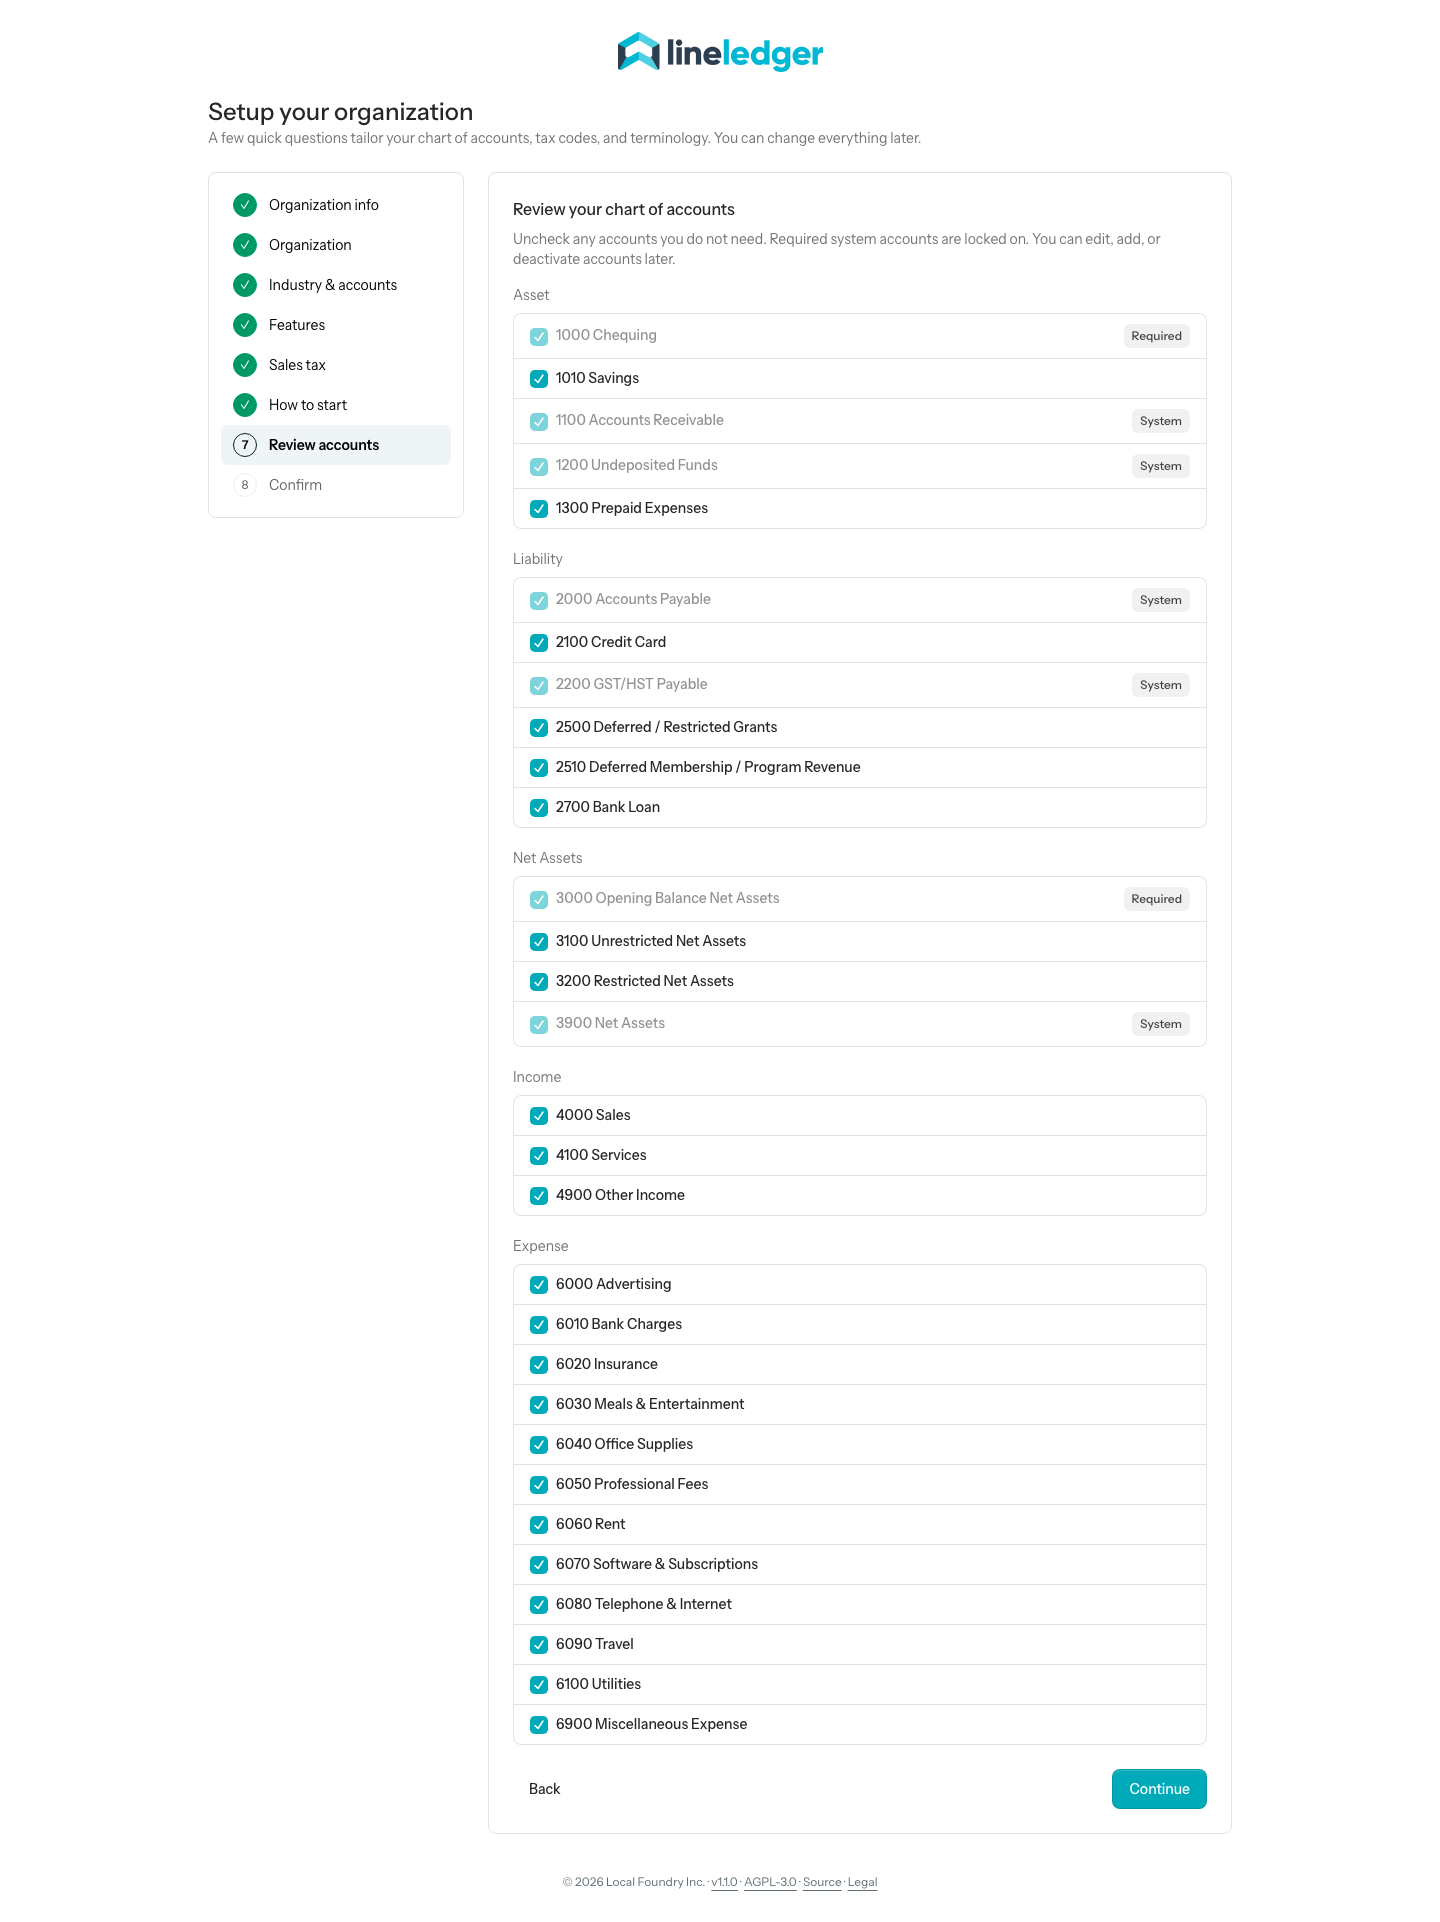
Unincorporated association
Choose Non-profit or charity in Step 2, then the Unincorporated association tier — the option for a club or association funded by member dues. The wizard records this as the Club / Association organization type and uses the Deferral method. The 3900 line is relabeled Net Assets, 3000 becomes Opening Balance Net Assets, and the wizard adds only three accounts, renaming a line already in that spot where there is one:
- 2510 Deferred Membership Dues
- 3100 Unrestricted Net Assets
- 4200 Membership Dues (income)
That gives you membership-dues income, a deferred-dues liability for dues paid in advance, and an unrestricted net-asset line. Unlike the other tiers, the wizard adds no grant, restricted-fund or endowment accounts — but it does not remove the lines your industry chart brought with it either. On the General business chart, 3200 Owner Draws stays in the Net Assets group; on the Non-profit chart, 2500 Deferred / Restricted Grants, 3200 Restricted Net Assets and 4100 Grant Revenue stay. Uncheck any your club does not need on step 7.
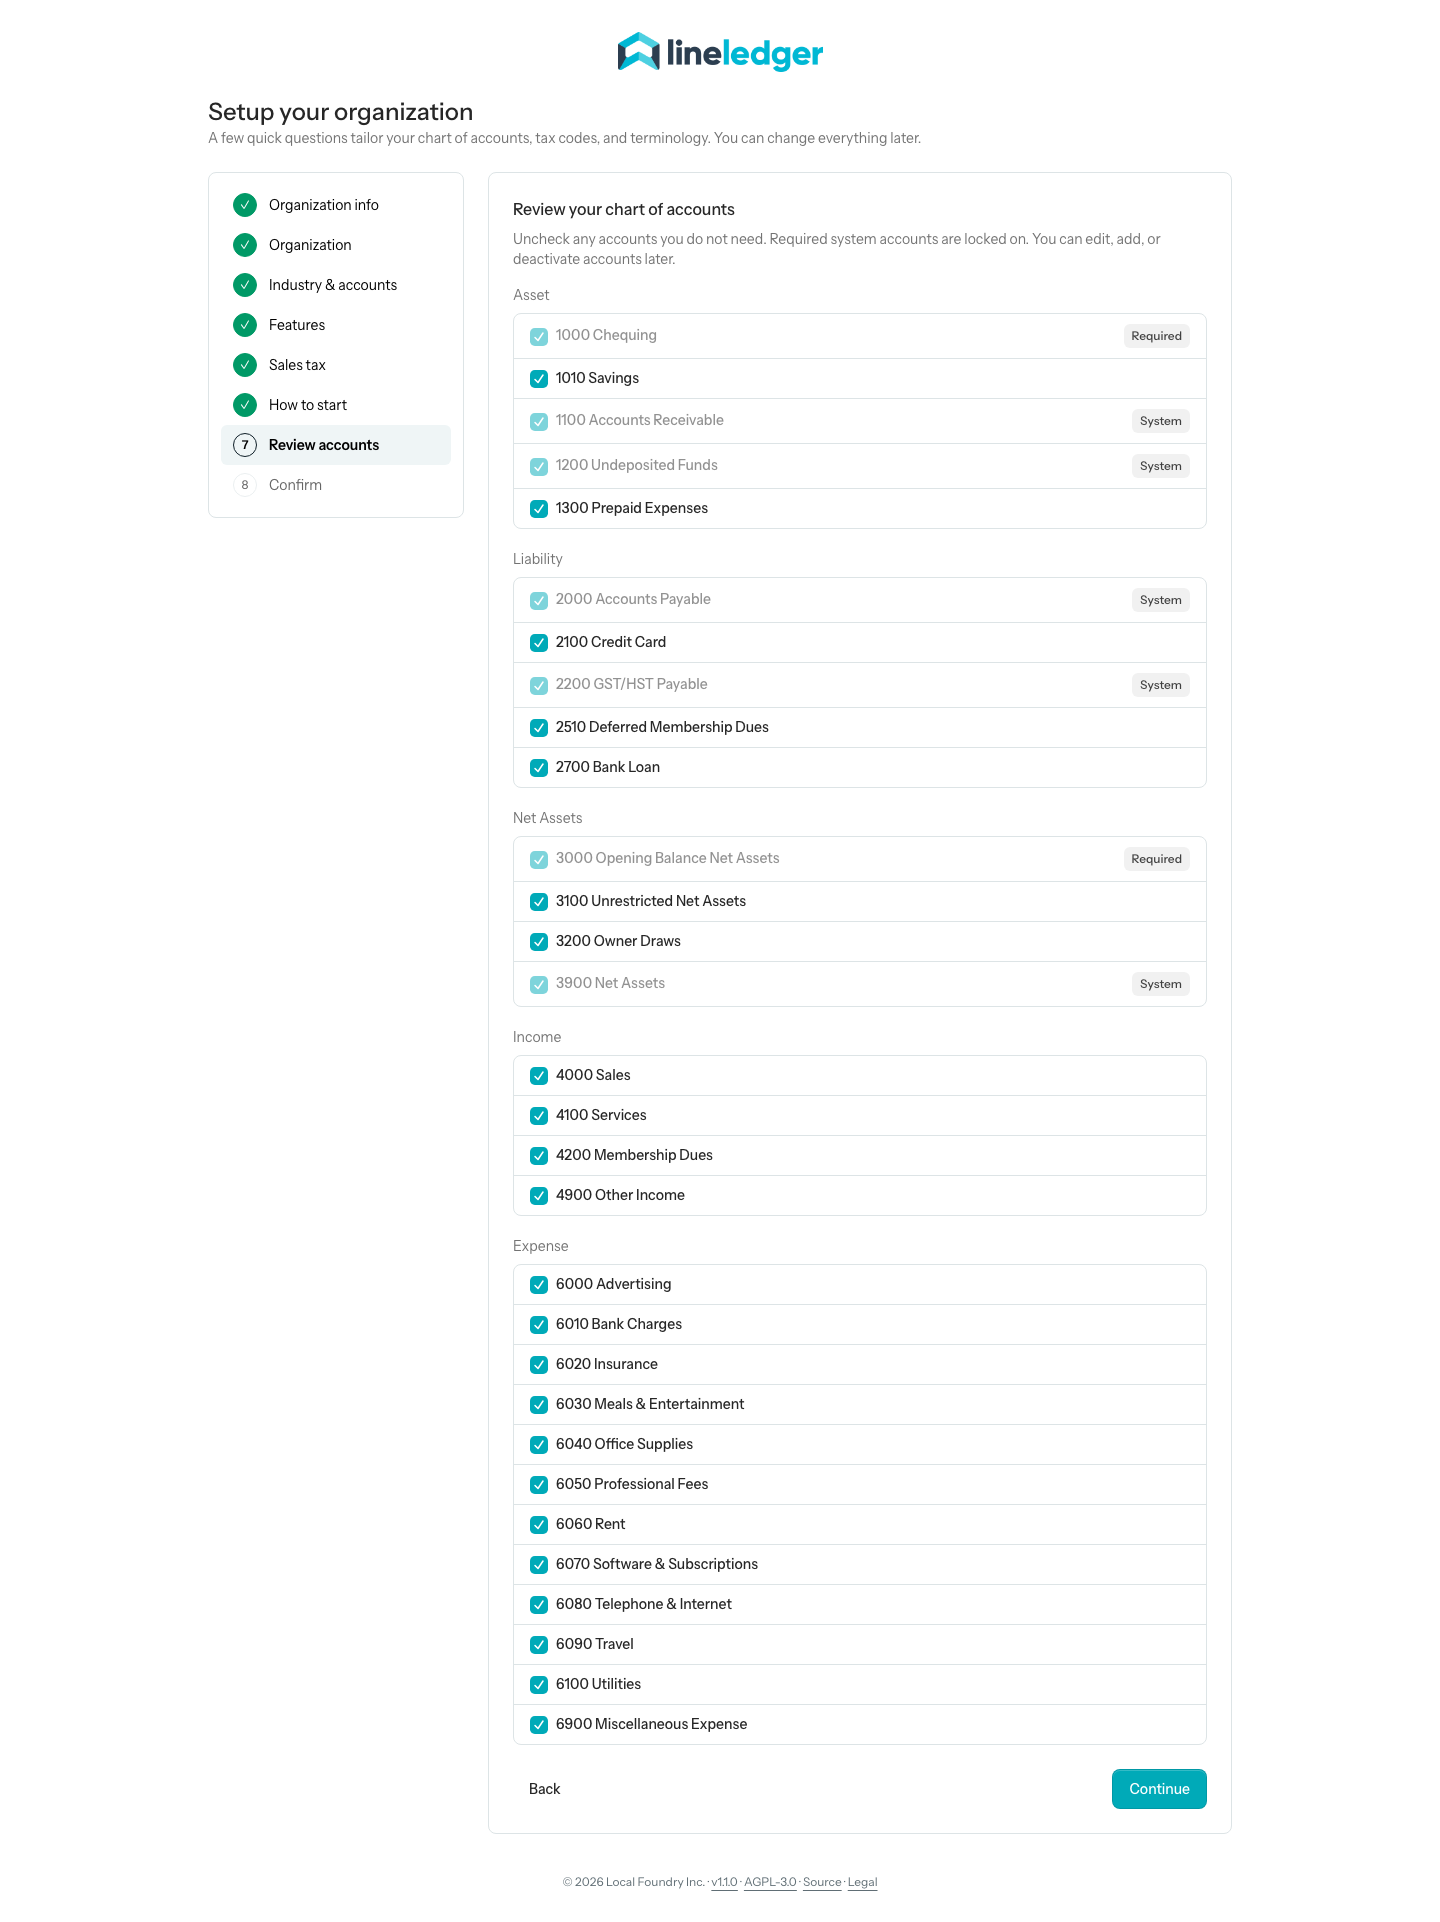
What you can change later
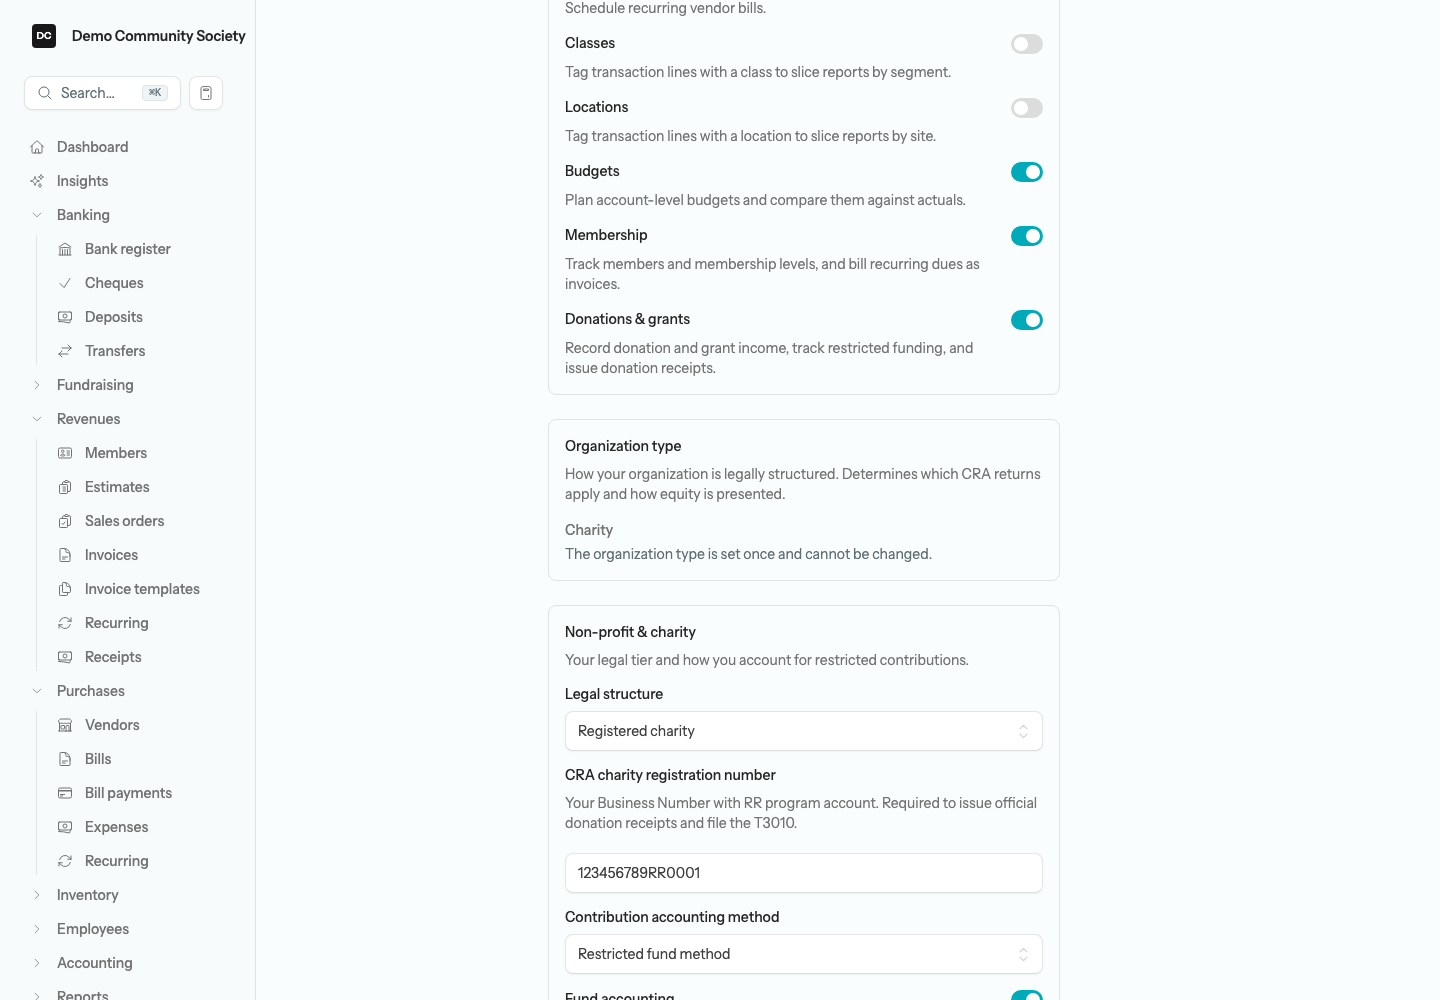
Most of the wizard’s answers are ordinary settings. Under Settings → Organizations you can rename the organization, change its province or state, currency, fiscal year start and timezone, and flip any feature module on or off. The tax number printed on your invoices is edited under Settings → Invoices instead: change it in Tax / GST/HST registration number, and use Show tax number on invoices to print or hide it. The wizard also saved your account numbers on the tax agencies under Settings → Tax codes, and the invoice, estimate and credit memo pages inside LineLedger list an agency’s number whenever that document uses one of its taxes — but changing an agency’s Registration number there does not change the number printed on the forms you send. A non-profit can also change its Legal structure, its CRA charity registration number, and its contribution method — though changing the method only affects new restricted contributions, never entries already posted.
Heads up — Three things are set once. The Country is fixed when the organization is created. The Organization type is too: Settings → Organizations shows it as read-only text with the note “The organization type is set once and cannot be changed,” because it drives your equity labels and CRA filing guidance. The industry you picked only shaped the starting chart and does not appear in settings at all — if you want a different mix of accounts, edit the chart itself under Accounting → Chart of Accounts.
Where to go next
- Opening balances — carry your balances over from a previous system after choosing Start fresh.
- Migrating from QuickBooks — the import that runs when you choose Import from QuickBooks.
- Dashboard — what you see first after Create organization, including the getting-started tips.
- Members — track members and bill recurring dues if you turned on Membership.
- Donations & grants — record contributions and issue receipts if you turned on Donations & grants.
- Funds — track restricted funding against your net-asset classes.
- Settings — revisit any of these choices, except the country and organization type, after setup.