The migration tool brings a QuickBooks company into the app from exported files. It runs as a wizard: a numbered step list on the left, and the current step on the right. You upload one file per step, preview what will be created, and commit before moving on. The run is resumable — leave and come back and it picks up where you left off. The examples below use our sample business, Demo Company Inc.
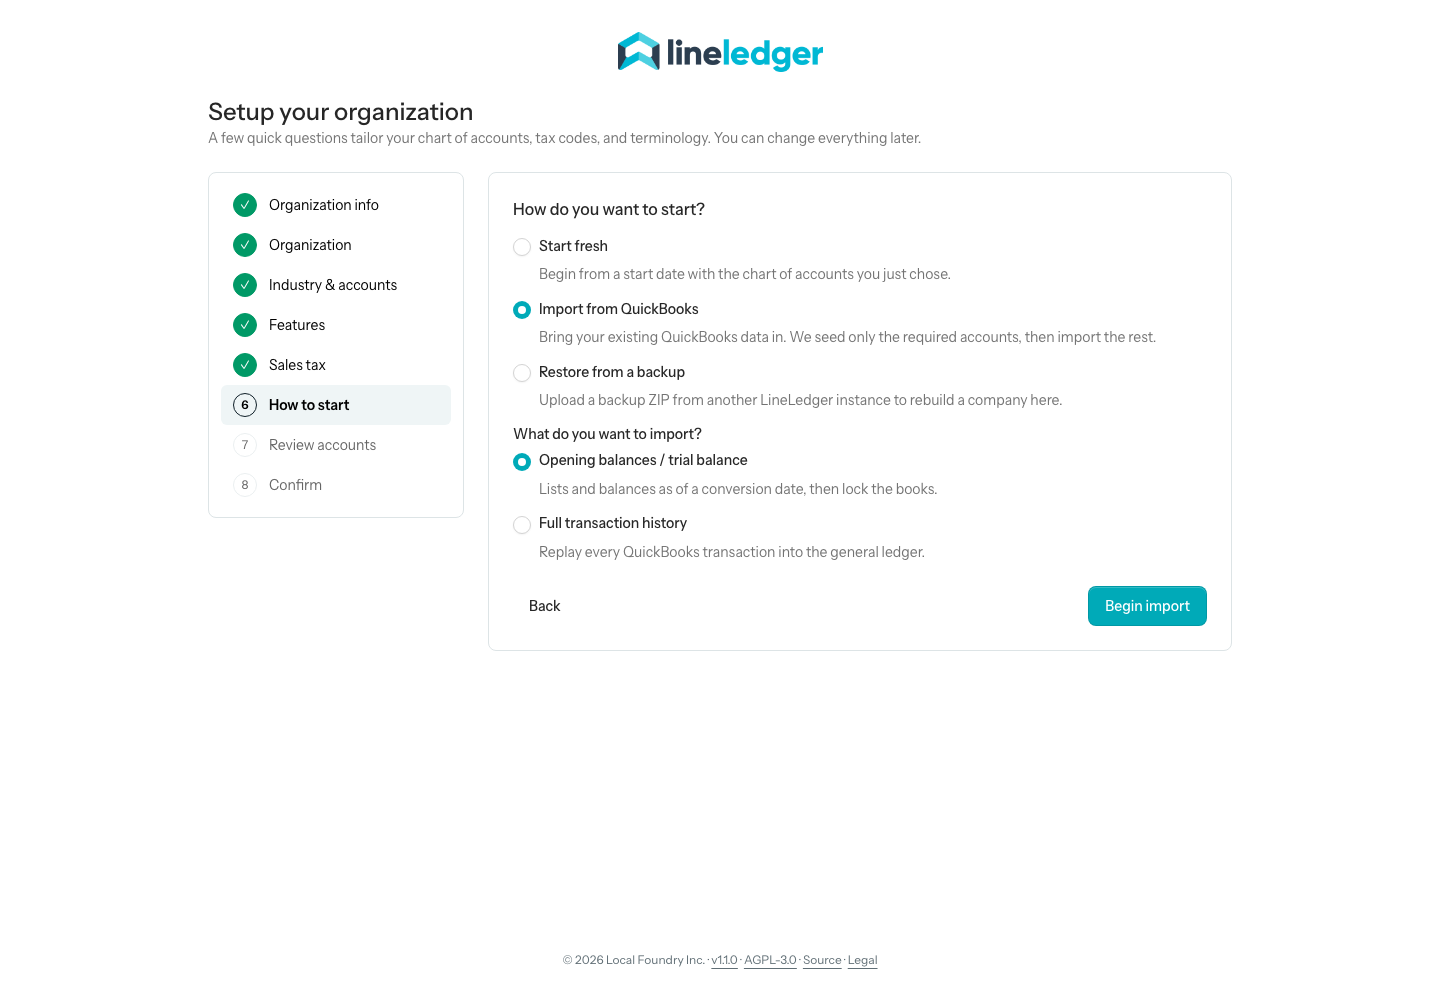
The import starts when you create a new organization: on the setup wizard’s How do you want to start? step, pick Import from QuickBooks and the wizard opens the import right after it creates the organization. While a run is unfinished, the app keeps a link to it under Settings → Company → Import from QuickBooks (the item appears only while an import is in progress) and shows a Finish setting up your company banner on your dashboard with a Continue import button, so you can step away and come back any time.
Importing from QuickBooks vs. entering opening balances
There are two ways to bring old books into a new organization, and they are chosen at different moments. Pick the one that matches where you are:
- Import from QuickBooks — this page. Chosen in the setup wizard when the organization is created. It reads QuickBooks exports (lists, open documents, a trial balance, or the whole journal) and writes them in one guided run, then finalizes it. An Opening balances run always locks the books through its conversion date; a Full transaction history run locks only if you tick the lock box when you finish. Best when you have QuickBooks Desktop exports in hand and want the lists and history loaded for you.
- Opening balances — the workspace under Accounting → Opening balances in the sidebar, available to Owners on every organization, however it was started — including one created with Import from QuickBooks. It holds a draft trial balance you type or import, opening balances per customer and vendor, outstanding cheques and deposits in transit, and inventory and fixed-asset imports, across six tabs — Overview, Trial balance, Customers (AR), Vendors (AP), Outstanding cheques, and Deposits in transit. One opening journal entry follows every save, nothing locks until you select Finalize & lock, and Un-finalize reopens it. Best when you are coming from any other system, or want to enter and adjust balances over time rather than in one sitting. See Opening balances.
Note. There is no menu entry for starting a fresh QuickBooks import on an organization that already exists — the wizard is offered only while you are creating one. If Demo Company Inc. was created with Start fresh, use the Opening balances workspace to carry the balances over. Creating the organization itself is covered in Create an organization.
What the importer does and does not do
The importer moves your chart of accounts, customers, vendors, items, open invoices and bills, inventory, fixed assets, and account balances. What it deliberately does not reconstruct is the link between a customer payment and the specific invoice it paid — QuickBooks’ exported files do not carry that linkage, so the app keeps the import general-ledger-driven rather than guessing which receipt cleared which invoice.
Note — General-ledger driven by design. Balances and journal entries come across faithfully, but payment-to-invoice matching does not. After an import your account totals tie out exactly; individual documents may show as open even where the original was paid. This is intentional — inventing those links from incomplete data would produce wrong history. (The full-history Reconstruct documents option can rebuild invoices and bills and auto-apply payments oldest-first, but that is a best-effort heuristic, not the original linkage.)
Choose an import mode
The mode decides how much QuickBooks history you bring across. On the recommended path you choose it in the setup wizard: once you pick Import from QuickBooks, a second question, What do you want to import?, offers Opening balances / trial balance and Full transaction history. The import then opens inside the wizard already set to that mode.
- Opening balances — the default conversion. You set a conversion date and import a trial balance, chart of accounts, and the customer, vendor, and item lists. History before the conversion date is not loaded; one consolidated opening journal entry lifts the books to that day, and finishing locks the organization through that date.
- Full transaction history — replays every historical journal entry from your QuickBooks general ledger, so every past transaction posts in detail. Use it when you want complete reportable history rather than just a starting point. You can upload several ledger files in one go — split exports for large date ranges are merged on import.
When you come back to an unfinished run from the dashboard or from Settings, the import opens as its own page. There the same two modes are buttons at the top — Opening balances and Full transaction history — and Demo Company Inc. can switch between them: the step list below rebuilds to match and a toast confirms the change. There is no separate save for the mode.
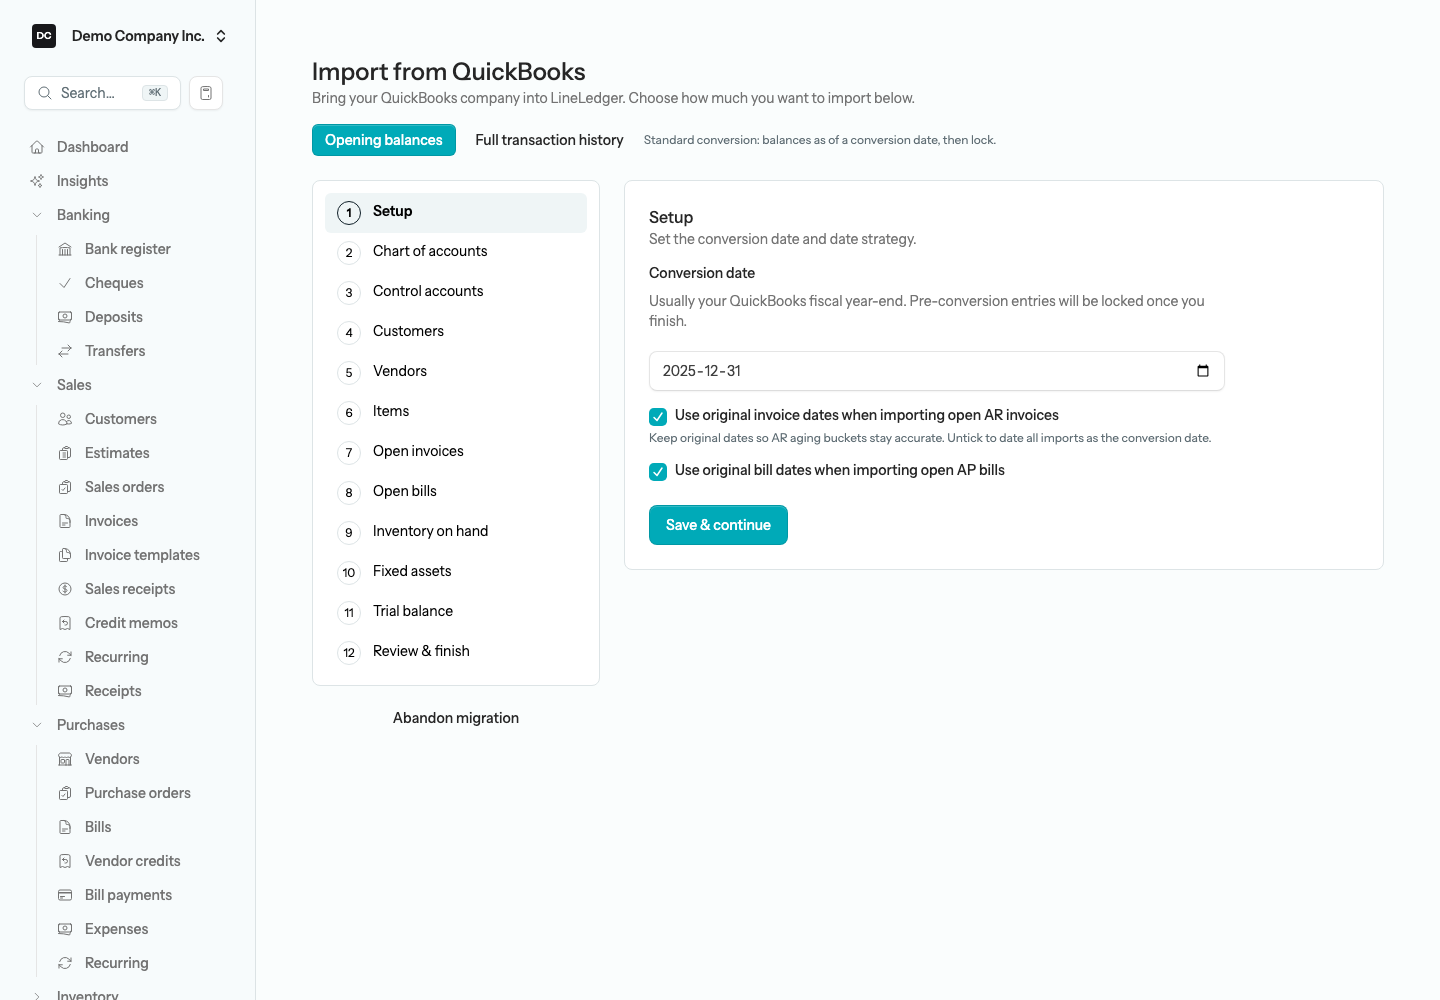
Note. You cannot switch modes once any step after Setup has been committed or skipped — the app shows a warning toast and keeps the current mode. The only way out of the mode you are in is Abandon migration at the bottom of the step list on the standalone page, and that ends the run: the app offers no button or menu to start another one afterwards (see Finishing, locking, and abandoning below). Inside the setup wizard that button reads Finish later instead: it parks the run and takes you to the dashboard, where Continue import reopens it as a page.
Step 1 — Setup
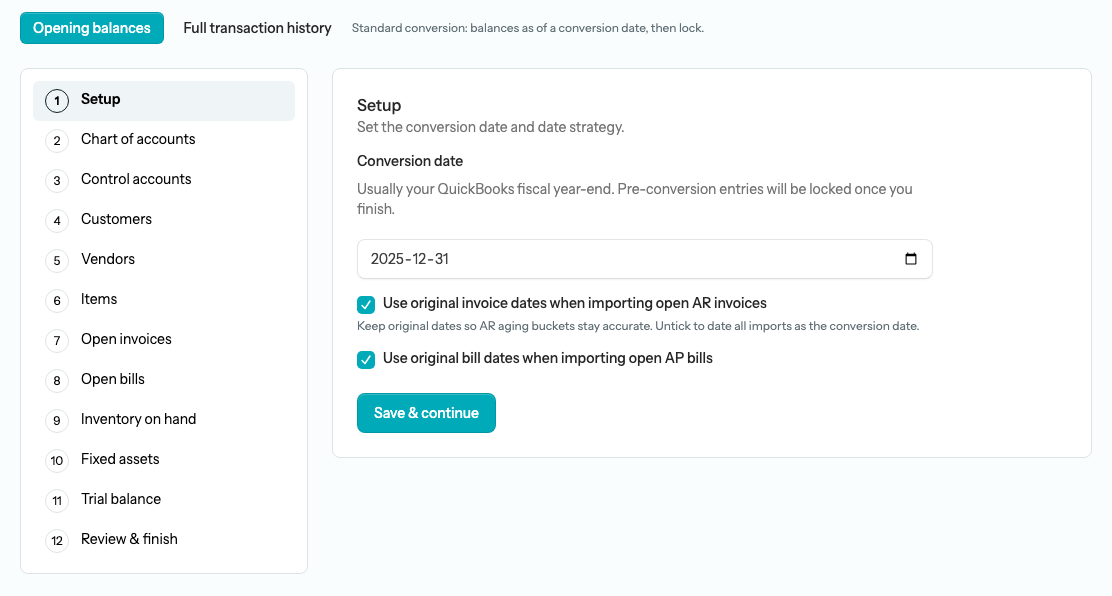
Setup is always the first step, and what it asks depends on the mode. In Opening balances mode it collects the conversion date and the date strategy; in Full transaction history mode it collects an optional history start date and three matching options. Select Save & continue to move on to the Chart of accounts step. A click anywhere in a date field opens the calendar.
To complete Setup in Opening balances mode:
- Confirm the Conversion date — usually your QuickBooks fiscal year-end. The wizard pre-fills it with your most recent fiscal year-end; change it if you convert on a different day.
- Leave “Use original invoice dates when importing open AR invoices” ticked to keep each open invoice on its real date so aging buckets stay accurate. Untick it to date every imported invoice as the conversion day.
- Do the same with “Use original bill dates when importing open AP bills” for open bills.
- Select Save & continue.
In Full transaction history mode the Setup step looks different: instead of a conversion date it offers a History start date (optional) and three checkboxes — Auto-create accounts found in the file but not in the chart, Link transaction names to customers/vendors (on by default), and Reconstruct documents (invoices, bills, cheques, deposits, receipts) where possible. These shape how the ledger replay later in the run handles unknown accounts, names, and document types; see Options worth knowing below. The history start date matters only if you choose to lock the imported history at the end.
Work through the remaining steps
After Setup, work down the step list. The list adapts to your mode — the Items, Inventory on hand, Fixed assets, and Trial balance steps appear only in Opening balances mode, and the Transaction history step appears only in Full transaction history mode, because the replayed ledger already carries that detail.
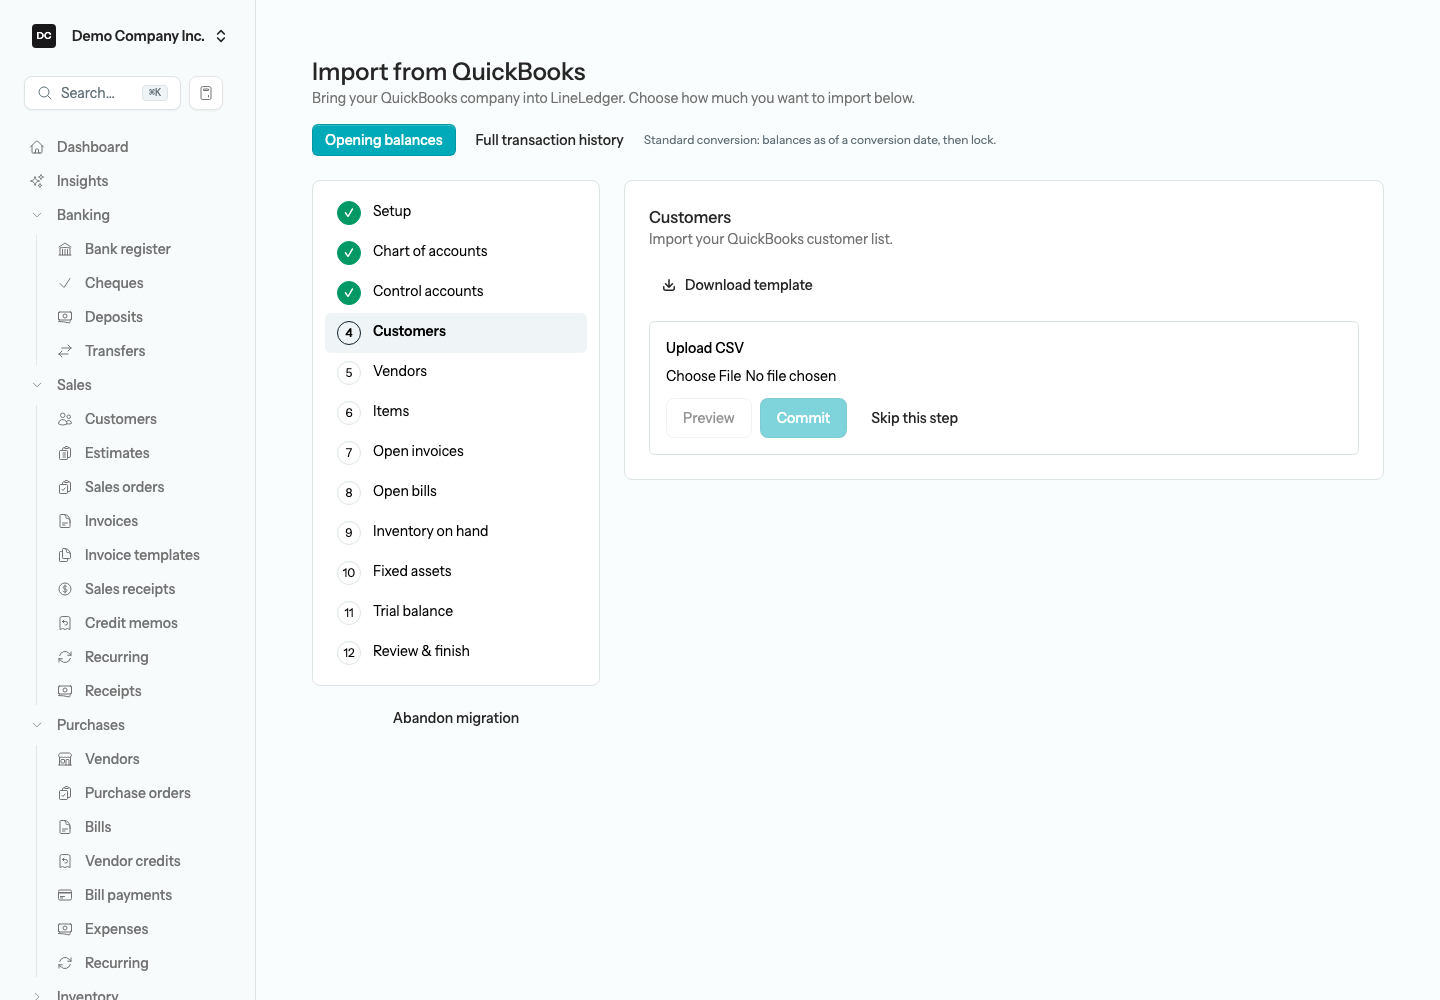
- Move down the step list — Chart of accounts, Control accounts, Customers, Vendors, and so on. Select any step in the list to jump to it; a green check marks the ones you have finished or skipped.
- At each upload step, select Download template, fill it from your QuickBooks export (or upload the QuickBooks list export as-is where the step accepts one — see Templates and previews), choose the file under Upload CSV, then Preview to see what will be created.
- Select Commit to write that step, or Skip this step if it does not apply.
- Finish on Review & finish, where you confirm the totals and finalize the run.
The steps
The wizard adapts the step list to the mode you chose. A typical run moves through:
- Setup — conversion date and date strategy (Opening balances), or history start date and matching options (Full transaction history).
- Chart of accounts — optional; add your QuickBooks accounts on top of the seeded chart. Existing codes are skipped and new ones added. In Full transaction history mode, do not skip this if you plan to reconstruct documents.
- Control accounts — confirm which accounts act as Accounts Receivable, Accounts Payable, Undeposited Funds, Sales Tax Payable, Employee Reimbursements Payable, Inventory Asset, Cost of Goods Sold, Retained Earnings, and Opening Balance Equity.
- Customers and Vendors — import the contact lists.
- Items — Opening balances only, and optional: import products and services with their accounts.
- Transaction history — Full transaction history only: replay every transaction as a balanced journal entry, de-duplicated and reconciled for rounding.
- Open invoices and Open bills — load the unpaid documents outstanding at the conversion date so you have live AR and AP aging.
- Inventory on hand and Fixed assets — Opening balances only: seed stock quantities and costs, and the asset register with cost and accumulated depreciation.
- Trial balance — Opening balances only: post the remaining account balances so the books open in balance.
- Review & finish — confirm the totals and finalize the run.
Tip. On the Control accounts step you can point a role at any imported account. Choosing an account whose type does not match the system role re-types it on the spot — pick an Income account to fill the Accounts Receivable role, for example, and the app converts that account to Accounts Receivable so it can act as the AR control. Useful when the QuickBooks chart had an off-type account you want to promote. Select Keep defaults to accept the seeded control accounts unchanged.
Full transaction history: replaying your ledger
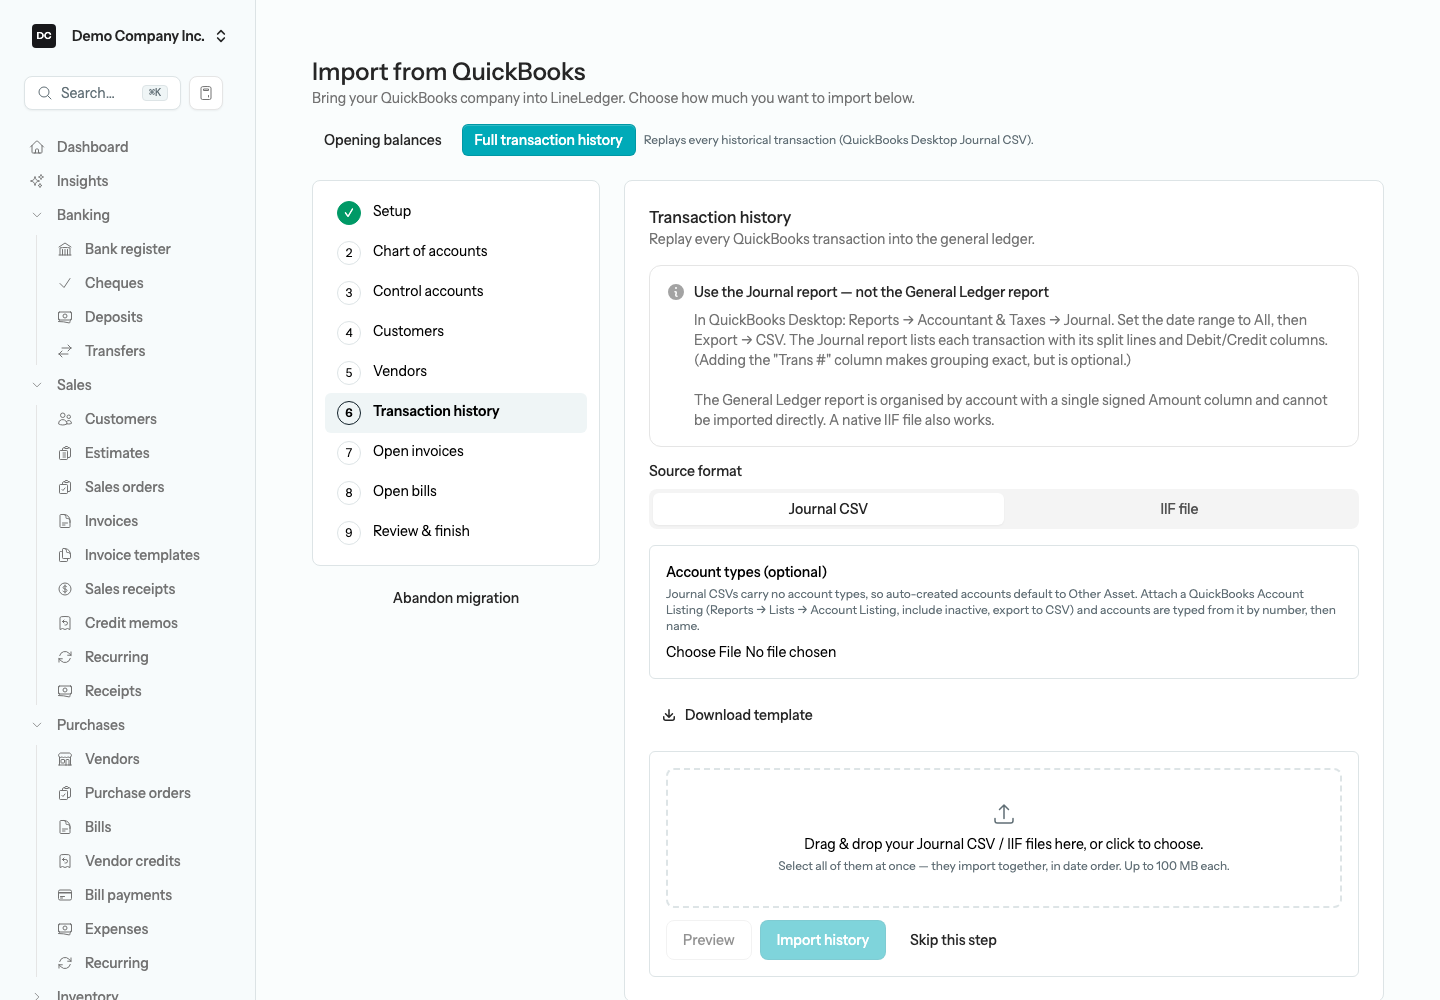
In Full transaction history mode the Transaction history step replaces the opening-balance steps. QuickBooks usually exports the ledger as one file per year (or per quarter for big companies), so the upload accepts several files at once and merges them into a single replay. The replay runs as a background job, so a queue worker must be running; the page shows Replaying transaction history… with a running count and updates automatically, and large files keep running even if you navigate away.
Heads up — Import your chart of accounts first. If Reconstruct documents is on but you skipped the Chart of accounts step, the Transaction history step shows this warning. Without a typed chart, accounts the replay creates are untyped (Other Asset) and every invoice, bill, receipt, cheque, and deposit falls back to a plain journal entry. Go back and import the QuickBooks Account Listing on the Chart of accounts step — it carries the account types — or turn off document reconstruction in Setup.
Note — Use the Journal report — not the General Ledger report. In QuickBooks Desktop choose Reports → Accountant & Taxes → Journal, set the date range to All, then Export → CSV. The Journal report lists each transaction with its split lines and separate Debit and Credit columns, which the importer needs; adding the “Trans #” column makes grouping exact but is optional. The General Ledger report is organised by account with a single signed Amount column and cannot be imported directly. A native IIF file also works.
To replay your transaction history:
- On the Transaction history step, choose the Source format — Journal CSV or IIF file.
- If you turned on Auto-create accounts and chose Journal CSV, an Account types (optional) box appears. Attach a QuickBooks Account Listing there (Reports → Lists → Account Listing, include inactive, export to CSV) so auto-created accounts are typed from it by number, then name, instead of defaulting to Other Asset. IIF files already carry account types.
- Drag every exported file into the drop zone, or click it to choose them — select them all at once and they import together, in date order. Up to 100 MB each.
- Select Preview to check the transaction counts, then Import history. Each historical journal entry posts on its original date. A transaction that is already in the books (from an earlier file or a re-run) is skipped, and a difference of a cent or two within a transaction is absorbed into a Conversion Rounding Variance account so every entry balances. If Reconstruct documents is on, recognised transaction types become real documents.
The trial balance: opening the books in balance
In Opening balances mode the final upload is the Trial balance. Its template has three columns — account_code, debit, credit. The importer matches each row to an account by code, then posts a single journal entry on the conversion date that brings those accounts to their QuickBooks balances. Any difference goes to Opening Balance Equity so the entry always balances.
To import the trial balance:
- Select Download template and fill it from your QuickBooks trial-balance export — one row per account, with the amount in either the debit or the credit column, never both.
- Upload the file and select Preview. The preview lists each matched account with its debit or credit, and flags any code it cannot find in your chart.
- Select Commit. The importer posts the opening entry; zero-balance rows are skipped, and any leftover difference lands in Opening Balance Equity.
Note — GL impact. One journal entry dated the conversion date: every accepted row is posted exactly as your file states it — a debit to the account for a debit balance, a credit for a credit balance — and the residual is debited or credited to Opening Balance Equity so the entry balances. Nothing dated before that day exists in the ledger.
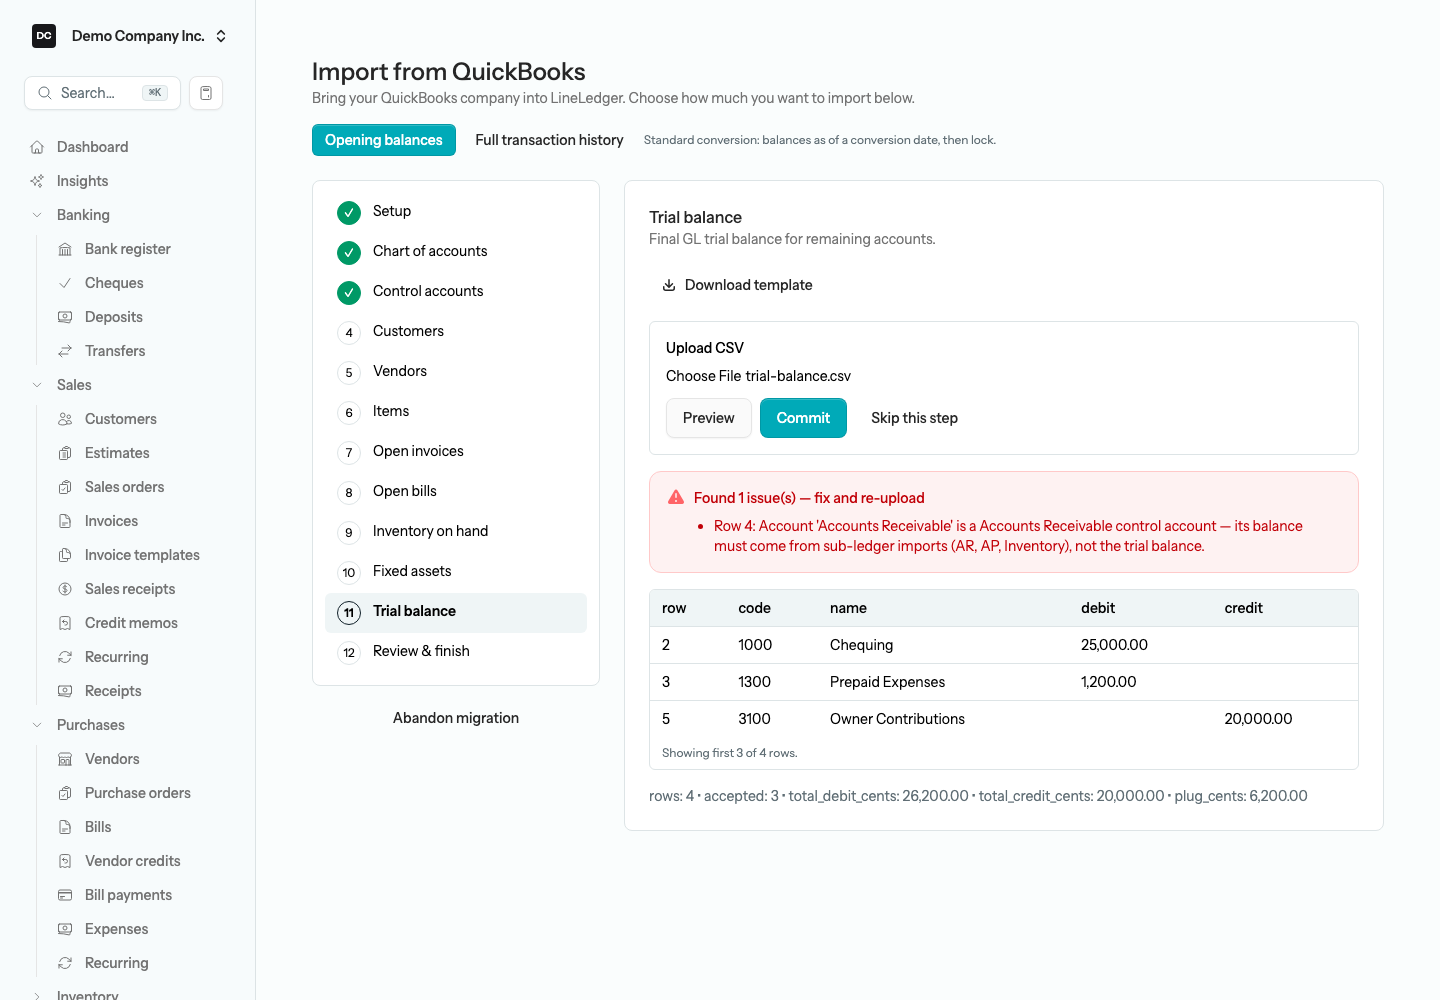
Note. Accounts Receivable, Accounts Payable, and Inventory rows are rejected on the trial balance because of their account type, and any account whose name contains “accumulated depreciation” is rejected too — the preview explains why for each one. Their detail has to come through the dedicated importers (open invoices, open bills, inventory on hand, fixed assets) so each customer, vendor, item, and asset stays tied to its balance. The depreciation check is by name only, so leave a contra-asset with a different name (say “Accum. Dep. — Vehicles”) off the trial-balance file yourself, or it would be counted twice once the Fixed assets step posts it.
Options worth knowing
- Use original dates — preserve each open invoice or bill’s real date instead of dating it to the conversion day, so aging stays accurate. Set per document type on the Setup step; both are on by default.
- Auto-create accounts found in the file but not in the chart — let the replay add an account on the fly when a file references one that does not exist yet. For Journal CSVs, attach an Account Listing on the Transaction history step so those accounts are typed correctly; otherwise they default to Other Asset and should be reviewed. Leave it off to require a matching chart first.
- Link transaction names to customers/vendors — link each replayed transaction to the customer or vendor whose name matches the transaction’s Name, ignoring upper and lower case. The name is the only thing compared — there is no reference-number match — so a name spelled differently from your contact list stays unlinked.
- Reconstruct documents — turn recognised transaction types into real documents during the replay — invoices, credit memos, customer receipts, bills, bill payments, deposits, and cheques — with account-level lines; everything else stays a plain journal entry. Receipts and payments are auto-applied oldest-first. Each rebuilt invoice, credit memo, receipt, deposit line, bill, and bill payment is tied to the customer or vendor named on the transaction — an existing contact with that name, or a new one the replay creates. Cheques only match a contact that already exists and never create one, so importing your customer and vendor lists first still gives the cleanest result. A rebuilt cheque leaves off any line coded to Accounts Receivable or Accounts Payable (its journal entry still holds that line), so a cheque that only settles a receivable or payable — a customer refund, say — is not rebuilt and stays a plain journal entry.
Templates and previews
Each upload step offers a downloadable CSV template so your file lines up with what the importer expects. Preview never writes anything — it shows row counts and any warnings so you can fix the file and re-upload. The preview table shows up to 200 rows and 100 issues, with a Showing first … of … rows note when there are more.
Commit is what actually writes that step to your books, and what happens when the file has errors depends on the step. Trial balance, Inventory on hand, and Fixed assets are all-or-nothing: if any row has an error, nothing is written. Chart of accounts, Customers, Vendors, Items, Open invoices, and Open bills skip only the rows with errors and save every valid row. On every step the toast then reads Import has errors — nothing was saved and the step stays open — but on those six steps the valid rows are already in your books despite what the toast says, and the summary line under the table (created: …) shows how many went in. The exception is an issue that begins Row 0: Import aborted. That commit hit an error it could not skip — an invoice or bill number already in your books, or a date it cannot read, such as 31/12/2025 — and was rolled back whole, so nothing from the file was saved, whatever the created count says.
Heads up — After a commit with errors, re-commit only the rows that failed. Commit once Preview reports no issues and you avoid this entirely. If a commit on Chart of accounts, Customers, Vendors, Items, Open invoices, or Open bills does report errors, fix the rejected rows and commit a file that holds only those rows — not the whole file again. Rows that were already saved are harmless to repeat for accounts (existing codes are skipped), customers and vendors (matched by name and merged), and items with a SKU (skipped), but an item without a SKU is created a second time, and an invoice or bill number that is already in your books makes the whole commit fail with an error.
Upload the QuickBooks export as-is
Three steps read QuickBooks’ own list exports directly, so you do not have to retype them into the template. Chart of accounts accepts an Account Listing export (Account, Type, Accnt. #, Description); Customers and Vendors accept a Customer List or Vendor List export. These readers skip the report preamble and padding columns QuickBooks adds, strip a byte-order mark, and convert Windows-1252 text to UTF-8 — as does the Transaction history step.
Open invoices also accepts QuickBooks’ Open Invoices report as-is, recognised by its Type and Open Balance columns. The app nets each customer’s credits (rows with a negative open balance, such as unapplied payments) against that customer’s invoices, oldest first, so a customer whose invoices and payments cancel out imports nothing; and it creates any customer that is not in your list yet. The template layout, by contrast, needs every customer to exist already — import Customers first.
No other upload gets that cleanup. The Items, Open invoices (in the template layout), Open bills, Inventory on hand, Fixed assets, and Trial balance steps read the file exactly as it is, so it has to be UTF-8 without a byte-order mark and laid out exactly like its template. Excel makes that awkward: its “CSV UTF-8 (Comma delimited)” format starts the file with a byte-order mark that hides the first column, and its plain “CSV” on Windows is not UTF-8, so names with accents (Café, Montréal) are not read correctly. Export from Google Sheets (File → Download → Comma-separated values) or from LibreOffice with the Unicode (UTF-8) character set instead. If a byte-order mark does slip in, on most of these steps Preview reports a missing required column, but the first column on Items is the optional SKU, so Preview shows no error — the SKU column is just blank — and every item is imported without its SKU.
Finishing, locking, and abandoning
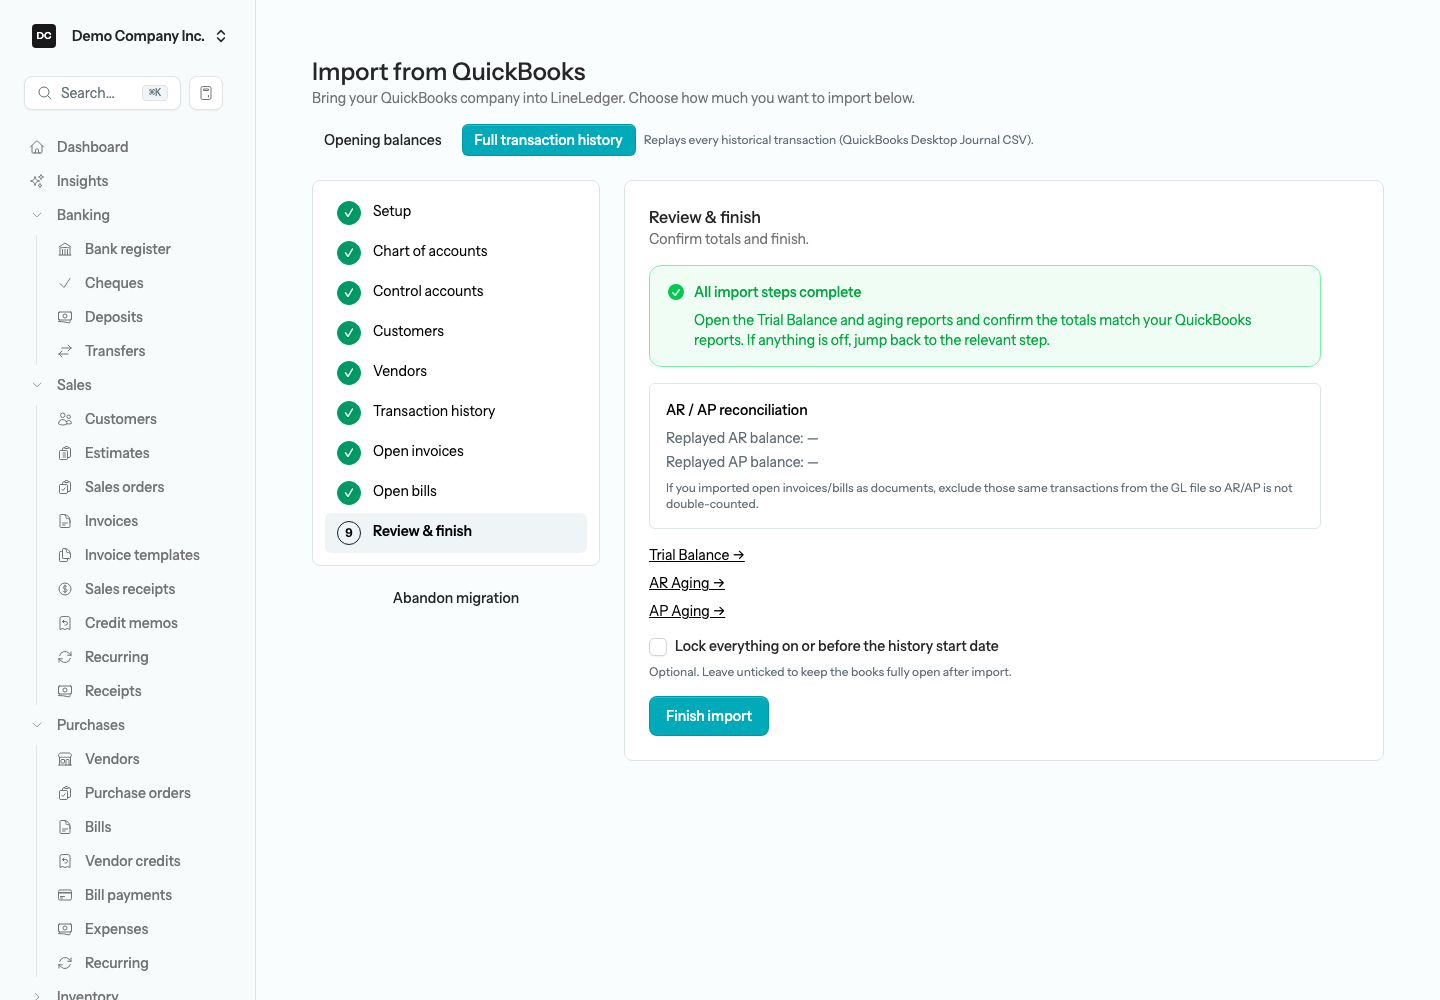
The Review & finish step links you to the Trial Balance, AR Aging, and AP Aging reports, each opened as of the conversion date, so you can confirm the totals match QuickBooks before you commit to the conversion. If anything is off, select the relevant step in the list and redo it.
Check AR and AP before you finish
In Full transaction history mode the Review & finish step also shows an AR / AP reconciliation panel: the Replayed AR balance and Replayed AP balance from the general ledger alongside the Open invoices total and Open bills total from the open-document steps. If you loaded open invoices or bills as documents, exclude those same transactions from the journal file — otherwise the replay posts them a second time and AR or AP is double-counted. The two figures on each line should agree before you finish.
- In Opening balances mode, select Finalize & lock. The step warns you first — Finalize will lock the books — because this sets the organization’s lock date to the conversion date, so no new postings dated on or before it will be accepted.
- In Full transaction history mode, select Finish import. Locking is optional — tick “Lock everything on or before the history start date” only if you want to freeze the imported history; leave it off to keep the books fully open. The lock uses the History start date you entered in Setup, so if you left that blank, nothing is locked.
Either way the app confirms Conversion complete and returns you to the dashboard. Owners and Admins can move the lock date later from the Close the books card under Settings → Organizations → Edit organization — see Accounting.
Heads up. Each step commits as you go, so the wizard is not all-or-nothing. If you select Abandon migration in an Opening balances run, the data you already imported stays in the organization; in a Full transaction history run, the replayed transactions and any reconstructed documents are removed. Either way the run is over: the app returns you to the dashboard, the Continue import banner and the Import from QuickBooks item under Settings disappear, and no button or menu starts a new run. To begin again, type the import page’s address into your browser yourself — your organization’s address followed by /import-from-quickbooks, such as …/demo/import-from-quickbooks for Demo Company Inc. — which opens a fresh run; or carry the balances over in the Opening balances workspace instead. Abandon migration is only on the standalone page — inside the setup wizard the button is Finish later, which keeps the run.
After the import
- Run each bank account’s first reconciliation using the QuickBooks statement-side balance as the beginning balance — see Banking.
- Review any auto-created accounts typed Other Asset on the chart of accounts — see Accounting.
- If you skipped the import, or need to adjust a balance after finishing, Owners can carry balances over or correct them in the Opening balances workspace — see Opening balances.
Reports tied to this area
- Trial Balance — as of the conversion date, to prove the books open in balance against your QuickBooks trial balance.
- AR Aging and AP Aging — as of the conversion date, to confirm the open invoices and bills you loaded match QuickBooks.
- Reports are described in Reports.