Note — In testing (beta). Native Canadian payroll is in testing (beta) and not generally available yet. Most organizations run payroll in their existing provider and post each pay run to LineLedger as a journal entry.
Payroll runs Canadian payroll end to end: you set up each employee once, run pay on a schedule, and the app calculates every statutory deduction, posts the wages to your books, writes the cheques, and produces a pay statement for each employee. Around the pay run it also tracks hours, vacation, sick and other time off, and lets staff request leave and log time from the employee portal. Each remitting period it tells you what to send the CRA and records the payment; at year end it produces T4s and the rest. Payroll is a Canada-only feature and is turned off until you enable it. The examples below use our sample business, Demo Company Inc.
Turning payroll on
Payroll is off by default. Switch it on for a Canadian organization and a Payroll group appears in the sidebar with Overview, Employee setup, Staff calendar, Pay runs, and a Reports section underneath (Remittance history, PD7A, Workers’ comp, T4 slips, Record of Employment, and Calculation check). The rest of the payroll reports — Payroll register, Revenu Québec remittance, T4A and RL-1 slips — sit in the Employees & Payroll group of the Reports page. The setup screens live under Settings → Payroll, with Pay schedules and Time-off policies indented beneath it.
To enable payroll:
- Open Settings → Organizations and select your organization to open its edit page.
- Scroll to the Features section and turn on Payroll.
- Select Save. The Payroll section now shows in the sidebar, and the full set of system payroll accounts is created for you: Wages & Salaries Expense and the employer-cost expense accounts, a payable for every deduction (CPP, EI, income tax, the Quebec set, RRSP, garnishments, benefits), Vacation Payable, Banked Time Payable, and Net Pay Clearing — the account that holds each employee’s net pay between posting the run and writing the cheque.
Note. The Payroll toggle only appears on Canadian organizations — the calculations, remittances, and slips are built around the CRA’s rules. United States and United Kingdom payroll are not part of the app today.
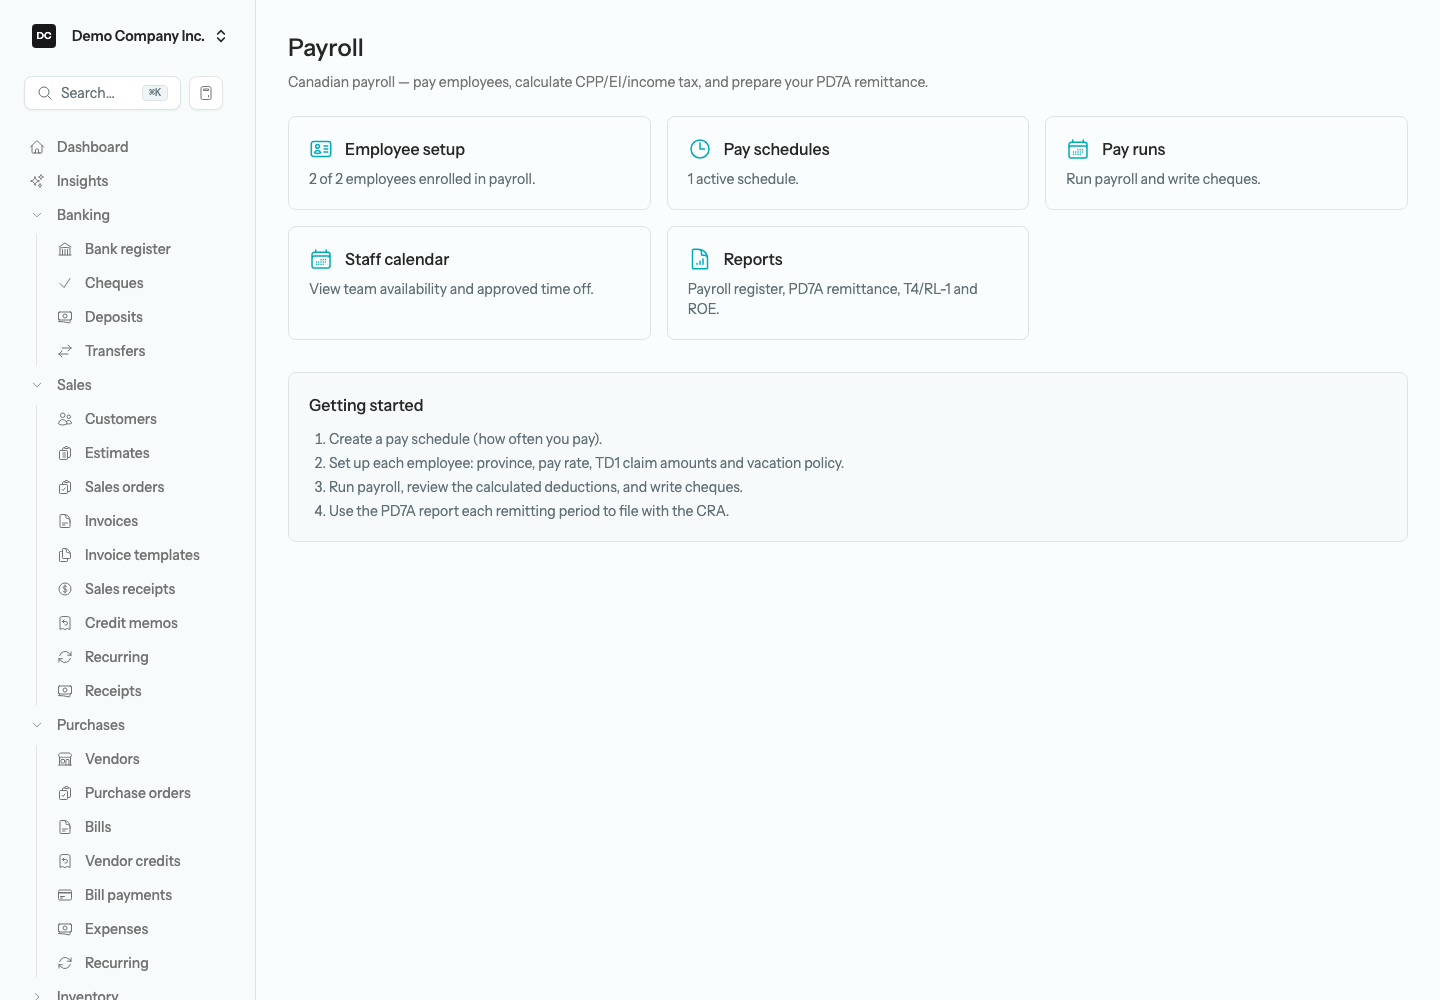
The Overview page (Payroll → Overview) is the hub. It tracks how many of your employees are enrolled in payroll and how many pay schedules are active, and lays out the order to set things up: create a schedule, set up each employee, run payroll, then remit. Work through it in that order the first time — after filling in the settings below.
Payroll settings
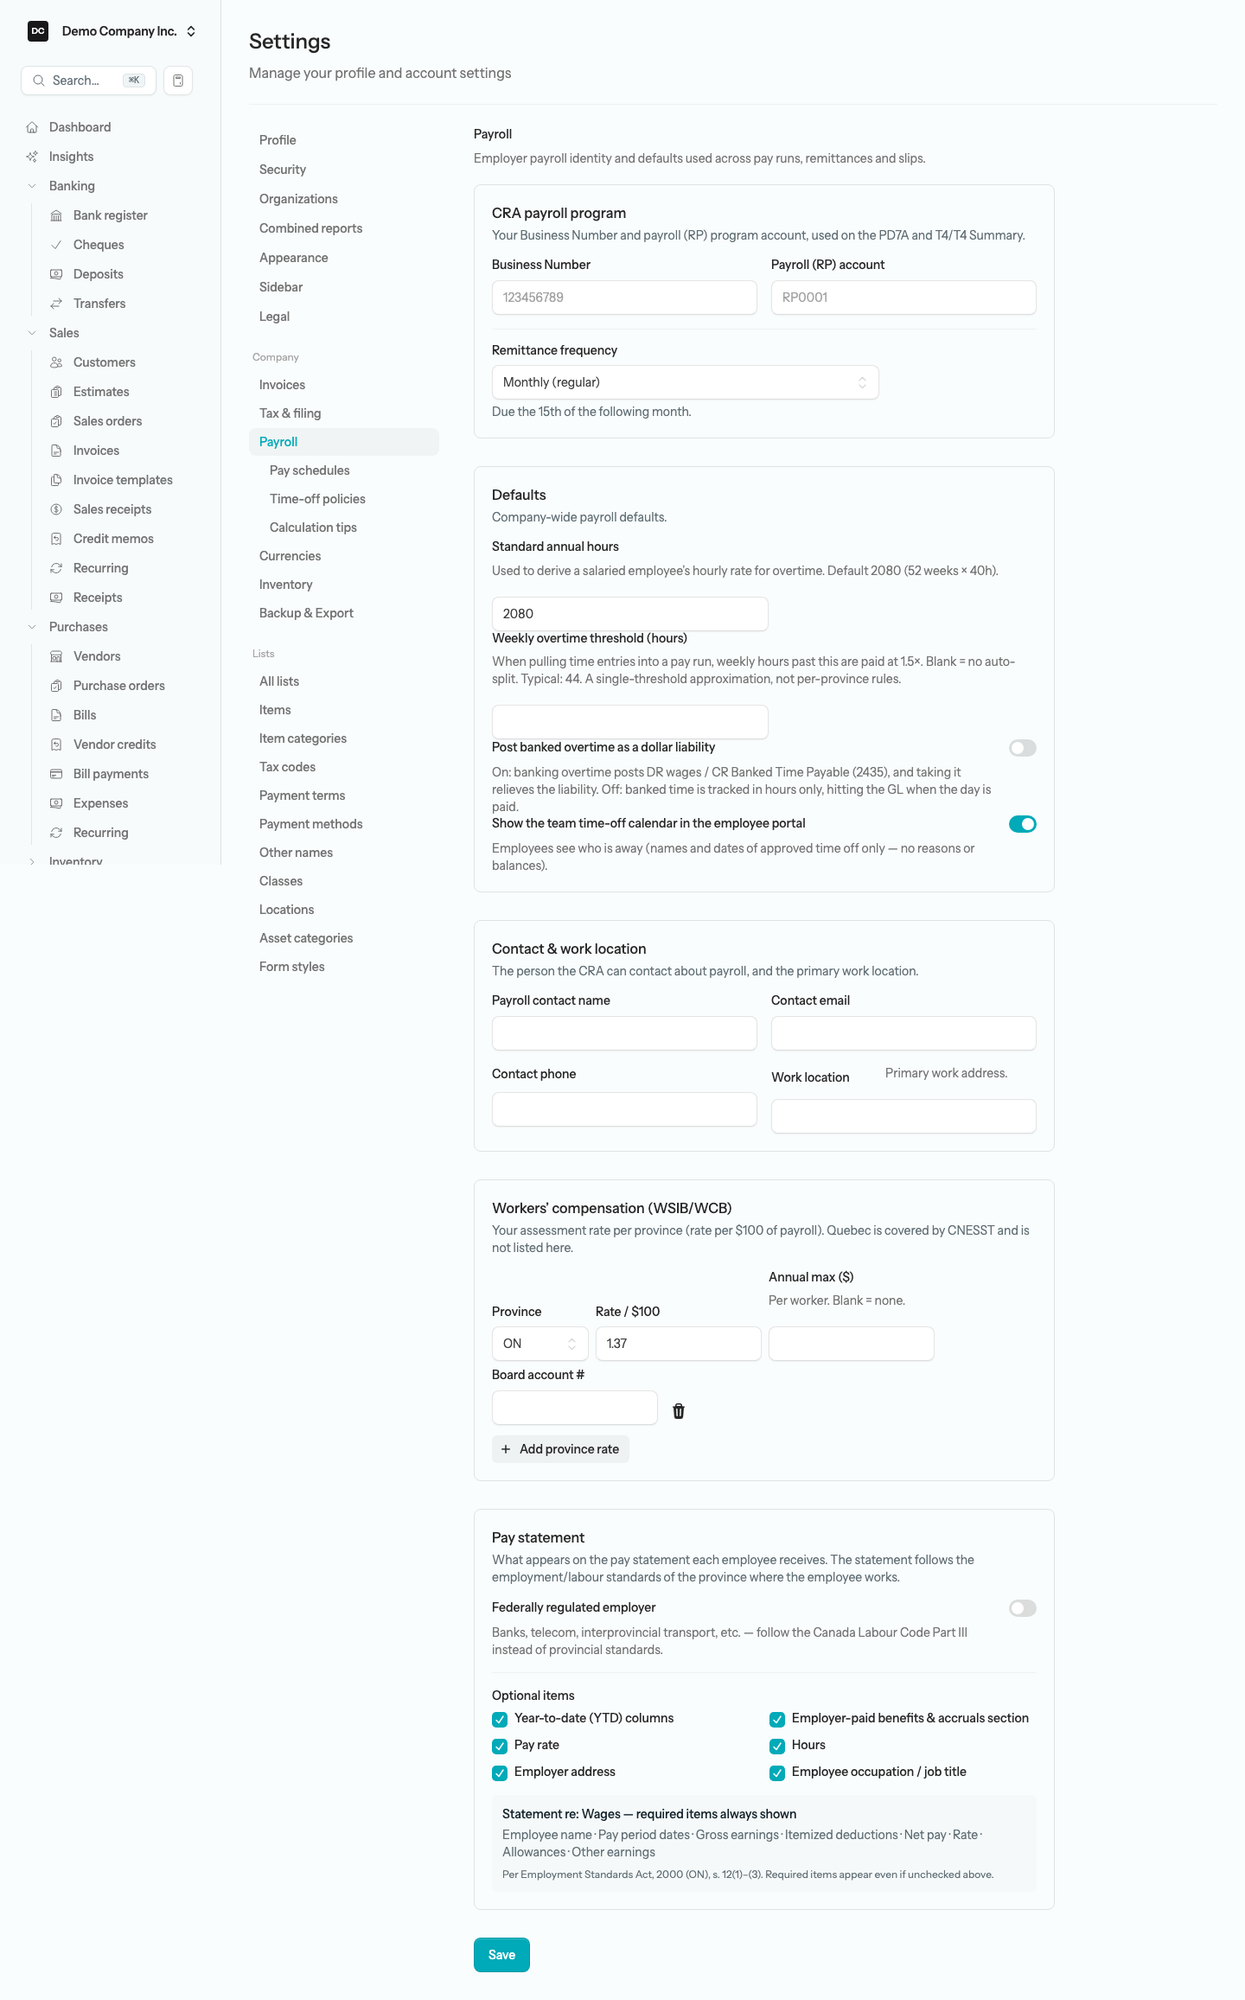
Settings → Payroll holds the employer-wide details that every pay run, remittance, and slip reads. Fill it in before your first run; the CRA numbers in particular are printed on the PD7A and the T4 Summary.
- CRA payroll program — your Business Number and Payroll (RP) account, and your Remittance frequency: Quarterly, Monthly (regular), Accelerated — Threshold 1 (twice monthly), or Accelerated — Threshold 2 (up to 4× monthly). The frequency sets the remitting periods on the PD7A and Revenu Québec reports, and a hint under the field spells out when each period is due (a monthly remitter pays by the 15th of the following month).
- Defaults — Standard annual hours (2080 by default, 52 weeks × 40 hours; used to derive a salaried employee’s hourly rate for overtime); Weekly overtime threshold (hours), so weekly hours past it are paid at 1.5× when you pull time entries into a pay run (blank means no automatic split; 44 is typical); Post banked overtime as a dollar liability, which posts banked hours to Banked Time Payable as they are earned rather than only when they are taken; and Show the team time-off calendar in the employee portal, on by default — employees see names and dates of approved time off only, never reasons or balances.
- Contact & work location — the Payroll contact name, Contact email, and Contact phone the CRA can reach, and your primary Work location.
- Workers’ compensation (WSIB/WCB) — one row per province with the Province, Rate / $100 of payroll, an optional Annual max ($) per worker, and your Board account #. Select Add province rate for each province you employ people in. Quebec is covered by CNESST instead, set on the organization (see Quebec payroll below).
- Pay statement — what each employee’s statement shows; see Pay statements below.
Select Save at the bottom. Two setup screens — Pay schedules and Time-off policies — are indented under Settings → Payroll, and Calculation tips opens the Calculation check report.
Create a pay schedule
A pay schedule says how often you pay — weekly, bi-weekly, semi-monthly, or monthly. It does more than set a calendar: the frequency tells the app how to annualize each pay cheque so CPP, EI, and income tax come out right. Set up one schedule for each pay cadence you run. Demo Company Inc. pays on a single Bi-weekly schedule.
To create a pay schedule:
- Open Settings → Payroll → Pay schedules — or use the Pay schedules card on the Payroll overview — and select New schedule.
- Give it a Name (for example “Bi-weekly”) and choose the Frequency.
- Set the Anchor period end date — the end of any one reference pay period; the app projects future periods from it.
- Optionally set Pay date offset (days after period end) — how many days after a period closes that payday falls — and leave Active on.
- Select Save.
Set up an employee for payroll
Every employee you pay needs a payroll profile — the province they work in, their pay rate, the claim amounts from their TD1 forms, a vacation policy, and any time-off types they earn. The app reads all of it each pay run, so you only enter it once. Employees come from the Employees area; here you enrol them in payroll. On the Employee setup list, an employee without a profile shows Set up and one with a profile shows Edit.
To set up an employee:
- Open Payroll → Employee setup and select Set up next to the employee.
- Under Identity, enter the Social Insurance Number, date of birth, and hire date. Leave the Termination date blank until they leave — see When an employee leaves below.
- Under Pay, choose the Province of employment, a Pay schedule, and the Pay basis — Salary, Hourly, or Commission — then the annual salary, or the hourly rate and default hours per period (commission-only staff are paid from commission earnings you add on the run).
- Under Tax credits (TD1), enter the Federal claim amount and the Provincial claim amount from the employee’s TD1 forms — or select Use current basic amounts to fill in this year’s basic personal amounts. Add an Additional tax per pay if they have asked for extra withheld.
- Under Vacation & posting, pick a Vacation policy — Accrue to liability or Pay on every cheque — a Vacation rate (%) (4% by default), and a Time-off approver — the person emailed when this employee submits a leave request from the portal (leave it blank to email everyone with Payroll access). The approver does not limit who can decide: anyone with Payroll access can approve or deny the request. Leave Active for payroll on.
- Under Time off, select Assign policy for each time-off policy the employee earns and give it an Opening balance, so their vacation, sick, or personal time starts from the right number. Current balances shows what they have accrued and used so far.
- Optionally, under Banked overtime, turn on Allow banking overtime so the employee can bank overtime as paid time off instead of being paid it out. Enter the Written agreement date — employment standards require a written agreement, and the setup will not save without it — and leave the Bank rate on the province’s default (1.5× in most provinces, 1.0× in Alberta and Yukon) unless your agreement says otherwise. New Brunswick does not allow banking, so the switch does not appear there.
- Select Save payroll setup.
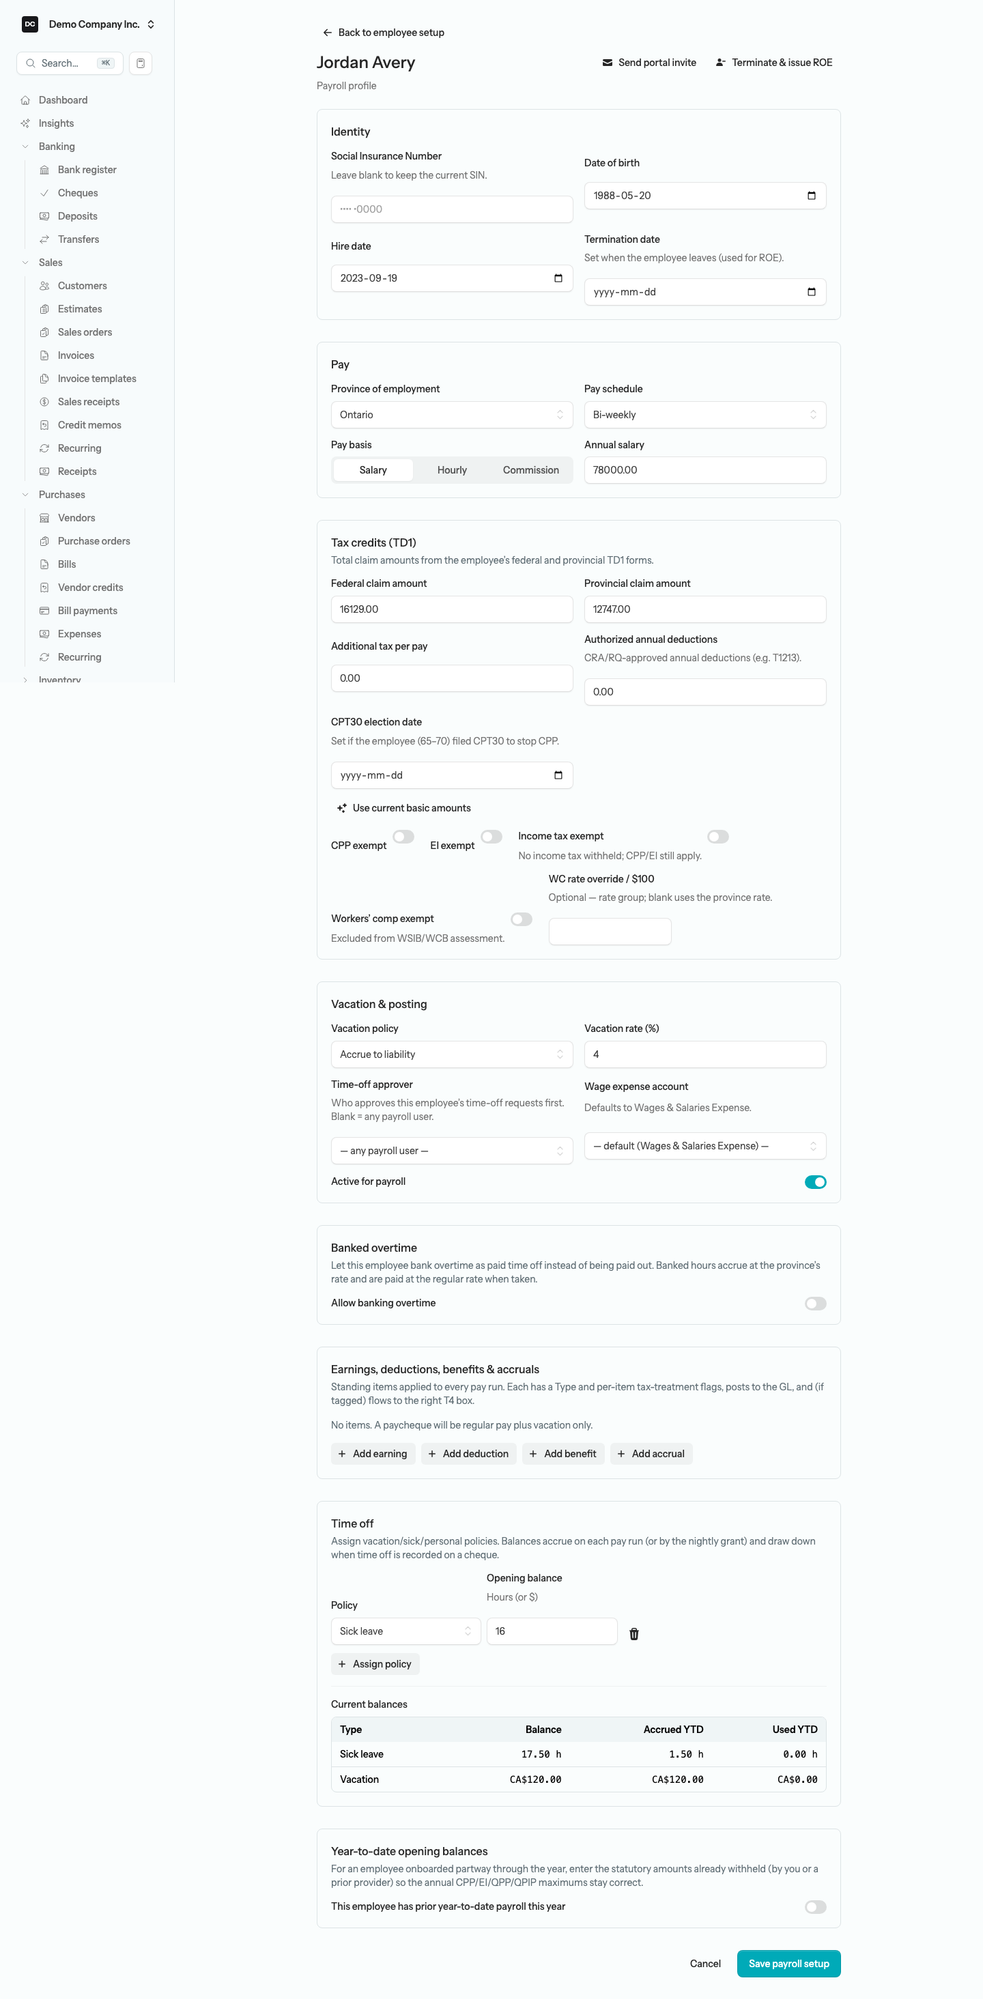
Tip — Exemptions and special cases. Most employees need none of these. If one is genuinely exempt, turn on CPP exempt (QPP exempt in Quebec), EI exempt, or Income tax exempt (no tax withheld; CPP and EI still apply) on the Tax credits (TD1) card and the app stops deducting it. An employee aged 65 to 70 who filed a CPT30 gets a CPT30 election date, which stops CPP from that date; CRA- or Revenu Québec-approved deductions such as a T1213 go in Authorized annual deductions. Outside Quebec you can also mark someone Workers’ comp exempt or give them a WC rate override / $100 for their rate group. Under Vacation & posting, Wage expense account points this employee’s wages at an account other than Wages & Salaries Expense. By default every deduction applies and is capped automatically once the employee reaches the annual CPP and EI maximums.
Standing earnings, deductions, benefits, and accruals
Anything that recurs on every cheque beyond regular pay and vacation — a car allowance, union dues, an RRSP match, a garnishment, group insurance — lives on the Earnings, deductions, benefits & accruals card of the payroll profile. Each item posts to the ledger on every pay run and, if you tag it, flows to the right T4 box.
To add a standing item:
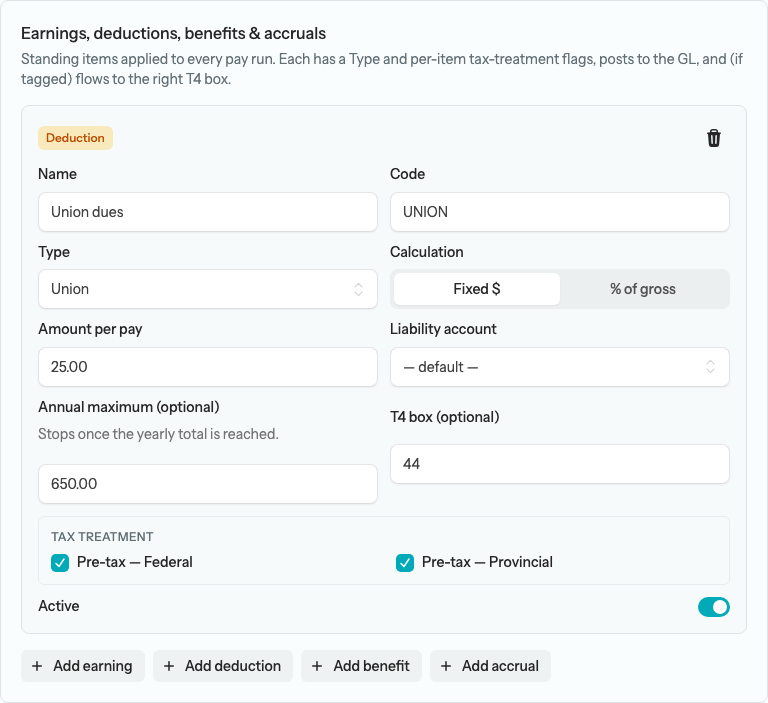
- On the employee’s payroll profile, select Add earning, Add deduction, Add benefit (an employer-paid contribution), or Add accrual.
- Give it a Name and Code, and pick a Type. Choose the Calculation — Fixed $ or % of gross — and enter the Amount per pay (Employer amount per pay for a benefit) or the Percent of gross. An accrual uses a Calculation basis instead.
- Tick the Tax treatment boxes that apply. A deduction has two: Pre-tax — Federal and Pre-tax — Provincial. Earnings and benefits have Taxable — Federal, Taxable — Provincial, CPP/QPP, PPIP (QPIP), EI insurable — earnings, and WCB eligible; earnings also offer EI insurable — hours, Add to net pay only, Tax as bonus, Primary earnings, Subtract from salary, Stat holiday eligible, and Stat holiday payout. Accruals have no tax treatment. The Type fills in sensible defaults.
- Optionally override the account — Expense account on an earning, Liability account on a deduction, and both on a benefit or accrual. A deduction or benefit can take an Annual maximum (optional), so it stops once the yearly total is reached, and an earning, deduction, or benefit can carry a T4 box (optional) such as 20 or 40.
- Leave Active on and select Save payroll setup. Turn Active off later to pause an item without losing it.
Joining mid-year
If an employee was paid earlier this year by you on another system or by a previous employer, open Year-to-date opening balances, turn on This employee has prior year-to-date payroll this year, and enter the Balances as of date, their Pensionable earnings to date and Insurable earnings to date, and the CPP, CPP2, and EI premiums withheld to date (QPP, QPP2, and QPIP for a Quebec employee). Without these the app would keep deducting CPP and EI past the annual maximums.
When an employee leaves
Select Terminate & issue ROE in the header of the payroll profile. Enter the Last day for which paid (Block 11) and the Reason for issuing (Block 16), then select Terminate & open ROE: the app stamps the termination date, deactivates the profile, and opens the Record of Employment report prefilled for that employee. Pay any final cheque before you terminate, so the ROE picks up every insurable hour and dollar.
Time-off policies
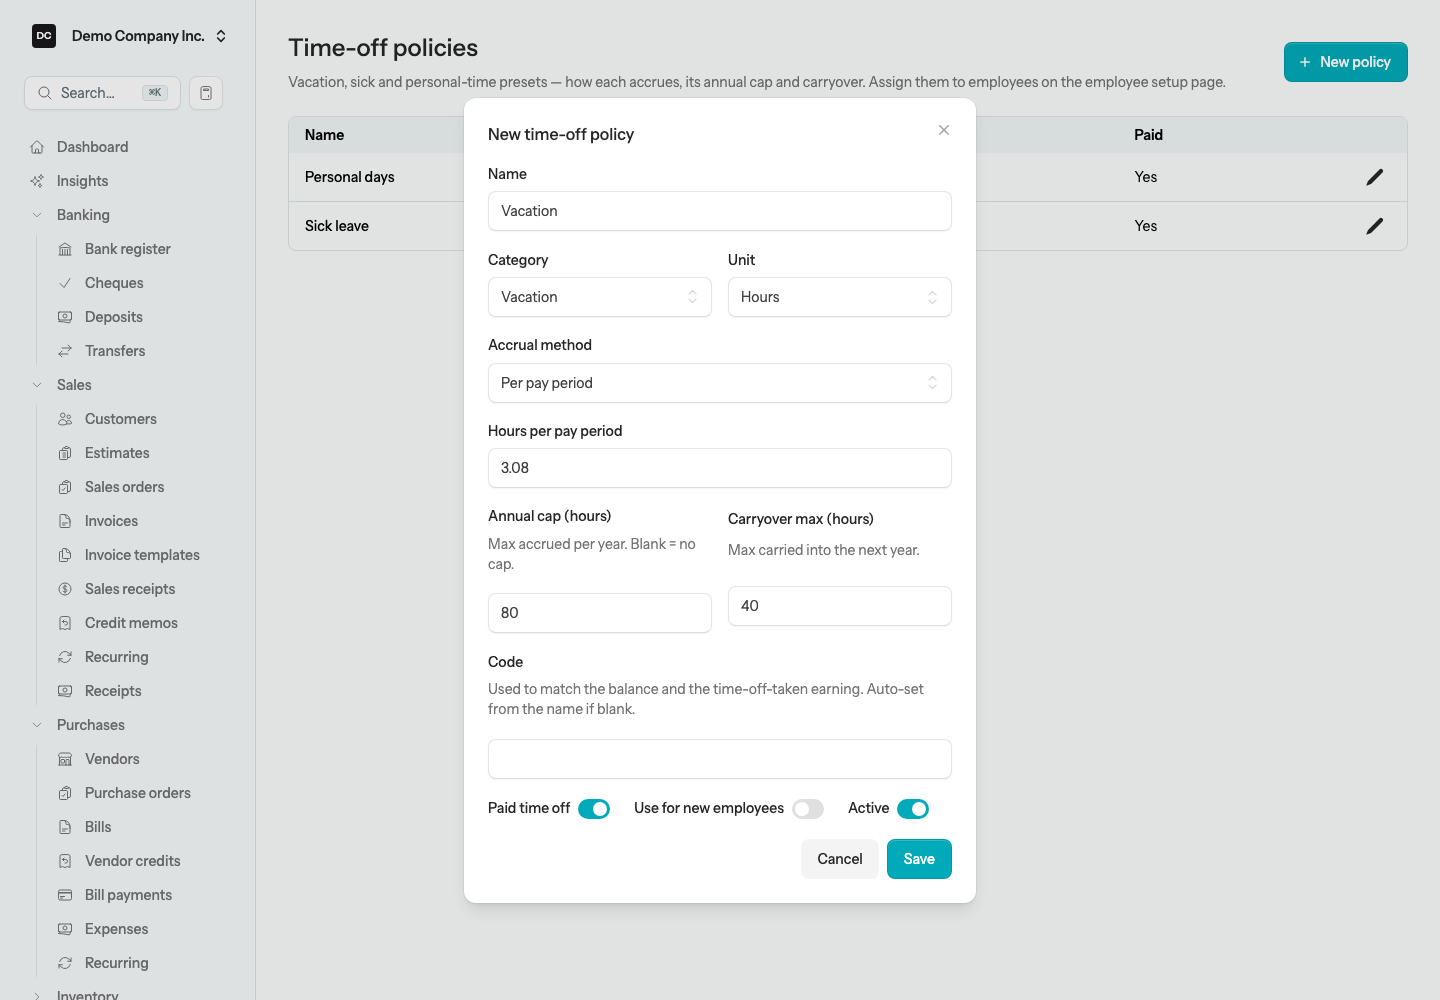
A time-off policy is an organization-wide preset for one kind of leave — how it accrues, its annual cap, how much carries over, and whether it is paid. You build the policies once, then assign them to employees on the setup page. Balances roll forward across pay runs, so the app always knows how much vacation or sick time someone has banked. Demo Company Inc. has two: Sick leave, which accrues 1.5 hours per pay period, and Personal days, granted as 24 hours at the start of each year.
To create a time-off policy:
- Open Settings → Payroll → Time-off policies and select New policy.
- Give it a Name and pick a Category — Vacation, Sick, Personal, Bereavement, Banked time, Other, or Unpaid. The category sets the colour the leave shows in on the calendars.
- Choose a Unit: Hours for most leave, or Dollars for a percent-of-earnings policy like vacation pay.
- Choose an Accrual method and the rate beside it (the rate label changes to match): Per pay period or Per hour worked accrue automatically on each pay run; Beginning of year and On work anniversary grant an annual lump; Manual only never auto-accrues.
- Optionally set an Annual cap (the most that accrues in a year) and a Carryover max (the most that carries into the next year). Leave them blank for no limit.
- Turn on Paid time off if the leave is paid, Use for new employees to assign it automatically, and Active to keep it selectable. Select Save.
Note. Per-pay-period and per-hour-worked policies top up the balance every time you post a pay run. Beginning-of-year and anniversary policies are granted once a year by a nightly task (payroll:accrue-time-off), which also rolls last year’s balance over within the carryover limit — so you do not have to grant or reset anything by hand.
Time-off requests and approvals
When someone wants vacation or a sick day, it flows through a two-step approval. An employee submits a request from the portal (or you record one on their behalf); a manager accepts the absence; then payroll confirms the pay treatment, which schedules the days as time entries for a pay run to pull in. Each step keeps everyone — and the books — in sync.
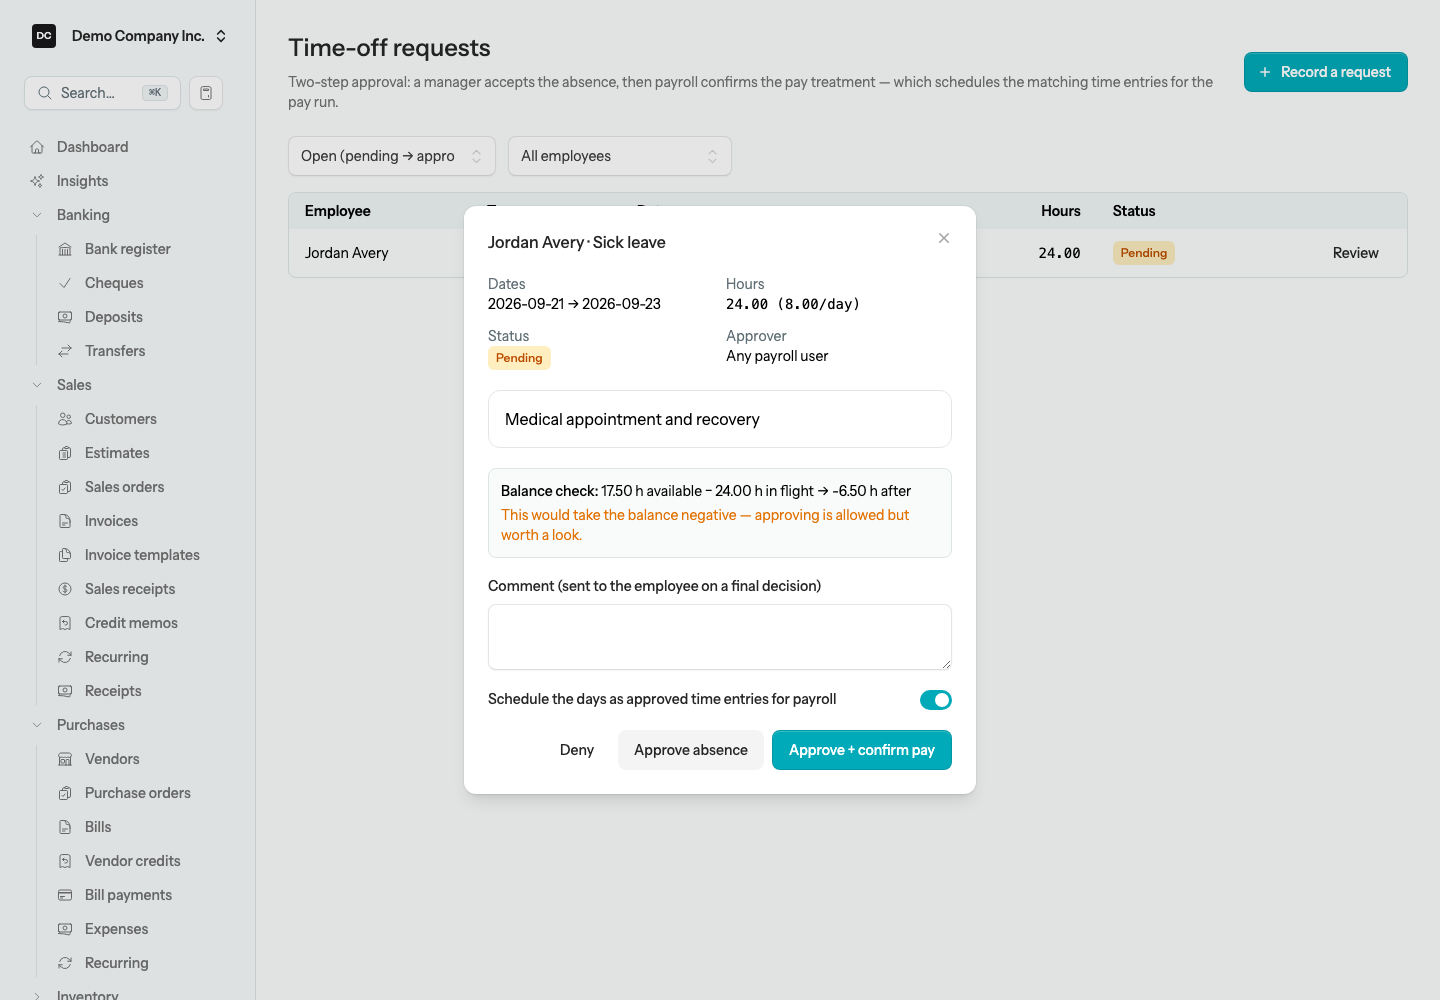
To review a request:
- Open Time-off requests (from the Staff calendar’s Time-off requests button, or the link in the approval email). Open requests — pending, manager-approved, and approved — show first.
- Select Review on a request to see the dates, hours, the approver, and a Balance check that shows how much the employee has, how much is already in flight, and what would be left.
- As a manager, select Approve absence to accept it (payroll confirms pay next), or Deny.
- To finish it in one step, select Approve + confirm pay; payroll users can also Confirm pay treatment on an already-accepted request.
- Leave the “Schedule the days as approved time entries for payroll” switch on so the leave comes into the next pay run when you select Pull hours from time entries.
Note — How leave becomes paid time. Confirming the pay treatment creates an approved time entry for each working day of the request, tagged with the policy as its pay type. Nothing is paid yet: the entries wait until you select Pull hours from time entries on a pay run covering those dates. That run pays the time according to the policy (paid or unpaid), and posting it draws the matching balance down — so a five-day vacation lowers the employee’s vacation balance by five days’ worth of hours.
Need to enter leave for someone yourself? Select Record a request on the Time-off requests page, pick the employee, the time-off type, the dates, and the hours per day, and it enters the same approval pipeline.
The staff calendar
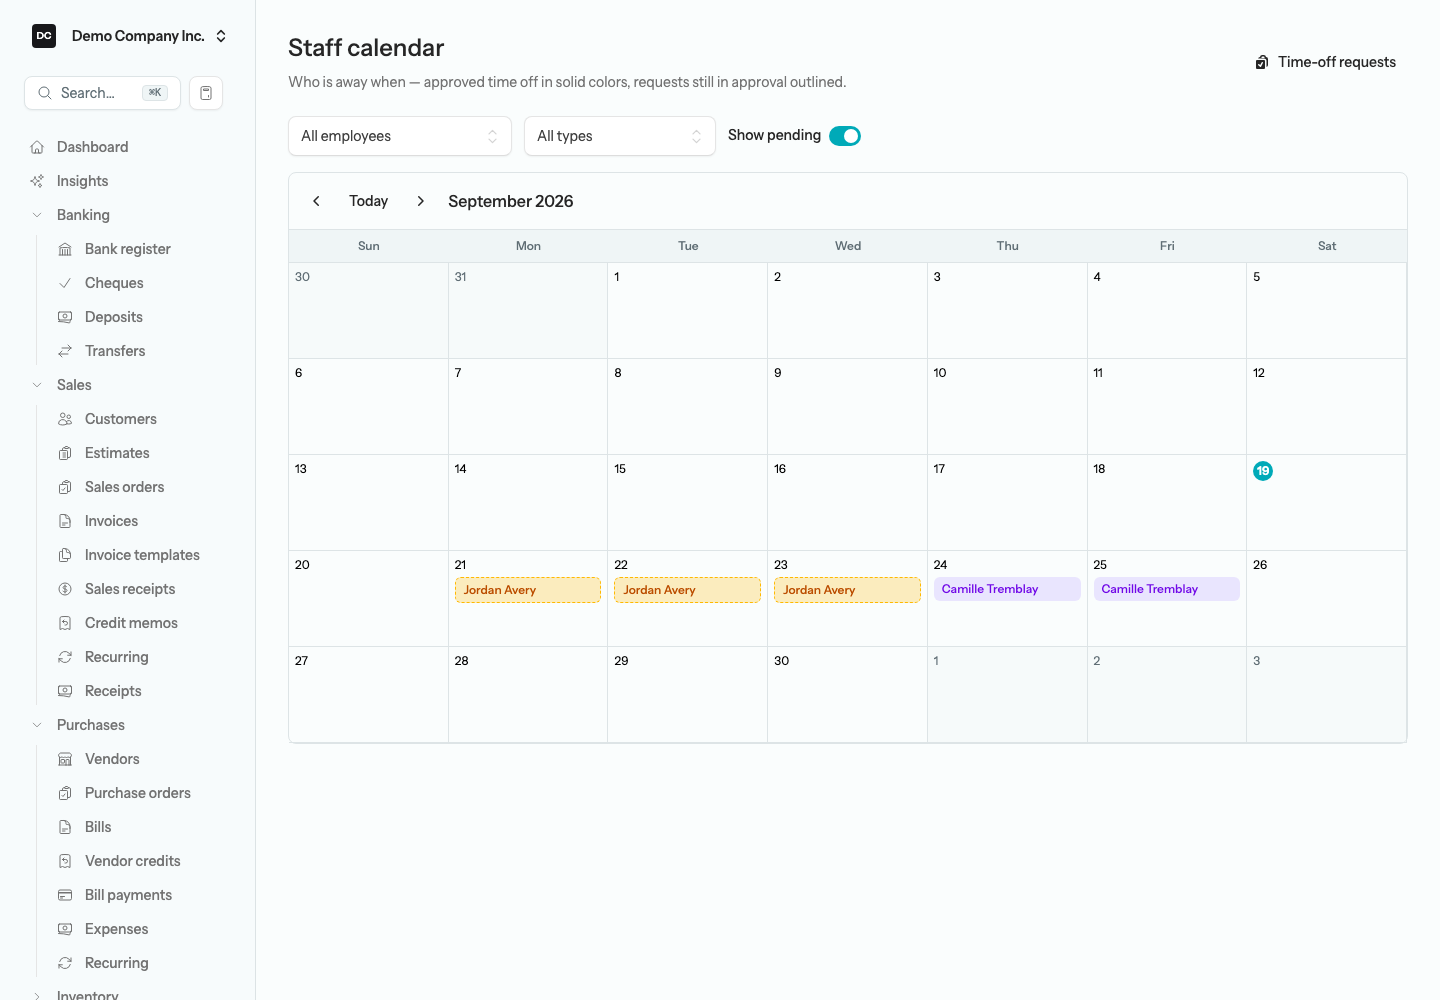
The staff calendar (Payroll → Staff calendar) is a month grid of who is away when. Approved time off shows as a solid chip in the leave type’s colour; requests still in approval show as a dashed amber chip, so you can spot clashes before you say yes.
To use the staff calendar:
- Open Payroll → Staff calendar. Use the arrows or Today to move between months.
- Filter by a single employee or a single leave type, or hide in-flight requests with the Show pending toggle.
- Select a day to open its panel, then approve or deny the requests on that day right from the calendar.
Time tracking and pay types
Hourly staff (and anyone with overtime or time off to record) can log their hours, and you bring those hours into the pay run instead of typing them in. Every entry carries a Pay type that tells payroll how to treat it.
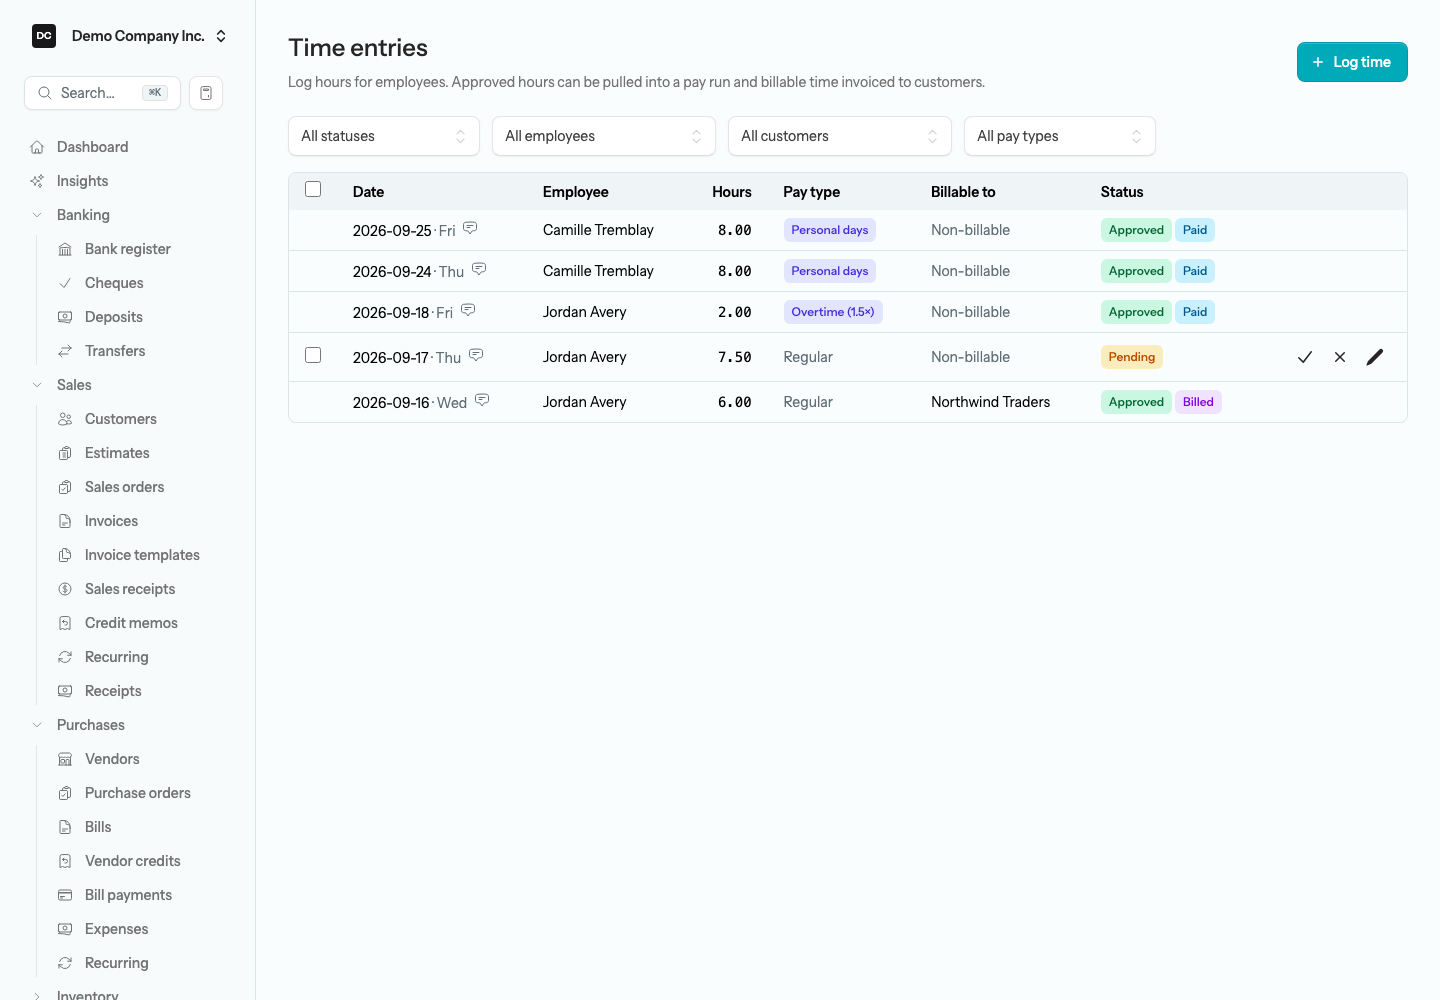
The Pay type list starts with the wage types every organization has — Regular pay, Overtime (1.5×), Overtime (2×), and Stat holiday pay — adds Overtime (bank the hours) once any active employee is set up to bank overtime, and ends with one entry for each active time-off policy (for Demo Company Inc., Personal days and Sick leave). A wage type prices the hours by its multiplier; a time-off type pays according to the policy and draws that balance down. In the list of entries, regular hours show simply as Regular.
To record time for an employee:
- Open the Time entries page. It has no sidebar entry: add /time-entries after your organization’s address (for Demo Company Inc., /demo/time-entries).
- Select Log time, pick the Employee, the Date, the Hours, and the Pay type, and add a Description or a Class / project if you use them. Turn on Billable to a customer and pick the Customer, a Service item, and a Rate / hour to bill the hours on later.
- Entries an employee logs from the portal’s My time page arrive as Pending. Approve or reject each one from its row, or tick several and select Approve selected. Filter the list by status, employee, customer, or pay type.
- Approved, unpaid entries wait for the next pay run covering their dates, where Pull hours from time entries brings them in. An entry shows Paid once a pay run has picked it up and Billed once it is on an invoice; neither can be edited or counted again. With a customer filter set, Create invoice turns that customer’s approved billable time into a draft invoice.
Tip — The employee portal. Employees with a portal login get a My time page to log hours, a Time off page that shows their balances and lets them request leave (with a live “what would be left” projection), their pay statements, and — unless you turn it off under Settings → Payroll — a team calendar of who else is away. They only ever see the pay types and time-off types that apply to them. To give someone access, add an email address to their record and select Send portal invite in the header of their payroll profile.
Run payroll
A pay run pays a group of employees for one pay period. You pick the period and who is in it, the app calculates everyone’s deductions, you review the numbers, and then you post the run to your books and write the cheques.
To run payroll:
- Open Payroll → Pay runs and select New pay run.
- Choose the Pay schedule and the Pay from bank account. The Period start, Period end, and Pay date fill in from the schedule — edit any of them, or select Reset to schedule to put them back. A click anywhere in a date field opens the calendar.
- Tick the employees to include, and enter hours for anyone paid hourly — or select Pull hours from time entries to bring in their approved, unpaid hours for the period; weekly hours past the overtime threshold in Settings → Payroll are split out as overtime at 1.5×.
- For anything extra this period, select Add earning under the employee: Overtime (1.5×), Overtime (2×), Overtime (bank the hours), Bonus, Retroactive pay, Commission, Sick pay, Stat holiday pay, Taxable allowance, or Other earnings. Hourly types take hours; the rest take an amount. Bonuses and retroactive pay are taxed by the CRA’s bonus method rather than as ordinary period income.
- Select Calculate. The app computes gross pay and every deduction and opens the pay run for review. (Save draft keeps it without calculating.)
- Check each line — Gross, CPP, EI, Fed tax, Prov tax, and Net. Use Adjust on a line to override any single deduction, or Recalculate after a change; Edit takes you back to the form.
- Select Post pay run to record the wages, deductions, and employer cost in the general ledger.
- Select Write cheques, confirm the Bank account, and enter the Starting cheque number. One cheque is written per employee with positive net pay, numbered sequentially. Select Print beside any cheque for pre-printed cheque stock, or Void a single cheque to reverse just its bank entry if you misprint one.
- Select Stub on any line to open that employee’s pay statement — see Pay statements below.
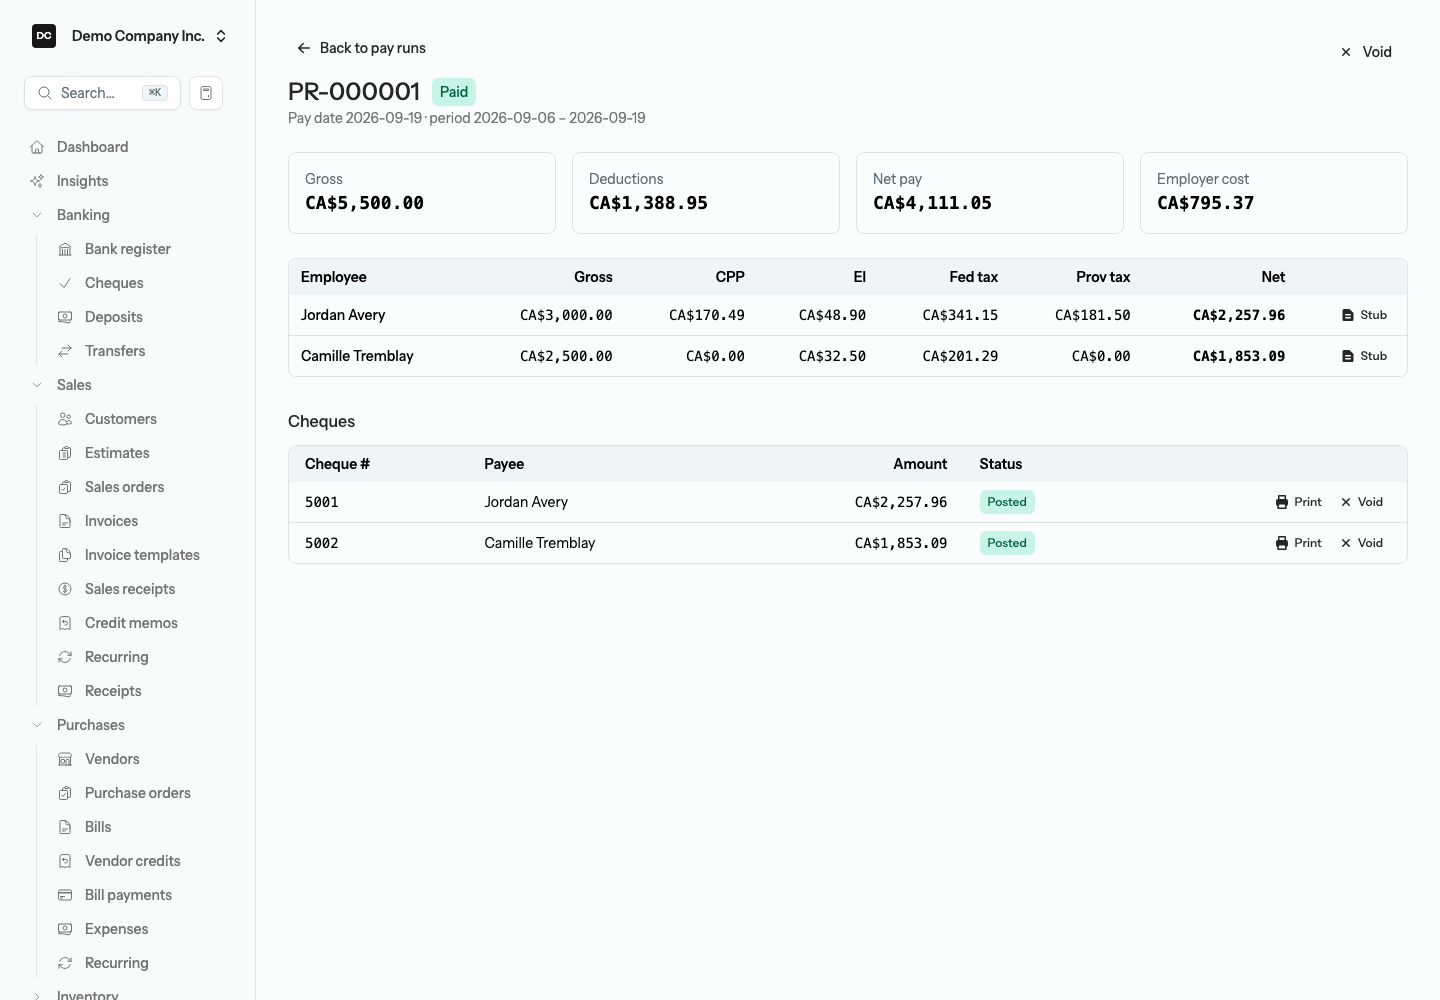
Note — What posting a pay run does to your books. Posting writes one balanced journal entry dated the pay date. It debits Wages & Salaries Expense (or the employee’s wage account override) for gross pay, debits the employer-cost accounts for the employer’s share of CPP or QPP, EI, and QPIP plus any workers’ comp, QHSF, and CNESST, and — under an Accrue to liability vacation policy — debits Vacation Pay Expense. It credits a payable for each statutory deduction (CPP Payable, EI Payable, Income Tax Payable, and their Quebec counterparts), Vacation Payable, the liability account of each standing deduction and benefit, and Net Pay Clearing for every employee’s net pay. The bank is not touched yet: each cheque you write afterwards debits Net Pay Clearing and credits the bank, so every payroll cheque reconciles on its own. A run moves Draft → Calculated → Posted → Paid (once every cheque is posted), or to Void if you Void it, which reverses the whole journal entry. The app will not void a run while any of its cheques is still posted: Void each cheque in the Cheques table first (the run drops back from Paid to Posted), then Void the run.
Note — One person edits a record at a time. If a teammate already has a pay run, an employee’s payroll setup, or a pay schedule or time-off policy open for editing, you see who is editing instead of the form, and Post pay run, Write cheques, Recalculate, Adjust, and Void wait until they are done. Owners and Admins can take over. See Settings → Edit locks for how a lock is held and released.
Pay statements
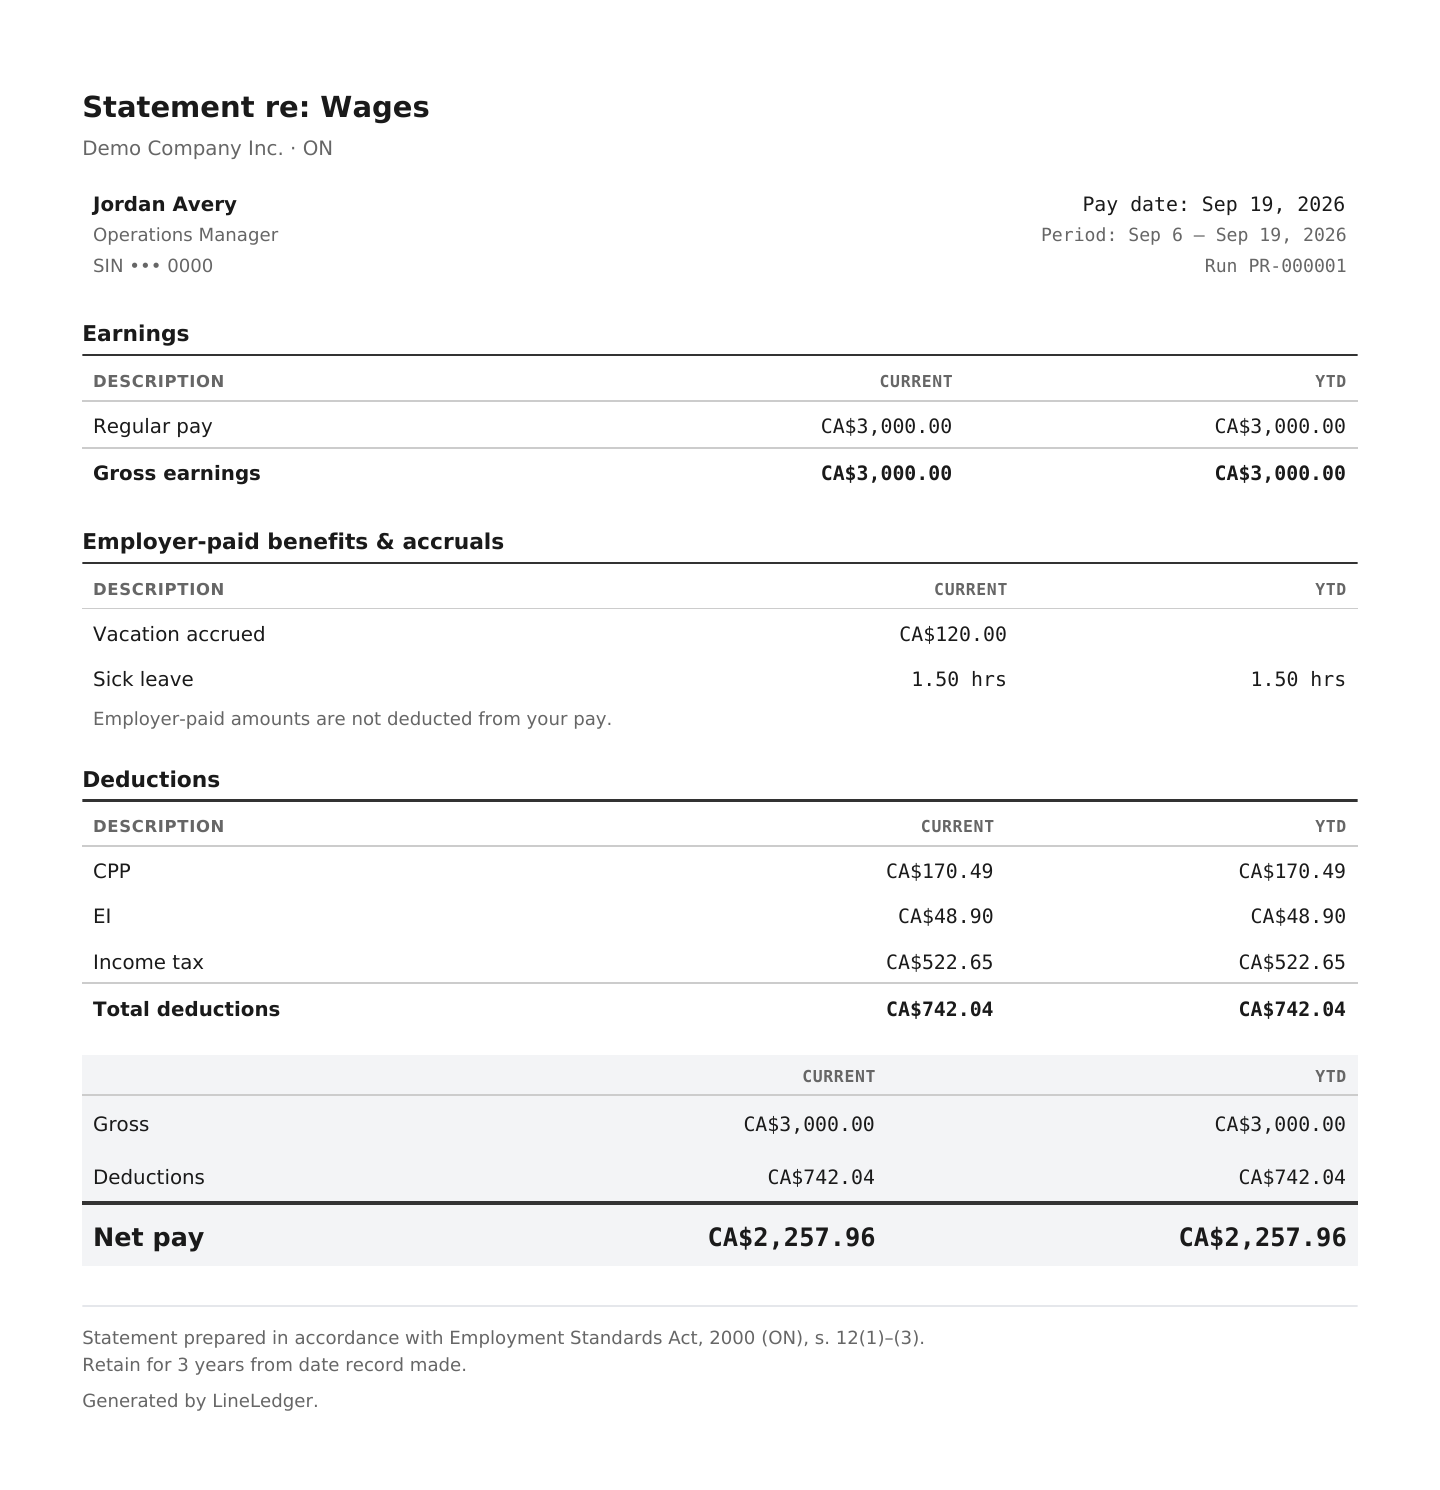
Every province requires a written statement with each pay, and the app produces one per employee per run. Once a run is calculated, each line on the pay run page has a Stub button that opens the employee’s pay statement as a PDF in a new tab; on a run that is not yet posted it is watermarked PREVIEW — not yet posted. The statement lists Earnings, Employer-paid benefits & accruals, and Deductions, each with a Current column and a YTD column, then Gross, Deductions, and Net pay, and names the employment-standards legislation it follows. Employees can download the same statement from the employee portal.
To choose what a statement shows, open Settings → Payroll and scroll to Pay statement. Turn on Federally regulated employer only if you are a bank, telecom, interprovincial carrier, or similar — the statement then follows the Canada Labour Code Part III instead of the province’s standards. Under Optional items, untick anything you would rather not print: Year-to-date (YTD) columns, Employer-paid benefits & accruals section, Pay rate, Hours, Employer address, or Employee occupation / job title — all six are on by default. The panel beneath lists what your organization’s own province (or the Canada Labour Code, if you are federally regulated) always requires. Each statement follows the rules of the province where that employee works, and anything that province requires prints even if you untick it. Select Save.
What the app calculates
For each employee on a pay run, the deduction engine works out:
- CPP — Canada Pension Plan, including the second-tier CPP2 above the higher earnings threshold, capped at the annual maximum.
- EI — Employment Insurance, capped at the annual maximum.
- Federal and provincial income tax — from the TD1 claim amounts and the pay frequency, with any Additional tax per pay added on top.
- Vacation and other time off — accrued to a liability account or paid out on the cheque, at the rate on each policy and the employee’s profile.
- Standing items — every active earning, deduction, benefit, and accrual on the profile, with its tax treatment applied.
- Employer cost — the employer’s matching CPP and EI, workers’ comp, and any employer-paid benefits, so you can see the true cost of the run, not just the net pay.
Year-to-date totals carry across pay runs (and start from the Year-to-date opening balances you entered for anyone who joined mid-year), so the annual CPP and EI maximums are respected automatically — an employee who has already hit the ceiling stops having it deducted.
Tip — Check the math against the CRA. The Calculation check report (Payroll → Calculation check) runs the deduction engine against a matrix of reference cases and shows where each figure lands: Cases verified, Reference values matched, Awaiting a reference, and an overall Passing or Failing status. CPP, CPP2, and EI are verified to the exact cent against the CRA’s formulas. The income-tax figures are computed by the same engine, but a number of their reference values are still marked Awaiting a reference until they are confirmed against the CRA’s Payroll Deductions Online Calculator — so check a sample cheque against PDOC before you rely on the tax withholdings. The same check runs from the command line as php artisan payroll:verify-calculations, which fails on any mismatch.
Tax rates and effective dates
The app carries the CRA Payroll Deductions Formulas (T4127) tables for CPP, EI, and federal and provincial income tax, plus Quebec’s QPP, QPIP, and Quebec-EI figures. The CRA revises these every January 1, and again on July 1 when a budget changes the rules mid-year. Each pay run automatically uses the table in effect on its pay date, so a June and a July cheque in the same year can be calculated on different rates without you doing anything.
| Effective | What changed |
|---|---|
| January 1, 2025 | Baseline 2025 tables — CPP (YMPE $71,300) and EI ($65,700), and the 2025 federal and provincial income-tax brackets (T4127 120th edition). |
| July 1, 2025 | Federal lowest tax rate cut from 15% to 14%; Alberta’s new 8% bracket on the first $60,000 (prorated); Manitoba’s basic personal amount frozen; PEI and Saskatchewan basic personal amounts raised (121st edition). |
| January 1, 2026 | Indexed brackets and amounts; CPP YMPE $74,600 and EI maximum $68,900; Quebec’s QPP rate cut to 6.30% and QPIP rate cut with a higher $103,000 ceiling (122nd edition). |
| July 1, 2026 | British Columbia’s lowest rate raised (prorated); Newfoundland and Labrador’s basic personal amount increased; PEI’s new bracket on income over $200,000 (123rd edition). |
Note. Quebec’s provincial income-tax brackets come from Revenu Québec (TP-1015) rather than the CRA. A few minor adjustments are intentionally left out. Ontario’s low-income tax reduction and Alberta’s supplemental tax credit are not applied, so a little extra is withheld, which the employee recovers when they file. Manitoba’s basic personal amount is not phased out for incomes between $200,000 and $400,000, so a very high earner there may have slightly too little withheld. British Columbia’s low-income tax reduction is applied. A pay run always uses the latest table on or before its pay date, so a run dated after the last change here (July 1, 2026) keeps using those rates until the next edition is added to the app — update the app before your first pay run of a new year. Pay dates before January 1, 2025 cannot be calculated at all.
Quebec payroll
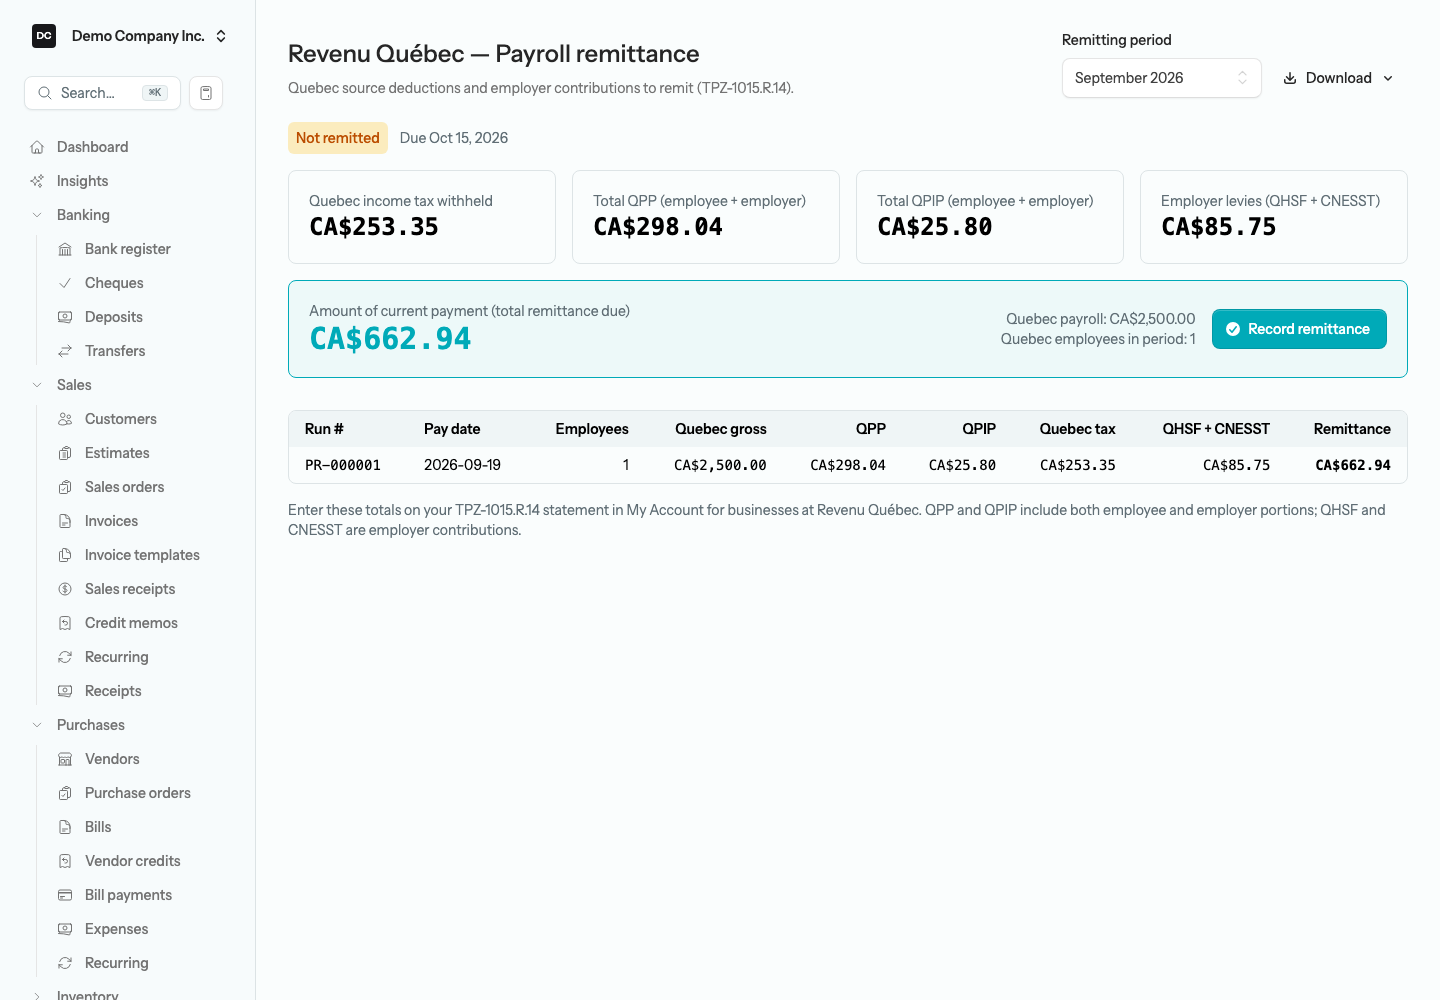
Quebec runs its own parallel system, and the app handles it automatically. Set an employee’s Province of employment to Quebec and their deductions switch from the federal set to the Quebec one — there is nothing extra to configure on the pay run itself. Demo Company Inc.’s Camille Tremblay is set up this way.
- QPP replaces CPP — the Quebec Pension Plan, with its own QPP2 second tier.
- QPIP — the Quebec Parental Insurance Plan, deducted alongside EI. You can mark a specific employee QPIP exempt on their profile.
- Quebec provincial income tax — withheld to Revenu Québec using the employee’s Quebec source-deductions claim (TP-1015.3) instead of a regular provincial claim.
Two of the Quebec amounts are employer levies you set once on the organization, because they apply to the whole Quebec payroll rather than to one person. Open Settings → Organizations → your organization, scroll to Quebec payroll (it appears once Payroll is on), and enter:
- QHSF rate (%) — the Health Services Fund, charged on Quebec gross pay.
- CNESST rate (%) — the occupational health-and-safety levy, charged on Quebec insurable earnings.
- Subject to the 1% workforce skills development levy (WSDRF) — tick it if it applies; it is reconciled on the RL-1 Summary.
Note. Leave the QHSF and CNESST rates at 0 if you have no Quebec employees or no levy to pay — nothing Quebec-specific is calculated until an employee’s province of employment is set to Quebec.
Remittances and year-end slips
Each payroll report reads straight from your posted pay runs, so they are always in step with what you actually paid. Pick the year (or the remitting period, for remittances) and the figures fill in. The app never sends money to an agency; you pay the CRA or Revenu Québec the way you normally do, then record the payment here so the payables clear and Remittance history stays complete.
To record a remittance:
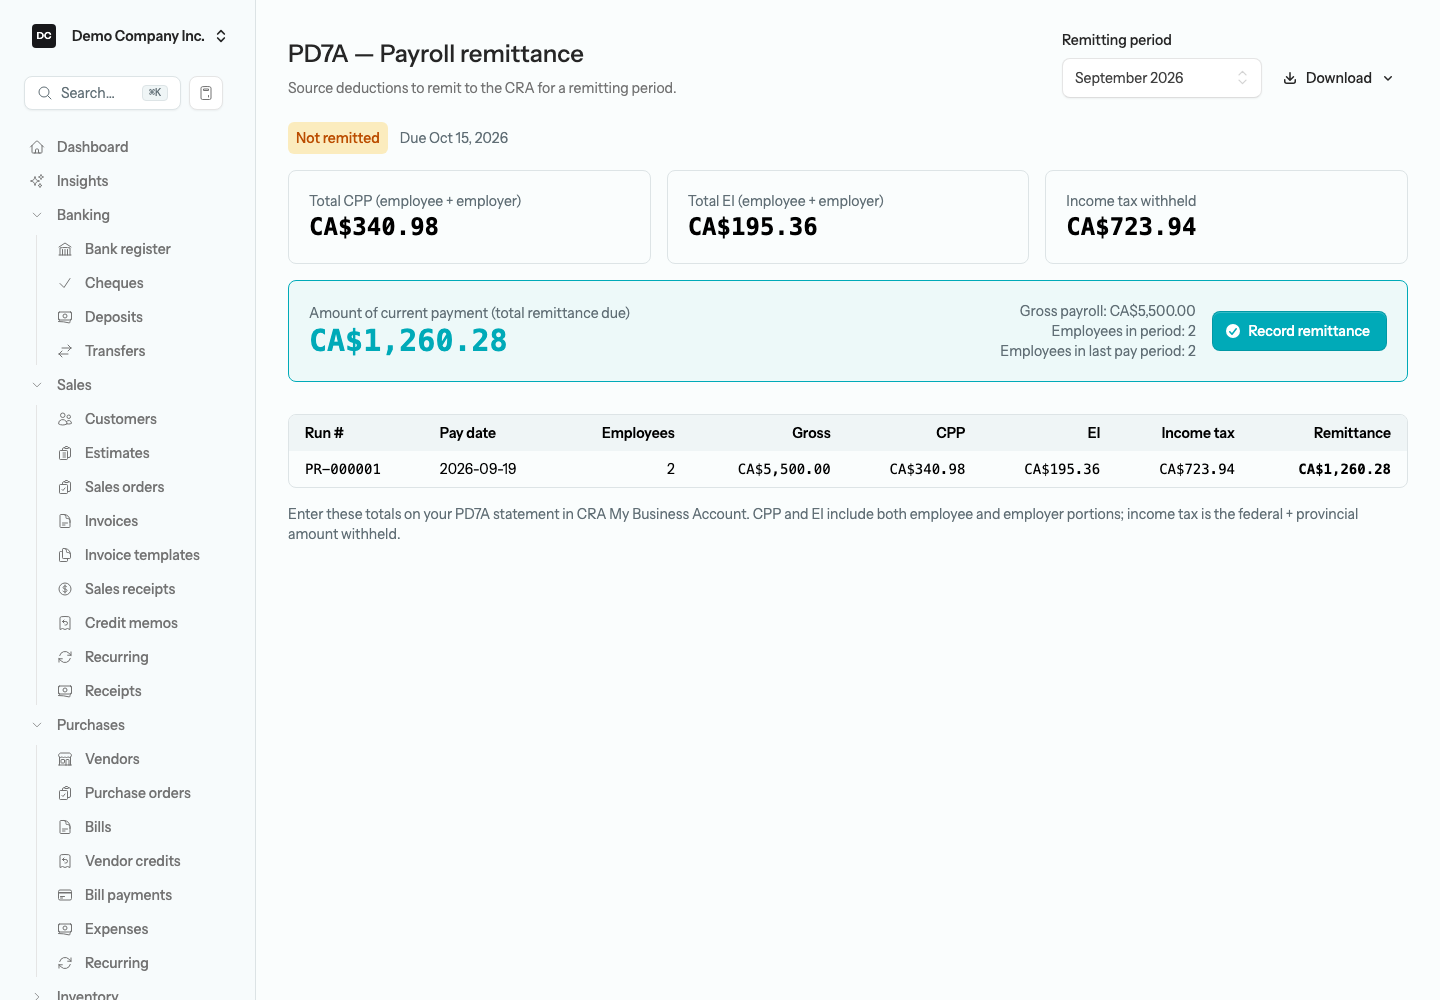
- Open Payroll → PD7A (or the Revenu Québec remittance or Workers’ comp report) and pick the Remitting period. The tiles show what is due, the period’s due date, and whether it is Remitted or Not remitted.
- Pay the agency — for the CRA, enter the totals on your PD7A statement in My Business Account; for Quebec, on the TPZ-1015.R.14 in My Account for businesses.
- Select Record remittance. Choose the bank account under Paid from, set the Payment date, put the confirmation number in Reference, and select Record payment.
- Open Payroll → Remittance history to see every remittance by Agency, Period, Due, Paid, Amount, and Status. Select Void on one recorded by mistake; its journal entry is reversed and the period can be recorded again.
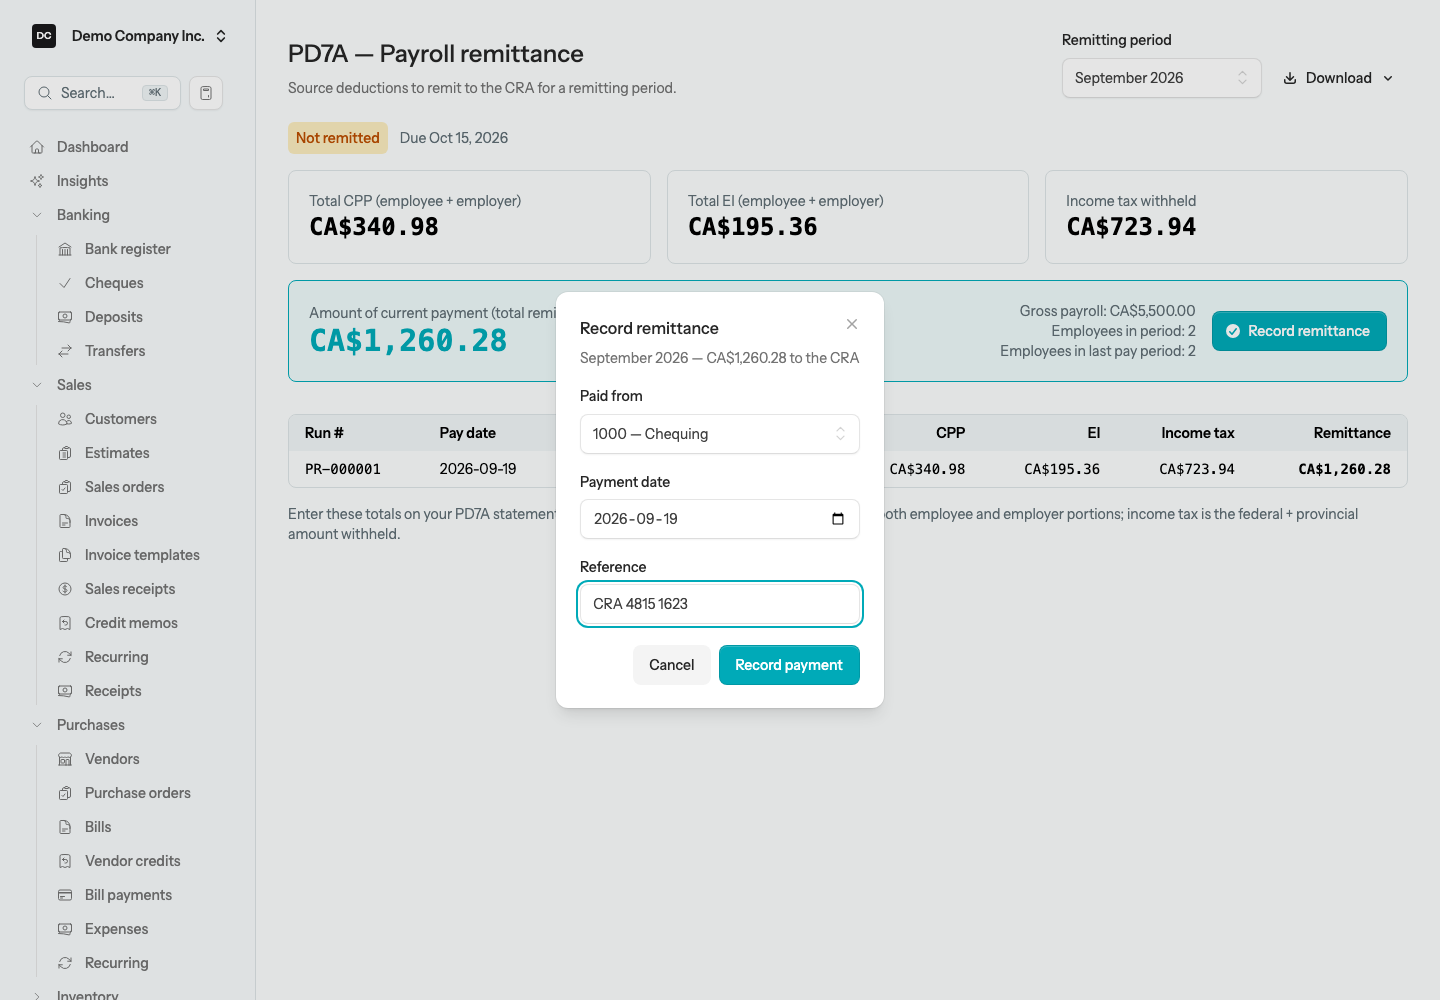
Note — What recording a remittance does to your books. Recording a remittance posts a journal entry that debits the statutory payables the period’s pay runs built up — CPP Payable, EI Payable, and Income Tax Payable for the CRA; the QPP, QPIP, Quebec income tax, QHSF, and CNESST payables for Revenu Québec; Workers’ Compensation Payable for the board — and credits the bank account you paid from. A period that already has a Paid remittance for that agency cannot be recorded twice.
| Report | What it is for | Exports |
|---|---|---|
| PD7A | The income tax withheld (federal plus provincial), CPP, and EI you owe the CRA for a remitting period, with Record remittance. | CSV, PDF |
| Revenu Québec remittance | The Quebec tax, QPP, QPIP, QHSF, and CNESST you owe Revenu Québec, with Record remittance. | CSV, PDF |
| Workers’ comp | The WSIB/WCB employer assessment to remit for a period, at each province’s rate from Settings → Payroll (Quebec is covered by CNESST instead), with Record remittance. | CSV |
| Remittance history | Every remittance you have recorded, by agency and period, with its status and a Void action. | — |
| Payroll register | Per-employee earnings, deductions, employer cost, and net for the posted pay runs in a date range. | CSV, PDF, Excel |
| T4 slips | Year-end employment-income slips for each employee. Finalize locks the year’s amounts as issued and publishes the slips to the employee portal; you can unlock later to amend. | All slips (PDF), Slips CSV, T4 Summary PDF, CRA XML (e-file); T4 PDF per employee |
| T4A slips | Year-end fees-for-services slips for vendors you mark for T4A. Totals posted bill payments, posted cheques, and posted pay-now expenses to each contractor in the year; only totals over $500 show unless you switch on Show below $500. | CSV, PDF, CRA XML (e-file) |
| RL-1 slips | Quebec year-end employment-income slips, with the same Finalize step; the Summary reconciles the WSDRF levy. | Slips CSV, RL-1 Summary PDF, Revenu Québec XML (e-file); RL-1 PDF per employee |
| Record of Employment | The ROE for an employee who has left — pick the Employee, the Reason for issuing (Block 16), and the Last day paid (Block 11); Terminate & issue ROE opens it prefilled. Transcribe the blocks into Service Canada’s ROE Web, or import the XML there; the app does not submit it. | ROE Web XML, Download worksheet (PDF) |
| Calculation check | A live check that the CPP/EI/tax engine matches its reference figures — see Check the math against the CRA above. | — |
Note — File-ready exports. Most reports keep their exports under a Download button; Workers’ comp has a single CSV button, and Record of Employment has separate ROE Web XML and Download worksheet buttons. T4 and RL-1 produce both the printable slips and the XML file the CRA and Revenu Québec accept for electronic filing, so a small employer can prepare and file year-end slips without separate software.
Reports tied to this area
- PD7A — income tax, CPP, and EI owed to the CRA per remitting period.
- Revenu Québec remittance — Quebec tax, QPP, QPIP, QHSF, and CNESST per period.
- Workers’ comp — the WSIB/WCB employer assessment to remit per period.
- Remittance history — every remittance recorded, with its status.
- Payroll register — earnings and deductions line by line across your pay runs.
- T4 / T4A / RL-1 — year-end slips with file-ready XML exports.
- Record of Employment — the ROE for a departing employee.
- Calculation check — the deduction engine against its reference figures.