A purchase order records what you have committed to buy from a vendor before the bill arrives. It is the purchasing mirror of a sales order: it never posts to the ledger on its own. You fulfill a purchase order by generating bills against it, and those bills are what actually post and receive stock. The examples below use our sample business, Demo Company Inc.
Note. Purchase orders are an optional module, turned on by default. If you do not see Purchase orders under Purchases in the sidebar, open Settings → Organizations, select your organization, find the Features section, and switch on “Purchase orders.” Turning the module off hides the sidebar entry and the Open Purchase Orders report; it never deletes the orders themselves.
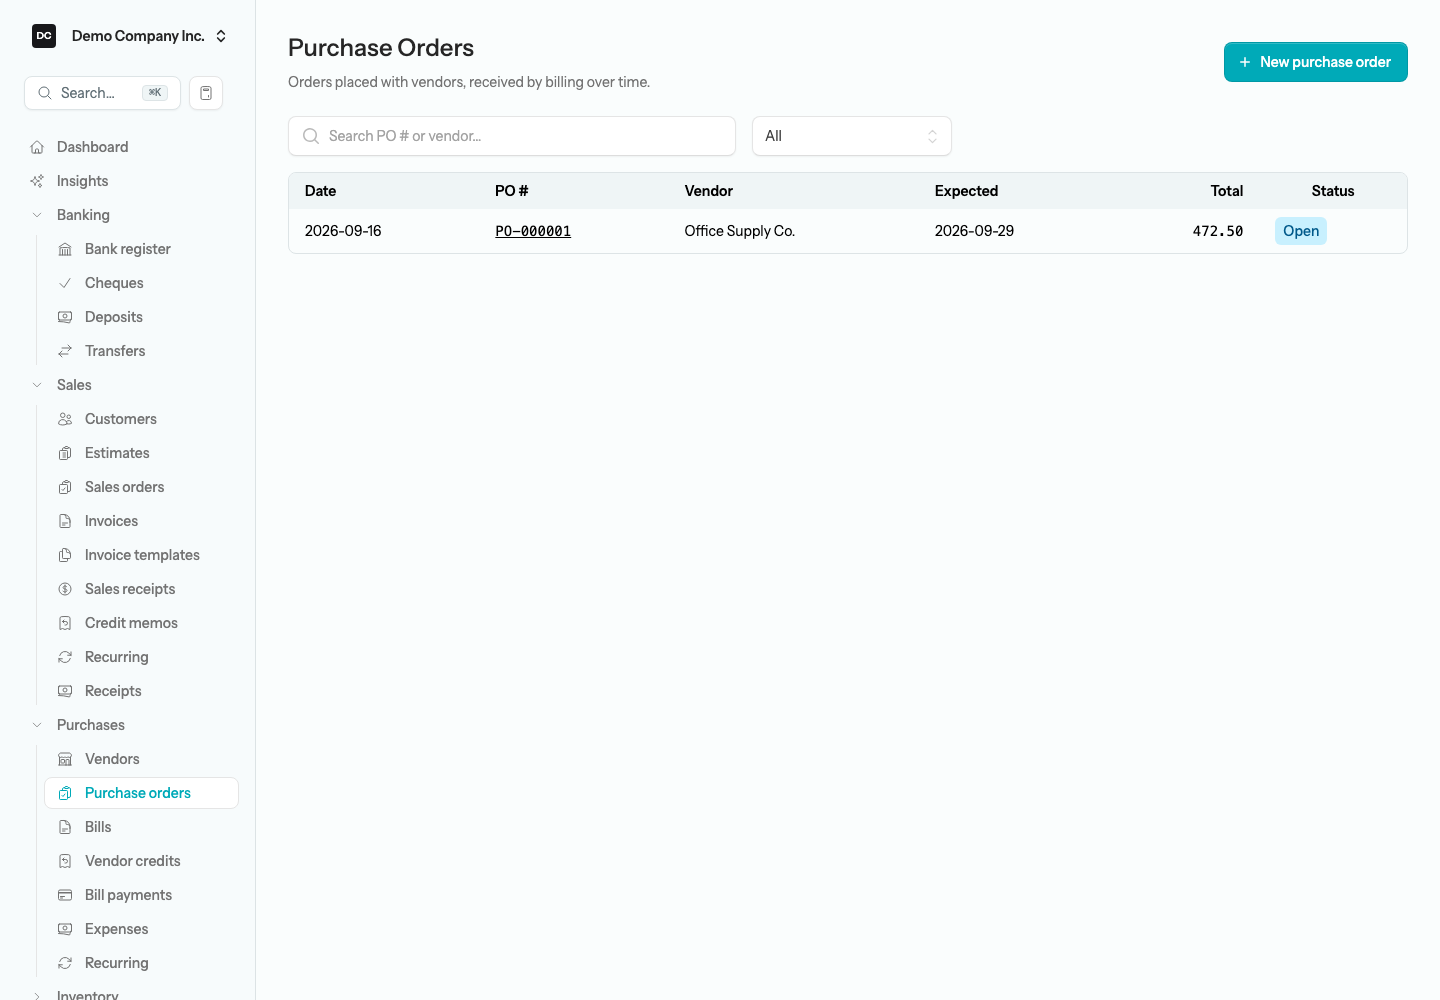
Open Purchases → Purchase orders from the sidebar to see the list. Each row shows the Date, PO #, Vendor, Expected, Total, and a Status that updates as you bill against it. Search by PO number or vendor name, or narrow the list with the status dropdown — All, Open, Partial, Closed, or Cancelled. On a phone the same orders appear as stacked cards.
Create a purchase order
Raise a purchase order when you place an order with a vendor and want to track it until the goods and the bill arrive.
To create a purchase order:
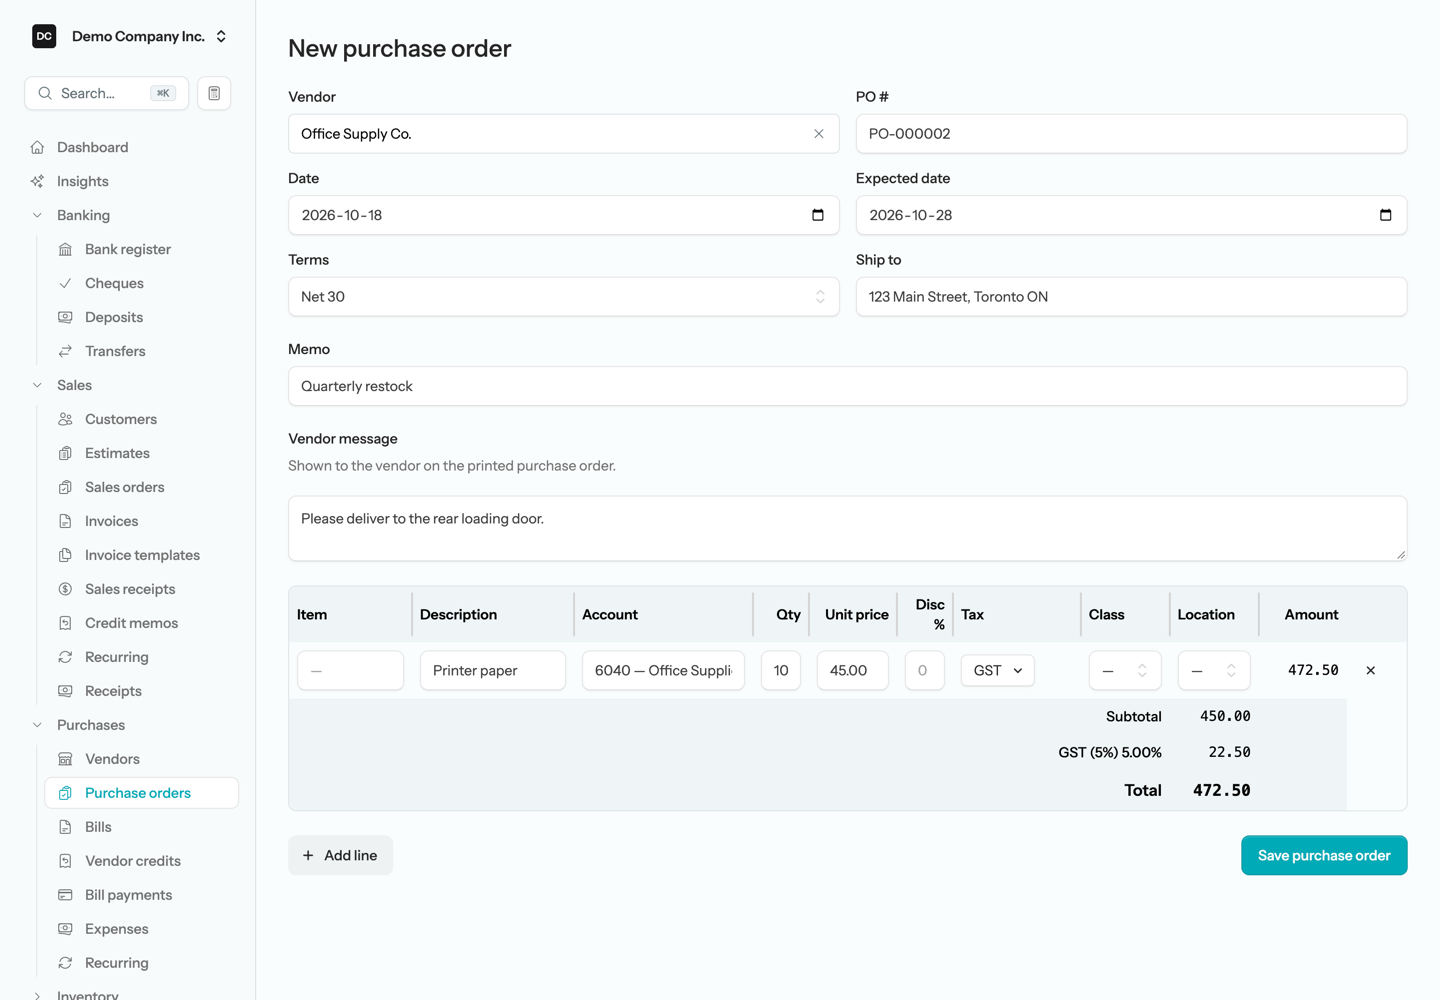
- Open Purchases → Purchase orders from the sidebar, then select New purchase order.
- Choose the Vendor. Start typing to pick an existing vendor, or type a new name and select Add “…” as new vendor to create them on the spot. Picking a vendor applies their default payment terms to the order.
- The PO # and Date fill in automatically. You can change the number — it only has to be unique within your organization, and the form tells you if it is already taken. Click anywhere in a date field to open the calendar.
- Set an Expected date if you want to track when the goods should arrive, and choose Terms — the draft bill you later raise from the order inherits them.
- Add a Ship to address. Use Memo for an internal note, and Vendor message for text that prints on the purchase order you send the supplier.
- Fill in at least one line — see What goes on a line, below. Select Add line for more, or press Tab from the last field of the last row to add one without leaving the keyboard. The × at the end of a row removes it; the form always keeps at least one line.
- Select Save purchase order.
What goes on a line
Account, Qty, and Unit price are required on every line — Qty and Unit price start at 1 and 0.00 — and everything else is optional. From left to right:
- Item — pick from your items list. Choosing an item fills the Account, Description, Unit price, and Tax from the item’s defaults (its expense account, or its income account if it has no expense account), so choose the item first and adjust the rest afterwards.
- Description — free text. It prints on the purchase order and is copied onto the bill.
- Account — required. The expense, asset, or liability account the purchase will be coded to when you bill it. Picking an account fills a still-blank Tax cell from the account’s default tax code.
- Qty and Unit price — required. The quantity ordered and the price per unit; clearing either one stops the order from saving. Unit price doubles as a calculator: type an expression such as 45*10 or 100/4 and press Enter to commit the result.
- Disc % — an optional percentage discount from 0 to 100 off the line. The order page and the printed PO show it as “less … disc” under the unit price.
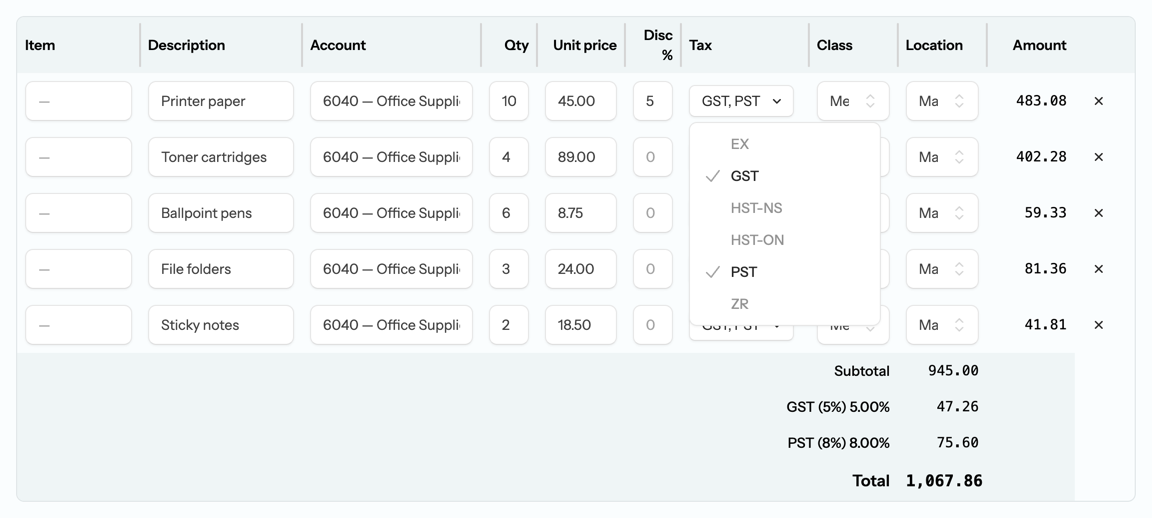
- Tax — a checkbox picker that takes up to two tax codes, say GST and PST. Once two are ticked the others are greyed out. The totals under the grid list each tax on its own row with its rate, and so do the order page and the printed PO.
- Class and Location — appear only when those dimensions are switched on under Settings → Organizations → Features. They are saved per line and carried onto the bill, so your reports can slice the purchase by department or site.
Tip — How defaults fill in. Picking a vendor fills the Tax cell on any line that does not have one yet, from the vendor’s default tax code; picking an account does the same from the account’s default. Neither replaces a tax code you have already chosen. Picking an item is different — it replaces the line’s Account, Description, Unit price, and Tax with the item’s defaults, so make any manual changes after choosing the item.
Note. Saving a purchase order writes only the order itself — nothing posts to your books and no stock moves. A PO is a record of intent until you bill against it.
Receive against a purchase order
When the goods and the vendor’s bill arrive, you receive against the order by generating a bill — for the full order or just the part that showed up.
To receive against a purchase order:
- Open the purchase order you want to receive.
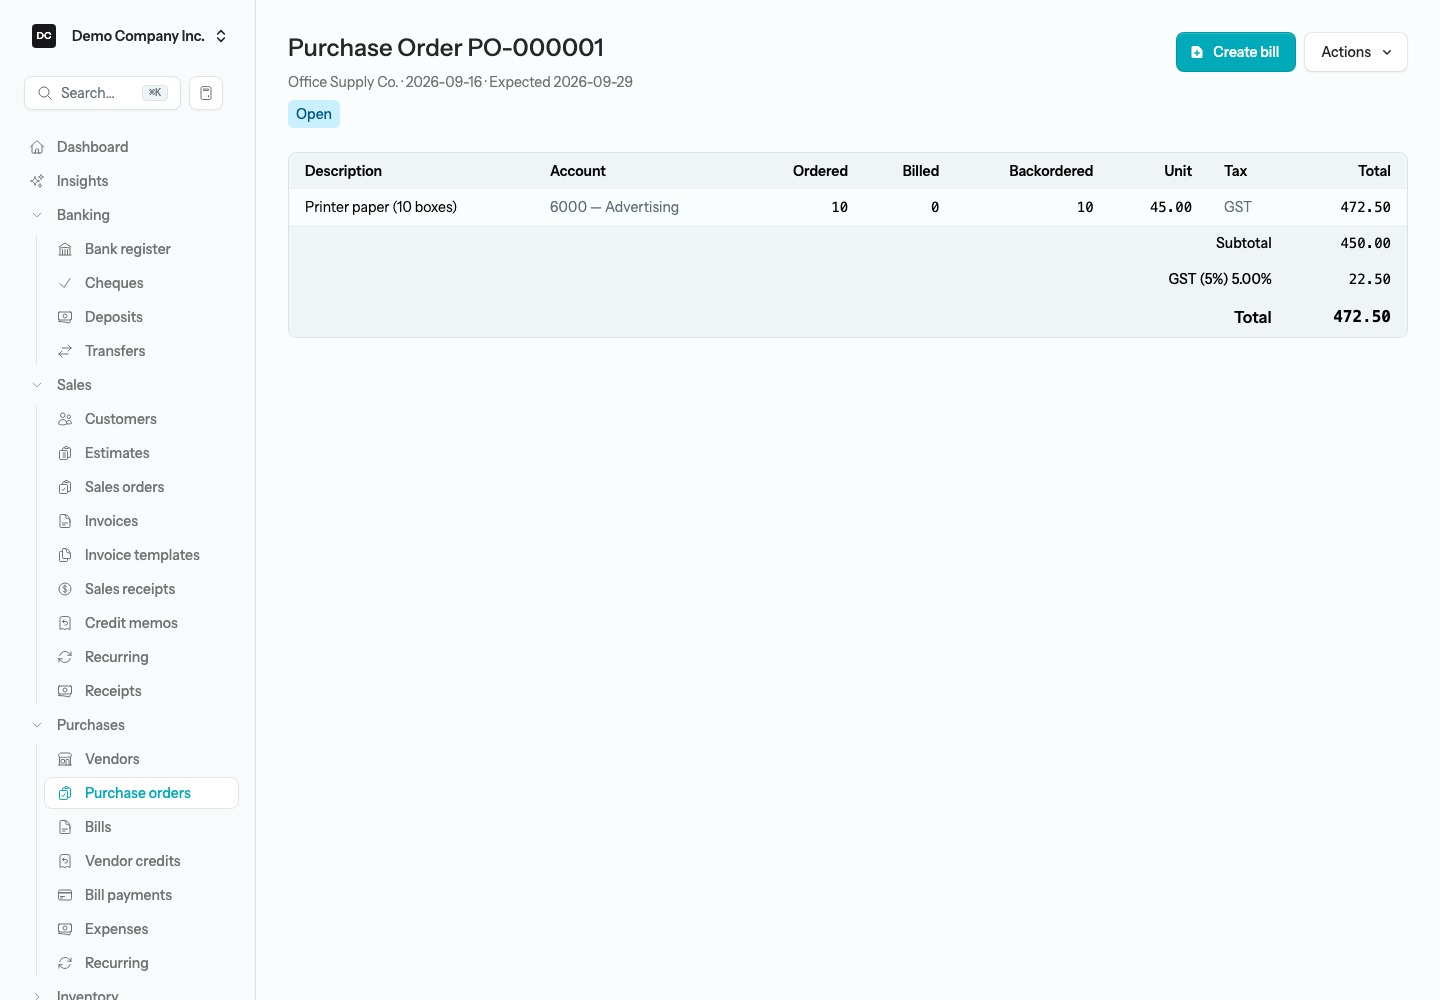
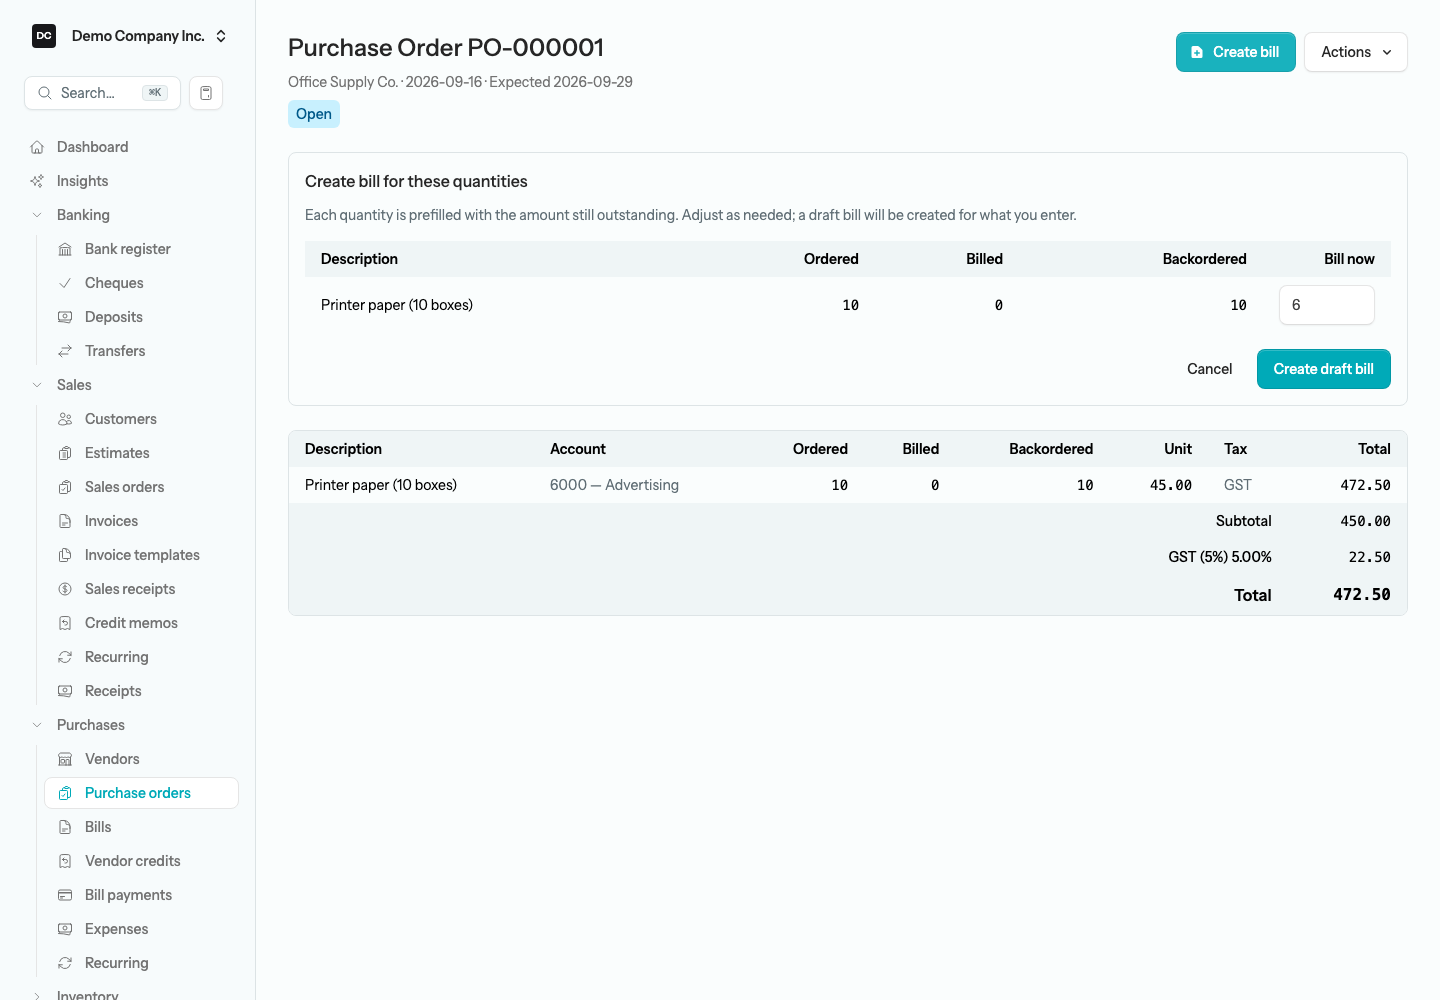
- Select Create bill in the top-right corner — on a phone, open the Actions menu and choose Create bill instead. A “Create bill for these quantities” panel opens showing each line with its Ordered, Billed, and Backordered quantities.
- In the Bill now column — prefilled with the quantity still outstanding — adjust each line to match what actually arrived. Set a line to 0 to leave it out. You cannot bill more than the outstanding quantity.
- Select Create draft bill. The app builds a draft bill dated today, linked to the order, and opens it in the bill form so you can review it. The order counts the draft’s quantities as billed straight away, before you post anything.
- Review the draft, then select Post bill to record the purchase and receive any stock. Read “Saving the bill resets the order’s billed quantities,” below, first.
Heads up — Check the draft bill before you post it. The draft bill copies each line’s item, account, description, quantity, unit price, first tax code, class, and location, plus the order’s terms and memo. It does not carry over a Disc % or a second tax code — if the vendor’s invoice shows either, add it on the bill before posting.
Heads up — Saving the bill resets the order’s billed quantities. When you select Save draft or Post bill on a bill raised from a purchase order, the bill stays attached to the order — it is still listed in the order’s Bills table — but its lines lose their link to the order’s lines, so the order stops counting them. Billed drops back, Backordered goes up by the same amount, and the status can return to Open, which brings Create bill and Edit back. Before you create another bill from the same order, check its Bills table so you do not bill the same goods twice. Once everything on an order has arrived and been billed, you can select Cancel order so it cannot be billed again.
Note — What posting the bill does to your books. Nothing touches the ledger until you post the bill. Posting it debits the account on each line — or the item’s inventory asset account for an inventory-tracked item, which also receives the stock at the cost on the bill — debits the tax agency’s payable account for any recoverable tax, and credits Accounts Payable for the total.
Every bill raised from the order is listed in a Bills table on the purchase order, showing each bill’s number, date, total, and current status, with a link to open it — so you can see the full receiving history at a glance. Paying and voiding bills works exactly as it does for any other bill; see Vendors.
Print, edit, or cancel an order
The Actions menu on a purchase order gathers everything else you can do with it:
- Print opens a PDF copy of the purchase order in a new tab — the version you send the vendor. It uses the logo, column choices, and footer message from Settings → Invoices, shows the Terms and Expected date, and prints your vendor message but never the memo.
- Edit reopens the form. It is available only while the order is Open (see Statuses below).
- Cancel order stops any further billing. It is offered only while the order is Open or Partial, and asks you to confirm.
- Create bill also lives here on a phone; on a larger screen it is the button beside the menu.
Note — One person edits an order at a time. If a teammate has the purchase order open for editing, its page shows who is editing, and Create bill and Cancel order wait until they are done. Opening the edit page yourself shows that notice instead of the form, with Try again and View purchase order — and, for Owners and Admins, Take over editing. See Edit locks under Settings for how locks are released and taken over.
Statuses
A purchase order’s status is worked out live from the bill lines linked to its lines. A draft bill counts as soon as Create draft bill makes it; voided and deleted bills do not count:
- Open — no quantity is counted as billed.
- Partial — some quantity is counted as billed, but lines are still outstanding.
- Closed — every line is fully billed.
- Cancelled — you stopped the order with Cancel order; no further billing is allowed.
Heads up. Because editing an order rebuilds its lines, only an Open order can be edited; the order locks as soon as any quantity is counted as billed. An order whose bills have been saved can show Open, and be editable, again — see “Saving the bill resets the order’s billed quantities,” above. Cancelling an order is permanent.
Reports tied to this area
- Open Purchase Orders — every purchase order you have not cancelled, newest first, with its vendor, date, expected date, and total, plus a CSV export. It goes by the order’s saved status rather than the live one, so an order stays on it, however much has been billed, until you cancel the order.
- Purchases by Vendor — spend per vendor over a period, net of vendor credits.
- Purchases by Item — spend and quantity purchased per item over a period.