A tax return records a filing with a tax agency — for a Canadian organization, typically a CRA GST/HST return — for a single period, tracking what you collected and what you paid (your input tax credits), the net owing, and any payment you make against it. Its figures are drawn straight from the journal entries in the period, so the return always reflects what is actually in your books. The examples below use our sample business, Demo Company Inc.
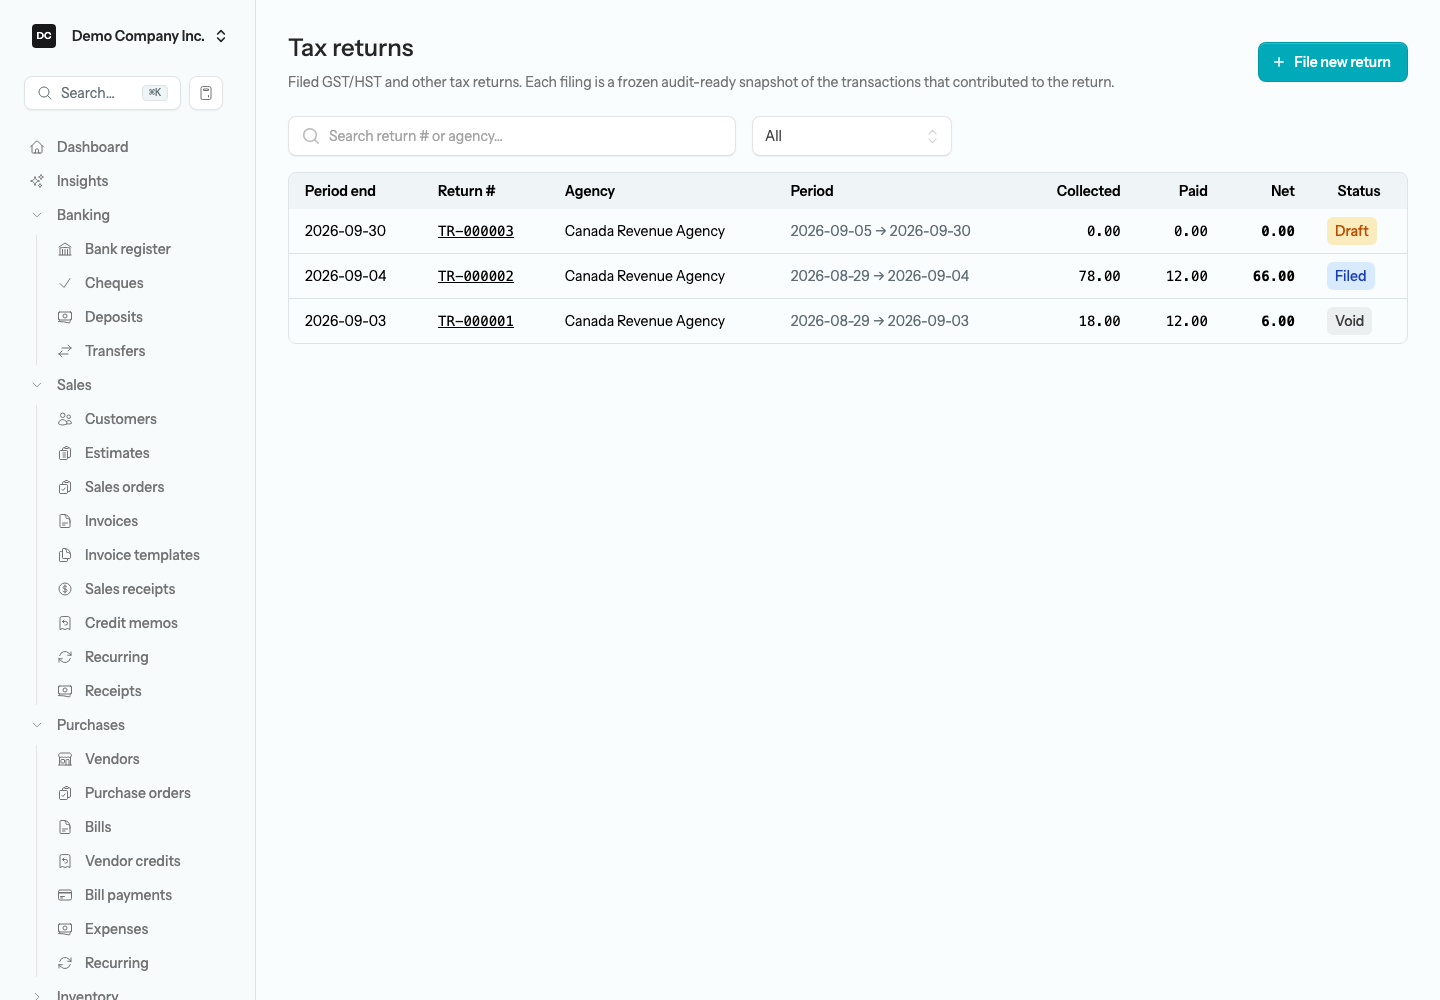
Tax returns live in the Reports area. Open Reports → All Reports from the sidebar and select Tax Returns under the Sales Tax heading. The list leads with the Period end and the Return # — the number opens the return’s page — followed by the Agency, the Period, the Collected, Paid, and Net amounts, and the Status: Draft, Filed, or Void. Filter by status, or search by return number or agency name. A draft shows its figures as of its last save; filing recalculates them from the ledger.
Tip. Select the star on the Tax Returns card in the Reports hub (Add to favorites) and a Tax Returns shortcut pins to your sidebar, so you do not have to dig through Reports each time you file.
Which returns apply to you
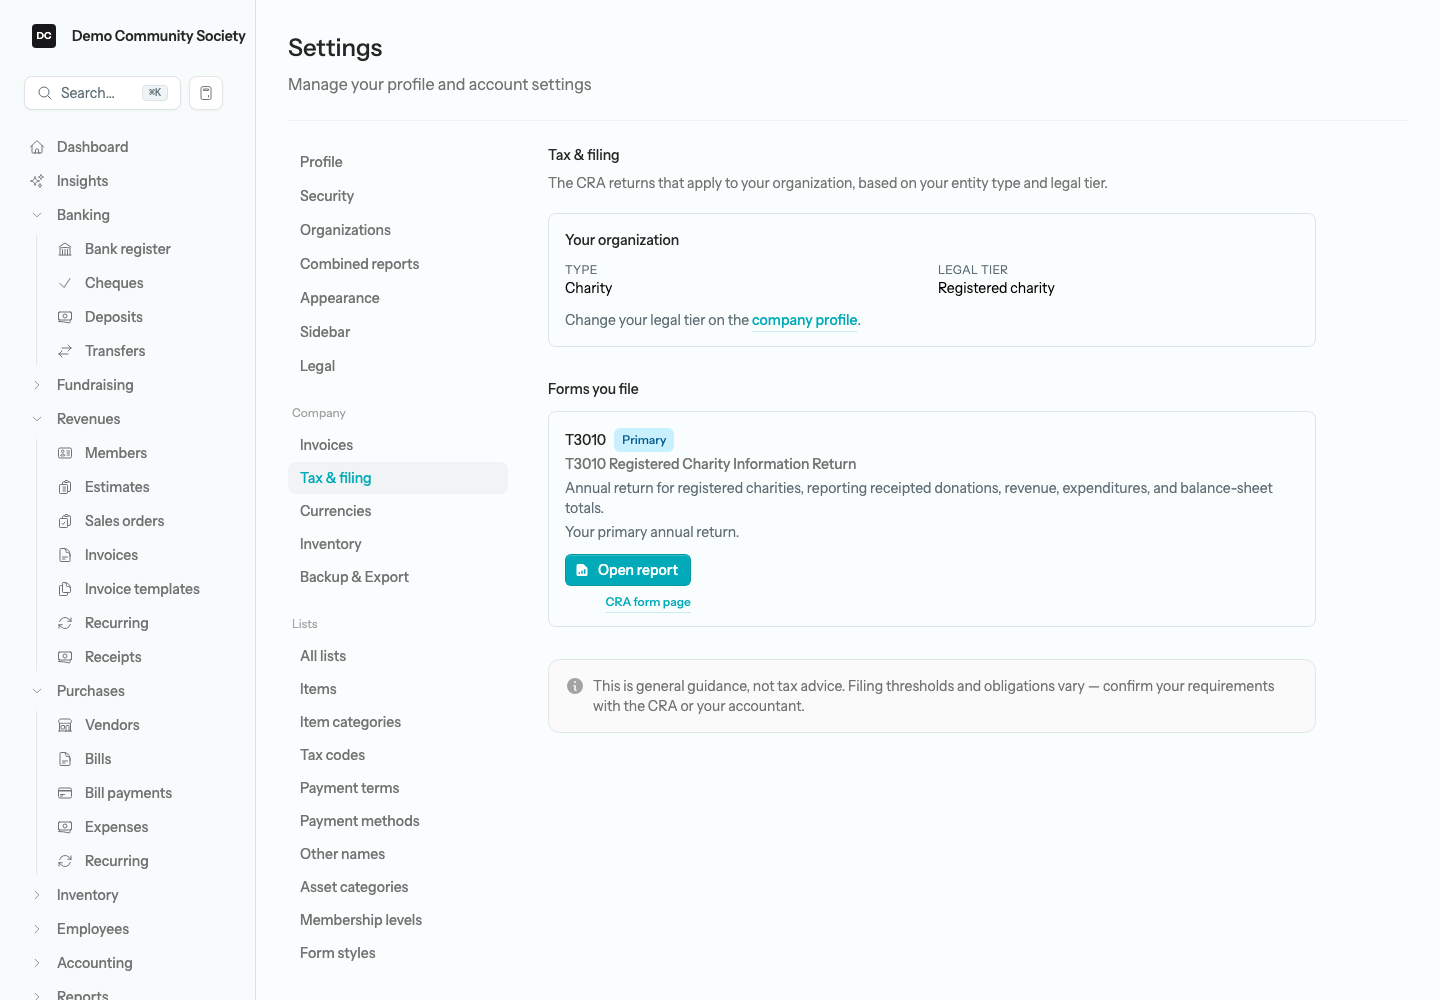
LineLedger does not keep a deadline calendar or send filing reminders — you record each filing as a tax return at the time you file it with the agency. To see which CRA returns your organization is responsible for, open Settings → Tax & filing. The page opens with a Your organization panel showing your Type and Legal tier, then Forms you file: one card per return, marked Primary or Information return, with the form code, its name, a short description, a note on when it applies, and a CRA form page link to the CRA’s own page. Most cards also have an Open report button that jumps to the matching report in the Reports hub. The exception is the T1044 non-profit information return — listed beside the T2 for a non-profit corporation, and on its own for an unincorporated association — which the app does not prepare, so its card has only the CRA form page link. If no CRA income-tax return is generated for your organization type, the page says so and points you at the Sales Tax report instead.
Note. Settings → Tax & filing is for Canadian organizations only — the entry appears in the Settings menu only when your organization is set up in Canada. A United States organization files sales tax returns exactly the same way — the Tax returns list keeps its heading, and only the line beneath it changes, reading “Filed Sales Tax and other tax returns” instead of “Filed GST/HST and other tax returns” — but it has no CRA forms page.
File a tax return
A return starts as a draft so you can review the numbers before committing them. The app reads your posted journal entries for the period and lists every line that contributes, so you can check the figures against what the agency expects. The lines come from the agency’s payable account — the account each of its tax codes collects into — so the agency you pick must have one. Agencies are set up under Settings → Lists → Tax codes, where a new agency gets a payable account created for it automatically; see Lists.
To file a tax return:
- Open the Tax returns list and select File new return.
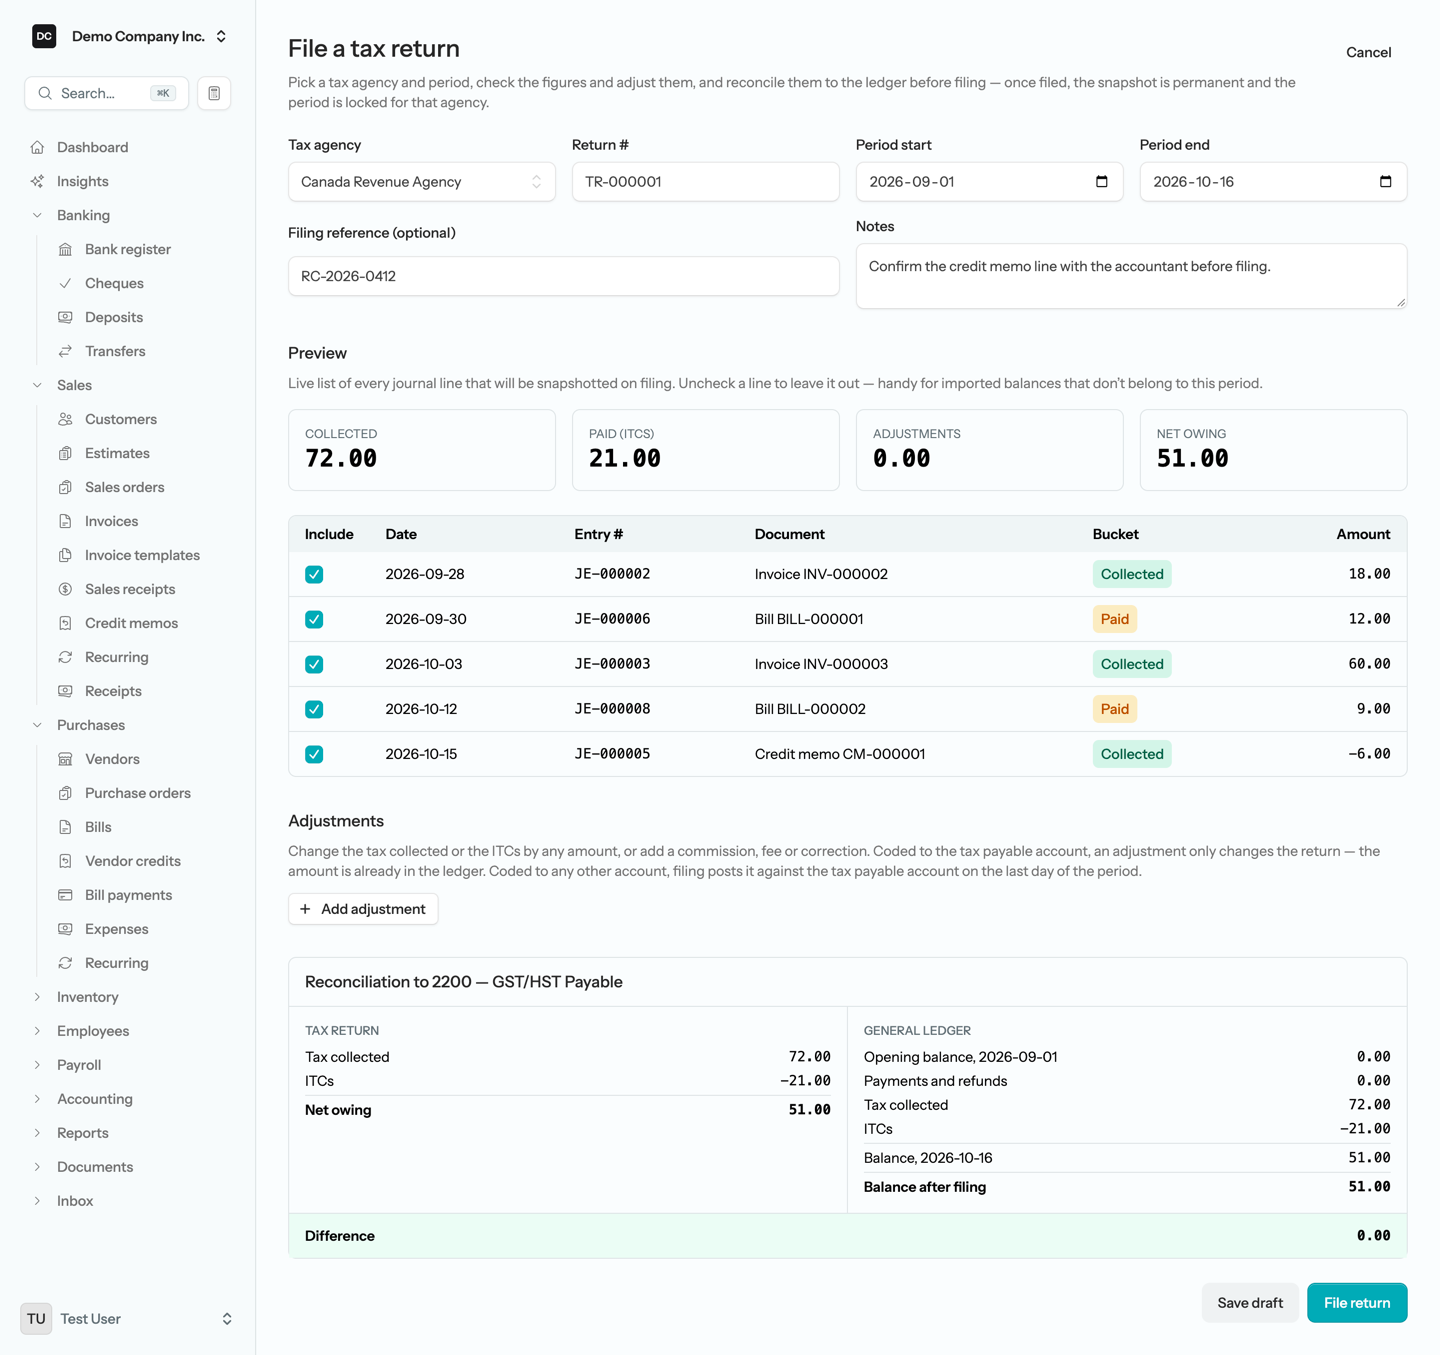
- The Return # is filled in for you — TR-000001, then counting up. You can type your own, but it must be unique within the organization — a duplicate is refused when you save.
- Choose the Tax agency you are filing with. Only active agencies are listed.
- Set the Period start and Period end. The form defaults to the previous calendar quarter; change the dates to match your filing period. A click anywhere in a date field opens the calendar.
- Review the Preview. The Collected, Paid (ITCs), Adjustments, and Net owing tiles total the return, and the table lists each line on it with its Date, Entry #, Document, Bucket, and Amount. Tax on an invoice or sales receipt is Collected, and a credit memo lowers it; tax on a bill, cheque, or expense is Paid — an input tax credit — and a vendor credit lowers it. A manual journal entry is classified by which side of the payable account it hit. An empty period reads “No transactions in this period for this agency.”
- Uncheck Include on any line you want to leave out. Excluded lines fade out and the tiles update as you toggle them.
- Add any adjustments — a correction to the tax collected or the ITCs, a collector’s commission, a fee — with Add adjustment. See Adjustments and the reconciliation below.
- Check the Reconciliation panel beneath: the return’s net owing beside what the agency’s payable account will hold once you file. The Difference should be 0.00. If it isn’t and you are sure of the return, tick File with a difference to accept it.
- Add an optional Filing reference (the government confirmation number) and any Notes.
- Select Save draft to come back to it later, or File return and confirm to lock in the snapshot. Either way you land on the return’s page, where a saved draft can also be filed later.
Note — What filing does. A draft’s figures recalculate from your journal entries every time you open it, and filing recalculates once more before it captures the contributing lines and the reconciliation as a permanent, audit-ready snapshot. Filing touches your ledger only through adjustments coded to an account other than the agency’s payable account: those post one journal entry, dated the last day of the period. From then on the period is locked for that agency: posting, editing, or back-dating a transaction that uses that agency’s tax codes inside the filed period is refused, so the snapshot stays a faithful record of what you reported.
Adjustments and the reconciliation
An adjustment changes the return by any amount before you file it. Each one has a Type, an Account, an Amount, and a Memo. Collected and ITC adjustments add to that box — enter a negative amount to lower it. Other covers everything else on the return: a collector’s commission, a bank fee, or a balance carried from an earlier period. Its amount is signed by its effect on the net owing, so a commission you keep is negative.
The Account decides what filing does with it. Coded to the agency’s payable account, listed first as “no ledger entry”, an adjustment only changes the return — use it for an amount that is already in the ledger, such as a small underpayment left over from last period. Coded to any other account, filing posts it against the payable account. A −100.00 commission coded to a PST Commission Income account posts debit PST Payable 100.00, credit PST Commission Income 100.00. When you later pay the agency, the payment debits PST Payable for the net owing, adjustments included.
The Reconciliation panel sets the return beside the agency’s payable account in the general ledger. On the ledger side it starts from the Opening balance on the first day of the period, then adds the Payments and refunds made in the period, the tax Collected and the ITCs, and any lines you left off the return, to reach the Balance at the end of the period. It then adds the adjustments filing will post, giving the Balance after filing. The Difference is that balance less the return’s Net owing. When last period’s payment didn’t clear the account exactly, the leftover shows up here as the difference; add it as an Other adjustment on the payable account and the difference comes to 0.00.
Note — Payments are not ITCs. A payment to the agency is not tax, so it never counts on the return. That covers a payment recorded against a return, and a cheque, expense, deposit, or journal entry that moves money straight between the payable account and a bank or credit card. It appears only in the reconciliation, listed under the panel. One case looks like a payment but isn’t: a cheque that pays nothing but customs GST. Add its amount as an ITC adjustment on the payable account to claim it.
Heads up. You cannot file two returns that overlap for the same agency. If a filed return already covers part of the period, filing is refused — void the existing return first, or adjust your dates so the periods do not overlap. Only filed returns count, so overlapping drafts are allowed while you work.
Note — One person edits a record at a time. Only a saved draft is locked. If a teammate already has one open on the Edit form, you see who is editing instead of the form, and Owners and Admins can take over. File new return has no saved record yet, so it is never locked — two people can open it at once. The return’s page shows a banner naming who is editing it, with a Take over editing button for Owners and Admins, and while they hold the lock File return and Void are refused straight away with a message — try again once they are done. See Settings → Edit locks for how a lock is held and released.
The return’s page
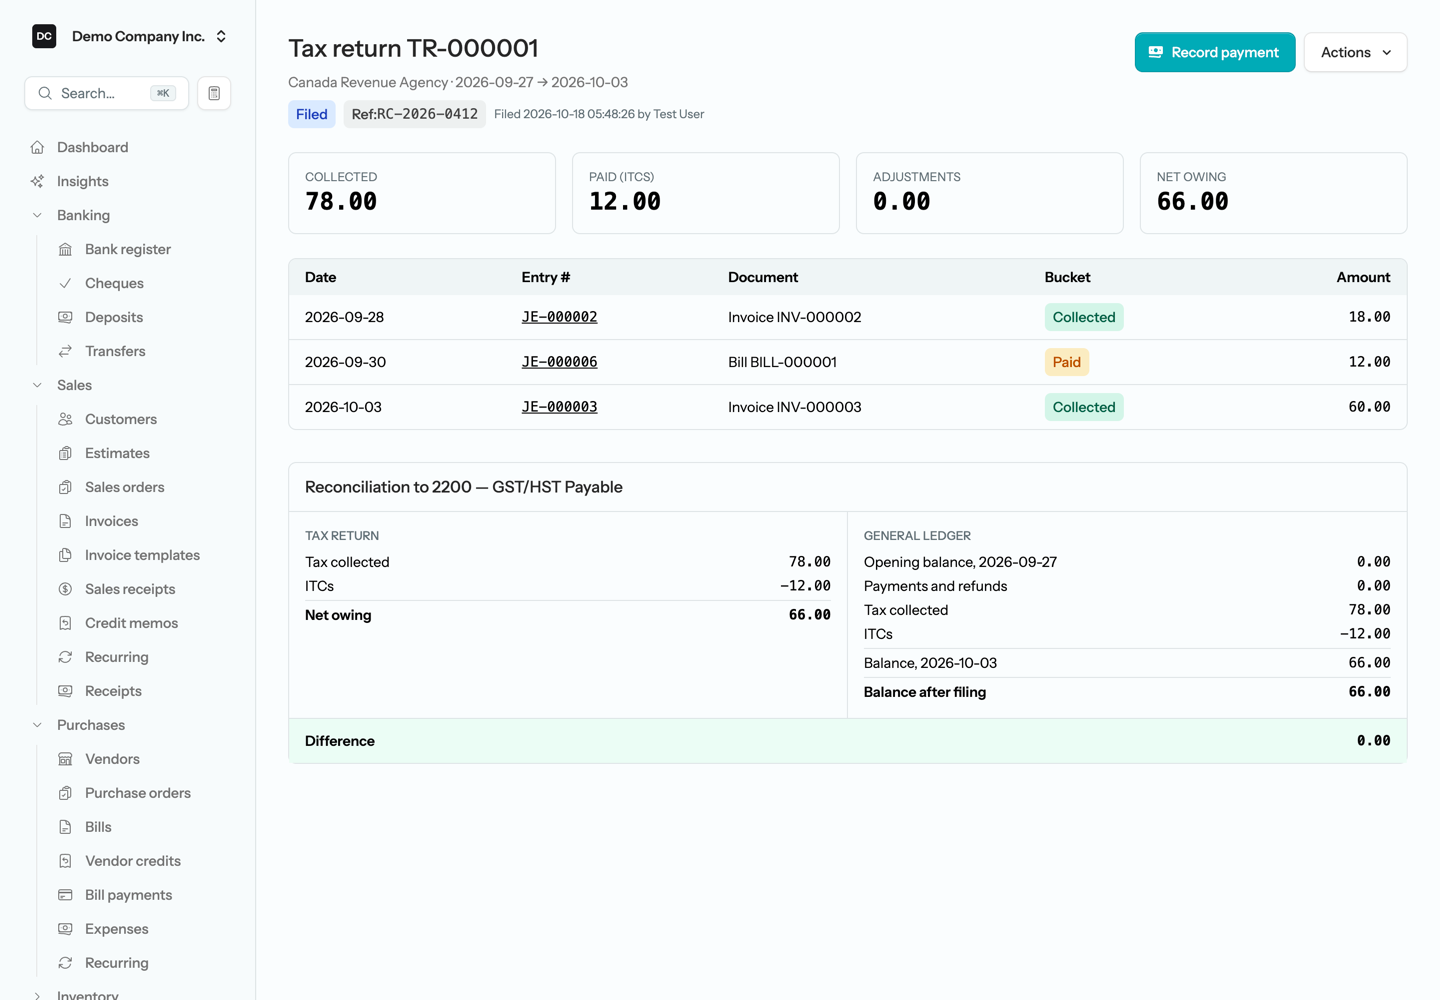
Selecting a Return # opens the return’s page, headed Tax return and its number, with the agency and period beneath. Badges show the status — Draft, Filed, or Void — plus Ref: with your filing reference once you have entered one, and a Filed stamp with the date, time, and who filed it. The buttons in the top-right corner depend on the status: a draft shows File return and an Actions menu holding Edit; a filed return shows Record payment (or Record refund, when the agency owes you) until a payment is posted, and an Actions menu holding Void.
Below the header, four tiles show Collected, Paid (ITCs), Adjustments, and Net owing, and the table lists the lines on the return with their Date, Entry #, Document, Bucket, and Amount. For a draft these are worked out live from the ledger and recalculate until you file; for a filed return they are the frozen snapshot. Any adjustments follow in their own table — a filed return links to the journal entry they posted — and then the Reconciliation panel. Beneath them the agency’s registration number appears when one is on file, followed by your Notes. Only a draft can be edited; a filed return is frozen, so to change one, void it and file a new return.
Tip. Every Entry # in the snapshot table is a link. It opens the invoice, bill, or cheque behind the line, or the journal entry itself for anything else — a sales receipt, an expense, a manual entry — so you can check a figure without leaving the return.
Once you record a payment, a Payments table appears at the foot of the page: Date, Payment # (a link to the payment’s own page), Direction (Payment to agency or Refund from agency), Net, Add-ons (penalty, interest, and commission together), Total, and Status — Draft, Posted, or Void. A voided return keeps its page and its snapshot lines; a red banner below the Collected, Paid (ITCs), and Net owing tiles, just above the snapshot table, says “This return has been voided”, with the date, who voided it, and the reason.
Note — UK VAT returns. A UK organization’s return page also shows the nine boxes of the HMRC VAT return, worked out live on a draft and frozen when you file, and its tiles read Paid (Input VAT) rather than Paid (ITCs). See United Kingdom & VAT.
Record a payment
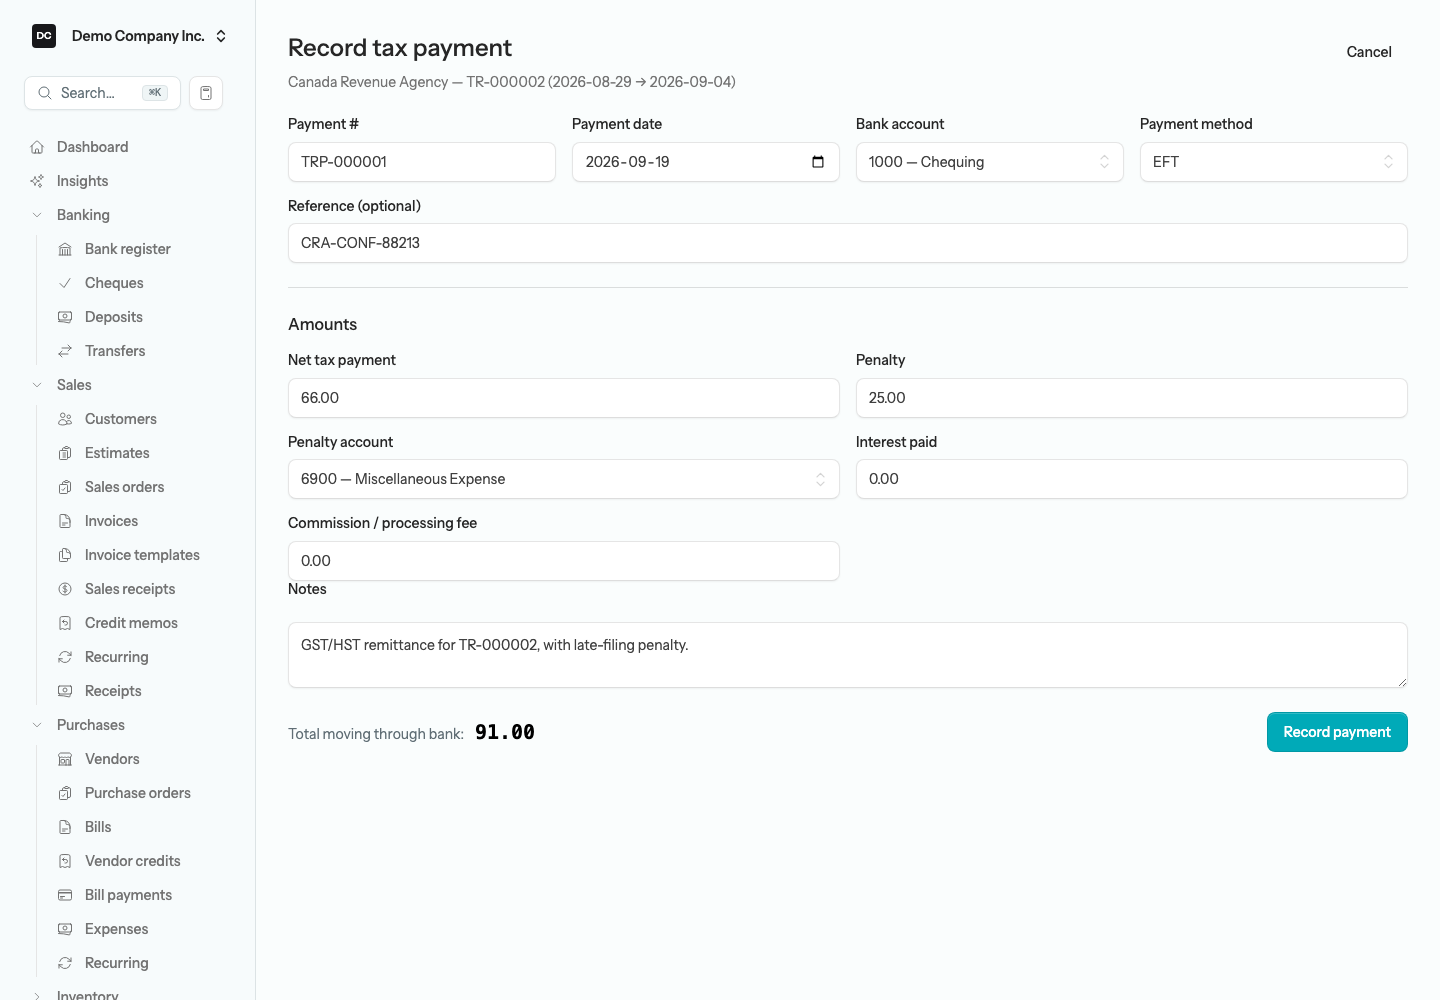
Once a return is filed, record the money you send the agency (or the refund you receive) so it clears the tax payable and moves through your bank. Payments can only be recorded against filed returns. When the net is owing the button reads Record payment and the form is headed Record tax payment; when the return is in a refund position it reads Record refund and the form is headed Record tax refund.
To record a payment:
- Open the filed return and select Record payment (or Record refund).
- The Payment # (TRP-000001 and counting, editable and unique like any document number) and the Payment date (today) are filled in for you. The Bank account defaults to your first bank account — change it if the money moves through a different one. Optionally pick a Payment method and type a Reference (the confirmation or tracking number).
- Under Amounts, the Net tax payment (Net tax refund on a refund) is pre-filled with the return’s net — adjust it if you are paying a different amount.
- If they apply, enter a Penalty, Interest paid, or Commission / processing fee. Each amount you enter reveals its own selector — Penalty account, Interest account, or Commission account — listing your expense accounts, and you must pick one before the payment can be recorded. The commission here is a fee paid on top of the remittance; a collector’s commission you keep belongs on the return as an adjustment instead. On a refund the only extra is Interest received, which needs an Interest income account.
- Add Notes if you like — they appear on the bank register row for this payment.
- Check the Total moving through bank, then select Record payment (or Record refund) and confirm. It posts to your books immediately and opens the payment’s page.
Note — What recording a payment does to your books. A payment to the agency debits the agency’s Tax Payable account for the net amount, debits the expense account you chose for any penalty, interest, or commission, and credits your bank for the total that leaves it. A refund reverses this: it debits your bank for the total received, credits Tax Payable for the net, and credits an income account for any interest received. The bank leg is labelled Tax payment (or Tax refund) followed by your Notes, so the bank register row says which remittance it was. Like any other transaction, a payment dated on or before your closing date is refused — see Accounting → Period locking.
The payment record
Recording a payment lands on its own page, headed Tax payment (or Tax refund) and its number, with a link back to the return, the agency, and the date beneath. Badges show Posted, a GL entry link that opens the journal entry it created, and Ref: with your reference. Two cards show the Bank account (with the Method, if you picked one) and the Direction. The table beneath breaks the money down — Net tax remitted (or Net tax refunded), then Penalty, Interest paid or Interest received, and Commission, each with the code of the account it posted to — and totals it as Total through bank. A Posted stamp records when and by whom.
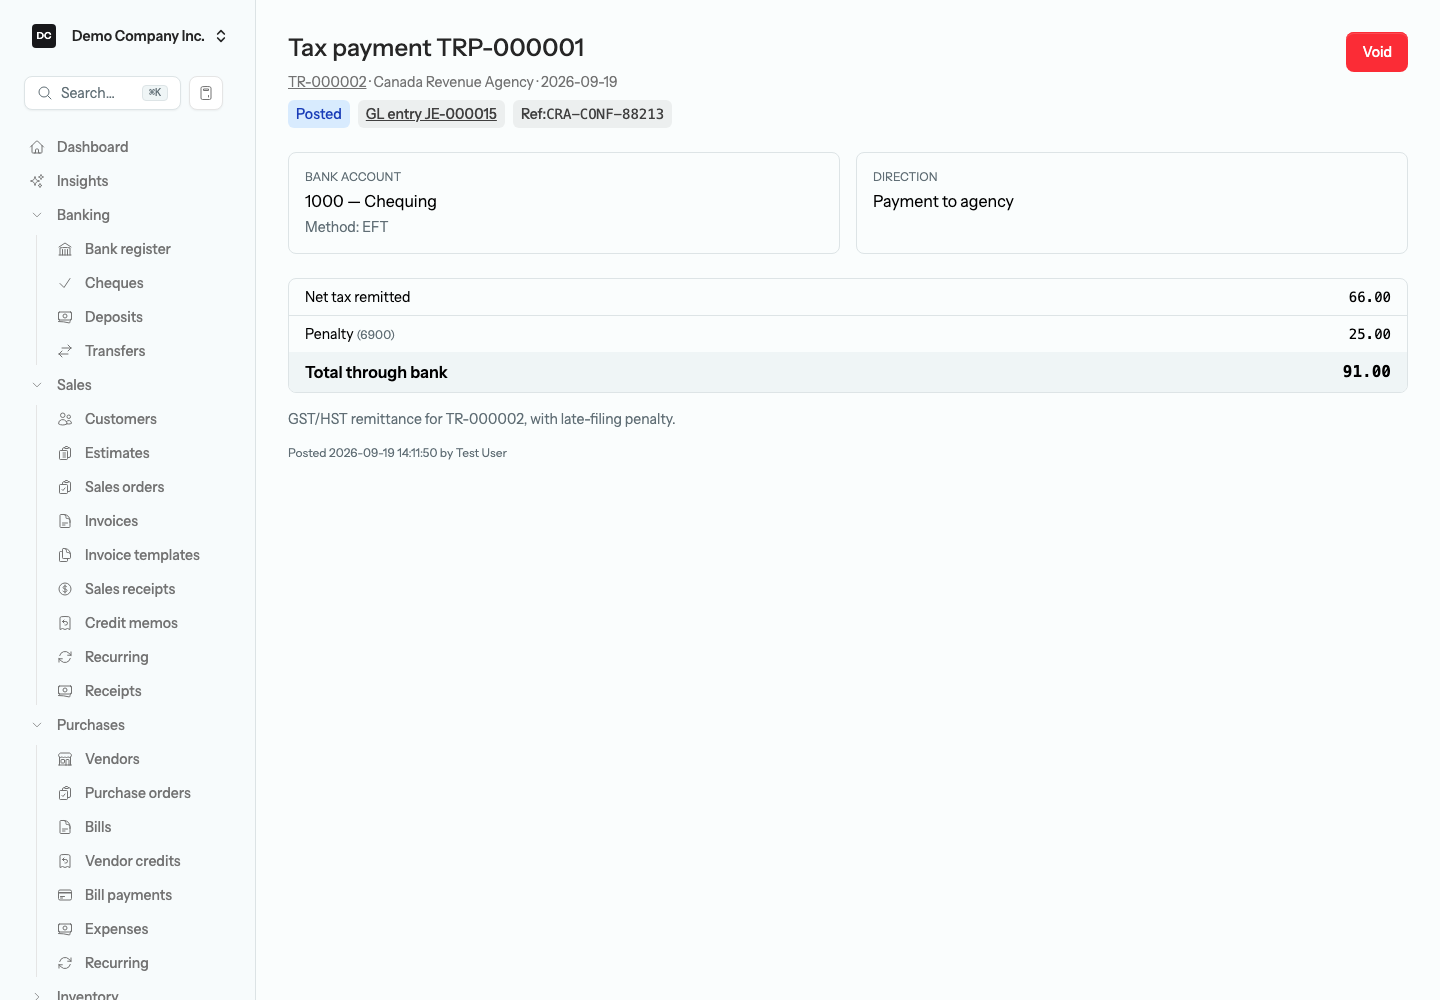
Tip. A return takes one payment at a time — while a posted payment exists, the Record payment button is hidden. Made a mistake? Open the payment and select Void: the app posts a reversing journal entry, marks the payment Void with a stamp of who voided it and when, and the return’s Record payment button comes back so you can record a corrected one.
Statuses
A return moves through three statuses: Draft → Filed → Void. A draft can still be edited from Actions → Edit, and its numbers keep recalculating from your journal entries. Filing freezes the snapshot, posts any adjustments coded to other accounts, locks the period for that agency, and unlocks Record payment. Voiding reverses the adjustments’ journal entry on its original date (refused if that date is on or before your closing date), marks the return Void, keeps the snapshot rows for your audit trail, and unlocks the period so you can post in it again.
To void a filed return:
- Open the return and choose Void from the Actions menu.
- In the Void tax return dialog, type a Reason — it is required.
- Select Confirm void. The page confirms that the period is unlocked.
Heads up. A voided return cannot be reopened. To correct a filing, void it and file a new return for the period — the voided one no longer counts for the overlap check. Voiding a return leaves any payment posted against it in place; void the payment separately if it should not stand.
Tax returns lean on the figures you can see any time on the Sales tax report, which shows the tax collected and the input tax credits paid, ready for filing. See Reports for the full list of financial statements and tax reports.
Reports tied to this area
- Sales Tax — per-agency tax collected on sales versus input tax credits claimed on purchases, ready for filing. Its Download menu offers CSV, Excel, and PDF, and the per-agency drill-down has its own Download — tax returns themselves have no export or print, so this is where to get a file.
- Audit Logs — the Accounting tab records each return filed or voided and each payment posted (with a snapshot of its journal entry) or voided, with who did it and when.
- GIFI Statement, T2125 Business Activities, T5013 Partnership, and T3010 Summary — CRA income-tax figures for Canadian organizations, where applicable; Settings → Tax & filing tells you which.
Integrations can file and void returns and post payments through the API — see API.